There are some desserts that just feel like a warm hug, you know? The kind that take you back to childhood, or that you whip up when you need a guaranteed crowd-pleaser without breaking a sweat. For me, that dessert is unequivocally this Brownie Refrigerator Cake. I know, I know, “brownie” and “no bake” might sound like a contradiction, but trust me on this one. It’s not a traditional dense, Fudgy Brownie like you’d get from the oven, but it captures that rich chocolatey essence in a way that’s utterly unique and, dare I say, even more craveable sometimes. Think of it as the ultimate shortcut to decadent chocolate bliss, a delightful little cheat that tastes like you spent hours slaving away. This recipe has been a lifesaver on those crazy busy weeknights when the sweet tooth strikes hard, and my kids actually beg for seconds (and sometimes thirds!). It’s a little bit like a no-bake cheesecake met a rich chocolate cake and they decided to have the most delicious baby ever, and it all happens in your fridge. I’ve tried variations on layered desserts, but this Brownie Refrigerator Cake is the one that truly captured my heart.
What is a Brownie Refrigerator Cake?
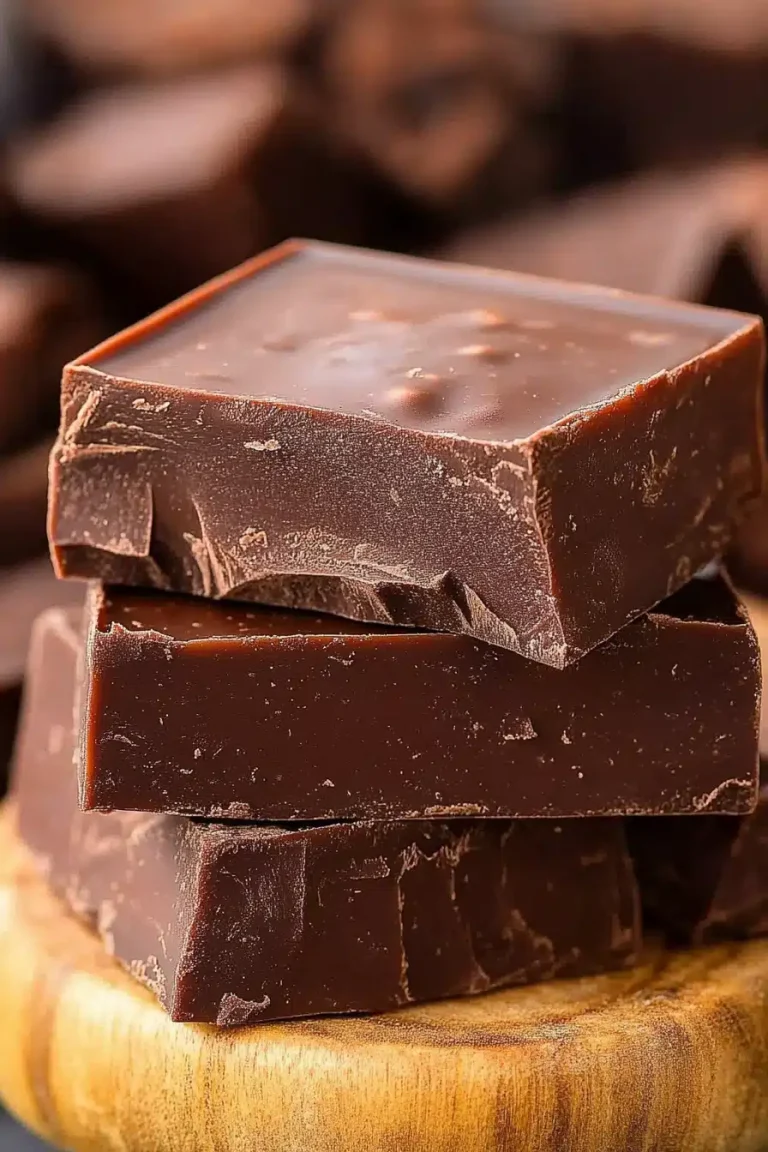
So, what exactly is this magical Brownie Refrigerator Cake? At its heart, it’s a layered dessert that uses no oven time at all. The “brownie” part comes from a base of crushed chocolate cookies, often mixed with butter, which forms a sturdy, flavorful foundation similar to a graham cracker crust but with a much deeper, more intense chocolate hit. This is then layered with a creamy, dreamy filling – usually a mixture of Cream Cheese, whipped cream, and powdered sugar, all infused with more chocolate goodness. Sometimes, I’ll add a touch of espresso or even a swirl of caramel to the filling to make it extra special. The whole thing is chilled until firm, allowing the flavors to meld together beautifully. The name “refrigerator cake” perfectly describes its preparation: it’s assembled and then relies on the cold of your fridge to set and solidify, transforming simple ingredients into a sophisticated-looking dessert that requires zero baking. It’s essentially a sophisticated chocolate parfait that you can slice and serve like a cake!
Why you’ll love this recipe?
What is the secret behind this Brownie Refrigerator Cake?flavor is out of this world. You get that deep, satisfying chocolate taste from the cookie crust and the rich filling, balanced perfectly by the creamy texture. It’s intense enough to satisfy any serious chocolate craving, but it’s also incredibly smooth and not overly sweet, which is a balance many baked cakes struggle to achieve. Then there’s the simplicity – and I cannot stress this enough. You literally don’t turn on your oven. It’s a few bowls, a whisk, and some chilling time. This makes it perfect for those sweltering summer days when you don’t want to heat up the kitchen, or for those days when your oven is already occupied with something else. Plus, the Cost-efficiency: What is the best way to measure cost-efficiency? is fantastic. Most of the ingredients are pantry staples, and even the special additions aren’t outrageously expensive, making it a budget-friendly way to impress guests or treat your family. What I love most about this is its versatility. While the classic chocolate version is divine, you can easily swap out the cookie base for Oreos, use White Chocolate in the filling, or even add a layer of fresh berries. It’s the kind of dessert that’s perfect for a casual weeknight treat, a potluck where you need something that travels well (just keep it chilled!), or even a birthday celebration if you want something a little different. It’s like my no-bake chocolate pie, but with a more cake-like structure and an even more indulgent feel. It truly is a no-fuss, high-reward dessert that always gets rave reviews.
How to Make Brownie Refrigerator Cake
Quick Overview
This Brownie Refrigerator Cake is wonderfully straightforward. You’ll start by creating a chocolate cookie crust, press it into your pan, whip up a luxuriously smooth chocolate Cream Cheese Filling, and then layer it all together. After a good chilling session in the refrigerator, it’s ready to be sliced and enjoyed. It’s a no-bake marvel that requires minimal effort for maximum deliciousness, proving that you don’t need to be a master baker to create something truly spectacular. The beauty is in its simplicity and how well the flavors meld in the fridge.
Ingredients
For the Main Batter (Crust):
2 cups finely crushed chocolate wafer cookies (like Nabisco Famous Chocolate Wafers, or even Oreos with the filling scraped out if you’re feeling adventurous) – I find the wafer cookies give a more refined crumb.
1/2 cup unsalted butter, melted – Use good quality butter; it really makes a difference.
2 tablespoons granulated sugar – Just a touch to enhance the cookie flavor.
1/4 teaspoon salt – To balance the sweetness.
For the Filling:
2 (8-ounce) blocks Cream Cheese, softened – Make sure they’re truly soft, at room temperature, for the smoothest filling.
1 cup powdered sugar, sifted – Sifting prevents any pesky lumps.
1 teaspoon vanilla extract – Pure vanilla extract for the best flavor.
1/2 cup unsweetened cocoa powder, sifted – Dutch-processed cocoa gives a richer, darker color and flavor.
1 cup heavy whipping cream, chilled – Cold cream whips up beautifully.
For the Glaze (Optional, but highly recommended!):
4 ounces semi-sweet chocolate chips – Or your favorite good quality chocolate.
1/4 cup heavy whipping cream – To make it silky smooth.
Step-by-Step Instructions
Step 1: Preheat & Prep Pan
First things first, grab an 8×8 inch or 9×9 inch square baking pan. You can line it with parchment paper, leaving some overhang on the sides. This makes lifting the cake out so much easier later on! I usually just do two strips in perpendicular directions, creating a nice sling. Lightly grease the pan before you line it, just to be sure nothing sticks. There’s nothing worse than a beautiful dessert stuck to the pan!
Step 2: Mix Dry Ingredients
In a medium bowl, combine your finely crushed chocolate wafer cookies, granulated sugar, and salt. Give them a good stir to ensure everything is evenly distributed. This simple step helps to enhance the overall flavor profile of the crust.
Step 3: Mix Wet Ingredients
Pour the melted butter into the dry ingredients. Use a fork or a spatula to mix everything together until the cookie crumbs are evenly moistened and resemble wet sand. This is the stage where you know you’ve got the right consistency for a firm crust.
Step 4: Combine
Press this moist crumb mixture firmly and evenly into the bottom of your prepared pan. You can use the bottom of a glass or a flat-bottomed measuring cup to get it really compact. A solid crust is the foundation of a great refrigerator cake! Make sure there are no loose spots or gaps.
Step 5: Prepare Filling
In a large bowl, beat the softened cream cheese until it’s completely smooth and creamy. This is crucial for avoiding lumps in your final filling. Gradually beat in the sifted powdered sugar and sifted cocoa powder until well combined. Stir in the vanilla extract.
Step 6: Layer & Swirl
In a separate, chilled bowl, whip the cold heavy cream until stiff peaks form. Gently fold about half of the whipped cream into the cream cheese mixture to lighten it. Then, gently fold in the remaining whipped cream until just combined and no streaks remain. Don’t overmix, or you’ll deflate the whipped cream! Spoon this glorious chocolate filling evenly over the cookie crust. If you want to get fancy, you can swirl in some extra whipped cream or even a little melted chocolate, but I usually keep it simple and let the creamy texture speak for itself. This is where the “cake” part really comes to life.
Step 7: Bake
Wait, bake? Nope! This is the beauty of it! No baking required. Just cover the pan tightly with plastic wrap, making sure the plastic doesn’t touch the filling if possible. Place it in the refrigerator and let it chill for at least 4-6 hours, or preferably overnight. This is when all the magic happens, and the layers set up beautifully.
Step 8: Cool & Glaze
Once the cake is completely firm, you can prepare the optional glaze. Gently heat the semi-sweet chocolate chips and heavy cream in a small saucepan over low heat, stirring constantly, or microwave in 30-second intervals, stirring in between, until smooth. Let it cool slightly, so it’s pourable but not hot. Drizzle this over the chilled cake. This glaze hardens slightly as it cools, giving it a lovely finish. Allow the glaze to set for about 15-20 minutes in the fridge before slicing.
Step 9: Slice & Serve
Use the parchment paper overhang to carefully lift the cake out of the pan onto a cutting board. Slice into squares using a sharp knife, wiping the knife clean between cuts for neat slices. Serve immediately and watch it disappear! This is best served chilled, so it holds its shape.
What to Serve It With
This Brownie Refrigerator Cake is so versatile, it’s practically a chameleon of desserts! For a delightful breakfast treat (yes, I’m that person!), I love serving a small sliver alongside a strong cup of black coffee. It’s surprisingly good to start the day with a little chocolate kick. For brunch, I make it a little more elegant. I’ll plate a slice on a nice dish and maybe add a few fresh raspberries or a dollop of extra whipped cream on the side. A mimosa or a nice chilled glass of sparkling cider pairs perfectly. As a decadent dessert, this Brownie Refrigerator Cake is a star. It’s fantastic on its own, but I also love serving it with a scoop of vanilla bean ice cream or a drizzle of raspberry coulis for an extra pop of flavor and color. For those late-night cozy snacks, there’s nothing better than a generous slice enjoyed straight from the fridge, perhaps with a tall glass of cold milk. My family also has a tradition of having this on movie nights, sliced up into little squares and eaten right out of the container with spoons. It’s that comforting and easy!
Top Tips for Perfecting Your Brownie Refrigerator Cake
I’ve made this Brownie Refrigerator Cake more times than I can count, and over the years, I’ve picked up a few tricks that make it even better. For the crust, if you don’t have a food processor, a sturdy zip-top bag and a rolling pin work wonders for crushing cookies. Just make sure you get them nice and fine; a coarse crumb won’t hold together as well. When you’re pressing the crust into the pan, really pack it down firmly. I’ve found that using a flat-bottomed glass or even the tamper from my blender helps achieve that nice, even, compact layer that’s essential for a good base. For the filling, the key is really soft cream cheese. If it’s cold, you’ll end up with a lumpy filling, and no one wants that! Let it sit on the counter for at least an hour, or even pop it in the microwave for 20-second bursts, checking frequently until it’s pliable but not melted. When you’re folding in the whipped cream, do it gently. Think of it like you’re trying to preserve as much air as possible. Overmixing will deflate the cream, resulting in a denser filling. My kids actually love to help with this part – it’s a great way to get them involved in the kitchen. If you’re making the glaze, don’t let it get too hot. A slightly warm glaze will melt into the filling, and you want it to sit on top and create that lovely crackly finish. I learned this the hard way after one too many times of my glaze sinking! For ingredient swaps, I’ve successfully used chocolate graham crackers for the crust in a pinch, and while it’s delicious, it’s not quite the same deep chocolate flavor as the wafer cookies. I’ve also tested this with almond milk instead of regular milk in some baked recipes, and it actually made it even creamier! While this isn’t a baked cake, that principle of moisture content is still important, and I find Dutch-processed cocoa powder gives a smoother texture and richer color compared to natural cocoa.
Storing and Reheating Tips
This Brownie Refrigerator Cake is a fantastic make-ahead dessert, which is one of the main reasons I love it so much. For room temperature storage, it’s best to keep it chilled until serving. If you have leftovers, you can leave it at room temperature for a couple of hours, but it’s designed to be eaten cold and will start to soften quite quickly once it’s out of the fridge. For refrigerator storage, this is where it truly shines. Once it’s set and you’ve served it, any leftovers should be covered tightly with plastic wrap or placed in an airtight container. It will stay delicious and maintain its texture for up to 3-4 days. I usually just pop the pan back into the fridge, plastic wrap directly on the surface if there’s no glaze, or a lid if I have one. If you’ve added the glaze, I find it holds up well for a couple of days. For freezer instructions, this cake freezes surprisingly well! You can freeze the entire un-glazed cake or slices of it. Wrap it very securely in several layers of plastic wrap, then add a layer of aluminum foil to prevent freezer burn. It should keep for up to 1-2 months. To thaw, transfer it to the refrigerator overnight. The glaze timing is also important; it’s best to add the glaze right before serving or just before the final chilling period. If you glaze it too far in advance, especially if you’re freezing it, the glaze can sometimes become a bit soft or streaky.
Frequently Asked Questions
Final Thoughts
So there you have it – my absolute favorite Brownie Refrigerator Cake! It’s the kind of dessert that proves you don’t need a complicated recipe or hours in the kitchen to create something truly magical. It’s rich, decadent, and surprisingly simple to pull off. I hope you’ll give this a try, especially on those days when you’re craving something sweet but just can’t face turning on the oven. It’s the perfect antidote to a busy schedule and a guaranteed way to bring smiles to faces. If you love this no-bake chocolatey goodness, you might also enjoy my No-Bake Chocolate Peanut Butter Bars or my classic No-Bake Cheesecake Recipe, which are also fantastic for those days you want dessert without the fuss. I can’t wait to hear what you think and see how your Brownie Refrigerator Cake turns out! Please leave a comment below and let me know your favorite part, or any fun variations you try. Happy no-baking!
Brownie Refrigerator Cake
Ingredients
Main Ingredients
- 1 box Brownie mix
- 0.5 cup Water
- 0.33 cup Vegetable oil
- 2 large Eggs
- 1 cup Heavy cream
- 0.5 cup Powdered sugar
- 12 oz Chocolate chips
- 0.5 cup Heavy cream
Instructions
Preparation Steps
- Prepare brownie mix according to package directions and bake in a 9x13 inch pan. Let cool completely.
- In a bowl, whip heavy cream and powdered sugar until stiff peaks form.
- Cut the cooled brownies into squares or rectangles.
- Layer brownies and whipped cream in a serving dish.
- In a heat-safe bowl, melt chocolate chips with 0.5 cup heavy cream, stirring until smooth. Let cool slightly.
- Pour ganache over the layered cake.
- Refrigerate for at least 2 hours before serving.