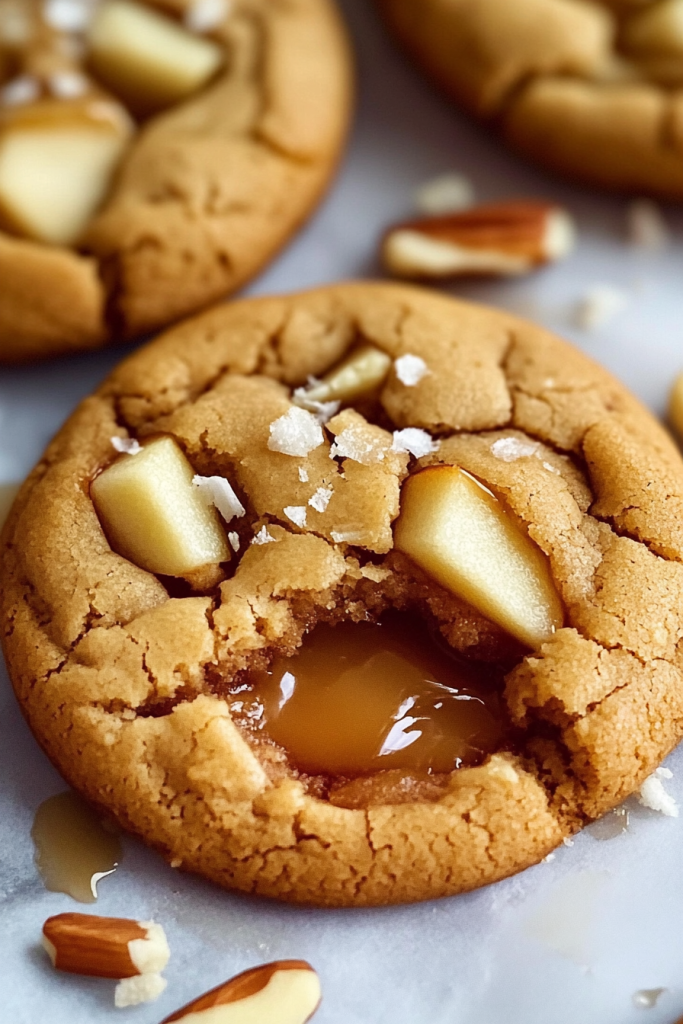
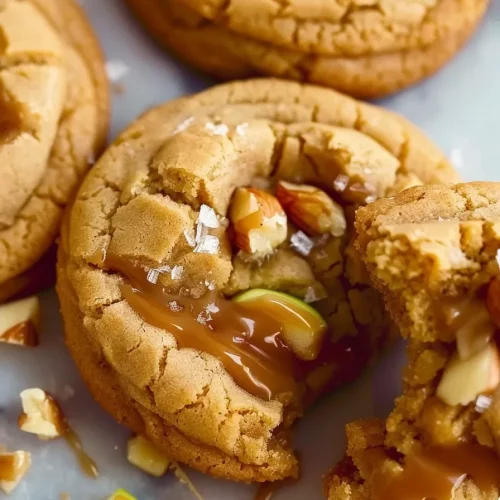
Oh, these Caramel Apple cookies! Honestly, just thinking about them makes me smile. They’re the kind of cookie that feels like a warm hug on a crisp autumn day, but you know what? They’re secretly fantastic year-round. I remember the first time I made them, it was a chaotic Saturday, and I was trying to use up a basket of apples that were just starting to look a little sad. I wanted something more exciting than a plain apple pie, but I also didn’t want to spend hours fussing. So, I rummaged through my pantry, had a little kitchen epiphany, and BAM! These caramel apple cookies were born. They’re not just cookies; they’re pure comfort, with that perfect balance of sweet, tart apple and rich, gooey caramel. Forget those dry, crumbly things you sometimes find – these are incredibly moist and tender. If you’ve ever loved a good apple crumble or a decadent caramel brownie, you’re going to fall head over heels for these caramel apple cookies. They’re honestly my go-to when I need a little sweetness in my life without a whole production.
What are Caramel Apple Cookies?
So, what exactly are these magical little gems? Think of them as your favorite soft Sugar Cookie, but with a major upgrade. They’re packed with bits of fresh, tender apple and then swirled or studded with pockets of melted caramel. It’s essentially taking the best of fall flavors – the sweet, slightly tart apples and the deep, comforting sweetness of caramel – and putting them into a perfectly chewy, delicious cookie form. It’s not a complicated process at all; it’s really just a fantastic way to capture those cozy, autumnal vibes in a bite-sized package. You get the soft chewiness of a great cookie, the delightful burst of apple, and then that surprise molten caramel goodness. They’re not overly sweet, which I love, because the apples bring their own natural flavor to the party, and the caramel just rounds everything out beautifully. It’s like a mini dessert, a tiny slice of heaven, really.
Why you’ll love this recipe?
Okay, let me count the ways you’ll adore these Caramel Apple cookies. First and foremost, the FLAVOR. Oh my goodness, the flavor! You get that initial soft, buttery cookie base, then these delightful little pockets of tender, slightly tart apple that just burst with freshness. And then, the caramel! It’s warm, it’s gooey, it’s pure indulgence. It’s a symphony of textures and tastes that just works so, so well together. I’ve tried other apple cookies before, but they often feel a bit one-dimensional, like they’re missing that extra zing. These have it.
Secondly, the SIMPLICITY. Honestly, you don’t need to be a master baker for this one. I’ve made them on busy weeknights, and they come together surprisingly quickly. The steps are straightforward, and the result is always impressive. It’s the kind of recipe that makes you feel like a baking superstar without all the fuss. It’s far simpler than baking a whole pie, but you get that same incredible apple and caramel combination.
Then there’s the COST-EFFICIENCY. Apples are usually pretty affordable, and the other ingredients are pantry staples. It’s a budget-friendly way to create a truly special treat. You don’t need exotic ingredients; just simple things you likely already have.
And let’s talk about VERSATILITY. These are phenomenal just as they are, but they’re also fantastic for so many occasions. They’re perfect for bake sales because they’re unique and always a hit. They’re also wonderful for holiday gatherings, or just for a cozy afternoon treat with a cup of tea or coffee. What I love most about this recipe is that it feels both comforting and a little bit special. It’s that perfect balance that makes it a winner in my book, every single time.
How do you make caramel apple cookies?
Quick Overview
Whipping up these caramel apple cookies is really quite straightforward. We’ll start by creaming together butter and sugar, adding eggs and vanilla, then combining them with our dry ingredients. The real magic happens when we fold in the fresh apples and then swirl in the luscious caramel. After a relatively short bake, you’ll have incredibly tender, flavorful cookies that taste like autumn in every bite. The whole process, from mixing to out-of-the-oven goodness, can be done in under an hour if you’re efficient, making it a lifesaver for spontaneous sweet cravings or unexpected guests.
Ingredients
For the Main Batter:
1 cup (2 sticks) unsalted butter, softened – Make sure it’s truly soft, not melted! It makes all the difference in getting that creamy texture.
1 ½ cups granulated sugar – You can use a mix of granulated and Brown Sugar for extra chewiness, but I usually stick with just granulated for simplicity here.
2 large eggs – Room temperature eggs incorporate better.
1 teaspoon vanilla extract – Pure vanilla extract is key for that lovely flavor.
2 ¾ cups all-purpose flour – Spooned and leveled, not scooped!
1 teaspoon baking soda – This gives them that perfect lift.
½ teaspoon salt – Balances the sweetness beautifully.
1 teaspoon ground cinnamon – Or a bit more if you’re a big cinnamon fan like me!
½ teaspoon ground nutmeg – Just a pinch adds such warmth.
1 ½ cups finely diced fresh apples – About 1-2 medium apples. I prefer a tart apple like Granny Smith or Honeycrisp so it cuts through the sweetness of the cookie and caramel. Don’t peel them if you like a little extra texture and color!
For the Filling:
½ cup caramel bits or chopped caramel candies – These melt so beautifully. If you can’t find them, you can chop up a good quality caramel candy bar.
2-3 tablespoons milk or heavy cream – This helps create that smooth, luscious caramel swirl. Heavy cream makes it extra rich!
For the Glaze:
1 cup powdered sugar – Sifted for a smooth finish.
2-3 tablespoons milk or heavy cream – Start with 2, add more only if needed for consistency.
½ teaspoon vanilla extract – A little extra flavor boost.
Step-by-Step Instructions
Step 1: Preheat & Prep Pan
First things first, preheat your oven to 375°F (190°C). While the oven is warming up, line a couple of baking sheets with parchment paper. This is my absolute favorite kitchen hack – it prevents sticking like a dream and makes cleanup a breeze. If you don’t have parchment, you can lightly grease your baking sheets, but parchment is definitely the way to go for perfectly shaped cookies.
Step 2: Mix Dry Ingredients
In a medium bowl, whisk together the flour, baking soda, salt, cinnamon, and nutmeg. Whisking them together ensures that the leavening agents and spices are evenly distributed throughout the dough. This prevents any surprise clumps of baking soda or pockets of unsweetened flour. You want that beautiful, consistent flavor in every single bite!
Step 3: Mix Wet Ingredients
In a large bowl, cream together the softened butter and granulated sugar until light and fluffy. This usually takes about 3-5 minutes with an electric mixer. Then, beat in the eggs one at a time, ensuring each one is fully incorporated before adding the next. Stir in the vanilla extract. The mixture should look smooth and slightly pale.
Step 4: Combine
Gradually add the dry ingredients to the wet ingredients, mixing on low speed until just combined. Be careful not to overmix! Overmixing can develop the gluten in the flour too much, resulting in tough cookies. Once the flour is mostly incorporated, gently fold in the diced apples. You want to see little streaks of apple throughout the dough.
Step 5: Prepare Filling
In a small microwave-safe bowl, combine the caramel bits (or chopped caramels) with 2 tablespoons of milk or heavy cream. Microwave in 15-second intervals, stirring between each, until the caramel is smooth and melted. If it seems too thick, add another tablespoon of milk or cream. You want it pourable but still thick enough to swirl without completely disappearing into the dough.
Step 6: Layer & Swirl
Drop rounded tablespoons of Cookie Dough onto your prepared baking sheets, leaving about 2 inches between them. Then, drizzle about a teaspoon of the melted caramel mixture over the top of each cookie dough ball. You can use a toothpick or a skewer to gently swirl the caramel into the dough. Don’t over-swirl; you want distinct pockets of caramel. It’s also okay if some caramel just sits on top – that’s extra delicious!
Step 7: Bake
Bake for 10-12 minutes, or until the edges are golden brown and the centers are set but still slightly soft. They’ll continue to cook a little on the baking sheet after you take them out. Keep an eye on them, as oven temperatures can vary. For perfectly chewy cookies, it’s better to slightly underbake them than overbake.
Step 8: Cool & Glaze
Let the cookies cool on the baking sheets for about 5 minutes before transferring them to a wire rack to cool completely. While they’re cooling, whisk together the sifted powdered sugar, 2 tablespoons of milk or cream, and vanilla extract for the glaze. Add more milk or cream, a teaspoon at a time, until you reach your desired drizzling consistency. Once the cookies are fully cooled, drizzle the glaze over the tops. This is optional but adds a beautiful finish and an extra touch of sweetness!
Step 9: Slice & Serve
Once the glaze has set slightly, your caramel apple cookies are ready to be enjoyed! These are absolutely divine served slightly warm or at room temperature. They’re perfect on their own, but a tall glass of cold milk or a warm mug of cider is always a welcome companion. I like to serve them on a pretty platter to really show them off. If you’re feeling fancy, a tiny scoop of vanilla ice cream alongside is pure bliss!
What to Serve It With
These caramel apple cookies are wonderfully versatile, fitting into so many moments! For a simple BREAKFAST treat, I love having one (or two, let’s be honest!) with a strong cup of coffee. The warmth and slight bitterness of the coffee cut through the sweetness of the cookie perfectly. They make a morning feel just a little bit more special. For a leisurely BRUNCH, they’re a fantastic addition to a dessert table. I like to arrange them on a tiered stand with some fresh berries for a pop of color, and they pair beautifully with mimosas or a sparkling cider. They feel elegant without being fussy.
As a DESSERT, these cookies are a winner any time of year. They’re wonderful after a hearty meal, maybe served alongside a rich chocolate cake or a creamy cheesecake. Their comforting flavors make them a perfect end to a cozy dinner. And for those pure COZY SNACKS, they are simply unbeatable. Picture this: a rainy afternoon, a good book, and a plate of these warm, chewy cookies. They’re the ultimate comfort food. My kids also adore them, and I’ve found they’re a huge hit at school events and birthday parties. They’re surprisingly sturdy for carrying around too. Honestly, I’ve even enjoyed a leftover cookie for a late-night snack while watching movies – they’re just that good!
Top Tips for Perfecting Your Caramel Apple Cookies
After making these caramel apple cookies more times than I can count, I’ve picked up a few tricks that I think really elevate them. First, when it comes to the APPLES: don’t go too fine with the dice. You want noticeable little pieces of apple in there for texture and flavor. And really, don’t bother peeling them unless you have a strong aversion to little flecks of red or green in your cookies. It’s extra work and the skins soften up beautifully. My absolute favorite apples for this are Honeycrisp or Granny Smith because they hold their shape and offer that perfect balance of sweet and tart.
For MIXING ADVICE, the biggest thing is to avoid overmixing the dough once the flour is added. Seriously, mix just until you don’t see any dry streaks of flour. Overmixing develops the gluten, which makes for tough, cakey cookies instead of the chewy, tender ones we’re going for. When you’re folding in the apples, be gentle. And when you’re swirling in the caramel, less is often more. You want little ribbons and pockets of caramel, not a completely uniform blend. A few dollops and a gentle swirl with a toothpick is usually all you need to get that beautiful marbling effect.
When it comes to SWIRL CUSTOMIZATION, I’ve found that using good quality caramel bits or chopping up decent caramel candies makes a huge difference in flavor and meltability. If your caramel seems too thick to swirl, just add a tiny splash more milk or cream. You’re looking for a consistency that’s like thick syrup. For visual appeal, don’t be afraid to let some of the caramel peek out on top – it caramelizes beautifully in the oven!
Ingredient SWAPS can happen! If you’re out of cinnamon, a pinch of allspice or even a tiny bit of cardamom can add a lovely warmth. If you’re not a fan of nutmeg, just leave it out. For the apples, if you can’t find tart varieties, you can use sweeter apples, but you might want to slightly reduce the sugar in the cookie dough just a touch to compensate. For the caramel, if you’re really in a pinch, you could try a thick dulce de leche, but be aware it might behave differently.
BAKING TIPS are crucial for that perfect texture. I always bake these in the middle of the oven. If your oven tends to run hot, you might want to reduce the temperature by 10-15 degrees or reduce the baking time by a minute or two. The best doneness test is when the edges are lightly golden and the centers look set but still slightly soft to the touch. They’ll firm up as they cool.
And finally, GLAZE VARIATIONS! If you prefer a thinner glaze, just add more liquid. If you want a richer glaze, use heavy cream. For a chocolatey twist, you can add a tablespoon of cocoa powder to the glaze. Or, skip the glaze entirely and just dust them with a little powdered sugar after they’ve cooled – still delicious!
Storing and Reheating Tips
One of the best things about these caramel apple cookies is how well they store, meaning you can enjoy them for days! For ROOM TEMPERATURE storage, I usually keep them in an airtight container. They’ll stay wonderfully fresh and chewy for about 3-4 days. Make sure they’ve cooled completely before sealing them up, otherwise, you risk condensation making them soggy.
If you plan on keeping them longer, REFRIGERATOR STORAGE is your best bet. Again, an airtight container is key. They’ll last for about a week in the fridge. I’ve found that if I’m going to store them for more than a couple of days, I sometimes like to add a slice of bread to the container – it helps keep them moist, a little trick I learned from my grandma!
FREEZER INSTRUCTIONS are also great for these. Once completely cooled, you can freeze the cookies in a single layer on a baking sheet until firm, then transfer them to a freezer-safe bag or container. They’ll keep their best quality for about 2-3 months. To thaw, just leave them at room temperature for an hour or two, or gently reheat them. For REHEATING, if they’ve been in the fridge or are just a little too firm, you can pop them in a toaster oven or a regular oven at around 250°F (120°C) for just a few minutes. They’ll come back to life beautifully, with that gooey caramel all melty again.
For GLAZE TIMING ADVICE, I always recommend applying the glaze *after* the cookies are fully cooled. If you glaze them while they’re still warm, the glaze will melt off and you’ll have a sticky mess. If you’re freezing them with glaze, it’s generally best to apply it right before serving after they’ve thawed. However, if you’re planning on storing them at room temperature or in the fridge and want to glaze them, just make sure they are completely cool. The glaze will set up nicely and keep them fresh.
Frequently Asked Questions
Final Thoughts
So there you have it, my absolute favorite caramel apple cookies! I truly hope you give these a try. They’re more than just a recipe to me; they’re a little bit of joy, a taste of cozy memories, and a surefire way to brighten anyone’s day. The combination of tender apple, warm spices, and that luscious caramel swirled into a soft, chewy cookie is just divine. They’re simple enough for a weeknight treat but special enough for any occasion. I’ve seen them disappear in minutes at my house, and I’m always asked for the recipe. If you’re a fan of apples, caramel, or just a really, really good cookie, you’re going to love these. If you end up making them, please, please come back and leave a comment to let me know how they turned out! I love hearing about your baking adventures and seeing your creations. Happy baking, and enjoy every delicious bite!
Caramel Apple Cookies
Ingredients
Main Ingredients
- 2.25 cups All-purpose flour
- 1 teaspoon Baking soda
- 0.5 teaspoon Salt
- 1 cup Unsalted butter, softened
- 1 cup Granulated sugar
- 0.75 cup Packed light brown sugar
- 2 Large eggs
- 1 teaspoon Vanilla extract
- 2 cups Diced, peeled apples (Granny Smith recommended)
- 1 cup Caramel bits
Instructions
Preparation Steps
- Preheat oven to 375°F (190°C). Line baking sheets with parchment paper.
- In a medium bowl, whisk together flour, baking soda, and salt. Set aside.
- In a large bowl, cream together the softened butter, granulated sugar, and brown sugar until light and fluffy.
- Beat in the eggs one at a time, then stir in the vanilla extract.
- Gradually add the dry ingredients to the wet ingredients, mixing until just combined. Do not overmix.
- Gently fold in the diced apples and caramel bits.
- Drop rounded tablespoons of dough onto the prepared baking sheets.
- Bake for 10-12 minutes, or until the edges are golden brown.
- Let the cookies cool on the baking sheets for a few minutes before transferring them to a wire rack to cool completely.


