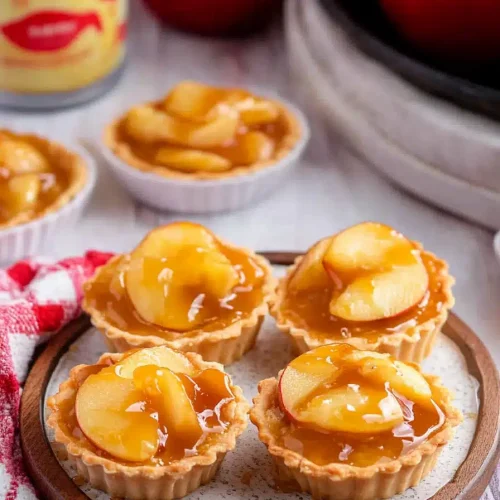
There are some flavors that just *scream* autumn to me, and crisp, juicy apples dipped in warm, gooey caramel are absolutely at the top of that list. Every year, as soon as those first cool breezes start to whisper, I get this undeniable craving. And you know what? It’s not just about the taste; it’s about the memories. I remember my mom setting out a platter of perfectly dipped apples for Halloween parties when I was little, and the sheer excitement I felt picking out which one I wanted. Fast forward to today, and I’ve found a way to elevate that nostalgic treat into something even more spectacular: a Caramel Apple board! Forget just dipping apples; we’re talking an entire spread, a celebration of fall flavors that’s as fun to assemble as it is to devour. It’s honestly way easier than you might think, and it’s become our go-to for everything from casual get-togethers to impressive holiday treats. Honestly, if you’re looking for a dessert that’s a guaranteed crowd-pleaser and feels special without being complicated, this caramel apple board is your new best friend.
What is a caramel apple board?
So, what exactly is this magical creation I keep raving about? Think of a charcuterie board, but instead of cheeses and meats, it’s all about apples and irresistible caramel goodness. A caramel apple board is essentially an artfully arranged platter featuring an assortment of fresh apples, delightful caramel dips, and a tempting array of toppings and dippers. It’s a build-your-own adventure for your taste buds! We’re not just talking about one kind of caramel; we’re talking rich, classic caramel, maybe a salted caramel if you’re feeling fancy, or even a white Chocolate Caramel swirl. Then, we load it up with all sorts of fun things to dip and sprinkle. It’s a beautiful, interactive dessert that brings people together. It’s essentially a deconstructed caramel apple, giving everyone the freedom to customize their perfect bite. It’s the best of all worlds – fresh fruit, decadent caramel, and endless crunchy, sweet, and savory possibilities!
Why you’ll love this recipe?
Honestly, where do I even begin with why this Caramel Apple board is an absolute must-try? First off, the flavor is just unreal. You have the crisp, refreshing tartness of the apples – we’ll talk about which ones are best in a bit! – playing against the unbelievably smooth, rich, and sweet caramel. It’s that perfect balance that just makes your taste buds sing. But it’s not just about the taste, which is spectacular, it’s also about how darn easy it is to pull together. I’ve had nights where I needed a last-minute dessert for unexpected guests, and this caramel apple board was an absolute lifesaver. Seriously, it takes way less time than you’d think. And the cost-efficiency! Apples are usually pretty affordable, and the caramel can be made with pantry staples. It’s a fraction of the cost of buying individual fancy desserts. What I love most about this is its sheer versatility. You can tailor it to any occasion, any dietary preference (we’ll get to that!), and any personal craving. It’s perfect for a cozy night in, a fun family activity, or even a stunning addition to a holiday spread. It’s infinitely more exciting than a plain apple pie or a standard cake, and the interactive nature makes it a total hit with kids and adults alike. It truly stands out because it’s not just one thing; it’s a whole experience!
How do I make a caramel apple board?
Quick Overview
Putting together this caramel apple board is all about a few simple steps: prepping your apples, whipping up or warming your caramel, and then artfully arranging everything on a beautiful platter. The beauty of this board is its flexibility. You can have everything ready in under 30 minutes if you’re in a rush, or you can spend a little more time making it extra elaborate. It’s designed to be approachable for any home cook, and the visual appeal is just a bonus to the incredible flavors you’re about to experience. We’re going for maximum deliciousness with minimum fuss, and this method totally delivers.
Ingredients
For the Apples: What are the best apples?
A mix of apple varieties is key here! I love using a combination for different textures and flavor profiles. You’ll want about 6-8 medium apples. My go-to picks are Honeycrisp (super sweet and crisp), Granny Smith (for that perfect tartness that cuts through the caramel), Fuji (sweet and firm), and Gala (a crowd-pleaser, always). Make sure they’re fresh and firm; bruised or mushy apples just won’t hold up as well. You can also include some thinly sliced pear for a nice variation!
For the Caramel Dip(s):
This is where the magic happens! I usually make a big batch of classic, rich caramel. You’ll need: 1 cup (200g) granulated sugar, 6 tablespoons (85g) unsalted butter, cut into pieces, 1/2 cup (120ml) heavy cream, and 1 teaspoon vanilla extract. For a Salted Caramel, just add a generous pinch of sea salt at the end. If you’re short on time, a good quality store-bought caramel sauce is totally fine – no judgment here! Just warm it up until it’s dippable.
For the Toppings and Dippers:
This is your chance to get creative! Aim for a variety of textures and flavors. I always include: crushed peanuts or pecans, mini chocolate chips (milk, dark, and white!), shredded coconut, rainbow sprinkles, chopped pretzels, mini marshmallows, crumbled graham crackers, and maybe some crushed Oreos. For something a little different, consider chopped dried fruit like cranberries or raisins, or even some granola. Think about what you loved on caramel apples as a kid!
Step-by-Step Instructions
Step 1: Preheat & Prep Pan
This step is less about a “pan” in the baking sense and more about preparing your serving board. Choose a beautiful wooden board, a large platter, or even a slate serving tray. Make sure it’s large enough to hold everything without looking too crowded. You’ll also want small bowls or ramekins for your caramel dips and any smaller toppings. Have everything clean and ready to go before you start assembling.
Step 2: Mix Dry Ingredients
This isn’t a baking recipe, so we don’t have traditional “dry ingredients” to mix. However, this step translates to preparing your dry toppings. Get all your chopped nuts, sprinkles, chocolate chips, pretzels, and any other dry dippers ready in separate small bowls or in piles on your serving board. This makes assembly a breeze and ensures everything looks tidy.
Step 3: Mix Wet Ingredients
If you’re making your own caramel from scratch, this is where the real cooking begins! In a medium saucepan, melt the granulated sugar over medium heat, stirring constantly until it turns a beautiful amber color. Be patient; it takes a few minutes. Once it’s liquid gold, carefully whisk in the butter until it’s melted and smooth. Then, slowly and carefully pour in the heavy cream while whisking. The mixture will bubble up vigorously – stand back! Continue whisking until it’s smooth and creamy. Remove from heat and stir in the vanilla extract and salt (if using). If using store-bought, simply warm it gently in a saucepan or microwave until pourable.
Step 4: Combine
This step is about bringing your caramel to the perfect dipping consistency. If your homemade caramel is too thick after cooling slightly, you can add a tablespoon or two more of warm cream to thin it out. If it’s too thin, it’s tricky to fix at this stage, but usually, homemade caramel thickens up nicely as it cools a bit. The goal is for it to be thick enough to coat an apple but still fluid enough for easy dipping.
Step 5: Prepare Filling
In this context, the “filling” is your caramel dip(s)! Pour your warm, luscious caramel into your prepared bowls or ramekins. If you’re making multiple types of caramel (like classic and salted, or a white chocolate drizzle), prepare those now and place them in their own bowls. Ensure the bowls are stable and won’t tip over when guests are dipping.
Step 6: Layer & Swirl
Now for the fun part – assembly! Slice your apples into wedges or quarters, depending on your preference. You can core them before or after slicing. Arrange the apple slices artfully on your board, fanning them out or creating little piles. Place the bowls of caramel strategically amongst the apples. Then, artfully scatter your various toppings around the apples and near the caramel bowls. Think about color and texture distribution. You want it to look abundant and inviting!
Step 7: Bake
No baking required for this one! That’s one of the biggest perks. Everything is served at room temperature or slightly warm (for the caramel), making it super low-stress.
Step 8: Cool & Glaze
The caramel will naturally cool to a perfect dipping temperature on the board. If you made your caramel from scratch, let it cool for about 5-10 minutes before pouring into bowls. It should be warm and gooey, not scorching hot. You don’t glaze the apples themselves here, as the caramel *is* the glaze.
Step 9: Slice & Serve
This is the grand finale! Once your caramel apple board is assembled, it’s ready to be enjoyed immediately. Make sure to have small forks or skewers available for dipping. The beauty is in the presentation, and watching everyone create their own perfect caramel apple combination is incredibly satisfying. It’s best served within an hour or two of assembly to keep the apples crisp and the caramel perfectly dippable.
What to Serve It With
The beauty of a caramel apple board is that it’s often the star of the show, but it plays wonderfully with other autumnal treats. For a casual breakfast, I love serving smaller portions of it alongside a steaming mug of coffee or a spiced chai latte. Imagine a crisp morning, a warm drink, and a perfectly sweet apple slice. For brunch, it adds a touch of elegance and fun. I’ll often pair it with some mini pumpkin muffins or a fluffy frittata. The sweetness of the board is a lovely contrast to savory dishes. As a dessert, it’s a showstopper! It’s fantastic after a hearty meal, especially something like roasted chicken or a cozy lentil soup. It’s a lighter, more interactive option than a heavy cake. And for those cozy snack times, it’s pure comfort food. My kids adore it as an after-school treat with a glass of cold milk. My family tradition is to have it out during movie nights in the fall; it’s so much more engaging than just popcorn!
Top Tips for Perfecting Your Caramel Apple Board
I’ve tinkered with this caramel apple board idea for years, and let me tell you, I’ve learned a few tricks along the way that make all the difference. First, when prepping your apples, I always slice them right before serving. If you’re worried about browning, you can toss them very gently in a little bit of lemon water (about a tablespoon of lemon juice to a cup of water) for a minute, then pat them dry. This totally prevents browning without affecting the taste. For mixing, if you’re making your own caramel, remember to stir constantly when melting sugar; hot spots can cause it to burn quickly. And when adding the cream, always do it slowly and be prepared for the steam! It’s a little dramatic, but so worth it. For swirl customization on your caramel, if you’re feeling adventurous, you could drizzle some melted white chocolate or dark chocolate over the caramel in the bowls for extra flair. The key to ingredient swaps is to think about complementary flavors. If you don’t have nuts, try toasted seeds like pumpkin or sunflower. Instead of pretzels, perhaps some crushed butter cookies. For baking tips, since this isn’t a baked item, I’ll say that oven temperature is important for other fall treats that might accompany your board! And glaze variations are your friend; think about adding a touch of cinnamon or a drop of maple extract to your caramel for a different flavor profile. It’s all about making it your own!
Storing and Reheating Tips
If by some miracle you have leftovers of your caramel apple board (which is rare in my house!), here’s how to store them. For the apples themselves, it’s best to store them separately from the toppings and caramel. Wrap apple slices tightly in plastic wrap or place them in an airtight container in the refrigerator. They’ll stay fresh for about 1-2 days, though they are best enjoyed the same day. For the caramel dip, store it in an airtight container in the refrigerator for up to a week. When you want to serve it again, gently reheat it in a saucepan over low heat or in the microwave in 15-second intervals, stirring between each, until it’s smooth and dippable again. You can also freeze caramel for up to 3 months; thaw it overnight in the fridge and then reheat. For toppings like nuts and sprinkles, they can be stored in airtight containers at room temperature or in the fridge if it’s very warm. It’s usually best to prep these fresh each time you make the board. My tip for glaze timing is to always have it ready but serve it slightly warm, never piping hot, so it’s perfect for dipping right away.
Frequently Asked Questions
Final Thoughts
So there you have it – the ultimate guide to creating a caramel apple board that’s not just a dessert, but an event! It’s a recipe that brings people together, sparks joy, and tastes like autumn in every single bite. I truly believe this caramel apple board is something special. It’s a way to capture that nostalgic feeling of classic caramel apples but elevate it into something modern and interactive. It’s proof that you don’t need to be a pastry chef to create something absolutely stunning and incredibly delicious. The combination of fresh fruit, rich caramel, and endless crunchy toppings is just pure magic. If you love this recipe, I think you might also enjoy my recipe for Spiced Apple Crumble Bars or my Easy Pumpkin Bread. They capture that same cozy, autumnal spirit! I can’t wait for you to try this caramel apple board. Please let me know in the comments how yours turns out, what toppings you chose, and if you have any brilliant variations of your own! Happy assembling, and even happier eating!
Caramel Apple Board
Ingredients
Main Ingredients
- 4 large apples such as Honeycrisp, Fuji, or Granny Smith, cored and sliced
- 1 package old-fashioned caramel for dipping
- 0.5 cup white chocolate melts
- 0.5 cup milk chocolate melts
- 12 oz Sprite for dipping apple slices to prevent browning
Toppings
- 1 crushed pretzels
- 1 chopped peanuts
- 1 mini chocolate chips
- 1 sprinkles
- 1 crushed candy canes seasonal
- 1 shredded coconut
Instructions
Preparation Steps
- Core the apples and slice them into wedges. Remove any seeds. Immediately dip each apple slice into the Sprite to prevent browning.
- Place all the desired toppings into individual small bowls, ramekins, or muffin liners. Arrange these artistically on a large serving board or platter.
- Melt the white chocolate and milk chocolate melts separately. This can be done in the microwave in 30-second intervals, stirring between each, or by using a double boiler on the stovetop.
- Prepare the caramel for dipping. If using store-bought caramel candies, melt them according to package directions.
- Place the bowls of melted white chocolate, milk chocolate, and caramel onto the serving board alongside the prepared apple slices. You can also include lollipop sticks for easier dipping if desired.
- Allow guests to assemble their own caramel apple creations by dipping apple slices into the caramel, chocolates, and their favorite toppings.