You know those moments when a craving hits, and you just *need* something sweet, comforting, and utterly delicious? For me, that craving often leads me straight to my kitchen, and more often than not, it’s for these incredible Cherry Pie Bites. They’re like a tiny explosion of pure joy in every bite, capturing all the best parts of a classic cherry pie but in a perfectly portioned, ridiculously easy-to-make package. Honestly, I’ve tried a million variations of baked goods over the years, but this one… this one is different. It’s the one I whip up when friends drop by unexpectedly, the one that disappears in minutes during holiday gatherings, and the one my kids practically beg for every single weekend. If you love the idea of a warm, gooey cherry filling wrapped in a tender, buttery crust but dread the fuss of a full-sized pie, then you are going to adore these Cherry Pie Bites. They’re truly a game-changer, and I’m so excited to share them with you.
What are cherry pie biscuits?
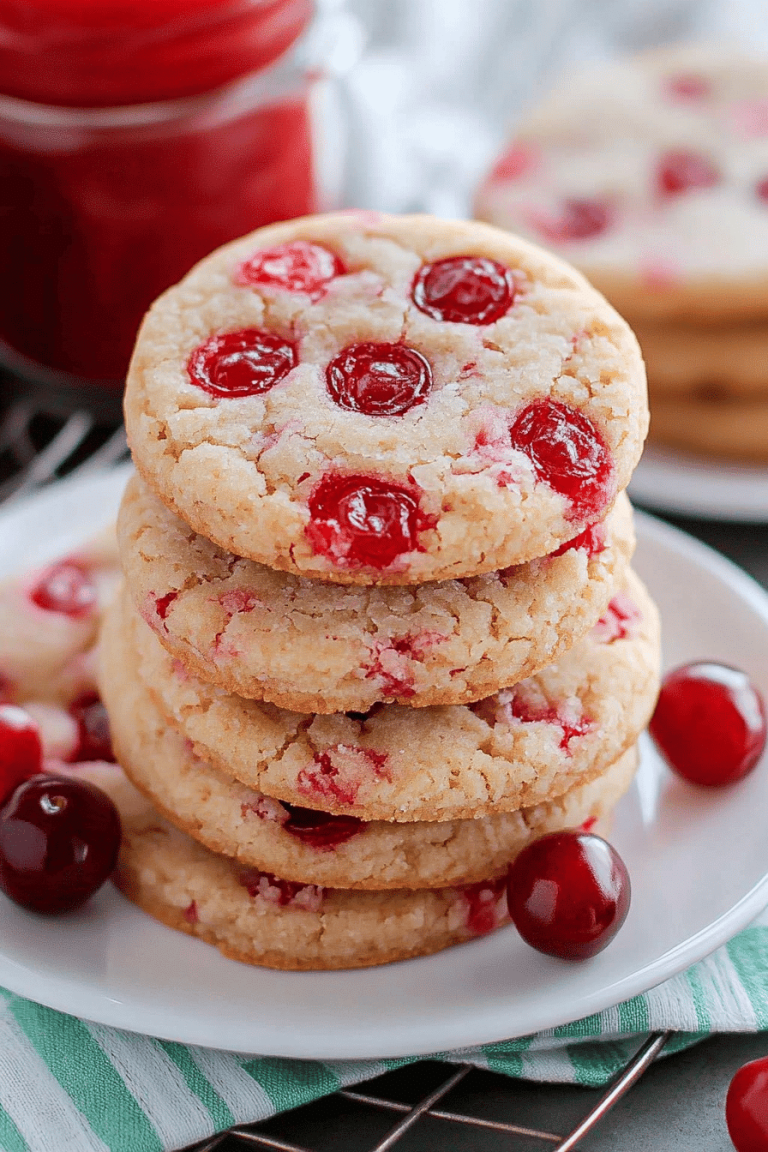
So, what exactly are these delightful little morsels? Think of them as miniature cherry pies, but without all the complicated lattice work or the fear of a soggy bottom! These Cherry Pie Bites are essentially a sweet, tender cake-like base swirled with a vibrant, slightly tart cherry filling, all baked into convenient, bite-sized portions. The “bites” part is key here. They’re usually made in a muffin tin or a mini-muffin tin, which makes them incredibly easy to serve and eat. It’s like a happy marriage between a muffin and a pie, but with that unmistakable cherry goodness that just sings. The name itself, Cherry Pie Bites, just perfectly encapsulates what they are – a little taste of pie heaven, made simple. They’re approachable, fun, and utterly irresistible.
Why you’ll love this recipe?
There are so many reasons why this Cherry Pie Bites Recipe has become my go-to, and I have a feeling it will become yours too! First and foremost, the FLAVOR is just out of this world. You get that classic sweet-tart punch of cherries, which is perfectly balanced by the tender, buttery crumb of the base. It’s not overly sweet, which I really appreciate. Then there’s the SIMPLICITY. Seriously, if you can stir ingredients together, you can make these. There’s no rolling out pie dough, no intricate crimping – just simple mixing and swirling. It’s a lifesaver on busy weeknights when you want something homemade but don’t have hours to spare. Plus, they’re incredibly COST-EFFICIENT. The ingredients are all pantry staples, and you can even use frozen cherries, which are often more affordable and available year-round. The VERSATILITY is another huge plus. While cherry is my favorite, I’ve made these with blueberries and even raspberries, and they’re all divine. They’re perfect for breakfast, a delightful dessert, or even a sweet afternoon pick-me-up. What I love most about this recipe is how forgiving it is. Even if you’re a beginner baker, you’re going to end up with something absolutely delicious. It’s the kind of recipe that makes you feel like a baking pro, even when you’re just starting out. They’re so much better than store-bought treats, and the fact that they’re baked fresh makes all the difference.
How do I make a cherry pie biscuit?
Quick Overview
This recipe is wonderfully straightforward. You’ll mix up a simple batter, prepare a quick cherry filling, swirl them together in muffin cups, and bake until golden and fragrant. It’s a one-bowl wonder for the batter, and the filling comes together in minutes on the stovetop. The magic happens when you swirl them, creating beautiful patterns and ensuring a burst of cherry in every bite. It’s about simplicity, speed, and guaranteed deliciousness. You really can’t go wrong!
Ingredients
For the Main Batter:
All-Purpose Flour: I usually use about 2 cups. Make sure it’s spooned and leveled, not scooped, for the best texture. If you accidentally scoop too much, your bites might turn out a bit tough, and nobody wants that!
Granulated Sugar: About 1 cup. This gives the batter its sweetness without being overpowering.
Baking Powder: 2 teaspoons. This is what gives them that lovely lift and tender crumb.
Salt: 1/2 teaspoon. Just a pinch to balance out the sweetness and enhance the other flavors.
Unsalted Butter: 1/2 cup (1 stick), softened. Softened butter is key here for a smooth, creamy batter. Melted butter can sometimes make baked goods a little greasy, so take the time to soften it properly.
Eggs: 2 large. Room temperature eggs incorporate better into the batter, so if you forget to take them out, a quick 10-minute soak in warm water does the trick.
Milk: 1/2 cup. Whole milk gives the best richness, but I’ve tested this with almond milk and it actually made it even creamier! Whatever you have on hand works.
Vanilla Extract: 1 teaspoon. A good quality vanilla makes a world of difference in baked goods.
For the Filling:
Cherries: About 2 cups, pitted. Fresh or frozen work beautifully. If using frozen, no need to thaw completely, just toss them in!
Granulated Sugar: 1/4 cup. This can be adjusted based on how sweet your cherries are.
Cornstarch: 2 tablespoons. This is essential for thickening the filling so it’s not too runny. Make sure it’s fully dissolved to avoid lumps.
Lemon Juice: 1 tablespoon. A little acidity brightens up the cherry flavor and adds that perfect tang.
Almond Extract (Optional): 1/4 teaspoon. If you love that classic cherry pie flavor, a tiny hint of almond extract is pure magic!
For the Glaze:
Powdered Sugar: 1 cup. Sifted for a smooth, lump-free glaze.
Milk or Cream: 2-3 tablespoons. Start with 2 and add more, a teaspoon at a time, until you reach your desired consistency.
Vanilla Extract: 1/2 teaspoon. For a touch of warmth.
Step-by-Step Instructions
Step 1: Preheat & Prep Pan
First things first, preheat your oven to 375°F (190°C). I like to line my muffin tins with paper liners for easy cleanup, but you can also grease and flour them really well if you prefer. Make sure you get into all the nooks and crannies if you’re greasing. This step is crucial because it ensures your Cherry Pie Bites won’t stick and will pop right out once they’re done baking.
Step 2: Mix Dry Ingredients
In a large bowl, whisk together the all-purpose flour, granulated sugar, baking powder, and salt. Whisking them thoroughly ensures that the leavening agent (baking powder) is evenly distributed, which means your bites will rise beautifully and consistently. You want to see a uniform mixture, no clumps of baking powder lurking around!
Step 3: Mix Wet Ingredients
In a separate medium bowl, cream together the softened unsalted butter and granulated sugar until light and fluffy. This is where the creaming method works its magic, incorporating air to make the batter tender. Then, beat in the eggs one at a time, mixing well after each addition. Stir in the milk and vanilla extract until just combined. Don’t overmix at this stage; we just want everything to come together smoothly.
Step 4: Combine
Gradually add the dry ingredients to the wet ingredients, mixing on low speed or by hand until just combined. I always tell people to stop mixing as soon as they don’t see any more dry streaks of flour. Overmixing can develop the gluten in the flour, leading to tough bites, and nobody wants a tough Cherry Pie Bite. A few tiny lumps are perfectly fine!
Step 5: Prepare Filling
While the oven is preheating or your batter is resting for a moment, let’s make that glorious cherry filling. In a small saucepan, combine the pitted cherries, granulated sugar, cornstarch, and lemon juice. Cook over medium heat, stirring constantly, until the mixture thickens and starts to bubble. This usually takes about 5-7 minutes. If you’re using almond extract, stir it in now. You want a nice, glossy, jam-like consistency. Be patient; it needs to thicken up properly so your bites aren’t soggy.
Step 6: Layer & Swirl
Now for the fun part! Spoon about 2 tablespoons of the batter into each prepared muffin cup, filling them about halfway. Then, dollop about 1-2 teaspoons of the cherry filling on top of the batter in each cup. Using a toothpick or a small knife, gently swirl the filling into the batter. You don’t want to over-swirl; just a few gentle turns create beautiful patterns and ensure you get that burst of cherry in every bite. Don’t cover the batter completely with the filling – you want both to be visible!
Step 7: Bake
Bake for 18-22 minutes, or until a toothpick inserted into the cake part of the bite comes out clean. The edges should be golden brown and the tops should spring back lightly when touched. Ovens can be a bit quirky, so keep an eye on them, especially during the last few minutes. If they’re browning too quickly, you can always loosely tent them with foil.
Step 8: Cool & Glaze
Let the Cherry Pie Bites cool in the muffin tin for about 10 minutes before transferring them to a wire rack to cool completely. This step is important to prevent them from breaking when you remove them. Once they’re completely cool, whisk together the powdered sugar, 2 tablespoons of milk (or cream), and vanilla extract in a small bowl until smooth. Add more milk, a teaspoon at a time, if needed, to reach a drizzle-able consistency. Drizzle the glaze over the cooled bites. I like to do this freehand for a rustic look.
Step 9: Slice & Serve
Once the glaze has set slightly, your incredible Cherry Pie Bites are ready to be enjoyed! They’re best served at room temperature or slightly warm. The combination of the tender cake, the sweet-tart cherry filling, and that lovely glaze is just pure perfection. Trust me, they won’t last long!
What to Serve It With
These Cherry Pie Bites are so versatile, they fit into almost any occasion. For BREAKFAST, they’re a delightful change from the usual muffins or toast. I love pairing them with a good cup of strong coffee; the bitterness cuts through the sweetness beautifully. A dollop of Greek yogurt on the side adds a nice creamy contrast. For BRUNCH, they’re a little elegant touch that everyone will rave about. Arrange them on a pretty tiered stand with some fresh berries and perhaps a mimosa or a sparkling cider. They look so lovely and inviting. AS DESSERT, they’re a crowd-pleaser for sure. Serve them warm with a scoop of vanilla bean Ice Cream or a dollop of whipped cream for pure indulgence. They’re also fantastic for a COZY SNACK, especially on a chilly afternoon. I often just grab one (or two!) with a glass of milk while I’m curled up with a book. My kids also love them after school with a glass of chocolate milk. It’s a simple, comforting treat that feels special without being fussy. One of my favorite family traditions is making a batch of these on a rainy Sunday afternoon and then watching a movie together, everyone snacking on their own little pie bite.
Top Tips for Perfecting Your Cherry Pie Bites
I’ve made these Cherry Pie Bites more times than I can count, and over the years, I’ve picked up a few tricks that make them even better. For the ZUCCHINI PREP (if you decide to add it, which I’ll explain in a bit!), if you’re using it, always grate it finely and then squeeze out as much moisture as humanly possible. Use a cheesecloth or a clean kitchen towel – this prevents soggy bites. The fresher your cherries, the brighter the flavor, but frozen are perfectly fine and often more convenient! For MIXING ADVICE, remember that rule about not overmixing. It’s the most important tip for a tender crumb. When you’re combining the wet and dry ingredients, just stir until you can’t see dry flour anymore. A few lumps are your friend here! For SWIRL CUSTOMIZATION, don’t go crazy with the toothpick. A few gentle passes are all you need to create that beautiful marbling effect. You want distinct ribbons of cherry, not a muddy mess. It’s all about visual appeal and getting that burst of cherry in every single bite. For INGREDIENT SWAPS, I’ve experimented a lot! If you don’t have cherries, blueberries or raspberries work wonderfully. You can also swap half the all-purpose flour for whole wheat flour for a nuttier flavor, but it might make them a bit denser. For BAKING TIPS, always know your oven. If it runs hot, reduce the temperature slightly or bake for a few minutes less. Placing the muffin tin in the center rack ensures even cooking all around. And don’t be afraid to test for doneness with a toothpick; it’s the most reliable method. For GLAZE VARIATIONS, if you want a thinner glaze for more of a drizzle, just add a tiny bit more milk. For a thicker glaze that sets up more like frosting, reduce the milk or add a bit more powdered sugar. You can also add a pinch of cinnamon or a drop of cherry extract to the glaze for an extra flavor boost!
Storing and Reheating Tips
One of the best things about these Cherry Pie Bites is how well they store, making them perfect for meal prep or just having a sweet treat on hand. At ROOM TEMPERATURE, they’ll stay fresh for about 2 days, especially if they’re stored in an airtight container. Make sure they’re completely cool before sealing them up to prevent condensation. For REFRIGERATOR STORAGE, they’ll keep for up to 4-5 days. Again, an airtight container is your best friend here. The glaze might soften slightly in the fridge, but they’ll still be delicious. When you’re ready to eat them from the fridge, you can enjoy them cold, or you can pop them in the microwave for just 10-15 seconds to take the chill off and revive that lovely soft texture. For FREEZER INSTRUCTIONS, these are fantastic for making ahead! Once they are completely cooled and the glaze has set (or if you plan to glaze them after thawing), wrap them individually in plastic wrap, then place them in a freezer-safe bag or container. They can be frozen for up to 2-3 months. To thaw, simply remove them from the freezer and let them come to room temperature on the counter for a few hours, or thaw them in the refrigerator overnight. If you froze them unglazed, you can glaze them once they’ve thawed. For GLAZE TIMING ADVICE, I always recommend glazing them *after* they’ve cooled completely. If you glaze them while they’re warm, the glaze will melt and become a sticky mess. If you’re planning to freeze them, it’s often best to freeze them *without* the glaze and add it after thawing for the freshest look and texture.
Frequently Asked Questions
Final Thoughts
There you have it – my absolute favorite Cherry Pie Bites! I truly believe this recipe is a winner because it delivers all the comfort and flavor of classic pie without any of the fuss. They’re perfect for sharing, forgiving for new bakers, and incredibly satisfying for anyone who loves a good, sweet treat. What I love most is seeing the smiles they bring to people’s faces. It’s that little burst of sunshine, that perfect balance of tender cake and bright cherry, that just makes everything feel a little bit better. If you’re a fan of these bites, you might also enjoy my “Lemon Blueberry Scones” for another burst of fruity goodness, or perhaps my “Easy Chocolate Lava Cakes” when you’re craving something rich and decadent. Give these Cherry Pie Bites a try, and I promise you won’t be disappointed. I can’t wait to hear how yours turn out! Don’t forget to leave a comment below and share your experience, or even your own creative variations. Happy baking!
Cherry Pie Bites
Ingredients
Main Ingredients
- 1 package refrigerated pie crusts
- 1 can cherry pie filling
- 0.25 cup granulated sugar
- 0.5 teaspoon ground cinnamon
- 1 tablespoon butter, melted
Instructions
Preparation Steps
- Preheat oven to 375°F (190°C). Line a baking sheet with parchment paper.
- Unroll the pie crusts on a lightly floured surface. Use a round cookie cutter (about 2 inches in diameter) to cut out circles. You should get about 24 circles.
- Place half of the circles onto the prepared baking sheet. Spoon about 1 teaspoon of cherry pie filling onto the center of each circle.
- In a small bowl, mix together the sugar and cinnamon. Sprinkle a pinch of the mixture over the cherry filling in each bite.
- Top the cherry filling with the remaining pie crust circles. Crimp the edges with a fork to seal.
- Brush the tops of the bites with melted butter.
- Bake for 20-25 minutes, or until golden brown. Let cool slightly before serving.