
Oh, Chicken Parmesan. Just saying the name makes me feel all warm and fuzzy inside, doesn’t it? It’s one of those dishes that feels like a hug on a plate, a true classic that never, ever gets old. I remember my mom making this when I was a kid, and the smell would just waft through the house, promising a delicious dinner. It’s funny, because sometimes we get so caught up in trying the latest trends or complicated recipes, but there’s something so incredibly satisfying about a perfectly executed chicken parmesan. It’s like the ultimate comfort food, but elevated. And honestly? When I’m craving something truly satisfying, something that feels both special and familiar, this is my go-to. It’s so much more than just breaded chicken; it’s a whole experience of cheesy, saucy, crispy goodness.
What is chicken parmesan?
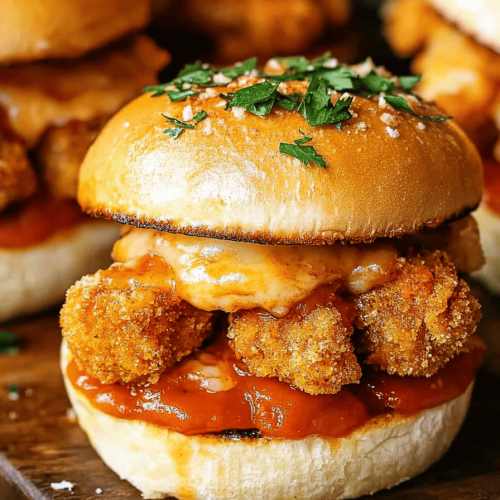
So, what exactly *is* this magical dish we call chicken parmesan? At its heart, it’s a beautiful marriage of tender chicken cutlets, coated in a golden, crispy breading, pan-fried to perfection, and then baked with a rich Marinara Sauce and a generous blanket of melted mozzarella and parmesan cheese. Think of it as the Italian-American answer to pure comfort. It’s often served over a bed of spaghetti, which is how I grew up eating it, but honestly, it’s versatile enough to stand on its own or pair with so many other things. The name itself tells part of the story: “parmesan” referring to that wonderfully nutty, hard Italian cheese that becomes so wonderfully gooey when melted. It’s a dish that’s been perfected over generations, each family adding their own little touch to make it their own. It’s simple, honest food that just tastes incredible.
Why you’ll love this recipe?
Okay, I know what you’re thinking. “Chicken parmesan? I’ve had it a million times.” But trust me, this isn’t just *any* chicken parmesan. This is the one you’ll be making again and again. What I love most about this recipe is how it balances that incredible, satisfying flavor with a surprising ease of preparation. We’re talking about chicken that’s so crispy it has a delightful crunch with every bite, a marinara sauce that’s rich and flavorful without being too heavy, and cheese that’s melted to gooey perfection. It’s a symphony of textures and tastes! Plus, it’s incredibly budget-friendly. You likely have most of the ingredients in your pantry already. This recipe is a lifesaver on busy weeknights when you want something truly impressive without spending hours in the kitchen. And the versatility? Oh my goodness. It’s fantastic with pasta, of course, but I’ve also served it with a big green salad for a lighter meal, or even tucked into a crusty roll for a killer sandwich. It’s that crowd-pleasing dish that everyone, from picky eaters to seasoned foodies, will devour. I’ve tested this with different types of breadcrumbs, and let me tell you, using a mix of Panko and regular breadcrumbs is the secret to that next-level crispiness.
How do I make Parmesan Chicken?
Quick Overview
This recipe breaks down into a few key steps: preparing your chicken, getting that perfect crispy coating, pan-frying until golden, and then baking it all together with sauce and cheese until bubbly and delicious. We’ll focus on getting that coating just right and making sure your chicken is tender and juicy. It’s all about building layers of flavor and texture. Don’t worry, it’s way simpler than it sounds, and the results are absolutely worth it. You’ll be amazed at how quickly this comes together once you get started.
Ingredients
For the
4 boneless, skinless chicken breasts (about 6-8 ounces each)
1 cup all-purpose flour
2 large eggs, lightly beaten
1.5 cups Panko breadcrumbs
0.5 cup grated Parmesan cheese
1 teaspoon garlic powder
1 teaspoon dried oregano
0.5 teaspoon salt
0.25 teaspoon Black Pepper
Olive oil or vegetable oil, for frying
For the Marinara Sauce:
1 tablespoon olive oil
2 cloves garlic, minced
1 (28 ounce) can crushed tomatoes
1 teaspoon dried basil
0.5 teaspoon dried oregano
Salt and Black Pepper to taste
Pinch of sugar (optional, to balance acidity)
For Topping:
8 ounces fresh mozzarella cheese, thinly sliced or shredded
0.5 cup grated Parmesan cheese
Step-by-Step Instructions
Step 1: Preheat & Prep Pan
First things first, preheat your oven to 400°F (200°C). This ensures everything is ready to go when it’s time to bake. Grab a large, oven-safe skillet or a baking dish. If you’re using a skillet, a cast-iron one is fantastic here because it holds heat so well, giving you a nice, even bake. If you’re using a baking dish, lightly grease it with a little Olive oil to prevent sticking.
Step 2: Mix Dry Ingredients
In a shallow dish or pie plate, combine the flour. In a second shallow dish, whisk the eggs until they’re just combined. In a third shallow dish, mix together the Panko breadcrumbs, 0.5 cup of grated Parmesan cheese, garlic powder, dried oregano, salt, and black pepper. This Panko and Parmesan mix is your secret weapon for extra crispy chicken. Make sure everything is well combined so you get that flavor in every bite.
Step 3: Prepare Chicken Cutlets
Now for the chicken. You want to pound your chicken breasts to an even thickness, about half an inch. This ensures they cook evenly and quickly. You can do this by placing a chicken breast between two pieces of plastic wrap or inside a large zip-top bag and gently pounding with a meat mallet, the bottom of a heavy pan, or even a rolling pin. It’s important not to go too thin, or it’ll dry out. We’re aiming for tender, juicy chicken.
Step 4: Bread the Chicken
This is where the magic happens! Take each pounded chicken cutlet and dredge it in the flour, making sure to coat both sides and shake off any excess. Then, dip it into the beaten eggs, letting any excess drip off. Finally, press the chicken into the Panko and Parmesan mixture, ensuring it’s completely coated. Really press the breadcrumbs on there so they adhere well. This double coating ensures that amazing crunch.
Step 5: Pan-Fry the Chicken
Heat about 1/4 inch of olive oil or vegetable oil in a large skillet over medium-high heat. You want the oil hot enough that a breadcrumb sizzles immediately when dropped in. Carefully place the breaded chicken cutlets into the hot oil, being careful not to overcrowd the pan. You might need to do this in batches. Fry for about 3-4 minutes per side, until golden brown and crispy. This step is crucial for that signature crispiness, even after baking. Once fried, transfer the chicken to a plate lined with paper towels to drain any excess oil. Don’t worry if they’re not cooked all the way through at this stage; they’ll finish cooking in the oven.
Step 6: Prepare Marinara Sauce
While the chicken is frying or draining, quickly whip up your marinara. In a small saucepan, heat 1 tablespoon of olive oil over medium heat. Add the minced garlic and sauté for about 30 seconds until fragrant (don’t let it burn!). Pour in the crushed tomatoes, stir in the dried basil and oregano, and season with salt and pepper to taste. Add a tiny pinch of sugar if your tomatoes are a bit tart. Let it simmer gently for about 10 minutes while you assemble everything. This gives the flavors a chance to meld.
Step 7: Assemble and Bake
Now, assemble your masterpiece. Spoon a thin layer of your marinara sauce into the bottom of your prepared baking dish or oven-safe skillet. Arrange the golden-brown chicken cutlets on top of the sauce. Spoon a generous amount of marinara sauce over each piece of chicken, making sure to get it into all the nooks and crannies. Top each cutlet with slices or shredded mozzarella cheese, and then sprinkle the remaining 0.5 cup of Parmesan cheese over everything. Pop it into your preheated oven.
Step 8: Bake to Perfection
Bake for 15-20 minutes, or until the cheese is melted, bubbly, and slightly golden brown, and the chicken is cooked through (an internal temperature of 165°F or 74°C). The aroma filling your kitchen at this point is absolutely heavenly! Keep an eye on it to make sure the cheese doesn’t burn. If it’s browning too quickly, you can loosely tent it with foil.
Step 9: Rest and Serve
This is a tough but important step: let the chicken parmesan rest for about 5-10 minutes after it comes out of the oven. This allows the juices to redistribute, ensuring your chicken is moist and tender. Then, serve it up! It’s absolutely divine served over a bed of spaghetti tossed with a little extra marinara, or alongside a fresh, crisp salad. My family can’t wait for this part; the anticipation is part of the fun!
What to Serve It With
The beauty of a truly great chicken parmesan is that it’s a star all on its own, but it also plays wonderfully with a variety of sides. For a classic, comforting meal, you can’t go wrong with a big bowl of spaghetti or linguine tossed with a little extra marinara sauce. The pasta soaks up all those delicious flavors! If you’re looking for something a bit lighter, a simple side salad with a bright vinaigrette is perfect. I love using a mix of crisp greens, cherry tomatoes, and maybe some red onion. For a more substantial meal, garlic bread is always a winner – perfect for sopping up any extra sauce. My kids also adore it with roasted broccoli or green beans; they’re so good at getting their veggies in when there’s something this delicious to look forward to!
For Breakfast: While not traditional, a small, leftover piece of chicken parm, maybe reheated and served alongside a perfectly poached egg and some crusty toast, can be an incredibly decadent and satisfying breakfast. Think of it as a savory tart! The richness of the cheese and sauce with the runny yolk is divine.
For Brunch: Elevate it with a side of creamy polenta or mashed potatoes. The smooth texture contrasts beautifully with the crispy chicken. A sprinkle of fresh parsley or basil adds a pop of color and freshness. Consider a sparkling Prosecco or a mimosa to make it feel truly special.
As Dessert: This is definitely a main course, but if you’re feeling adventurous, a tiny, bite-sized piece could be part of a larger Italian-themed tasting menu. However, for a true dessert experience, follow it with something light and fruity like a panna cotta or a simple scoop of gelato.
For Cozy Snacks: Leftovers are fantastic! You can chop up a piece and serve it over a warm bed of quinoa or even just eat it cold straight from the fridge (don’t judge!). It makes for a hearty and satisfying snack that feels way more special than your average chips.
Top Tips for Perfecting Your Chicken Parmesan
Over the years, I’ve learned a few tricks that take this chicken parmesan from good to absolutely spectacular. First, regarding the chicken itself, make sure you pound it to an even thickness. This is non-negotiable! It guarantees even cooking and prevents any dry, overcooked edges while the center is still raw. When you’re breading, really press that Panko mixture onto the chicken. Don’t be shy! The more it adheres, the crispier your chicken will be. I learned this the hard way after a few batches where the breading just sort of fell off. Another crucial step is the pan-frying. This initial fry is key to achieving that incredible, satisfying crunch that holds up even after baking. Don’t skip it! And don’t overcrowd the pan; give each piece enough space to get beautifully golden brown. I used to cram them all in, and then I ended up with soggy chicken. Big mistake!
Marinara Sauce Secrets: While you can certainly use your favorite store-bought marinara, making your own is surprisingly easy and makes a huge difference. A good quality canned crushed tomato is your base. Simmering it with fresh garlic, a good pinch of herbs, and just a touch of sugar to balance any acidity will elevate the whole dish. Taste and adjust seasoning as it simmers – this is key! Don’t be afraid to add a splash of red wine to the sauce while it simmers for extra depth of flavor.
Cheese is Key: For the topping, I swear by using fresh mozzarella. It melts beautifully and gives that classic, gooey stretch. If you can find it in a ball and slice it yourself, even better! Grated Parmesan adds that salty, nutty depth. Don’t skimp here; the cheese is a major player!
Don’t Over-Sauce: While we love our marinara, don’t drown the chicken in it before baking. A good coating is perfect, but too much liquid can make the breading soggy. Save some extra sauce for serving if needed. I’ve also found that if you’re making this ahead of time, it’s best to assemble and bake it just before serving to maintain maximum crispiness.
Ingredient Swaps: If you’re out of Panko, regular fine breadcrumbs will work, but you might need to bake it a little longer to achieve similar crispiness. You can also mix in some dried Italian herbs into regular breadcrumbs if you don’t have them on hand. For the cheese, if fresh mozzarella isn’t available, a good quality low-moisture part-skim mozzarella will do the trick.
Storing and Reheating Tips
Leftover chicken parmesan is a treasure, and luckily, it stores and reheats surprisingly well. If you have any leftovers (which is rare in my house!), let them cool completely before storing. This is important to prevent condensation and sogginess. For optimal results, store the chicken parmesan in an airtight container in the refrigerator. It should stay good for about 3-4 days. I usually place a piece of parchment paper between layers if I’m stacking pieces to help maintain some of the crispiness.
When it comes to reheating, the oven is your best friend. Preheat your oven to 350°F (175°C). Place the leftover chicken parmesan on a baking sheet or in an oven-safe dish. If you want to get it extra crispy again, you can place it directly on the oven rack (with a baking sheet underneath to catch drips). Reheat for about 10-15 minutes, or until heated through and the cheese is melted and bubbly again. This method really helps revive that delightful crunch.
If you’re short on time, the microwave can be used, but be warned, it will soften the breading considerably. If you must use the microwave, cover the chicken loosely with a paper towel to help absorb steam and heat in short bursts, checking frequently. For reheating chicken that’s already been sauced and cheesed, you might want to add a splash of water to the bottom of the dish before reheating in the oven, as the sauce can dry out slightly. And remember, the glaze on top is best added fresh after reheating if you’re aiming for that perfect, glistening finish.
Frequently Asked Questions
Final Thoughts
There you have it – my absolute favorite way to make chicken parmesan. It’s a recipe that brings joy to my table every single time, and I truly hope it does the same for yours. It’s proof that simple, well-executed ingredients can create something truly extraordinary. The combination of that incredibly crispy coating, the tender chicken, the rich marinara, and the gooey, melted cheese is just pure culinary magic. It’s the kind of meal that makes you want to gather everyone around the table and savor every bite. If you love classic Italian-American comfort food, you absolutely have to give this a try. And if you’re feeling inspired, you might also enjoy my recipe for [Link to another relevant recipe, e.g., “Classic Lasagna Bolognese”] or my quick and easy [Link to another relevant recipe, e.g., “Garlic Parmesan Roasted Asparagus”]. I can’t wait to hear how your chicken parmesan turns out! Please leave a comment below and let me know what you think, or share any fun twists you added. Happy cooking!
Chicken Parmesan
Ingredients
Main Ingredients
- 4 boneless, skinless Chicken breasts
- 1 cup All-purpose flour
- 2 large Eggs
- 1 cup Breadcrumbs
- 0.5 cup Grated Parmesan cheese
- 2 cups Marinara sauce
- 8 oz Mozzarella cheese, sliced
- 0.25 cup Olive oil
- to taste Salt and pepper
Instructions
Preparation Steps
- Preheat oven to 375°F (190°C).
- Pound chicken breasts to 1/2-inch thickness.
- Season chicken with salt and pepper. Dredge in flour, then egg, then breadcrumbs mixed with Parmesan cheese.
- Heat olive oil in a large skillet over medium-high heat. Cook chicken until golden brown, about 3-4 minutes per side.
- Place chicken in a baking dish. Top with marinara sauce and mozzarella cheese.
- Bake for 20-25 minutes, or until cheese is melted and bubbly and chicken is cooked through.


