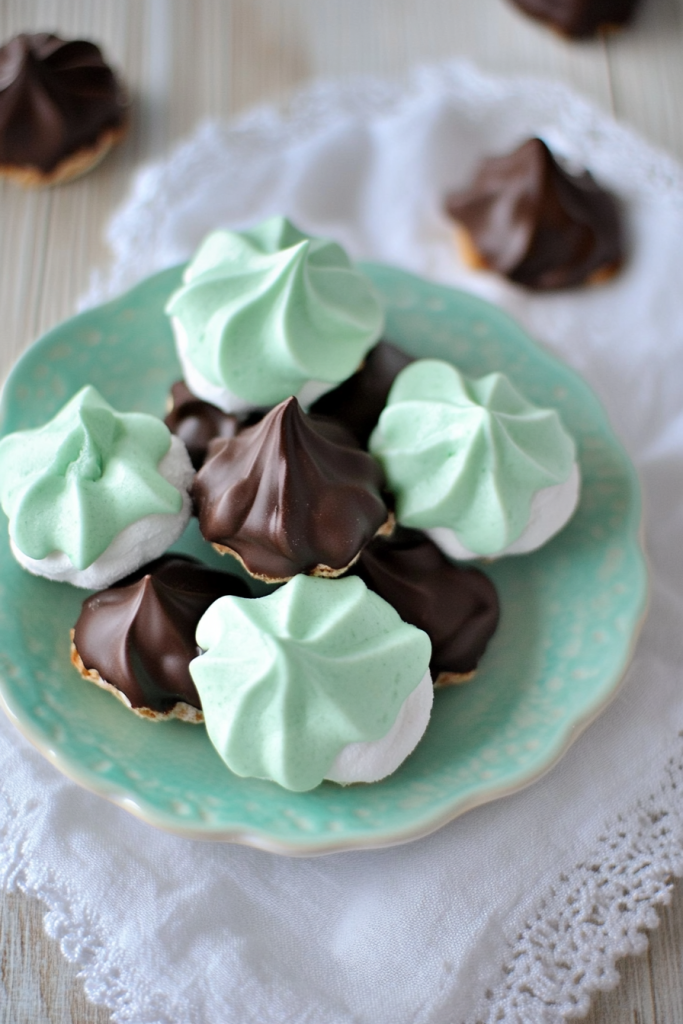
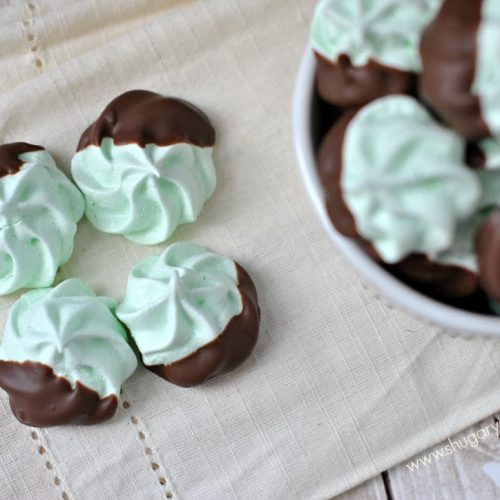
There are some flavors that just instantly transport you back to happy memories, and for me, chocolate and mint is absolutely one of them. It’s that classic pairing that feels both comforting and a little bit fancy. Whenever I’m feeling a bit nostalgic, or even just craving something truly delightful that isn’t going to weigh me down, my mind immediately goes to these Chocolate Mint Meringues. They’re so airy and light, and the combination of rich chocolate with that bright, cool mint is just… perfection. I remember my grandma making something similar when I was little, and while hers weren’t quite as refined (bless her heart!), that essence of pure joy she infused into her baking is what I always try to capture. Honestly, these little bites are a million times better than those pre-packaged mint creams you might find; they’re so much fresher and have this wonderful crisp-then-melty texture that’s just addictive. If you’ve ever made a classic French meringue, think of these as that, but with an extra layer of sophisticated deliciousness. They’re like little clouds of flavor, and they always disappear so fast at my house!
What is chocolate mint meringues?
So, what exactly are these magical little treats? Think of them as delicate, crisp cookies made from whipped egg whites and sugar, baked at a low temperature until they’re light as air and shatteringly crisp. But we don’t stop there! We’re folding in rich cocoa powder for that beautiful chocolatey depth and a hint of pure mint extract to give them that refreshing zing. They’re not overly sweet, which is one of the things I adore about them. The sugar is really there to create that perfect, stable structure for the meringue, while the other flavors shine through. It’s essentially taking the elegant simplicity of a meringue and infusing it with a flavor combination that’s universally loved. They’re almost like a grown-up version of those candy canes you get at Christmas, but in a much more refined, melt-in-your-mouth form. They’re the kind of thing that makes people ask, “Wow, did you *really* make these?” and that’s always a good sign, right?
Why you’ll love this recipe?
What are some of the reasons why I love this Chocolate Mint Meringue recipe?flavor. It’s an absolute showstopper. The deep, slightly bitter notes of the cocoa powder are beautifully balanced by the sweet, airy meringue, and then that burst of cool mint cuts through everything, making each bite feel incredibly refreshing. It’s sophisticated without being intimidating. Then there’s the simplicity. Honestly, meringues can sound fancy, but once you get the hang of whipping egg whites, it’s surprisingly straightforward. The main thing is patience, letting them bake slowly until they’re perfectly crisp. You don’t need a ton of fancy equipment either, just a good stand mixer or a hand mixer and a watchful eye. And the Cost-efficiency: What is the best way to measure cost-efficiency?? You’re looking at pantry staples: egg whites, sugar, cocoa powder, and a touch of mint extract. It’s an incredibly budget-friendly way to create something that feels truly special and luxurious. Plus, they’re incredibly versatile! While I love them just as they are, they’re also fantastic crumbled over ice cream, used as edible decorations for cakes, or even sandwiched with a bit of chocolate ganache for an extra indulgent treat. What I love most about these is that they satisfy that craving for something sweet and a little bit special without feeling heavy. They’re perfect for a light dessert after a rich meal, or just a lovely afternoon pick-me-up. They remind me a bit of my No-Bake Chocolate Peanut Butter Bars in terms of their “wow” factor with minimal fuss, but they’re so different in texture and profile, offering that crisp, airy experience.
How to Make Chocolate Mint Meringues
Quick Overview
This recipe is all about creating light, airy meringue shells infused with chocolate and mint. We’ll whip egg whites to stiff peaks, gently fold in sugar and cocoa, pipe them into elegant shapes, and then bake them low and slow until they’re crisp and dry. The mint is added right at the end to preserve its vibrant flavor. It’s a process that requires a little patience, but the result is incredibly rewarding. You get these delicate, melt-in-your-mouth cookies that are so much more satisfying than anything store-bought.
Ingredients
For the Meringues:
3 large egg whites, room temperature (this is key for volume!)
1 cup superfine granulated sugar (also called caster sugar – it dissolves better and gives a smoother texture)
1/4 cup unsweetened cocoa powder (use a good quality one for the best flavor)
1/2 teaspoon pure mint extract (not peppermint, unless you want it *really* intense!)
Step-by-Step Instructions
Step 1: Preheat & Prep Pan
First things first, preheat your oven to a nice low 200°F (95°C). It’s crucial to bake these at a low temperature to dry them out rather than brown them. Line two baking sheets with parchment paper. If you want to be super precise with your shapes, you can draw circles on the parchment paper using a cookie cutter or a glass as a guide, then flip the paper over so the pencil marks are on the bottom. This helps keep your meringues uniform, though I’m usually going for more of a rustic charm!
Step 2: Mix Dry Ingredients
In a small bowl, whisk together the superfine sugar and the unsweetened cocoa powder until they are thoroughly combined. Make sure there are no lumps of cocoa powder. This step is important because we’ll be folding these dry ingredients into the whipped egg whites later, and we don’t want any streaks of unmixed cocoa.
Step 3: Mix Wet Ingredients
In a very clean, dry bowl of a stand mixer (or a large bowl if using a hand mixer), add your room temperature egg whites. It’s super important that there’s absolutely NO trace of yolk in the whites, or they won’t whip up properly. Start beating the egg whites on medium speed until they become frothy and soft peaks form when you lift the beaters. Think of it like the fluffy part of a cloud – not too stiff yet.
Step 4: Combine
Gradually add the sugar-cocoa mixture, a tablespoon at a time, while the mixer is running on medium-high speed. Keep mixing until the egg whites are stiff, glossy, and the sugar is completely dissolved. You’ll know the sugar is dissolved when you rub a little bit of the meringue between your fingers and don’t feel any grittiness. This usually takes about 8-10 minutes. Once you have those lovely stiff peaks that stand straight up, gently fold in the pure mint extract. Be careful not to overmix at this stage, as we want to keep all that lovely air in the meringue.
Step 5: Prepare Filling
This step is technically just folding the dry ingredients into the wet, but it’s the most crucial part for texture! Using a spatula, gently fold the sugar-cocoa mixture into the whipped egg whites. Do this in a few additions, folding carefully until just combined. You want to incorporate everything without deflating the airy egg whites too much. A few little streaks of cocoa are okay; it’s better than overmixing and ending up with a dense meringue.
Step 6: Layer & Swirl
Spoon the meringue mixture into a piping bag fitted with a large round tip (or a star tip for a fancier look, though I often just use a plastic bag with a corner snipped off). Pipe mounds of meringue onto the prepared baking sheets. Aim for about 1.5 to 2 inches in diameter. If you drew guides, use them! You can create pretty swirls or simple mounds. I sometimes like to swirl them slightly with a toothpick for a bit of visual interest.
Step 7: Bake
Bake for 1 to 1.5 hours. The meringues should feel firm to the touch and lift easily off the parchment paper. They should be dry but not browned. Turn off the oven, crack the door open slightly (you can wedge a wooden spoon in there), and let the meringues cool completely in the oven for at least another hour, or even overnight. This slow cooling process helps prevent cracking.
Step 8: Cool & Glaze
Once completely cool and dry, carefully remove the meringues from the parchment paper. If you want a drizzle, you can melt a bit of Dark Chocolate and drizzle it over the tops, or even mix a touch more cocoa with a tiny bit of water or melted chocolate to create a thin glaze. I usually keep them plain, as the mint flavor is so distinct.
Step 9: Slice & Serve
These are ready to be enjoyed as soon as they’re fully cooled! They’re best served at room temperature. Arrange them on a pretty platter and watch them disappear!
What to Serve It With
These Chocolate Mint Meringues are so wonderfully versatile, they fit in almost anywhere! For Breakfast, imagine a couple of these alongside your morning coffee or a delicate cup of tea. They’re a sweet little treat to start the day without feeling heavy. They also pair beautifully with a light fruit salad. For Brunch, they add an elegant touch to any spread. I love plating them in small bowls or on a tiered stand. They look especially stunning next to some fresh berries or a light yogurt parfait. As Dessert, they’re a dream! They are the perfect light finish to a rich meal, offering that refreshing minty chocolate hit. You can serve them alongside a slice of chocolate cake or even with a scoop of vanilla bean Ice Cream, allowing the meringues to provide a lovely textural contrast. For Cozy Snacks, well, these are pure comfort in bite-sized form. They’re perfect with a warm mug of hot chocolate (doubling down on the chocolate goodness!) or even a glass of milk for a simple, satisfying treat. My kids absolutely love them as an after-school snack, and honestly, so do I!
Top Tips for Perfecting Your Chocolate Mint Meringues
I’ve made these meringues more times than I can count, and I’ve picked up a few tricks along the way that I swear by. First, regarding the egg whites, always use room temperature ones. They whip up to a much greater volume than cold eggs. Also, ensure your bowl and whisk are spotlessly clean – any grease or fat will prevent the whites from forming stiff peaks. I learned that the hard way after a batch that just wouldn’t cooperate! For the sugar, superfine (caster) sugar is your best friend here. It dissolves much more easily into the egg whites, giving you a smoother, glossier meringue and avoiding that slightly grainy texture you can sometimes get with regular granulated sugar. When you’re mixing the dry ingredients into the whites, be gentle. Use a spatula and fold them in with an under-and-over motion. Don’t stir! We want to preserve all that precious air that gives the meringues their lightness. A few small streaks of cocoa are far better than deflating the mixture. For swirl customization, don’t feel pressured to make them perfect. I actually love the slightly rustic look they get from just being spooned onto the paper. If you do want swirls, a piping bag with a star tip works wonders for pretty, consistent shapes, but a simple round tip or even a sturdy ziplock bag with a corner snipped off will do just fine. For baking, low and slow is the mantra. The 200°F (95°C) temperature is really important; too hot and they’ll brown and puff up too much, losing that delicate crispness. My oven can sometimes run a little hot, so I’ll sometimes pop the oven door open a tiny bit further with a wooden spoon to regulate the temperature. And definitely let them cool in the oven with the door ajar; this slow cooling prevents dramatic temperature changes that can cause cracking. If you’re worried about mint flavor intensity, start with a smaller amount of extract and taste a tiny bit of the meringue mixture (before adding to whites) or a small piped dollop on parchment. You can always add more, but you can’t take it away! Pure mint extract is potent, so a little goes a long way.
Storing and Reheating Tips
Once you’ve mastered these delicate delights, you’ll want to make sure they stay as perfect as possible. For room temperature storage, these are best kept in an airtight container. Meringues are hygroscopic, meaning they absorb moisture from the air, so a good seal is essential. They’ll stay beautifully crisp for up to a week, maybe even a little longer if your climate is very dry. Avoid storing them in the refrigerator, as the moisture in the fridge will make them soft and chewy, which isn’t the texture we’re going for here. If you find they’ve lost a bit of their crispness after a few days, you can pop them in a very low oven (around 175°F or 80°C) for about 10-15 minutes to dry them out again. For freezer instructions, if you happen to have too many (a rare problem, I know!), you can freeze them. Make sure they are completely cooled and dry. Wrap them tightly in plastic wrap, then place them in an airtight container or a freezer bag. They should keep well in the freezer for about 1-2 months. To thaw, simply remove them from the freezer and let them come to room temperature in their container, still sealed, to prevent condensation. For glaze timing advice, if you’re adding a chocolate drizzle or glaze, it’s best to do this just before serving or storing. If you glaze them and then seal them in an airtight container, the moisture from the glaze can soften the meringue. I usually wait until they’re completely cool, then drizzle or dip, and serve them the same day or store them carefully.
Frequently Asked Questions
Final Thoughts
I really hope you give these Chocolate Mint Meringues a try! They’re such a delightful little treat that feels so much more special than they are difficult to make. They’re that perfect combination of elegant and easy, a little bit whimsical and utterly delicious. Whether you’re looking for a light dessert to impress guests, a fun baking project with the kids (if they’re patient!), or just a way to satisfy a sweet craving with something sophisticated, these meringues truly deliver. They’re proof that sometimes, the simplest ingredients can create the most magical results. If you love this recipe, you might also enjoy my recipe for Classic Vanilla Bean Meringues for a pure, unadulterated meringue experience, or my Chocolate Lava Cakes for a richer, more decadent chocolate fix. I can’t wait to hear how your Chocolate Mint Meringues turn out! Please leave a comment below and share your experience, or if you have any little tweaks you discovered! Happy baking, my friends!
Chocolate Mint Meringues
Ingredients
Main Ingredients
- 3 large egg whites
- 0.25 teaspoon cream of tartar
- 0.75 cup granulated sugar
- 0.5 cup powdered sugar
- 0.5 cup mini chocolate chips
- 0.5 teaspoon peppermint extract
Instructions
Preparation Steps
- Preheat oven to 200°F (93°C). Line a baking sheet with parchment paper.
- In a clean, dry bowl, beat egg whites and cream of tartar until soft peaks form.
- Gradually add granulated sugar, beating until stiff and glossy.
- Gently fold in powdered sugar, mini chocolate chips, and peppermint extract.
- Spoon or pipe meringue onto prepared baking sheet.
- Bake for 60 minutes, or until meringues are dry and firm.
- Turn off the oven and let meringues cool completely inside with the door slightly ajar.


