You know those nights? The ones where you’ve had a super long day, the kids are finally asleep (or at least quiet!), and you just *need* something chocolatey, something decadent, something that feels like a warm hug in dessert form? Yeah, those nights. I used to sigh and think, “Ugh, I want cake, but I really don’t want to whip out the stand mixer, grease pans, and deal with a whole hour of baking and cleanup for just one person.” Sound familiar? Well, my friend, I’ve got your back. This chocolate mug Cake Recipe is my absolute go-to, my secret weapon for instant gratification. It’s like a tiny, personal-sized miracle in a mug. Forget those sad, dry microwave cake mixes that promise heaven and deliver cardboard; this is the real deal. It’s rich, moist, and tastes like it came from a fancy bakery, all in about five minutes flat. Honestly, it’s better than any store-bought single-serving dessert I’ve ever tried, and way more satisfying than just eating chocolate chips straight from the bag (though I’ve been there too!).
What is a chocolate mug cake?
So, what exactly *is* this magical chocolate mug cake? Think of it as your personal, portable slice of chocolate heaven. It’s essentially a miniature Chocolate Cake, mixed and cooked right inside your favorite mug. The name says it all, right? “Chocolate” for that deep, irresistible flavor and “mug cake” because, well, it’s made in a mug! It’s the ultimate convenience dessert. Instead of a full-sized cake that might take an hour or more from start to finish and leave you with half of it leftover (which, let’s be honest, is both a blessing and a curse!), a mug cake is portion-controlled and lightning-fast. It’s perfect for single servings, a quick craving fix, or even a fun little treat to make with the kids when they’re begging for something sweet after school. It’s the express lane to chocolatey bliss, no fancy equipment or lengthy commitment required.
Why you’ll love this recipe?
Oh, where do I even begin with why you’ll absolutely adore this chocolate mug cake? First off, let’s talk about the flavor, because it’s seriously out of this world. It’s intensely chocolatey, rich, and moist, with just the right amount of sweetness that doesn’t overwhelm the cocoa. It’s not that artificial, overly sweet taste you sometimes get from quick fixes. It genuinely tastes like a properly baked cake. And the simplicity? It’s a lifesaver! You can whip this up on a Tuesday night when you’re exhausted, or on a Saturday afternoon when you need a quick pick-me-up. It takes mere minutes to mix and just over a minute to cook. Plus, the cost-efficiency is fantastic. You’re using basic pantry staples you probably already have, so it’s incredibly budget-friendly. And versatility! While I love it as is, you can easily add a swirl of Peanut Butter, some chocolate chips, or a dollop of whipped cream on top. It’s also incredibly forgiving. I’ve experimented with different types of milk and even added a splash of coffee to deepen the chocolate flavor, and it always turns out amazing. Compared to other single-serve dessert ideas, this chocolate mug cake hits every single mark: incredible taste, ridiculous ease, minimal cost, and maximum satisfaction. It’s the perfect solution when you’re craving something truly special without any of the fuss.
How do I make a chocolate mug cake?
Quick Overview
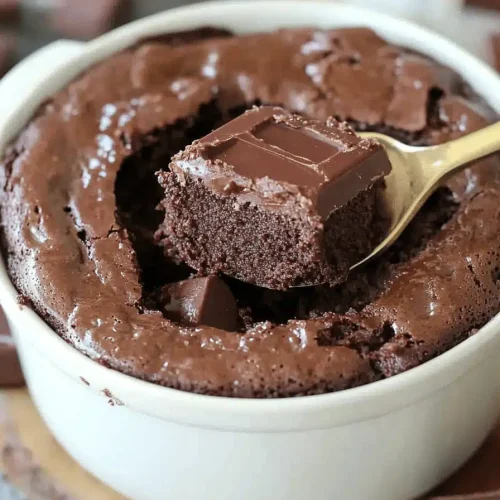
The beauty of this chocolate mug cake is its sheer speed and simplicity. You’ll basically whisk together your dry ingredients directly in your mug, then stir in your wet ingredients until just combined. A quick pop into the microwave, and in about 60-90 seconds, you’ll have a warm, gooey, decadent Chocolate Cake ready to devour. It’s so straightforward, it feels almost too easy, but trust me, the results are spectacular. This method minimizes dishes and maximizes your enjoyment time, which is exactly what we want when a chocolate craving strikes!
Ingredients
For the Main Batter:
This is where the magic starts! You’ll need all-purpose flour, granulated sugar, unsweetened cocoa powder, baking soda, and a pinch of salt. I always use good quality unsweetened cocoa powder; it makes a noticeable difference in the depth of flavor. For the flour, just your standard all-purpose works perfectly. Baking soda is crucial for lift, and the salt balances the sweetness and enhances the chocolate. Make sure your baking soda is fresh – an old box can lead to a flatter cake.
For the Wet Ingredients:
Here we’ve got milk (any kind works – dairy, almond, oat; I’ve tested them all and they all yield great results, though dairy sometimes gives a slightly richer texture), a touch of vegetable oil or melted butter for moisture and richness, and a splash of vanilla extract to round out the flavors. You can even add a teaspoon of instant coffee granules dissolved in a tablespoon of hot water if you’re a serious chocolate lover – it just amplifies that deep cocoa taste without making it taste like coffee.
For Optional Add-ins & Toppings:
This is where you can have some fun! Chocolate chips are a classic for a reason – they add little pockets of melted goodness. A spoonful of Peanut Butter or Nutella swirled in before microwaving is divine. For topping, a dusting of powdered sugar, a drizzle of chocolate sauce, a dollop of whipped cream, or even a scoop of ice cream takes it to the next level.
Step-by-Step Instructions
Step 1: Preheat & Prep Pan
Okay, first things first – grab your favorite mug. Seriously, pick one you love. It should be microwave-safe, of course, and ideally not too wide or too shallow, as that can affect cooking time. You don’t need to grease or flour it; the oil in the batter does a great job preventing sticking. Just have it ready!
Step 2: Mix Dry Ingredients
Into your mug, measure out 4 tablespoons of all-purpose flour, 4 tablespoons of granulated sugar, 2 tablespoons of unsweetened cocoa powder, 1/4 teaspoon of baking soda, and a tiny pinch of salt. Use a fork or a small whisk to stir these together really well. You want to make sure there are no pockets of cocoa powder or baking soda hiding, and that everything is evenly distributed. This step is super important for an even rise and consistent flavor throughout your little cake.
Step 3: Mix Wet Ingredients
Now, add 3 tablespoons of milk (whatever kind you have on hand!), 2 tablespoons of vegetable oil (or melted butter), and 1/2 teaspoon of vanilla extract to the same mug. If you’re adding the dissolved coffee, pop that in now too.
Step 4: Combine
Using your fork or whisk, stir everything together until *just* combined. It’s really important not to overmix here. A few small lumps are perfectly fine, even desirable! Overmixing can develop the gluten too much and make your cake tough. Scrape down the sides of the mug to make sure all the dry bits are incorporated into the batter. The batter should be thick but pourable, similar to pancake batter.
Step 5: Prepare Filling (Optional)
If you’re feeling fancy and want to add a surprise center, now’s the time! You can drop a tablespoon of chocolate chips, a dollop of peanut butter, or a spoonful of Nutella right into the center of the batter. Don’t stir it in; just let it nestle in there. It will melt into a gooey pocket during cooking.
Step 6: Layer & Swirl (Optional)
If you added a dollop of peanut butter or Nutella, you can gently swirl it with a toothpick or the tip of your fork, just a few times, to create a marbled effect. Don’t over-swirl, or you’ll lose the distinct pocket of deliciousness. You can also add a few extra chocolate chips on top of the batter if you like!
Step 7: Bake
Pop that mug into the microwave. Microwave on high power for about 60 to 90 seconds. The exact time will depend on your microwave’s wattage, so start with 60 seconds. The cake should look set around the edges but might still be a little moist on top – that’s exactly what you want for a perfectly fudgy texture. It will continue to cook a little as it cools. If it looks too wet after 60 seconds, give it another 10-15 seconds, checking each time. Be careful not to overcook it, or it can become dry and rubbery.
Step 8: Cool & Glaze
Carefully remove the hot mug from the microwave (use an oven mitt or towel – it’s hot!). Let it sit for a minute or two. If you’re adding a glaze or topping, now is the time. You can simply dust it with powdered sugar, drizzle some melted chocolate, or a ready-made chocolate syrup. For a quick glaze, whisk together a tablespoon of powdered sugar with a teaspoon of milk or water until smooth.
Step 9: Slice & Serve
You can eat it right out of the mug with a spoon – that’s my favorite way! Or, if you want to get fancy for a photo (or just because!), you can carefully invert the mug onto a plate. Sometimes a little coaxing with a knife around the edges helps. Serve immediately while it’s warm and gooey. The aroma alone is heavenly!
What to Serve It With
This little chocolate mug cake is surprisingly versatile. For breakfast, I sometimes whip one up when I’m in a rush. It’s decadent enough to feel like a treat but quick enough for a weekday. Pair it with a strong cup of coffee to cut through the richness, or a glass of cold milk if you’re feeling nostalgic. For brunch, imagine serving these individually to guests – a little dusting of powdered sugar and a tiny sprig of mint looks so elegant! It’s a sweet ending without the commitment of a large cake. As a dessert, it’s obviously a no-brainer. A scoop of good vanilla bean ice cream melting into the warm cake is pure bliss. Sometimes, I’ll make two and share them with my partner after dinner. And for those cozy snack moments? This is the star. Curl up on the couch with a blanket, a good book, and this warm chocolate mug cake. It’s the ultimate comfort food, perfect on its own or with a side of berries for a touch of freshness.
Top Tips for Perfecting Your Chocolate Mug Cake
I’ve made this chocolate mug cake more times than I can count, and through trial and error, I’ve picked up a few tricks that make it consistently amazing. The key to a moist cake is often the moisture content. For this recipe, we don’t use zucchini, so we rely on the wet ingredients and precise cooking time. One thing I learned early on is the danger of overmixing. When you mix the wet and dry ingredients, just stir until they’re *barely* combined. A few tiny lumps in the batter are perfectly fine and actually better than a super smooth, overworked batter. Overmixing can lead to a tough, rubbery cake, and nobody wants that! When it comes to baking, microwaves vary wildly. My advice? Start with the lower end of the cooking time (60 seconds) and add 10-second increments as needed. You’re looking for the edges to be set and the center to still look slightly moist. It will continue to cook from residual heat. If you’re using add-ins like chocolate chips or peanut butter, resist the urge to stir them in too much. Just a gentle swirl for the peanut butter or letting the chips sink slightly is best for those delightful pockets. Ingredient swaps: I’ve found that most plant-based milks work beautifully, though sometimes dairy milk gives a slightly richer result. You can also swap the vegetable oil for melted butter for a slightly different flavor profile. For the cocoa powder, use unsweetened for the best chocolate flavor; sweetened cocoa will make your cake too sweet. And if you don’t have baking soda, you can try using baking powder, but you might need to adjust the amount slightly and it can affect the texture a bit.
Storing and Reheating Tips
Honestly, this chocolate mug cake is best enjoyed immediately, warm and fresh from the microwave. It’s designed for single servings and instant gratification! However, if you happen to have any leftovers (which is rare in my house!), you can store it. At room temperature, it will be fine for a few hours, but the texture can become a bit drier. For best results, refrigerate any leftovers in an airtight container or covered directly in the mug. It will keep in the refrigerator for about 1-2 days. When you’re ready to reheat, just pop the mug (if stored in it) or the cake on a plate back into the microwave for about 15-20 seconds. You just want to warm it through, not cook it further. Adding the glaze is definitely best done right before serving. If you’re storing it, I’d leave off the glaze and just add it after reheating for the best texture and appearance. I haven’t tried freezing it, as it’s so quick to make, but I imagine individual portions could be wrapped tightly and frozen for up to a month, then thawed in the fridge and reheated. Just be aware that freezing and reheating can sometimes alter the texture of baked goods, making them a bit denser.
Frequently Asked Questions
Final Thoughts
So there you have it – my absolute favorite chocolate mug cake recipe! It’s the perfect example of how you don’t need a lot of time or fancy ingredients to create something truly delicious and satisfying. It’s incredibly forgiving, so even if you’re new to baking, you’ll nail this one. I hope you give it a try the next time a chocolate craving strikes, or even just when you want a little moment of sweetness in your day. It’s the kind of recipe that makes you feel good about what you’re eating, and that’s always a win in my book. If you love this, you might also enjoy my single-serving brownie recipe or my quick and easy chocolate chip cookies – perfect for those moments when you need a little sweet treat! I can’t wait to hear how yours turns out, so please leave a comment below and let me know your favorite part, or any fun variations you tried. Happy baking, my friends!
Chocolate mug cake
Ingredients
Main Ingredients
- 4 tablespoons all-purpose flour
- 4 tablespoons granulated sugar
- 2 tablespoons unsweetened cocoa powder
- 0.25 teaspoon baking powder
- 0.125 teaspoon salt
- 3 tablespoons milk
- 3 tablespoons vegetable oil
- 0.25 teaspoon vanilla extract
- 1 tablespoon chocolate chips (optional)
Instructions
Preparation Steps
- In a large mug, whisk together the flour, sugar, cocoa powder, baking powder, and salt.
- Add the milk, oil, and vanilla extract to the mug. Stir until well combined and smooth.
- If desired, stir in the chocolate chips.
- Microwave on high for 60-75 seconds, or until the cake is cooked through.
- Let cool slightly before enjoying.