You know, there are some foods that just feel like a hug in a bowl, and for me, that’s a perfectly made bowl of classic hummus. It’s one of those things I can whip up almost on autopilot now, but the first time I truly mastered it, it felt like a culinary revelation. It’s not just about chickpeas and tahini, is it? It’s about that creamy, dreamy texture, that subtle tang, and that incredible versatility that makes it a lifesaver on busy weeknights or the star of any appetizer spread. I remember my mom making a version of this when I was little, and while hers was good, this one—oh, this one is something special. It’s that perfect balance, that smooth consistency that you just can’t get from a store-bought tub. If you’re looking for a truly authentic, incredibly satisfying classic hummus that tastes like it came from a favorite Mediterranean cafe, you’ve landed in the right spot. This is the one that my family devours, the one I bring to every potluck, and the one that always gets rave reviews. Get ready to ditch the pre-packaged stuff for good!
What is hummus?
So, what exactly are we talking about when we say “classic hummus”? At its heart, hummus is a delightful dip or spread that originated in the Middle East. Think of it as a lovingly blended concoction of cooked chickpeas, tahini (that glorious sesame paste), lemon juice, and garlic, all brought together with a touch of Olive oil and a pinch of salt. The name “hummus” itself is actually the Arabic word for chickpeas, which makes perfect sense when you taste it! It’s not just a simple dip; it’s a testament to how a few humble ingredients can create something so complex and satisfying. It’s essentially the bedrock of so many Middle Eastern meals, enjoyed with pita bread, fresh vegetables, or as part of a larger mezze platter. My version is all about achieving that super smooth, almost velvety texture that’s so addictive. It’s approachable, it’s comforting, and it’s incredibly good for you too, making it a win-win in my kitchen.
Why you’ll love this recipe?
Honestly, there are so many reasons why this classic hummus recipe has become my go-to, and I just know you’re going to fall in love with it too. First off, the flavor is just out of this world. We’re talking about a bright, zesty kick from the fresh lemon juice that perfectly balances the earthy notes of the chickpeas and the rich, slightly nutty undertones of good quality tahini. And the garlic? Just enough to give it a little punch without being overpowering. Then there’s the texture. Oh, the texture! It’s incredibly smooth and creamy, not grainy or thick like some versions can be. This recipe has a simplicity to it that I absolutely adore. You don’t need a fancy degree in culinary arts to make this. A good food processor is pretty much all you need, and the steps are so straightforward, you’ll be amazed at how easy it is. Plus, let’s talk about the budget-friendliness. Chickpeas, tahini, lemon, garlic – these are all pretty accessible and affordable ingredients, especially when you consider how much you’re making compared to buying it. What I love most, though, is its incredible versatility. You can serve this classic hummus as is, or you can get creative with toppings. It’s perfect with warm pita bread, crisp veggie sticks like carrots and cucumbers, or even as a spread on sandwiches and wraps. Compared to other dips like guacamole or Spinach Artichoke Dip, hummus has this wholesome, satisfying quality that makes it feel both indulgent and nourishing. It’s the kind of dish that makes you feel good, both while you’re making it and while you’re eating it. It’s truly a staple in my entertaining repertoire and my everyday snacking life!
How do I make Hummus?
Quick Overview
Making this classic hummus is surprisingly simple, and the results are miles beyond anything you’ll find on a grocery store shelf. The magic really happens in the blending stage, where we transform humble chickpeas into a luxurious, creamy dip. The key is in the preparation of the chickpeas and the quality of your tahini. You’ll be blending everything together until it’s incredibly smooth and then finishing it off with a drizzle of olive oil and maybe a sprinkle of paprika. It’s a process that takes minutes but yields a flavor and texture that will make you feel like a kitchen pro. Trust me, it’s so easy, you’ll wonder why you ever bought it before.
Ingredients
For the Main Batter:
2 cans (15 ounces each) chickpeas, drained and rinsed. For the smoothest hummus, I always recommend rinsing them really well to get rid of that “canned” taste. Some people swear by peeling the chickpeas, and while I’ve tried it, I’ll be honest, I usually skip this step for a classic hummus as the food processor does a great job! But if you want that ultra-silky texture, go for it! Make sure to reserve some of the liquid from the can, sometimes called aquafaba – this can be a lifesaver for achieving the perfect consistency.
1/2 cup tahini. This is crucial! Use a good quality tahini. Stir it well before measuring because the oil can separate. It should have a rich, creamy, and slightly nutty flavor. Don’t skimp here, as it really is the soul of the hummus.
1/4 cup fresh lemon juice. Freshly squeezed is non-negotiable for that bright, vibrant flavor. Start with this amount, and you can always add more to taste.
2 cloves garlic, minced. You can adjust this to your liking. I prefer a subtle garlic note, but if you’re a garlic lover, feel free to add a bit more. Roasting the garlic first can give a sweeter, milder flavor if raw garlic is too strong for you.
1/4 cup ice water. This is a little trick for achieving that super creamy texture. The cold water emulsifies with the tahini and chickpea mixture beautifully.
For Serving & Garnish:
Extra virgin olive oil, for drizzling. A good quality olive oil makes a difference in both flavor and presentation. Don’t be shy with the drizzle!
Smoked paprika, for dusting. This adds a lovely visual appeal and a subtle smoky flavor.
Fresh parsley or cilantro, chopped (optional). For a pop of color and freshness.
Pita bread or vegetable sticks, for serving. Always have something to scoop this deliciousness with!
Step-by-Step Instructions
Step 1: Preheat & Prep Pan
This step isn’t really about preheating a pan for hummus itself, but rather ensuring you have your serving dish ready and any accompaniments (like pita bread if you’re warming some) prepared. Gather all your ingredients so they’re within easy reach. This is how I get into my cooking groove – having everything prepped before I even turn on the food processor.
Step 2: Mix Dry Ingredients
In this case, our “dry” ingredients are really the prepped chickpeas and the minced garlic that will go into the food processor first. If you’re adding any dry spices at this stage (though for classic, we keep it simple), this is when they’d go in. The goal here is to get the garlic and chickpeas breaking down initially.
Step 3: Mix Wet Ingredients
In a separate bowl, or directly in your food processor bowl after a preliminary pulse, you’ll combine the tahini and lemon juice. Whisking them together first can sometimes help create a slightly lighter base for your hummus. This mixture will get thick and paste-like, which is exactly what you want.
Step 4: Combine
Add the tahini and lemon juice mixture to the food processor with the chickpeas and garlic. Start processing. This is where the magic happens! Let the food processor run for a good few minutes. You’ll want to scrape down the sides a few times to ensure everything is getting incorporated. Gradually add the ice water, a tablespoon at a time, while the processor is running, until you reach your desired creamy consistency. You’re looking for a super smooth, almost whipped texture. Don’t rush this part; the longer you process, the creamier it gets!
Step 5: Prepare Filling
For classic hummus, there isn’t a separate “filling.” The entire blended mixture is the star. If you were making a flavored hummus, this is where you’d incorporate things like roasted red peppers, sun-dried tomatoes, or herbs into the main mixture. For now, we’re keeping it pure and simple.
Step 6: Layer & Swirl
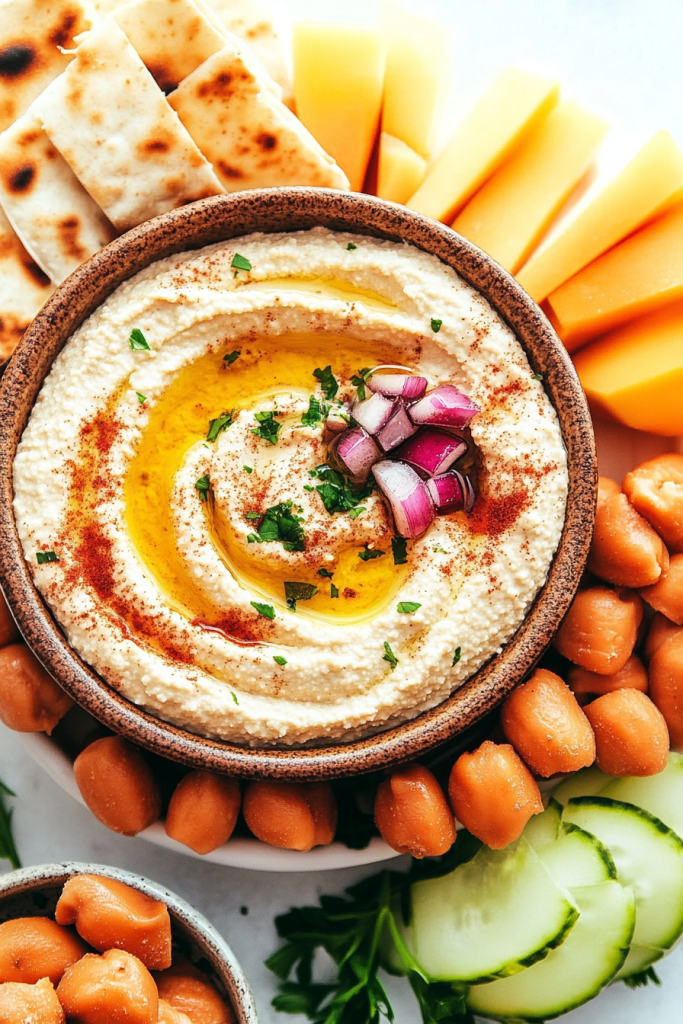
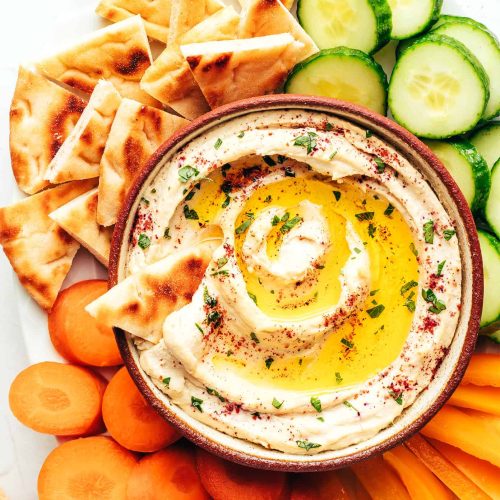
Transfer the hummus to a shallow serving bowl. Use the back of a spoon to create a slight swirl or well in the center. This is purely for presentation and creates a perfect little pool for your olive oil.
Step 7: Bake
Hummus is not baked! It’s a no-cook wonder. The “cooking” process is simply the blending and emulsifying of the ingredients. The only thing you might “bake” is pita bread to serve alongside it, but the hummus itself is enjoyed as is.
Step 8: Cool & Glaze
Hummus is best served at room temperature, or even slightly chilled. Once it’s in your serving bowl, drizzle generously with your best extra virgin olive oil. Then, sprinkle with smoked paprika and chopped fresh parsley or cilantro if you’re using them. The “glaze” here is essentially the olive oil and paprika topping.
Step 9: Slice & Serve
Serve your gorgeous classic hummus immediately with warm pita bread, your favorite crunchy vegetable sticks (carrots, celery, bell peppers, cucumbers are all fantastic!), or even as a spread in sandwiches and wraps. Enjoy the fruits of your labor!
What to Serve It With
Oh, the possibilities are endless when it comes to serving this divine classic hummus! It’s truly the chameleon of the appetizer world, fitting in perfectly wherever you put it. For a casual breakfast, I love a little dollop on a piece of toasted sourdough, maybe with a sprinkle of za’atar. It’s surprisingly satisfying and gives you a great energy boost. On a lazy Sunday morning, it’s perfect for a relaxed brunch spread. Imagine a beautiful platter with this hummus, some olives, feta cheese, fresh tomatoes, and crusty bread – it feels so elegant yet effortless. If you’re looking for a healthier dessert option (yes, dessert!), a small bowl of hummus with some fruit like berries or apple slices can be surprisingly satisfying and much lighter than a traditional sweet treat. And for those cozy snack times? This is a lifesaver. Instead of reaching for chips, I’ll whip up a quick batch, grab some carrot sticks and bell peppers, and I’ve got a guilt-free, incredibly tasty snack. My kids, who can be notoriously picky, absolutely devour it with pita chips. I’ve also made a big batch for movie nights, serving it alongside popcorn and other munchies. It’s that crowd-pleaser that appeals to almost everyone. My personal favorite way, though? Just a big spoonful straight from the bowl while I’m making dinner. Don’t judge!
Top Tips for Perfecting Your Classic Hummus
I’ve made this classic hummus more times than I can count, and over the years, I’ve picked up a few little tricks that I think make a big difference. First, let’s talk about the chickpeas. While using canned is super convenient (and my usual go-to!), if you have the time, cooking dried chickpeas until they are very tender can yield an even better result. If you’re using canned, make sure to drain and rinse them thoroughly. I often find myself rubbing the chickpeas between my hands to remove any loose skins – it’s a little tedious, but it seriously contributes to that super smooth texture that I crave. For the tahini, please, please use the good stuff! Stir it really well before you measure it out because the oil separates. A bitter or bland tahini will definitely impact the final flavor. And when you’re processing everything, be patient. Let that food processor run for at least 3-5 minutes, scraping down the sides as needed. The longer you blend, the creamier it gets. Don’t be afraid to add that ice water, a tablespoon at a time. It’s not just about thinning it out; it helps create a beautiful, airy, and smooth emulsion. I’ve learned that sometimes the amount of water needed can vary depending on the tahini and the chickpeas, so using your eyes and taste buds is key. For the garlic, I’ve found that if raw garlic is too potent for you, you can lightly roast a clove or two until softened before adding it. It imparts a lovely sweetness. When it comes to serving, don’t just dump it in a bowl. Create that little swirl with the back of your spoon and then go to town with the olive oil and a good sprinkle of smoked paprika. It makes it look so much more appealing and adds another layer of flavor. If you find your hummus is a little too thick, don’t panic! Just add a tiny bit more ice water or even a splash of aquafaba (the liquid from the chickpea can) and process again until smooth. Conversely, if it’s too thin, you can add a few more chickpeas or a little more tahini.
Storing and Reheating Tips
One of the best things about making a big batch of classic hummus is how well it keeps, making it perfect for meal prep or having on hand for spontaneous snacking. If you’ve got leftover hummus, the best way to store it is in an airtight container in the refrigerator. It’ll stay fresh and delicious for about 3 to 5 days. I like to press a piece of plastic wrap directly onto the surface of the hummus before putting the lid on. This helps prevent a skin from forming and keeps it from drying out. When it comes to reheating, you don’t actually “reheat” hummus in the traditional sense, as it’s meant to be served cool or at room temperature. If it’s been in the fridge for a while and has firmed up a bit, you can just let it sit out on the counter for about 15-20 minutes to come back to a softer, more spreadable consistency. Sometimes, if it seems a little too stiff, a tiny drizzle of olive oil and a quick stir can revive it beautifully. I’ve never tried freezing hummus myself, mostly because it’s so easy to whip up a fresh batch when I need it, and I find the texture can sometimes change after thawing. But if you were to try it, I’d recommend freezing it in smaller portions in freezer-safe containers or bags. Thaw it slowly in the refrigerator overnight, and then give it a good stir or a quick pulse in the food processor with a little extra olive oil or water to get that smooth texture back. For the olive oil and paprika garnish, I always recommend adding that just before serving, rather than storing it with the hummus, to keep it looking and tasting its freshest.
Frequently Asked Questions
Final Thoughts
So there you have it, my friends! This classic hummus recipe is more than just a dip; it’s a little bit of magic in a bowl. It’s proof that with just a few simple, wholesome ingredients, you can create something truly spectacular. I hope you’ll give it a try and experience that incredible creamy texture and vibrant flavor for yourself. It’s the kind of recipe that makes you feel good about what you’re eating, and it’s so satisfying to know you made it from scratch. If you’re a fan of Mediterranean flavors, you might also want to check out my recipe for [link to another relevant recipe, e.g., baba ghanoush or a Greek salad]. They complement each other beautifully! I can’t wait to hear how yours turns out – please leave a comment below and tell me what you think, or share your own favorite hummus toppings! Happy blending!
Classic Hummus
Ingredients
Main Ingredients
- 1.5 cup dried chickpeas
- 0.25 cup tahini
- 0.25 cup lemon juice Freshly squeezed
- 0.25 cup ice water
- 1 clove garlic minced
- 0.5 teaspoon ground cumin
- 0.0625 teaspoon salt
- 0.0625 teaspoon black pepper
- 2 tablespoons olive oil for serving
- 0.5 teaspoon smoked paprika for serving
Instructions
Preparation Steps
- Soak the chickpeas in water overnight. Drain and rinse.
- Cook the chickpeas until very tender. You can do this on the stovetop or in a pressure cooker.
- In a food processor, combine the cooked chickpeas, tahini, lemon juice, ice water, garlic, cumin, salt, and pepper.
- Process until smooth and creamy, adding more ice water if needed.
- Transfer to a serving bowl. Drizzle with olive oil and sprinkle with smoked paprika.
- Serve with pita bread and vegetables.


