Oh, this recipe. This coconut oil Pumpkin Bread Recipe has a special place in my heart, and let me tell you, it’s a lifesaver. It’s one of those things I pull out when the autumn air starts to get that crisp edge, or even when I just need a little bit of cozy comfort on a chilly evening. My kids, bless their hearts, practically beg for it. Seriously, the moment they smell that warm spice wafting from the oven, they’re hovering. It reminds me so much of my grandmother’s kitchen – that comforting aroma of cinnamon, nutmeg, and something sweet baking. This isn’t just any quick bread, though. It’s incredibly moist, bursting with flavor, and uses coconut oil, which gives it this subtle, delightful richness that butter just can’t quite replicate. If you love pumpkin muffins, imagine those flavors and textures elevated into a sliceable loaf that’s perfect for sharing… or not sharing, I won’t judge!
What is coconut oil pumpkin bread?
So, what exactly is this magical thing we call coconut oil pumpkin bread? At its core, it’s a quick bread, which means it’s super easy to whip up because it doesn’t require any yeast or complicated rising times. Think of it as a more sophisticated, incredibly delicious cousin to your everyday Banana Bread, but with all the cozy, warm flavors of fall. The “coconut oil” part is key here – it replaces the traditional butter or vegetable oil and adds a distinct, lovely aroma and a wonderfully tender crumb. And of course, the “pumpkin” brings that signature earthy sweetness and vibrant color. It’s essentially a fluffy, spiced cake baked in a loaf pan, often with a swirl of something extra delicious (more on that later!). It’s the kind of treat that feels special enough for guests but is so ridiculously simple to make, you’ll find yourself baking it for Tuesday mornings.
Why you’ll love this
Honestly, there are so many reasons this coconut oil pumpkin bread is my go-to. For starters, the flavor is just out of this world. You get that wonderful sweetness from the pumpkin, perfectly balanced with warm spices like cinnamon, nutmeg, and a hint of cloves. The coconut oil doesn’t overpower anything; instead, it lends a subtle, nutty depth and an incredible tenderness to the crumb that’s just divine. And let’s talk about texture: this bread is unbelievably moist. I’ve tried other pumpkin bread recipes, and sometimes they can turn out a little dry or dense, but this one? It’s consistently perfect. Plus, it’s surprisingly simple to make. I’m talking minimal fuss, one-bowl-ish action, and no fancy techniques required. Even if you’re not a seasoned baker, you can absolutely nail this. It’s also quite cost-effective, using pantry staples and that wonderful pumpkin puree. What I love most about this is its versatility. It’s fantastic on its own, but it’s also a perfect canvas for a tangy Cream Cheese Frosting or a simple powdered sugar glaze. If you’re looking for a dessert that feels comforting and homemade without demanding hours in the kitchen, this is your answer. It’s also a great way to use up that can of pumpkin puree that’s been lurking in your pantry!
How do I make coconut oil pumpkin bread
Quick Overview
This recipe is all about simplicity and deliciousness. We’ll start by whisking together our dry ingredients, then combine the wet ingredients (including that luscious coconut oil and pumpkin puree), and finally, gently bring them together. The magic happens when we swirl in a simple, sweet filling for extra flavor and visual appeal. Bake until a toothpick comes out clean, then let it cool just enough before glazing. It’s genuinely that straightforward – I promise!
Ingredients
For the Main Batter:
- 2 cups all-purpose flour: I usually use unbleached all-purpose flour, but I’ve also had great success with a good quality white whole wheat.
- 1 teaspoon baking soda: This is what gives our bread that lovely rise. Make sure it’s fresh!
- 1/2 teaspoon baking powder: Works with the soda for extra lift.
- 1 teaspoon ground cinnamon: The star of our fall spice show!
- 1/2 teaspoon ground nutmeg: Adds that warm, cozy depth.
- 1/4 teaspoon ground cloves: Just a pinch adds so much!
- 1/2 teaspoon salt: Balances all the sweetness.
- 1 1/2 cups granulated sugar: You can reduce this slightly if you prefer a less sweet bread, but I find this amount perfect.
- 1 cup pumpkin puree: Make sure it’s pure pumpkin, not pumpkin pie filling, which already has spices and sugar.
- 1/2 cup melted coconut oil: Use refined if you don’t want any coconut flavor, or unrefined for a hint of it!
- 2 large eggs: At room temperature if you can, it helps them incorporate better.
- 1/4 cup milk (any kind works!): I often use whole milk or even unsweetened almond milk.
- 1 teaspoon vanilla extract: For that extra layer of flavor.
For the Filling:
- 1/2 cup packed light brown sugar: This adds a lovely caramel note.
- 2 tablespoons all-purpose flour: To thicken it up a bit.
- 1 teaspoon ground cinnamon: More spice for our swirl!
For the Glaze:
- 1 cup powdered sugar: Sifted for a smooth finish.
- 2-3 tablespoons milk (or lemon juice for a tangy twist!): Start with 2 and add more until you reach your desired consistency.
- 1/2 teaspoon vanilla extract (optional): If you want a hint of vanilla in the glaze.
Step-by-Step Instructions
Step 1: Preheat & Prep Pan
First things first, let’s get your oven preheated to 350°F (175°C). Then, grab a standard 9×5 inch loaf pan. Grease it really well with either some extra coconut oil or butter, and then dust it with a little flour. Tapping out the excess flour will prevent those white streaks on your beautiful loaf. I usually line the bottom with parchment paper too, leaving a little overhang on the sides – this makes lifting the bread out a breeze once it’s baked!
Step 2: Mix Dry Ingredients
Grab a large mixing bowl. In it, whisk together the flour, baking soda, baking powder, cinnamon, nutmeg, cloves, and salt. Give it a good whisk until everything is evenly distributed. This ensures that your leavening agents and spices are mixed throughout the batter, so you don’t get any pockets of too much spice or not enough rise. I always give this a good 30 seconds of whisking just to be sure.
Step 3: Mix Wet Ingredients
In a separate, medium-sized bowl, whisk together the granulated sugar, pumpkin puree, melted (but not hot!) coconut oil, eggs, milk, and vanilla extract. Whisk until everything is well combined and smooth. You want to make sure the eggs are fully incorporated and there are no streaks of yolk. The mixture will be quite liquidy and a beautiful orange color!
Step 4: Combine
Now, pour the wet ingredients into the bowl with the dry ingredients. Using a spatula or a wooden spoon, gently fold everything together until *just* combined. It’s really important not to overmix here. A few lumps are perfectly fine! Overmixing can develop the gluten in the flour too much, resulting in a tough, dense bread, and we definitely don’t want that. Stop mixing as soon as you don’t see any more dry flour streaks.
Step 5: Prepare Filling
In a small bowl, mix together the Brown Sugar, flour, and cinnamon for the filling. Stir it with a fork until it looks like damp sand. This is going to create those delightful pockets of spiced sweetness throughout your bread.
Step 6: Layer & Swirl
Pour about half of the pumpkin batter into your prepared loaf pan. Sprinkle half of the Brown Sugar filling mixture evenly over the top. Then, pour the remaining batter on top, followed by the rest of the filling mixture. Now, for the fun part! Take a butter knife or a skewer and gently swirl it through the batter, creating ribbons of the brown sugar filling. Don’t over-swirl, just a few passes will do the trick to create those beautiful marble effects.
Step 7: Bake
Place the loaf pan in your preheated oven. Bake for 50-65 minutes. The exact time will depend on your oven. You’ll know it’s done when a wooden skewer or toothpick inserted into the center comes out clean, with maybe a few moist crumbs attached but no wet batter. If the top starts browning too quickly, you can loosely tent it with aluminum foil for the last 15-20 minutes of baking.
Step 8: Cool & Glaze
Once it’s baked, carefully remove the loaf pan from the oven. Let it cool in the pan for about 10-15 minutes. This is important for the bread to set properly. Then, use the parchment paper overhang (if you used it!) to lift the loaf out and place it on a wire rack to cool completely. While it’s cooling, whisk together the powdered sugar, 2 tablespoons of milk, and vanilla extract (if using) for the glaze. Add more milk, a teaspoon at a time, until it’s drizzly but not too thin. Once the bread is completely cool, drizzle the glaze over the top. Let the glaze set for about 15-20 minutes before slicing.
Step 9: Slice & Serve
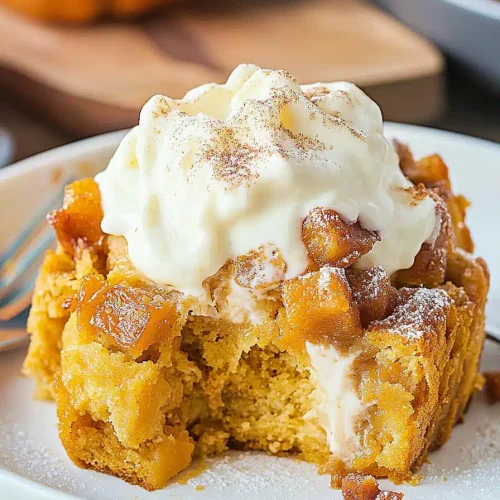
Once the glaze has set, you can slice into your gorgeous coconut oil pumpkin bread! I usually use a serrated knife for the cleanest cuts. Serve it at room temperature for the best flavor and texture. It’s wonderful on its own, but even better with a cup of coffee or tea. Enjoy!
What to Serve It With
This coconut oil pumpkin bread is incredibly versatile, and I love how it fits into so many different parts of my day! For breakfast, it’s absolute perfection alongside a hot mug of coffee – I love the contrast of the warm spice with a dark roast. It’s a step up from my usual toast, but still quick and easy for those rushed mornings. For a more leisurely brunch, I’ll often serve thick slices alongside some scrambled eggs, crispy bacon, and maybe a fruit salad. It adds a lovely sweetness and a beautiful pop of fall color to the table. If you’re looking for a simple dessert, it’s fantastic on its own, but you can elevate it with a dollop of whipped cream or a small scoop of vanilla bean ice cream. For those times when you’re just craving something sweet and comforting in the afternoon or late evening, it’s the perfect cozy snack. My family loves it with a glass of cold milk. I’ve even found that a thin spread of cream cheese on a warm slice is heavenly!
Top Tips for Perfecting Your Coconut Oil Pumpkin Bread
Over the years of making this coconut oil pumpkin bread (and let me tell you, it’s been *many* years and many loaves!), I’ve picked up a few tricks that I swear by. For starters, make sure your pumpkin puree is well-drained if it seems particularly watery. Sometimes, the cans can have a lot of liquid, and too much moisture can make the bread gummy. I usually give it a quick whisk in a fine-mesh sieve if I’m unsure. When mixing the wet and dry ingredients, the absolute biggest tip I can give you is: do NOT overmix. Seriously, stop as soon as you don’t see any dry flour. A few lumps are a sign of a tender crumb! For that beautiful swirl effect, don’t go overboard. Just a few gentle passes with a knife or skewer are enough to create lovely ribbons. If you swirl too much, you can end up blending the filling into the batter, losing that distinct swirl. When it comes to ingredient swaps, I’ve experimented quite a bit. If you don’t have coconut oil, good quality melted butter (cooled slightly) works well, but it will change the subtle flavor profile a bit. For the spices, feel free to adjust to your liking. Some people add a pinch of ground ginger or allspice. And if you want an extra bit of crunch or chew, I’ve added a handful of chopped pecans or walnuts to the batter, or even some chocolate chips – they are divine! Baking is always a bit of an art, so always trust the toothpick test. Every oven is different, so start checking around the 50-minute mark. If the top is browning too fast, a loose tent of foil is your best friend. For the glaze, consistency is key. Too thick and it’s hard to drizzle; too thin and it’ll just run off. Aim for something pourable but not watery. And remember, practice makes perfect. Each time you make it, you’ll get a better feel for the batter and the baking process!
Storing and Reheating Tips
Proper storage is key to keeping this coconut oil pumpkin bread tasting fresh and delicious. If you plan to eat it within a couple of days, storing it at room temperature is perfectly fine. Make sure it’s completely cooled, then wrap it tightly in plastic wrap or place it in an airtight container. It should stay wonderfully moist for about 3-4 days. If you think you won’t get through the whole loaf that quickly, or if your kitchen tends to be warm, the refrigerator is your best bet. Again, cool completely, then wrap it well in plastic wrap, and then place it in an airtight container or a zip-top bag. It will keep well in the fridge for up to a week, though I find the texture is best within the first 5 days. If you’re a serious planner or just want to have some on hand for whenever a craving strikes, this bread freezes beautifully! Once completely cool, wrap it very snugly in a layer of plastic wrap, followed by a layer of aluminum foil, or place it in a heavy-duty freezer bag, pressing out as much air as possible. It can be stored in the freezer for up to 3 months. To thaw, simply unwrap it and let it come to room temperature on the counter for a few hours. If you’ve already glazed it, the glaze might soften a bit upon thawing, which is perfectly fine. For reheating, I love to lightly toast a slice in the toaster oven or a regular toaster for just a minute or two. It warms it up and brings back that fresh-baked aroma and slightly crisp texture. If you’ve frozen it and thawed it, a few minutes in a warm oven (around 300°F or 150°C) can help revive its texture, especially if it feels a bit dense from thawing. For the glaze, I usually wait to add it after the bread has completely cooled, and if I’m storing it in the fridge or freezer, I’ll often glaze it just before serving if it’s room temperature, or let the glaze set up after it’s thawed and warmed.
Frequently Asked Questions
Final Thoughts
So there you have it – my absolute favorite coconut oil pumpkin bread recipe! I really hope you give it a try. It’s more than just a recipe to me; it’s a little piece of comfort and warmth that I love sharing. It’s proof that you can create something truly special and incredibly delicious with simple ingredients and just a little bit of love. The moist crumb, the perfect blend of spices, and that subtle coconut oil richness really make it stand out. If you enjoy this, you might also love my Spiced Apple Crumble Muffins or my Easy Chocolate Chip Banana Bread for more cozy baking inspiration. I can’t wait to hear how your coconut oil pumpkin bread turns out! Let me know in the comments below if you tried it, what variations you made, or any fun family memories it brings up for you. Happy baking, everyone!
Coconut Oil Pumpkin Bread
Ingredients
Main Ingredients
- 1.75 cup All-purpose flour
- 1 teaspoon Baking soda
- 1 teaspoon Ground cinnamon
- 0.5 teaspoon Ground ginger
- 0.25 teaspoon Ground cloves
- 0.5 teaspoon Salt
- 1.75 cup Granulated sugar
- 1 cup Pumpkin puree
- 0.5 cup Coconut oil, melted
- 2 large Eggs
- 0.5 cup Water
Instructions
Preparation Steps
- Preheat oven to 350°F (175°C). Grease and flour a 9x5 inch loaf pan.
- In a large bowl, whisk together flour, baking soda, cinnamon, ginger, cloves, and salt.
- In a separate bowl, whisk together sugar, pumpkin puree, coconut oil, and eggs.
- Add the wet ingredients to the dry ingredients and mix until just combined. Stir in water.
- Pour batter into prepared loaf pan and bake for 50-60 minutes, or until a toothpick inserted into the center comes out clean.
- Let cool in pan for 10 minutes before transferring to a wire rack to cool completely.