You know those recipes that just… make people happy? The ones that disappear from the plate faster than you can say “second helping”? Well, this Cracked Out Cheese Ball is absolutely one of them. I remember the first time I made it for a neighborhood potluck. I was a little nervous, honestly. It wasn’t a super fancy dish, but it had this irresistible, almost addictive quality that I just couldn’t get enough of. By the end of the night, people were practically licking the serving bowl clean, and I had at least three different friends begging me for the recipe. It’s funny, because it’s really not complicated at all, but the flavor payoff is HUGE. It’s got this fantastic salty, savory goodness with just the right amount of crunch, and it’s so much more interesting than your average cheese ball. If you’ve ever loved those “cracked out” chicken or potato recipes with all those delicious, savory add-ins, you’re going to be obsessed with this cheese ball. It’s truly a lifesaver for parties, game nights, or honestly, just a Tuesday when you need a little something special.
What is a Cracked Out Cheese Ball?
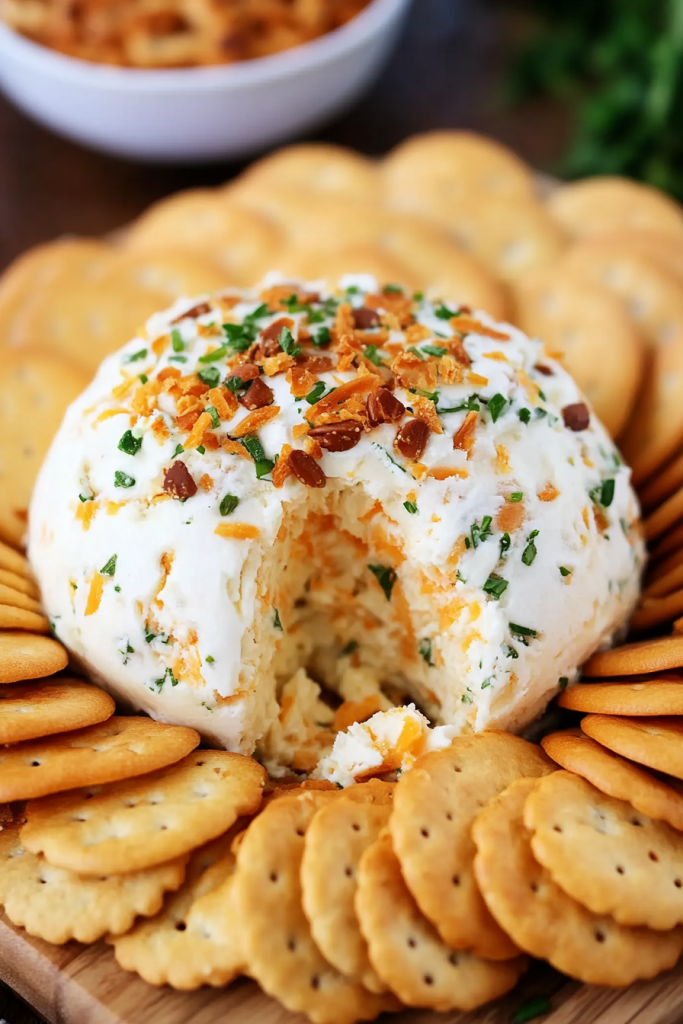
So, what exactly is this magical Cracked Out Cheese Ball? Think of it as all your favorite savory, craveable flavors all rolled into one irresistible bite. The “cracked out” name comes from that incredible combination of ingredients that just works so perfectly together – a little bit of everything you love! It’s essentially a rich, creamy cheese base, loaded with goodies like crispy bacon, sharp cheddar cheese, and those amazing little ranch seasoning packets that just make everything better. We then roll it in even more deliciousness, giving it that satisfying crunch and extra burst of flavor in every single bite. It’s not just a cheese ball; it’s an experience! It’s the kind of appetizer that doesn’t just sit on the table; it becomes the star of the show. It’s what happens when comfort food meets party perfection, and I’m so excited for you to try it.
Why you’ll love this recipe?
Honestly, where do I even begin with why this Cracked Out Cheese Ball is my go-to? First off, the FLAVOR. Oh. My. Goodness. It’s this perfect harmony of salty, smoky bacon, sharp, tangy cheddar, and that unmistakable savory kick from the ranch seasoning. It’s complex enough to be interesting but so familiar and comforting that everyone just devours it. Then there’s the SIMPLICITY. I’m not kidding when I say this comes together in a matter of minutes. You don’t need any fancy equipment or complicated techniques. It’s the kind of recipe I can whip up even when I’m already juggling a million other things. It’s incredibly COST-EFFECTIVE too! All the ingredients are readily available at your local grocery store and they don’t break the bank. You get so much flavor and so much “wow” factor for such a small investment. And VERSATILITY? This cheese ball is a chameleon! It’s perfect for holiday parties, Super Bowl gatherings, casual get-togethers, or even just a cozy night in with a good movie. You can serve it with a variety of dippers, and it always shines. What I love most about this is that it’s completely foolproof. Even if you’re new to making appetizers, you’re going to nail this one. It’s that reliable, that delicious, and that crowd-pleasing. It’s definitely one of my favorite recipes to share because I know it’s going to be a guaranteed hit, just like my
or my
What are some easy bruschetta recipes?
.
How to Make Cracked Out Cheese Ball
Quick Overview
Making this Cracked Out Cheese Ball is a breeze! It’s all about combining a few key ingredients, chilling it until firm, and then giving it that signature crunchy coating. You’ll mix your creamy base, fold in the delicious “cracked out” mix-ins, shape it into a ball, and then roll it in the exterior coating. The chilling step is important for shaping, and the coating is where all the magic happens for that perfect texture and flavor. It’s so straightforward, I promise!
Ingredients
For the Main Batter:
2 blocks (8 ounces each) Cream Cheese, softened: Make sure this is good quality, full-fat cream cheese. It’s the backbone of our cheese ball, so don’t skimp! Softened means it should be spreadable, not melted. I usually leave mine on the counter for about an hour before I start.
1/2 cup finely chopped cooked bacon: Crispy is key here! I like to cook my bacon until it’s really crunchy so it adds a great texture. You can use pre-cooked bacon bits in a pinch, but fresh is always best.
1/4 cup shredded sharp cheddar cheese: I prefer sharp cheddar for its bold flavor, but a medium cheddar works too. Make sure it’s shredded, not pre-shredded if you can help it, as pre-shredded often has anti-caking agents that can affect texture.
2 tablespoons chopped fresh chives: These add a delicate oniony freshness and a beautiful pop of green color. If you don’t have fresh chives, you can use the green parts of a scallion.
1 tablespoon dry ranch seasoning mix: This is where that “cracked out” flavor really comes in! You can usually find these little packets in the salad dressing aisle.
For the Filling:
1/4 cup more finely chopped cooked bacon: Yes, more bacon! We want that flavor infused throughout.
1/4 cup more shredded sharp cheddar cheese: For those little pockets of cheesy goodness inside.
2 tablespoons more chopped fresh chives: For freshness and visual appeal within the ball.
For the Glaze:
1/2 cup finely chopped cooked bacon: This is for the outer coating, so we want plenty of that smoky crunch.
1/2 cup shredded sharp cheddar cheese: Again, for flavor and visual appeal on the outside.
1/4 cup chopped pecans or walnuts (optional): If you like a little nutty crunch, this is a fantastic addition to the coating. I sometimes skip this if I’m in a rush, but it’s lovely when I have the time.
2 tablespoons more chopped fresh chives: For that finishing touch of green.
Step-by-Step Instructions
Step 1: Preheat & Prep Pan
You don’t actually need to preheat an oven for this part, but what you *do* need is a clean mixing bowl and some plastic wrap. Make sure your Cream Cheese is nicely softened. This is crucial for getting a smooth, lump-free base. If it’s too cold, it will be difficult to mix properly.
Step 2: Mix Dry Ingredients
This step is more about combining your flavor boosters. In a small bowl, gently toss together the extra bacon, cheddar cheese, and chives that are designated for the *inside* of the cheese ball. This ensures they’re evenly distributed before we mix them into the Cream Cheese.
Step 3: Mix Wet Ingredients
In your large mixing bowl, add the softened cream cheese. Use a sturdy spoon or an electric mixer (if you prefer) to beat the cream cheese until it’s completely smooth and creamy. This is your base, so you want it to be as luscious as possible. Stir in the dry ranch seasoning mix until it’s well incorporated.
Step 4: Combine
Now, it’s time to bring it all together! Gently fold the internal filling mixture (the bacon, cheddar, and chives from Step 2) into the cream cheese mixture. Don’t overmix; you want to see little pockets of cheese and bacon throughout. This creates wonderful bursts of flavor in every bite.
Step 5: Prepare Filling
Wait, didn’t we just do this? Yes! This step is actually about preparing the *outer coating*. In a shallow dish or on a plate, combine the ingredients for the glaze: the finely chopped bacon, shredded cheddar cheese, optional nuts, and chives. Mix them all together thoroughly. This is what your cheese ball will be rolled in, so make sure it’s well combined and ready to go.
Step 6: Layer & Swirl
This is where we shape the cheese ball! Take your cream cheese mixture and, using your hands (you might want to lightly grease them or wear gloves for easier handling), form it into a round ball. Be gentle but firm, pressing it together so it holds its shape. Once you have your ball, carefully roll it in the prepared outer coating mixture, pressing gently to help it adhere. Make sure it’s evenly coated on all sides.
Step 7: Bake
This recipe actually doesn’t require baking! The magic comes from the refrigeration to set the cheese ball and then the delicious coating. So, once it’s rolled, we’re heading to the fridge.
Step 8: Cool & Glaze
Place the coated cheese ball on a plate or serving platter and cover it loosely with plastic wrap. Refrigerate for at least 1 hour, or until firm. This is essential for it to hold its shape when served and for the coating to adhere properly. You can also make this a day ahead and keep it chilled.
Step 9: Slice & Serve
Once chilled and firm, your Cracked Out Cheese Ball is ready to be devoured! Serve it with your favorite crackers, baguette slices, pretzels, or even vegetable sticks. You can use a cheese knife or a small spatula to scoop and serve. It’s best served chilled but not ice-cold, so let it sit out for about 10-15 minutes before serving if it’s been in the fridge for a while.
What to Serve It With
Oh, the possibilities are endless when it comes to serving this glorious Cracked Out Cheese Ball! For a simple BREAKFAST indulgence, I love to pair it with some toasted sourdough bread or even some hearty whole-wheat crackers. It’s surprisingly satisfying! For a more elegant BRUNCH spread, I like to arrange it on a nice wooden board with an assortment of artisan crackers, some fresh fruit like grapes or berries for a sweet contrast, and maybe a side of sliced charcuterie. It adds a savory punch to the whole affair. As a decadent DESSERT, believe it or not, it can work! Especially with some slightly sweeter crackers or even alongside some chocolate-covered pretzels. It’s unexpected but works beautifully if you’re going for a savory-sweet theme. And for those COZY SNACKS or casual gatherings, it’s all about comfort. I always have a big bowl of potato chips (kettle-cooked are my favorite!), pretzels, and some sturdy crackers nearby. My family also loves using it as a dip for little mini bell peppers – so refreshing! My kids, in particular, love anything they can scoop with, so tortilla chips are always a big hit.
Top Tips for Perfecting Your Cracked Out Cheese Ball
After making this Cracked Out Cheese Ball countless times, I’ve picked up a few tricks that really make a difference. First, for the BACON PREP: always cook your bacon until it’s really crispy. Soggy bacon just won’t give you that satisfying crunch. I like to lay it out on paper towels after cooking to absorb as much grease as possible before chopping. For MIXING ADVICE, the key is not to overwork the cream cheese. Beat it until it’s smooth, but once you add the other ingredients, gentle folding is best. You want those little pockets of flavor and texture, not a homogenous paste. For SWIRL CUSTOMIZATION, while this isn’t a swirled recipe, the distribution of the internal ingredients is key to flavor in every bite. Make sure they’re well distributed throughout the cream cheese mixture. For INGREDIENT SWAPS, if you’re not a fan of bacon, smoked ham bits can be a good substitute, though the flavor profile will be different. For cheese, a sharp white cheddar is a great alternative to the orange. For the ranch seasoning, you can experiment with other dry soup mixes like a vegetable or onion soup mix, but ranch is truly king here! For BAKING TIPS, remember, this isn’t baked! The key is proper chilling. Don’t rush this step. Make sure it’s firm before you roll it in the coating. OVEN VARIATIONS don’t apply here, but ensure your refrigerator is at a good temperature to set the ball. For GLAZE VARIATIONS, feel free to add a pinch of garlic powder or a tiny bit of smoked paprika to the coating for an extra layer of flavor. I’ve also seen people add a sprinkle of finely chopped parsley for more color, which is lovely. I learned this trick after years of making it: if your cheese ball is looking a bit too soft to handle for coating, just pop it back in the freezer for 10-15 minutes. It makes it much easier to roll without sticking to your hands too much.
Storing and Reheating Tips
Storing this delicious Cracked Out Cheese Ball is pretty straightforward, and luckily, it holds up well! If you happen to have any leftovers (which is rare in my house!), you can keep it covered tightly with plastic wrap at ROOM TEMPERATURE for no more than 2 hours. After that, it’s best to refrigerate it. For REFRIGERATOR STORAGE, once it’s chilled and firm, keep it well-covered with plastic wrap or in an airtight container. It should stay fresh and delicious for about 3-4 days. The flavors actually meld even more, which is a nice bonus! I haven’t personally tried FREEZER INSTRUCTIONS for this cheese ball because it’s usually gone so quickly, but if you wanted to try, I’d recommend shaping and coating it, then freezing it *before* the initial chill. Wrap it tightly in plastic wrap, then in foil, and freeze for up to a month. Thaw it overnight in the refrigerator, and then let it sit at room temperature for about 15-20 minutes before serving. For GLAZE TIMING ADVICE, I always recommend applying the outer coating *just before* serving if possible, especially if you’re planning on refrigerating for a longer period, as the coating can sometimes soften slightly. However, if you’re making it ahead, coating it and then chilling it is perfectly fine and usually works out great!
Frequently Asked Questions
Final Thoughts
So there you have it – my absolute favorite Cracked Out Cheese Ball recipe! I truly hope you give this one a try. It’s more than just an appetizer; it’s a little bundle of joy that brings people together. The combination of creamy, cheesy, savory, and crunchy is just pure perfection, and the fact that it’s so easy to make makes it a winner every single time. It’s the kind of recipe that becomes a legend in your own kitchen, the one everyone asks for again and again. If you love this one, you might also enjoy my
or my
for more appetizer inspiration! I can’t wait to hear how your Cracked Out Cheese Ball turns out! Please leave a comment below and let me know your favorite way to serve it, or any fun variations you try. Happy snacking!
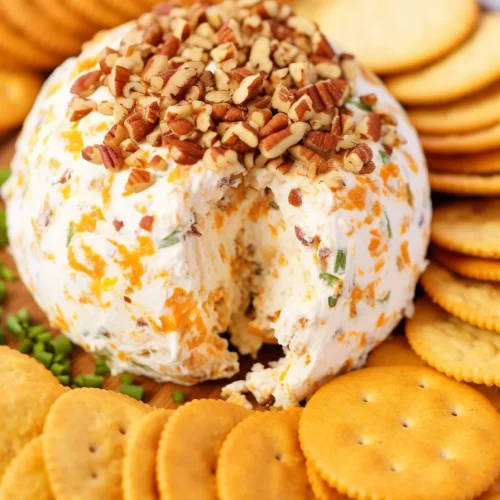
Cracked Out Cheese Ball
Ingredients
Main Ingredients
- 8 oz Cream Cheese
- 2 cups Sharp Cheddar Cheese, shredded
- 1 cup Bacon, cooked and crumbled
- 0.5 cup Green Onions, chopped
- 1 tsp Ranch Seasoning Mix
- 0.5 cup Chopped pecans, for coating
Instructions
Preparation Steps
- In a large bowl, beat the cream cheese until smooth.
- Add the cheddar cheese, bacon, green onions, and ranch seasoning mix. Mix well.
- Shape the mixture into a ball and roll in chopped pecans.
- Wrap the cheese ball in plastic wrap and refrigerate for at least 2 hours, or up to overnight, to allow flavors to meld.
- Serve with crackers, vegetables, or your favorite dippers.


