There are some dishes that just *feel* like home, aren’t there? For me, this Air Fryer Chicken recipe is one of those magical things. It’s not just about the crispy skin and incredibly juicy interior (though, oh my goodness, it has those in spades!), it’s about the feeling it brings. I remember the first time I pulled these golden-brown beauties out of the air fryer basket – the aroma that filled my kitchen was pure happiness. My kids, who can be notoriously picky, took one bite and their eyes lit up. “Mom, what *is* this?” they asked, already reaching for seconds. It’s become our weeknight lifesaver, the answer to the dreaded “What’s for dinner?” question when I’m running on fumes but still want to serve something truly special. It’s so much simpler than traditional fried chicken, and honestly, I think it’s even tastier. Think of it as your secret weapon for weeknight dinners that taste like a weekend feast.
What is an air fry chicken?
So, what exactly *is* this Air Fryer Chicken that’s taken over my kitchen? At its heart, it’s simply chicken pieces – think thighs, drumsticks, or even breasts – that are seasoned and cooked in an air fryer. The air fryer is this amazing appliance that circulates hot air around your food at high speed, creating a super-crispy exterior without needing to submerge anything in oil. It’s kind of like a super-powered convection oven, but more compact and, dare I say, more magical for achieving that perfect crunch. This isn’t just “baked chicken” trying to pretend it’s fried; this is a whole new level of crispy, juicy perfection, achieved with minimal fuss and way less mess. It’s essentially a shortcut to that delightful fried chicken experience, made healthier and incredibly easy for even the busiest of days.
Why you’ll love this recipe?
What are some of the best ways to fall head over heels for this Air Fryer Chicken?flavor. Oh, the flavor! It’s perfectly seasoned, with a savory, slightly smoky depth that just sings. Every bite is a delightful contrast – that shatteringly crisp skin giving way to unbelievably tender and juicy meat. It’s the kind of flavor that makes you close your eyes and savor it. Then there’s the simplicity. Seriously, this is so easy. You toss the chicken in a simple spice rub, pop it in the air fryer, and let it do its magic. No standing over a hot stovetop for hours, no greasy splatter. It’s a game-changer for busy weeknights. And let’s talk Cost-efficiency: What is the best way to measure cost-efficiency?. Chicken pieces are usually pretty budget-friendly, and since you’re not deep-frying, you’re saving on oil and energy costs too. It’s a win for your wallet and your taste buds! What I love most about this is its sheer versatility. You can serve it with pretty much anything – mashed potatoes, a fresh salad, roasted veggies, or even just some plain rice. It’s a staple in my rotation because it always feels like a treat, even on a Tuesday night. It’s definitely earned its place as one of my all-time favorite chicken recipes, right up there with my mom’s classic roasted chicken, but with a fun, modern twist!
How to Make Air Fryer Chicken
Quick Overview
Making this Air Fryer Chicken is ridiculously simple. You’ll start by tossing your chicken pieces in a flavorful spice blend, ensuring each piece is coated evenly. Then, you’ll arrange them in your air fryer basket, making sure not to overcrowd. The magic happens as the air fryer circulates hot air, cooking the chicken to crispy perfection in about 20-25 minutes, depending on the size of your pieces. It’s a hands-off approach to incredible flavor and texture. What makes this method so special is how consistently you get that perfect crunch, something that can be tricky to achieve otherwise. You’ll be amazed at how quickly you go from raw chicken to a plate full of deliciousness!
Ingredients
For the Chicken:
2-3 lbs bone-in, skin-on chicken thighs or drumsticks (about 6-8 pieces)
1 tablespoon olive oil
1 teaspoon paprika
1 teaspoon garlic powder
1 teaspoon onion powder
1/2 teaspoon dried thyme
1/2 teaspoon dried oregano
1/4 teaspoon cayenne pepper (optional, for a little kick!)
Salt and freshly ground Black Pepper to taste
For the Optional Glaze (highly recommended!):
2 tablespoons honey or maple syrup
1 teaspoon soy sauce or tamari
1/2 teaspoon Dijon mustard
A quick note on ingredients: I like to use bone-in, skin-on chicken thighs and drumsticks because they tend to stay juicier and the skin gets wonderfully crisp. You can absolutely use boneless, skinless chicken breasts, but you’ll want to reduce the cooking time significantly to avoid drying them out. For the spices, feel free to play around! This blend is my tried-and-true favorite, but if you love smoked paprika or a bit more heat, go for it. The glaze is truly optional, but I beg you, just try it! It adds a beautiful sticky sweetness that complements the savory chicken perfectly. Honey or maple syrup both work beautifully here.
Step-by-Step Instructions
Step 1: Preheat & Prep Pan
First things first, let’s get that air fryer ready to work its magic. You’ll want to preheat your air fryer to 380°F (190°C). This is super important because it ensures the chicken cooks evenly and gets that signature crispiness from the moment it goes in. While it’s preheating, grab your chicken pieces and pat them thoroughly dry with paper towels. This step is CRUCIAL for crispy skin! Moisture is the enemy of crispiness, so get them as dry as you possibly can.
Step 2: Mix Dry Ingredients
In a small bowl, I like to whisk together all my dry spices: paprika, garlic powder, onion powder, thyme, oregano, cayenne pepper (if you’re using it), salt, and black pepper. Give it a good mix so all those lovely flavors are evenly distributed. This ensures every piece of chicken gets a consistent coating of deliciousness. You want to smell those herbs and spices mingling – it’s already starting to smell amazing!
Step 3: Mix Wet Ingredients
In a separate, slightly larger bowl (big enough to toss the chicken in), drizzle your chicken pieces with the olive oil. This helps the spice rub stick. Don’t go overboard with the oil; we’re not deep-frying here, just giving the spices something to adhere to. Give the chicken a quick toss to coat it lightly in the oil.
Step 4: Combine
Now, sprinkle that beautifully blended spice mixture over the oiled chicken. Get in there with your hands (the best way!) and toss everything together until each piece of chicken is thoroughly coated in the spice rub. Make sure no spot is missed! You want to see that lovely reddish-brown hue all over every single piece. This is where the flavor really starts to build.
Step 5: Prepare Filling
If you’re opting for the glaze (and you totally should!), now’s the time to whisk together the honey or maple syrup, soy sauce, and Dijon mustard in a tiny bowl. Set it aside. This little mix is going to add a fantastic sweet and savory dimension to your chicken. It takes literally 30 seconds and is so worth it!
Step 6: Layer & Swirl
Carefully place your seasoned chicken pieces in the preheated air fryer basket. Arrange them in a single layer, making sure there’s a little space between each piece. Don’t overcrowd the basket! If you have too many pieces, they’ll steam instead of crisping up. You might need to cook in batches, which is perfectly fine. Trust me, it’s better to do a second batch than to compromise on crispiness.
Step 7: Bake
Air fry at 380°F (190°C) for about 20-25 minutes. The exact time will depend on the size of your chicken pieces and your specific air fryer model. About halfway through the cooking time (around the 12-15 minute mark), I like to give the basket a shake or carefully flip the pieces with tongs. This helps ensure even browning and crisping on all sides. You’re looking for a beautiful golden-brown color and the internal temperature to reach 165°F (74°C) when checked with a meat thermometer in the thickest part of the thigh, avoiding the bone.
Step 8: Cool & Glaze
Once the chicken is cooked through and beautifully golden, carefully remove the pieces from the air fryer basket. If you’re using the glaze, this is the fun part! While the chicken is still hot, brush or drizzle the prepared glaze over the pieces. The heat will help it melt and create a gorgeous, sticky coating. Let the chicken rest for about 5 minutes before serving. This resting period is so important; it allows the juices to redistribute throughout the meat, making it even more tender and flavorful.
Step 9: Slice & Serve
Now for the grand finale! Serve your incredible air fryer chicken hot. It’s fantastic on its own, or alongside your favorite sides. The smell alone will have everyone gathering around the table, eagerly awaiting their first bite of this crispy, juicy perfection. Enjoy every single delicious morsel!
What to Serve It With
This air fryer chicken is such a chameleon in the kitchen, it truly goes with everything! For a quick and comforting breakfast, imagine a couple of crispy drumsticks alongside a slice of toast and a fried egg. It’s surprisingly delicious and a great protein boost to start your day. On a more elegant note, for brunch, I love pairing it with a vibrant arugula salad with a lemon vinaigrette and some fluffy mini cornbread muffins. The crispiness of the chicken is a wonderful contrast to the fresh greens. And when it comes to dessert? Okay, maybe not *directly* as dessert, but it’s the perfect savory component to a meal that might end with something sweet. Think of it as the star of a light supper that leaves room for a slice of pie! For those cozy, relaxed evenings, it’s pure heaven with classic comfort foods. My family loves it with creamy mashed potatoes and steamed green beans, or even just a simple scoop of coleslaw. Another family favorite is serving it with a side of fluffy white rice and a drizzle of extra glaze – pure comfort food bliss!
Top Tips for Perfecting Your Air Fryer Chicken
I’ve made this air fryer chicken more times than I can count, and through those many batches, I’ve picked up a few tricks that make all the difference. For your chicken prep, the absolute biggest thing is to pat it DRY. I mean, really dry. Use paper towels and don’t be shy. The drier the skin, the crispier it will get. Also, if you’re using bone-in pieces, try to ensure they are relatively similar in size so they cook at the same rate. When it comes to mixing, don’t overthink it. Get your hands in there and make sure every nook and cranny of the chicken is coated with the spice rub. The goal is even flavor distribution, not a paste. If you’re making the glaze, my biggest tip is to taste and adjust. Does it need a touch more sweetness? A bit more saltiness? Play around with it until it’s perfect for your palate. For the swirl customization, I just use a pastry brush to lightly coat the chicken after it comes out of the air fryer. You can be as artistic or as rustic as you like! Some people like a light drizzle, others like to really drench it – both are delicious. When it comes to baking, I always recommend using a meat thermometer. While the times I’ve listed are a great guideline, every air fryer is a little different. Cooking chicken to 165°F (74°C) internally is the safest and most reliable way to ensure it’s cooked through. If your chicken pieces are on the smaller side, start checking them a few minutes earlier. For ingredient swaps, if you don’t have paprika, smoked paprika is a fantastic substitute for a deeper, smokier flavor. If you’re not a fan of thyme or oregano, feel free to use other dried herbs like rosemary or Italian seasoning. And if cayenne isn’t your thing, just leave it out! The beauty of this recipe is its adaptability. Finally, for the glaze variations, you can add a tiny pinch of ginger for a bit of warmth, or even a squeeze of lime juice right at the end for a bright, fresh counterpoint to the sweetness.
Storing and Reheating Tips
One of the best things about this air fryer chicken is that it’s fantastic even as leftovers! If you happen to have any (which is rare in my house!), here’s how I store it. For room temperature storage, I typically don’t leave cooked chicken out for more than two hours for food safety reasons. If it’s a cool day and you’re planning to eat it within a couple of hours, just cover it loosely. For longer storage, definitely move it to the refrigerator. In the refrigerator, I like to store leftover chicken in an airtight container. It usually stays perfectly delicious for about 3-4 days. I’ve found that keeping the skin on helps it retain its texture better, even when cold. If you’re looking to freeze it, which I sometimes do if I make a big batch, make sure to cool the chicken completely first. Wrap the pieces tightly in plastic wrap, then place them in a freezer-safe bag or container. It should stay good in the freezer for up to 2-3 months. When you’re ready to reheat, the best method is usually back in the air fryer at around 350°F (175°C) for about 5-7 minutes, or until heated through and the skin is re-crisped. You can also reheat it in a conventional oven or even a skillet. For glaze timing advice, if you plan on refrigerating or freezing, I usually add the glaze after reheating, just before serving, to maintain its stickiness and shine. If you’re reheating previously glazed chicken, it might not be as glossy, but it will still be delicious!
Frequently Asked Questions
Final Thoughts
There you have it – my absolute favorite air fryer chicken recipe! It’s proof that you don’t need a whole lot of fuss to create something truly spectacular. This dish embodies everything I love about cooking: incredible flavor, satisfying textures, and the joy of bringing people together around the table. It’s the kind of recipe that makes you feel like a kitchen rockstar, even on your busiest evenings. I truly hope you give this air fryer chicken a try and that it becomes a beloved staple in your home, just like it has in mine. If you enjoy this recipe, you might also love my [link to another chicken recipe, e.g., Easy Baked Lemon Herb Chicken] or my popular [link to another recipe, e.g., Crispy Oven Fries] for the perfect side dish. I can’t wait to hear how yours turns out! Please leave a comment below and let me know what you think, or share any amazing variations you come up with. Happy cooking!
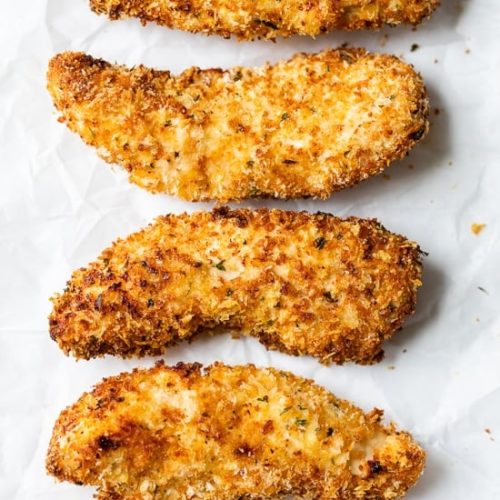
Air Fryer Chicken Tenders
Ingredients
Main Ingredients
- 1.25 lbs Chicken tenders
- 2 large Eggs beaten
- 1 tsp Kosher salt
- Black pepper to taste
- 0.5 cup Seasoned breadcrumbs *
- 0.5 cup Seasoned panko *
- Olive oil spray
- Lemon wedges for serving
Instructions
Preparation Steps
- Season chicken with salt and pepper.
- Place egg in a shallow bowl. In a second shallow bowl, combine the bread crumbs and panko.
- Dip chicken in the egg, then into the breadcrumb mixture and shake off excess and place on a large dish or cutting board. Spray both sides of the chicken generously with oil.
- Preheat air fryer to 400F.
- In batches, cook the chicken 5 to 6 minutes on each side, until the chicken is cooked through and crispy and golden on the outside. Serve with lemon wedges.


