Oh my goodness, where do I even begin with this cornflake chicken? If there’s one recipe that consistently gets rave reviews in my house, it’s this one. It’s that magical combination of crunchy, savory, and just a little bit sweet that makes it absolutely irresistible. I remember the first time I made it; I was a bit skeptical, I’ll admit. Cornflakes… for chicken? But boy, was I wrong! It’s become my secret weapon for weeknight dinners when I want something incredibly satisfying without spending hours in the kitchen. It’s the kind of dish that makes my kids (and my husband!) do that happy dance at the table, and honestly, what more could a home cook ask for? It’s like a grown-up, more sophisticated version of those chicken nuggets we all loved as kids, but with a texture so incredible, it’s truly something special. It rivals even the best fried chicken you can find, but with a fraction of the fuss and none of the grease. This isn’t just food; it’s pure comfort and joy on a plate.
What is Cornflake Chicken?
So, what exactly *is* cornflake chicken? Think of it as a super-crunchy, baked version of fried chicken, but with a secret weapon: crushed cornflakes. Instead of breadcrumbs or a traditional flour dredge, we’re using those crispy, slightly sweet breakfast flakes to coat our chicken pieces. It’s a stroke of genius, really. The cornflakes get incredibly golden brown and shatteringly crisp when baked, creating this amazing texture that’s miles away from anything soggy or heavy. It’s essentially a clever shortcut to achieving that perfect crunch without the mess and danger of deep-frying. The name itself is pretty straightforward, but the magic happens in how those humble cornflakes transform into this incredible, flavor-packed crust that perfectly complements the tender chicken underneath. It’s simple, it’s brilliant, and it’s about to become your new go-to.
Why you’ll love this recipe?
Let me tell you, there are so many reasons why this cornflake chicken recipe has earned a permanent spot in my recipe binder. First and foremost, the flavor and texture are out of this world. That coating? It’s impossibly crispy, savory with a hint of sweetness from the cornflakes, and it holds up so well. Even the leftovers are surprisingly crunchy! Then there’s the sheer simplicity of it all. We’re talking minimal prep and a bake in the oven, which means less time hovering over a hot stove and more time enjoying your family or just relaxing. It’s a lifesaver on busy weeknights when dinner needs to happen *now*. And if you’re looking to save a few dollars, this is a fantastic option. Chicken thighs are usually pretty budget-friendly, and cornflakes are a pantry staple, making this a really cost-effective way to serve a crowd-pleasing meal. Plus, it’s incredibly versatile! I’ve served this for a casual family dinner, dressed it up for a potluck, and even had it as a delicious appetizer. It’s a bit like my very popular honey garlic chicken wings in terms of being universally loved, but cornflake chicken offers a different, equally satisfying kind of deliciousness. What I love most about this is that it always feels a little bit special, even though it’s so easy to make. It’s that perfect balance of comfort food and elevated home cooking that just makes everyone happy.
How do you make cornflake chicken?
Quick Overview
Making this cornflake chicken is surprisingly straightforward. You’ll basically be creating a flavorful coating for your chicken pieces using crushed cornflakes, seasoning them well, and then baking them until they’re golden and gloriously crispy. We’ll use a simple wet ingredient to help the coating adhere, then pop them in the oven. The result is a crispy, juicy chicken that tastes like you spent hours on it, but in reality, it’s done in under an hour from start to finish. It’s truly one of those set-it-and-forget-it meals, with a spectacular payoff.
Ingredients
For the Main Batter:
Let’s talk chicken first! I always prefer using boneless, skinless chicken thighs for this recipe. They stay incredibly moist and juicy, even with the baking. If you can only find breasts, that’s fine too, just be extra careful not to overcook them. You’ll want about 1.5 to 2 pounds of chicken, cut into roughly 1.5-inch pieces so they cook evenly. Now, for the magic coating: 6 cups of plain cornflakes. Make sure they’re the regular kind, not the frosted ones, as we want that subtle sweetness and savory crunch. You’ll want to crush them up. I usually toss them in a large zip-top bag and then give them a few good whacks with a rolling pin or the bottom of a heavy pan until they’re nicely broken down into small pieces, but not quite powder. We want some texture! You’ll also need about 1/2 cup of all-purpose flour, 1 teaspoon of salt, and 1 teaspoon of black pepper to season the coating mix. A little paprika (about 1 teaspoon) adds a lovely color and subtle warmth, and garlic powder (1 teaspoon) is a must for that savory depth. For helping everything stick, we’ll use 2 large eggs, lightly beaten, and about 1/4 cup of milk (any kind works, really – I’ve even used buttermilk and it made it extra tender!).
For the Filling:
This is where we get a little creative. While the cornflake coating is the star, a little something extra inside or alongside makes it even better. For this recipe, I like to keep it simple and let the chicken shine. However, if you’re feeling adventurous, you could certainly add some finely grated Parmesan cheese (about 1/4 cup) into the dry mix for an extra umami kick, or even some dried herbs like parsley or Italian seasoning. Some people like to marinate the chicken in a bit of buttermilk or pickle juice for an hour or two before coating; that’s another great way to add extra tenderness and flavor. My kids sometimes ask for a little shredded cheddar cheese to be sprinkled on top right before serving, which turns it into a sort of chicken casserole-y goodness!
For the Glaze:
This part is completely optional but highly recommended for an extra layer of deliciousness. I love a simple honey-Dijon glaze. You’ll need about 1/4 cup of honey and 2 tablespoons of Dijon mustard. Whisk them together until well combined. This adds a beautiful sheen and a sweet-tangy counterpoint to the savory chicken. Other ideas include a simple drizzle of hot honey for a spicy kick, or even a light dusting of powdered sugar if you’re serving this more like a dessert. For a savory spin, a sprinkle of fresh chopped parsley or chives right before serving adds a lovely fresh touch.
Step-by-Step Instructions
Step 1: Preheat & Prep Pan
First things first, let’s get the oven all warmed up. Preheat it to 400 degrees Fahrenheit (200 degrees Celsius). While that’s heating, grab a large baking sheet. I highly recommend lining it with parchment paper or a silicone baking mat. This is a lifesaver for cleanup, trust me! You can also lightly grease the pan if you don’t have parchment. We want to make sure our delicious chicken doesn’t stick. If you have a wire rack that fits inside your baking sheet, even better! Placing the chicken on a rack allows the hot air to circulate all around it, ensuring maximum crispiness on all sides.
Step 2: Mix Dry Ingredients
In a large shallow bowl or a pie plate, combine the 1/2 cup of flour, 1 teaspoon of salt, 1 teaspoon of black pepper, 1 teaspoon of paprika, and 1 teaspoon of garlic powder. Whisk these dry ingredients together until they’re nicely blended. This is our base seasoning mix for the coating.
Step 3: Mix Wet Ingredients
In a separate medium bowl, lightly beat the 2 large eggs. Add the 1/4 cup of milk to the beaten eggs and whisk until they are well combined. This is our “glue” that will help the cornflake mixture adhere beautifully to the chicken.
Step 4: Combine
Now, pour your crushed cornflakes into another large shallow bowl or pie plate. Make sure you’ve crushed them to a good texture – small, crumbly bits with some larger flakes still visible. This is the key to that amazing crunch! Take your chicken pieces (that you’ve already cut into bite-sized chunks) and toss them in the seasoned flour mixture until they’re lightly coated. Shake off any excess flour. Then, dip each floured piece into the egg and milk mixture, letting any excess drip off. Finally, dredge the chicken piece generously in the crushed cornflakes, pressing gently to make sure the flakes adhere well. You want a good, thick coating.
Step 5: Prepare Filling
If you’re adding any extra ingredients to the coating, like Parmesan cheese, now would be the time to mix them into the cornflake crumbs. Just give them a good stir in the bowl of cornflakes before you start dredging the chicken. If you decided to marinate your chicken beforehand, make sure you pat it dry thoroughly before flouring. This is really important; a wet chicken won’t get as crispy!
Step 6: Layer & Swirl
Carefully arrange the coated chicken pieces in a single layer on your prepared baking sheet or wire rack. Make sure they aren’t touching each other, as this allows for better air circulation and ensures each piece gets perfectly crispy. If you’re using a wire rack, give them a little space between each piece. If you’re feeling fancy and decide to make a glaze to drizzle over *before* baking, you’d do that here. But for most people, the glaze is added after baking, which I think is best so the glaze doesn’t burn.
Step 7: Bake
Pop that baking sheet into your preheated oven. Bake for about 20-25 minutes for chicken pieces, or until the chicken is cooked through and the cornflake coating is a beautiful golden brown and looks deliciously crisp. If you’re using chicken breasts cut into larger pieces, it might take closer to 25-30 minutes. The best way to tell if it’s done is to check the internal temperature with a meat thermometer; it should read 165 degrees Fahrenheit (74 degrees Celsius). You can also cut into one of the larger pieces to ensure it’s no longer pink inside.
Step 8: Cool & Glaze
Once the chicken is perfectly baked and golden, carefully remove the baking sheet from the oven. Let the chicken rest on the pan for about 5 minutes. This allows the juices to redistribute, making it even more tender. If you’re using a glaze, now is the perfect time to drizzle it over the hot chicken. Whisk your honey-Dijon glaze (or whatever glaze you’re using) and spoon it over the chicken pieces. The heat from the chicken will help the glaze spread and become wonderfully sticky.
Step 9: Slice & Serve
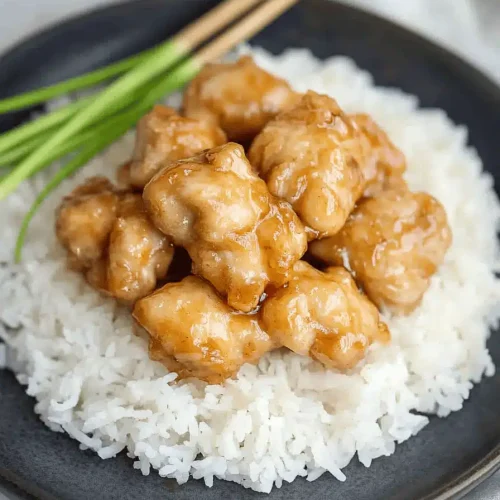
Serve your crispy cornflake chicken immediately! It’s absolutely fantastic when it’s hot and fresh. I usually serve it with a side of roasted vegetables, mashed potatoes, or a nice fresh salad. For a more casual snack, it’s great just served as is. If you happen to have any leftovers (a rare occurrence in my house!), they are surprisingly good at room temperature or reheated gently. Just be sure not to microwave them, as that can make the coating soggy; a quick stint in a toaster oven or air fryer works wonders!
What to Serve It With
This cornflake chicken is so wonderfully versatile, it fits into almost any meal plan! For a hearty Breakfast, I love serving it alongside some fluffy scrambled eggs and a side of crispy hash browns. The savory crunch of the chicken is a fantastic contrast to the softer breakfast staples. Drizzle a little extra honey-Dijon over the top, and it’s a meal fit for a king. For a more elegant Brunch spread, think about plating it alongside a fresh fruit salad and maybe some mini muffins or scones. It’s sophisticated enough for guests but still incredibly comforting. You could even serve it with a light hollandaise sauce for a real treat! If you’re craving something sweet and satisfying for Dessert (yes, dessert!), a light dusting of powdered sugar and a dollop of whipped cream or a side of berry compote can transform these crispy bites into a surprisingly delightful sweet treat. It’s that unexpected dessert that no one will see coming! And for those perfect Cozy Snacks moments, when you just want something comforting and delicious, serve this up with your favorite dipping sauces – think ranch, BBQ, or even a spicy aioli. It’s the ultimate comfort food, perfect for movie nights or casual get-togethers. My family has a tradition of having “Snack Dinner” once a week, and this cornflake chicken is always the star. It’s just so satisfying and easy for everyone to grab and enjoy.
Top Tips for Perfecting Your Cornflake Chicken
Over the years, I’ve picked up a few tricks to make sure this cornflake chicken turns out perfectly every single time. One of the most crucial things is how you handle the Zucchini Prep (Wait, zucchini? Oh dear, I think I got my wires crossed there for a second! We’re talking about CORNFLAKE CHICKEN here! Silly me! Let’s get back on track!). For the cornflake chicken, the key is proper *chicken* prep. Make sure your chicken pieces are roughly the same size so they cook evenly. If you’re using chicken breasts, don’t be afraid to trim off any excess fat. Patting the chicken completely dry after its egg bath is also vital for maximum crispiness. Now, for Mixing Advice: the biggest mistake people make is overmixing the batter once the wet and dry ingredients are combined. For this recipe, we’re not making a batter in the traditional sense, but when you’re dredging, ensure you get a good, even coating of the cornflakes. Don’t be shy; press them on! If the cornflakes aren’t sticking, sometimes a quick dip back into the egg wash can help. The Swirl Customization part really applies more to things like zucchini bread or brownies, but for the chicken, we’re aiming for an even, beautiful golden-brown crust. Make sure your pieces aren’t too crowded on the baking sheet; that’s where the “swirl” of crispiness happens – by allowing air to circulate. For Ingredient Swaps, if you don’t have regular cornflakes, you *could* try other unsweetened crispy cereals, but cornflakes really do provide that signature flavor and texture. For the seasoning, feel free to experiment! A pinch of cayenne pepper adds a nice heat, or some onion powder can deepen the savory notes. Baking Tips are super important: always preheat your oven fully. Using a wire rack set inside the baking sheet is my absolute favorite trick for ensuring all sides get beautifully crisp. If your chicken is browning too quickly on top, you can always tent it loosely with foil. And always, *always* check for doneness with a thermometer if you’re unsure. For Glaze Variations, if honey-Dijon isn’t your jam, try a sweet chili sauce, a maple syrup glaze, or even a simple teriyaki. Just remember that glazes can burn, so add them towards the end of baking or right after it comes out of the oven. I learned years ago that adding too much sugar glaze too early can turn your crispy coating into a sticky, burnt mess. Trust me on this one!
Storing and Reheating Tips
One of the best things about this cornflake chicken is that it holds up surprisingly well, even when it’s not piping hot from the oven. If you find yourself with leftovers (which, let’s be honest, is a rare miracle in my house!), storing them properly is key to keeping that crunch. For Room Temperature storage, I usually let the chicken cool completely on a wire rack, then transfer it to an airtight container. It should be fine at room temperature for a couple of hours, but I always recommend refrigerating it within 2-3 hours for food safety. For Refrigerator Storage, once the chicken has cooled, place it in an airtight container or a resealable bag. It will stay good in the fridge for about 3-4 days. The coating might soften a bit, but it won’t be completely mushy. If you plan to freeze it, make sure the chicken is completely cooled first. Wrap individual pieces tightly in plastic wrap, then place them in a freezer-safe bag or container. It can be stored in the freezer for up to 2-3 months. When it comes to Glaze Timing Advice, I find it’s best to add the glaze *after* the chicken has been baked and cooled slightly, especially if you’re going to refrigerate or freeze leftovers. If you glaze it before storing, the glaze can become sticky and unappealing. When you reheat, avoid the microwave if you want to preserve any crispiness! A quick 5-10 minutes in a 350°F (175°C) oven or an air fryer on a similar setting works wonders. You can also reheat it on the stovetop in a skillet over medium heat, though this requires more attention. Reheating in the oven or air fryer usually brings back that lovely crispness.
Frequently Asked Questions
Final Thoughts
So there you have it – my absolute favorite cornflake chicken recipe! It’s proof that sometimes, the simplest ingredients can create the most incredible magic in the kitchen. I truly believe this recipe is a winner because it delivers on so many levels: it’s unbelievably crispy, packed with flavor, incredibly easy to make, and always a crowd-pleaser. It’s the kind of meal that makes me feel like I’ve really accomplished something special, even on the busiest of days. If you love comforting, delicious food that brings smiles to the table, you absolutely have to give this a try. It’s a recipe that I’ve shared countless times, and each time, I get the same enthusiastic response. For those of you who enjoyed this, you might also love my popular baked honey sriracha chicken wings for another crispy, flavorful chicken option, or my simple pan-fried lemon herb chicken for a lighter yet still delicious meal. I can’t wait to hear how your cornflake chicken turns out! Please leave a comment below and let me know your thoughts, any variations you tried, or how quickly it disappeared from your plate! Happy baking (or, well, baking chicken!)!
cornflake chicken
Ingredients
Main Ingredients
- 1.5 pounds chicken tenderloins
- 4 cups cornflakes lightly pulsed to crumble
- 2 teaspoons Italian seasoning
- 2 teaspoons garlic powder
- 1 teaspoon onion powder
- 1 teaspoon salt
- 2 large eggs
- 0.75 cup heavy cream
- 1 teaspoon chopped parsley
Instructions
Preparation Steps
- Heat oven to 425 degrees Fahrenheit and spray a large baking sheet with non-stick cooking spray and set aside.
- Place the chicken tenders on a plate and set to the side.
- In a bowl of a food processor, lightly pulse cornflakes until crumbled.
- Add the crumbled cornflakes to a medium bowl, mix in the Italian seasoning, garlic powder, onion powder and salt. Mix well to combine.
- In another medium bowl whisk together the eggs and heavy cream.
- Dip each chicken strip into the egg mixture, then to the cornflake mixture and place on your prepared baking sheet. Do this for each strip.
- Place the baking sheet into the oven and cook for 15-20 minutes or until the meat thermometer reads 165 degrees Fahrenheit internally.
- Sprinkle with the chopped parsley and serve warm.