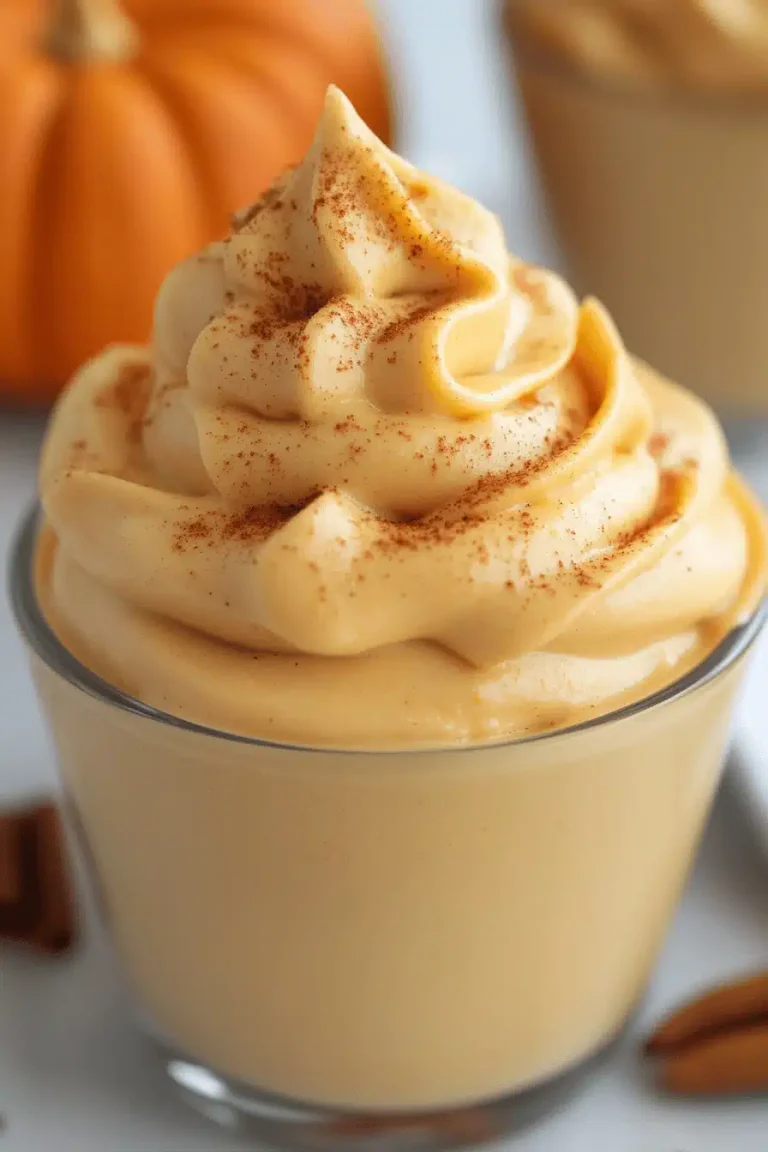
The first time I smelled caramel mingling with pumpkin in my grandma’s kitchen, I knew autumn had arrived. There was something magical about how the kitchen got sweeter as the spices woke up—the way cinnamon, nutmeg, and ginger clung to the air like a cozy blanket. This pumpkin caramel cake is my grown-up version of that moment: a tender pumpkin-spiced cake tucked with a luscious caramel-Cream Cheese Filling and a glossy caramel glaze that catches the light like toffee on a bright fall afternoon. It’s not fussy, it’s not faddish, and it’s surprisingly simple to pull off on a busy weeknight or to wow guests on a weekend. If you’ve ever compared pumpkin bread to pumpkin cake, this is the one that leans into cake textures—so moist, so soft, and just enough caramel bite to feel like a celebration. I’ve made this countless times, and it never fails to make the kitchen feel like home.
What is pumpkin caramel cake?
Think of Pumpkin Caramel cake as a cozy, layered dessert that wears autumn on its sleeve. It’s essentially a spice-forward pumpkin cake, split with a creamy caramel-studded filling and finished with a silky caramel glaze. The name comes from the star ingredients—pumpkin puree for moisture and color, and caramel to bring that warm, amber sweetness that makes every bite feel indulgent. It’s a cross between a pumpkin layer cake and a cheesecake-y filling, but with the light, tender crumb of a well-made sheet cake. This dessert is the kind of dish your family asks for year after year, especially when the leaves turn and a comforting scent wafts from the oven. I love the way the pumpkin keeps the texture moist, while the caramel adds depth without overwhelming the spice notes. It’s a dessert that tastes like a memory you haven’t yet made again but want to bake tonight.
Why you’ll love this recipe?
What I love most about this pumpkin caramel cake is the way it feels like a hug in cake form. The batter is forgiving—you’ll smell the spices and pumpkin while it bakes, and the kitchen will feel like an autumn postcard. The filling is creamy and not too sweet, tempered by a hint of sea salt in the glaze that keeps things balanced. It’s a lifesaver on busy nights because you can mix the batter ahead, bake the layers, and assemble once you’ve got a spare moment. And yes, it’s crowd-pleasing: my kids ask for this all the time, and friends always comment on how the glaze shimmers like caramel rain. Budget-wise, it’s friendly: you’ll probably be reaching for pantry staples, and it uses pantry staples in an elegant way—no fancy techniques required, just a little patience and a lot of warm flavor. If you’ve got leftovers, this cake tastes even better the next day, when the filling settles and the glaze takes on a glossy, almost caramel-crisp finish on the edges. It’s also wonderfully versatile: you can bake it as a two-layer cake, a Sheet Cake, or even cupcakes if you’re in a rush and want single-serving slices of pumpkin bliss. Trust me on this one… it’s a keeper.

Quick Overview
Here’s the quick gist: a spiced pumpkin cake, split with a caramel-Cream Cheese filling, all moistened and stabilized with a touch of buttermilk and oil. The glaze adds that shiny finish and a final caramel whisper on top. The method is straightforward—whisk dry ingredients, whisk wet ingredients, bring them together just until combined, bake until a toothpick comes out clean, then layer with filling and chill with a glaze. It’s surprisingly forgiving, and the result feels both homey and a little indulgent—perfect for a celebration or a weeknight treat when you deserve a little sweetness.
Ingredients
For the Main Batter:
- 1 3/4 cups (220 g) all-purpose flour (100 g) (100 g) (100 g) (100 g
- 1 cup (240 g) pumpkin puree (canned or homemade)
- 3/4 cup (150 g) granulated sugar
- 2 large eggs
- 1/2 cup (120 ml) neutral oil (like canola or vegetable)
- 1/2 cup (120 ml) buttermilk or almond milk
- 1 teaspoon baking powder
- 1/2 teaspoon baking soda
- 1/2 teaspoon fine salt
- 1 1/2 teaspoons Pumpkin Pie spice
- 1/2 teaspoon ground cinnamon
- Optional: 1/4 teaspoon ground ginger or a pinch of cloves
For the Filling:
- 8 oz (225 g) cream cheese, softened
- 1/2 cup (60 g) powdered sugar, sifted
- 1/2 cup (120 ml) caramel sauce, plus extra for drizzle
- 1 teaspoon vanilla extract
- 1/2 cup (120 ml) cold heavy cream, lightly whipped (optional for extra fluff)
For the Glaze:
- 1/2 cup (120 ml) caramel sauce
- 2 tablespoons heavy cream
- 2–3 pinches of sea salt (optional for a salted caramel touch)

Step-by-Step Instructions
Step 1: Preheat & Prep Pan
Set your oven to 350°F (175°C). Grease two 8-inch round cake pans well and line the bottoms with parchment rounds. A quick spray of nonstick spray and a light dusting of flour helps the cakes release cleanly. If you’re pressed for time, you can bake the batter as a sheet cake and trim into layers later, but I prefer round layers for elegance and easier layering. The aroma starts early here, and I always like to have the pans ready so I can get right to it.
Step 2: Mix Dry Ingredients
In a medium bowl, whisk together flour, baking powder, baking soda, salt, pumpkin pie spice, cinnamon, and ginger until evenly distributed. Sifting isn’t mandatory, but it helps keep the crumb tender and light. I’ve learned that a little warmth from the spices really comes alive after you bake, so don’t skip this step—your future self will thank you when you get that perfect crumb.
Step 3: Mix Wet Ingredients
In another bowl, whisk the pumpkin puree, sugar, eggs, oil, buttermilk, and vanilla until smooth. The mixture should look glossy and well combined; if it’s gloppy or separated, you’ve probably overmixed, and we want to avoid that. The pumpkin adds moisture, but the oil keeps the crumb tender and the texture cake-like rather than dense. I’ve tested this with almond milk and found it makes the cake slightly lighter; it’s a nice option if you’re dairy-free or pairing with a dairy-free filling and glaze.
Step 4: Combine
Pour the wet ingredients into the dry and fold together just until there are no visible streaks of flour. A few tiny lumps are totally fine. Overmixing here is the enemy of a soft, delicate crumb. If you’re worried, alternate adding the wet and dry ingredients in two additions, stopping as soon as the batter looks cohesive. Then scrape the bowl with a spatula to make sure you haven’t left any pockets of flour behind.
Step 5: Prepare Filling
Beat the cream cheese with the powdered sugar, caramel, and vanilla until silky. If you like a lighter texture, fold in the lightly whipped cream. This filling should be thick but spoonable—like the consistency of a rich frosting. Taste and adjust sweetness if needed; you want to balance the caramel’s deep sweetness with a bit of tang from the cream cheese. If you’re short on time, you can skip the whipped cream and keep it simpler, but I love the extra fluff as a contrast to the cake crumb.
Step 6: Layer & Swirl
If you’re making a traditional two-layer cake, bake the batter in the prepared pans for about 25–30 minutes, or until a toothpick inserted into the center comes out with a few moist crumbs. Let the layers cool in the pans for 10 minutes, then turn out onto a rack to cool completely. Once cooled, place one layer on your serving plate, spread a thick, even layer of the filling, and top with the second cake layer. For a pretty marble effect, dollop a little caramel on top of the filling and swirl gently with a toothpick before capping with the final layer. The swirl looks gorgeous when you slice, and it helps the glaze cling to the cake elegantly.
Step 7: Bake
Bake the layers on the middle rack, rotating halfway through to ensure even rising. If your oven tends to bake unevenly, you may need to add 5–10 minutes; the key is to avoid overbaking, which can dry out the pumpkin crumb. When a toothpick comes out clean or with just a few moist crumbs, you’re good. I tend to err on the side of slightly underbaking because the filling and glaze add moisture and richness that compensate for a touch of underdone crumb. Rest the layers on a rack for about 15 minutes before removing to finish cooling completely.
Step 8: Cool & Glaze
Cool the assembled cake for at least 30 minutes, then spoon the glaze over the top, letting it drip down the sides in an even, glossy veil. If you want a super smooth finish, brush the glaze with a small spatula, working in gentle rounds. If you’re making this ahead, you can chill the cake after glazing; just know the glaze will set a bit firmer in the fridge. For an extra candy-like finish, drizzle a second light layer once the first is set. If you love a touch of salt, sprinkle a pinch of flaky sea salt over the glaze while it’s still tacky.
Step 9: Slice & Serve
Let the cake come to room temperature for about 20 minutes before slicing. A sharp serrated knife helps yield clean, elegant pieces. I like serving slices with a dollop of whipped cream or a simple scoop of vanilla bean ice cream for extra luxury. The pumpkin aroma will fill the room, and the caramel will catch the light as you lift the first bite. This pumpkin caramel cake holds beautifully for a few hours, but it shines brightest when eaten fresh—the texture is at its best soon after glazing. If you’re transporting it, keep the glaze separate and apply just before serving to preserve that glossy finish.
What to Serve It With
This cake begs a comforting companion, not because it needs it, but because it enhances the experience. Think of it as the star, and coffee, chai, or a glass of cold milk as the steadfast supporting cast. For breakfast or brunch, a light drizzle of extra caramel with a sprinkle of chopped toasted pecans adds texture without overpowering. At dessert time, pair it with a scoop of cinnamon ice cream or a dollop of softly whipped cream to balance the spice and the caramel. And for a fall gathering, set out small wedges with candied walnuts and a mug of hot apple cider or a robust espresso. My family loves a caramel latte alongside a warm slice, and I swear the scent of pumpkin and caramel makes friends linger at the table longer than usual.

Top Tips for Perfecting Your pumpkin caramel cake
These tips come from countless batches and a few happy accidents that taught me a thing or two about balance and texture.
Pumpkin Prep: I usually use canned pumpkin puree for reliability, but if you’re making fresh pumpkin, cook it down until it’s very thick and concentrated. Drain off any excess moisture so the batter isn’t too loose. If your puree is on the lusher side, you can whisk in a tablespoon or two of flour to help stabilize the batter.
Mixing Advice: Don’t overmix once you combine wet and dry. A few lumps are okay and often desirable for a tender crumb. If you see the batter become smooth and glossy, you’re probably overworked. Resting the batter for 10 minutes after mixing can also help the flour hydrate fully, leading to a softer crumb.
Swirl Customization: For a prettier swirl, reserve a portion of the caramel and drop it in chunks across the cake before you add the second layer. Use a skewer or a toothpick to drag lines through the filling and crumb for a marbled look that’s pretty without being fussy.
Ingredient Swaps: To make gluten-free, swap in a 1:1 gluten-free flour blend with 1/4 teaspoon xanthan gum per cup of flour for structure. For dairy-free versions, use dairy-free cream cheese, coconut cream in place of the whipped cream, and a dairy-free butter substitute in the glaze. Almond milk works beautifully here, but I’ve also tested oat milk for a slightly richer texture. Taste changes will vary with substitutions, so taste as you go and adjust the spice and sweetness accordingly.
Baking Tips: If your oven runs hot, drop the temperature to 325°F (165°C) and bake longer, checking doneness with a toothpick. Edge doming can be a sign of premium air in the batter; if you prefer a perfectly flat top, you can tap the pan halfway through baking to settle the batter slightly. Position the pans on the middle rack for even browning and ensure good air circulation around them.
Glaze Variations: Try adding a teaspoon of espresso powder to the glaze for a coffee-kissed caramel note, or swap half of the caramel for dulce de leche for a deeper caramel tone. A pinch of flaky salt in the glaze at the end intensifies the caramel and makes the filling flavors pop. If you prefer a thinner glaze, whisk in a little more cream; for thicker, add a pinch of powdered sugar to reach your desired consistency.
Over the years I’ve learned that the best pumpkin caramel cake isn’t about chasing perfection; it’s about balancing warmth, sweetness, and a touch of richness. It’s a forgiving dessert if you’re mindful of overmixing and don’t rush the chilling step—both help the flavors meld and the texture stay soft. My kitchen crew is always generous with tasting spoons during the filling stage, because a little extra caramel can be transformative, and nothing beats that moment when the knife first slides through the layers and reveals a glossy swirl of caramel and pumpkin. If you’re trying this with kids around, let them help with the glaze—it’s simple enough for hands to manage, and the outcome feels like pure pride to a hopeful little helper.
Storing and Reheating Tips
Storing a pumpkin caramel cake with a creamy filling requires a little care to keep the texture plush and the glaze glossy.
Room Temperature: The cake can sit at room temperature for up to 2 hours, especially if your house is warm. If you’re serving later in the day, refrigerate to keep the cream cheese filling fresh, then let it come to room temperature for about 20 minutes before slicing for the best texture.
Refrigerator Storage: Cover loosely, or keep in a cake dome for up to 3 days. If you’re worried about the glaze taking on a dull look, you can rewarm the cake gently in the oven for a few minutes or warm slices in the microwave for a few seconds to revive the glaze’s shine.
Freezer Instructions: You can freeze baked, unassembled layers for up to 2 months. Wrap tightly and thaw in the fridge before assembling with the filling. Glazing after thawing is ideal for the freshest finish. If you freeze the filled cake, wait to glaze until fully thawed to prevent glaze cracking.
Glaze Timing Advice: If you’re storing the cake unglazed, glaze just before serving. If you glaze ahead, keep it refrigerated and reheat slightly to restore gloss. Either way, a quick re-whisk or a gentle warm-up will make the glaze gleam again.
Frequently Asked Questions
Final Thoughts
I keep coming back to this pumpkin caramel cake because it nails comfort and celebration in one bite. It’s the kind of dessert that makes a Tuesday feel special and a Sunday feel like a family reunion. The pumpkin keeps the crumb tender and the spice bright, while the caramel—oh, the caramel—gives a glow to every slice without becoming cloying. It’s a recipe I’ve handed to friends, to neighbors, to my sister when she needed a little sweetness after a long week. If you bake it, you’ll join the small club of people who text me after the first bite with nothing more than, “That glaze is everything.” So go ahead and bake it tonight. Let the house fill with that warm, caramel aroma and enjoy the moment of quiet happiness that only a homemade cake can bring. Happy baking! And please leave a comment below with your variation or how you liked the texture—I love reading about your twists and seeing your photos. And if you try the pumpkin caramel cake, rate the post and share your version with friends and family.

pumpkin caramel cake
Ingredients
Main Ingredients
- 1 box spice cake mix
- 15 oz pumpkin puree
- 1 egg large egg
- 0.333 cup canola or vegetable oil
- 2 teaspoon pumpkin pie spice
- 12 oz sweetened condensed milk
- 12 oz caramel sundae topping
- 8 oz whipped topping thawed
- 0.5 cup toffee bits
- 0.5 cup mini semi-sweet chocolate chips
- 0.333 cup salted caramel sauce
Instructions
Preparation Steps
- Preheat oven to 350F. Line a 9x13-inch pan with aluminum foil and spray with cooking spray; set aside.
- In a large bowl, whisk together the spice cake mix, pumpkin puree, egg, oil, and pumpkin pie spice until just combined.
- Bake for 27 to 30 minutes, until the center is set and a toothpick comes out with a few moist crumbs.
- While the cake bakes, whisk together the sweetened condensed milk and caramel sundae topping; set aside.
- Poke holes all over the warm cake with a wooden skewer, then slowly pour the condensed milk mixture over the cake, letting it soak through.
- Chill the cake in the fridge for 15 minutes, then spread whipped topping over the surface and sprinkle with toffee bits and chocolate chips. Drizzle with salted caramel sauce.
- Refrigerate for at least 2 hours or overnight before slicing and serving.