
I still remember the first time I made Baked Chicken parmesan for my family. It was a chaotic Tuesday night, the kind where homework is everywhere, someone’s already spilled milk, and dinner feels like another mountain to climb. I’d seen countless recipes for chicken parm, most involving a deep-fryer or a complicated breading process that I just didn’t have the energy for. But this one? This baked chicken parmesan is a game-changer. It’s the kind of meal that feels like a restaurant treat but is surprisingly simple to pull off, even on those crazy weeknights. Honestly, the smell that fills the kitchen when this is baking? It’s pure comfort. It’s the ultimate hug in a dish, and I’ve been making it ever since. It’s become our go-to, the one dish my kids *always* ask for, and it never, ever disappoints.
What is baked chicken parmesan?
So, what exactly *is* this magical dish we call Baked Chicken parmesan? At its heart, it’s a classic Italian-American comfort food that takes tender chicken cutlets, coats them in a savory breading, bakes them until golden, and then smothers them in rich marinara sauce and gooey, melted mozzarella cheese. Think of it as the no-fuss, oven-baked version of the traditional fried chicken parmesan, but with all the flavor and none of the mess. It’s essentially chicken at its finest, elevated with simple, delicious toppings. This particular version I’m sharing with you focuses on getting that perfect crispy-chewy texture from the oven, making it both healthier and incredibly easy to assemble. It’s the kind of meal that proves you don’t need fancy techniques or deep-frying to achieve phenomenal results.
Why you’ll love this recipe?
Honestly, there are so many reasons this baked Chicken Parmesan recipe has earned a permanent spot in my recipe binder, and I just know you’ll fall in love with it too. First off, the flavor. Oh, the flavor! You get that satisfying crunch from the breading that holds up so beautifully in the oven, the juicy, tender chicken, the tangy sweetness of the marinara, and that glorious, stretchy melted cheese. It’s a symphony of deliciousness in every bite. Then there’s the simplicity. I’m all about making life easier in the kitchen, and this recipe delivers. It uses everyday ingredients you probably already have, and the steps are so straightforward, even a beginner cook can master it. Plus, it’s remarkably budget-friendly. Chicken breasts are usually pretty affordable, and the other ingredients are pantry staples. What I love most, though, is its versatility. Serve it with pasta for a classic meal, or tuck it into a crusty roll for an epic sandwich. It’s a lifesaver on busy weeknights, a guaranteed crowd-pleaser for company, and even makes fantastic leftovers (if you’re lucky enough to have any!). It truly stands out because it manages to be both incredibly comforting and remarkably easy to whip up, which is the holy grail for home cooks like us.
How do I make Baked Chicken Parmesan?
Quick Overview
This baked Chicken Parmesan recipe is all about achieving that delicious, golden-brown crust without the fuss of frying. We’ll be coating our chicken in a seasoned breadcrumb mixture and baking it to perfection before topping it with marinara and cheese. It’s a straightforward process that results in tender, flavorful chicken with a wonderfully crisp exterior. You’ll be amazed at how simple it is to get restaurant-quality results right in your own oven. It truly is one of my most foolproof recipes.
Ingredients
For the Chicken & Breading: For the Chicken & Breading: For the Chicken & Breading: For the Chicken & Breading
4 boneless, skinless chicken breasts (about 1.5 lbs total)
1 cup panko breadcrumbs (these are key for crispiness!)
1/2 cup grated Parmesan cheese (use the real stuff, it makes a difference!)
1 teaspoon dried Italian seasoning
1/2 teaspoon garlic powder
1/4 teaspoon salt
1/4 teaspoon Black Pepper
2 large eggs
2 tablespoons milk (any kind works, even almond milk for creaminess!)
2 tablespoons olive oil (or a neutral oil like avocado oil)
For Topping:
2 cups your favorite marinara sauce (store-bought is totally fine, or use homemade!)
1.5 cups shredded mozzarella cheese
Fresh basil leaves, for garnish (optional, but oh so pretty!)
Step-by-Step Instructions
Step 1: Preheat & Prep Pan
First things first, let’s get that oven ready. Preheat it to a nice 400°F (200°C). This temperature is perfect for getting our chicken golden and crispy without drying it out. While the oven heats up, grab a large baking sheet. To make cleanup a breeze (because who likes scrubbing pans?), I like to line mine with parchment paper or aluminum foil. Lightly grease it with a bit of olive oil or cooking spray – this helps prevent sticking and gives us an extra little crisp.
Step 2: Mix Dry Ingredients
Now, let’s create our flavor bomb breading! In a shallow dish or a pie plate (something wide and flat works best), combine the panko breadcrumbs, grated Parmesan cheese, Italian seasoning, garlic powder, salt, and black pepper. Give it a good stir with a fork or whisk until everything is well combined. You want those seasonings distributed evenly so every bite of chicken is delicious. I like to give this a little sniff – it already smells amazing, right?
Step 3: Mix Wet Ingredients
In a separate shallow dish, whisk together the two large eggs with the 2 tablespoons of milk. This egg wash is what helps the breadcrumbs cling beautifully to the chicken. Make sure it’s well combined so you don’t get any eggy pockets in your coating. It should look nice and smooth, ready to coat our chicken.
Step 4: Combine
Okay, time to prepare the chicken itself. If your chicken breasts are super thick, I like to slice them in half horizontally to create thinner cutlets. This helps them cook more evenly and quickly. Pat the chicken dry with paper towels – this is a crucial step that helps the breading stick better! Now, one by one, dip each chicken cutlet into the egg wash, letting any excess drip off. Then, transfer it to the breadcrumb mixture, pressing gently to coat both sides thoroughly. Make sure every nook and cranny is covered! Place the breaded chicken onto your prepared baking sheet in a single layer, making sure they aren’t touching too much. Drizzle the 2 tablespoons of olive oil evenly over the tops of the chicken cutlets. This oil is essential for getting that gorgeous golden-brown crust in the oven.
Step 5: Prepare Filling
This step is incredibly simple because we’re using our favorite marinara sauce! If you’re using store-bought, just open the jar. If you have a homemade sauce that you love, now’s the time to get it ready. You don’t need to cook it beforehand; it will simmer and thicken beautifully in the oven with the chicken. Just make sure you have about 2 cups ready to go.
Step 6: Layer & Swirl
This is where the magic really happens! Once the chicken is all breaded and on the baking sheet, it’s time for the sauce and cheese. Spoon about half of your marinara sauce over the chicken cutlets, spreading it out a bit. Don’t worry about perfect coverage; a rustic look is part of its charm! Then, generously sprinkle the shredded mozzarella cheese over the sauce. You want a good, melty layer that will bubble and brown. If you have any extra Parmesan, you can sprinkle a little more on top for an extra cheesy kick!
Step 7: Bake
Now, slide that baking sheet into your preheated oven. Bake for about 20-25 minutes, or until the chicken is cooked through and the cheese is melted and bubbly, with some lovely golden-brown spots. The exact time will depend on the thickness of your chicken, so keep an eye on it. A meat thermometer inserted into the thickest part of the chicken should read 165°F (74°C). The aroma filling your kitchen at this point is just heavenly!
Step 8: Cool & Glaze
Once it’s out of the oven, resist the urge to cut into it immediately! Let the baked chicken parmesan rest for about 5 minutes. This allows the juices to redistribute, making the chicken even more tender and moist. If you have any leftover marinara sauce, you can spoon a little extra over the top now, or serve it on the side. The cheese will have set up beautifully during the rest.
Step 9: Slice & Serve
Carefully transfer the baked chicken parmesan to a serving platter. Garnish with some fresh basil leaves if you’re feeling fancy – it adds a lovely pop of color and freshness. Then, slice it into individual portions. It’s absolutely stunning served piping hot, with that gooey cheese stretching with every cut. This is where you can see all those beautiful layers of flavor and texture.
What to Serve It With
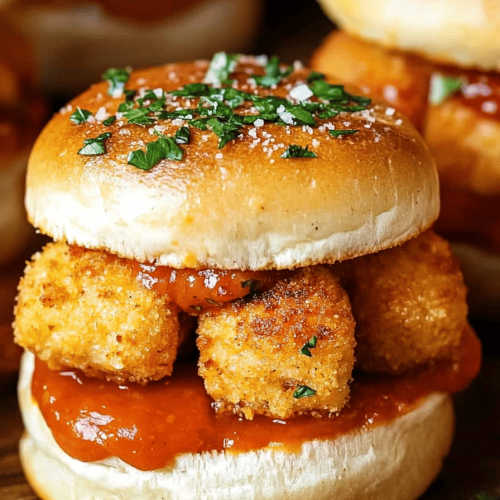
This baked chicken parmesan is so versatile, it truly fits into any mealtime scenario you can imagine! For a hearty breakfast (yes, really!), I love having a small slice with some scrambled eggs and a side of roasted potatoes. It feels wonderfully decadent, like a treat to start the day. For a leisurely brunch, plating a piece alongside a simple green salad with a light vinaigrette and some crusty bread makes for an elegant and satisfying spread. The richness of the chicken parm is perfectly balanced by the fresh salad. As a more traditional dinner, you absolutely can’t go wrong serving it with your favorite pasta – spaghetti, linguine, or even penne are perfect for soaking up any extra marinara sauce. And for those moments when you just need a comforting, delicious snack, a smaller portion of this baked chicken parmesan is pure bliss. I’ve even made mini versions and served them on slider buns for a fun, casual get-together. My family loves it when I make a big batch and serve it with garlic breadsticks; it’s always a winner.
Top Tips for Perfecting Your Baked Chicken Parmesan
Over the years, I’ve learned a few tricks that take this baked chicken parmesan from good to absolutely incredible. First, when it comes to the chicken, don’t skip patting it dry! This is the secret to getting a really crisp coating that sticks. If the chicken is wet, the breading will just slide off. Also, if your chicken breasts are really thick, slicing them in half horizontally (butterflying them) is a game-changer for even cooking. For the breading, I swear by panko breadcrumbs. They’re lighter and crispier than regular breadcrumbs, giving you that satisfying crunch without being heavy. Mixing the grated Parmesan cheese right into the panko adds a fantastic depth of flavor and helps with browning. When you’re coating the chicken, really press the breadcrumbs on to make sure they adhere well. Don’t be afraid to get your hands in there! For the sauce, I tend to use a good quality store-bought marinara to save time, but if you have a homemade sauce you love, go for it! Just make sure it’s not too watery. When you’re spooning it over the chicken, a rustic, not-too-perfect spread is actually ideal; it lets the cheese melt into all the nooks and crannies. And speaking of cheese, fresh shredded mozzarella melts so much better than pre-shredded stuff, which often has anti-caking agents that can make it a bit rubbery. If you find your cheese browning too quickly before the chicken is cooked, you can always tent the baking sheet loosely with foil for the last 5-10 minutes of baking. Trust me, these little tweaks make a huge difference!
Storing and Reheating Tips
One of the best things about this baked chicken parmesan is how well it stores and reheats! If you have any leftovers (which, let’s be honest, is rare in my house!), let the chicken cool completely before storing. For room temperature storage, it’s best to consume it within two hours, just to be safe. Once cooled, store any leftovers in an airtight container in the refrigerator. It should stay fresh and delicious for up to 3-4 days. When it comes to reheating, I find the oven or a toaster oven works best for restoring that delightful crispiness. Place the chicken parm on a baking sheet and reheat at around 350°F (175°C) for about 10-15 minutes, or until heated through and the cheese is melty again. If you’re in a real hurry, the microwave works too, but the breading might lose some of its crispness. You can also reheat it in a skillet over medium heat with a little bit of oil. If you plan on freezing portions, make sure they are completely cooled, then wrap them tightly in plastic wrap, followed by a layer of aluminum foil or placing them in a freezer-safe bag. Frozen chicken parm will last for about 2-3 months. Thaw it overnight in the refrigerator before reheating. For the best results, I recommend adding any extra marinara sauce *after* reheating, rather than storing it with the chicken, to prevent the breading from getting soggy.
Frequently Asked Questions
Final Thoughts
So there you have it – my absolute favorite baked chicken parmesan recipe! I truly believe this dish captures the essence of comfort food: familiar, delicious, and incredibly satisfying. It’s the perfect example of how you can create something truly special with simple ingredients and a little bit of love. It’s the kind of meal that brings people together, sparks conversation, and leaves everyone feeling happy and full. If you’re looking for a weeknight dinner that feels like a weekend treat, or a crowd-pleasing dish that’s surprisingly easy to make, this is it. Give it a try, and I can almost guarantee it will become a staple in your kitchen too. I’d absolutely love to hear how yours turns out! Don’t be shy about sharing your own variations or any tips you discover in the comments below. Happy baking, everyone!
Baked Chicken Parmesan
Ingredients
Main Ingredients
- 2 tsp extra virgin olive oil
- 4 boneless, skinless chicken breasts chicken breasts
- 1 medium zucchini, diced
- 1 medium yellow onion, chopped
- 1.5 cups tomato sauce
- 1 tsp Italian seasoning
- 1 cup mozzarella cheese, shredded
- 0.5 cup Parmesan cheese
Instructions
Preparation Steps
- In a large skillet, heat 1 tsp of oil over medium-high heat. Add chicken breasts and sear for 1 to 2 minutes per side until golden brown. Transfer to a baking dish.
- Heat remaining oil in the skillet. Add zucchini and onions and saute for 3 to 5 minutes until lightly browned. Remove from pan and place on top of the chicken.
- In a bowl, mix the tomato sauce and Italian seasoning. Pour over the chicken and vegetables. Sprinkle with mozzarella and Parmesan cheese on top.
- Bake in a 350°F oven for 30 minutes or until juices run clear on the chicken when it’s pierced with a fork.


