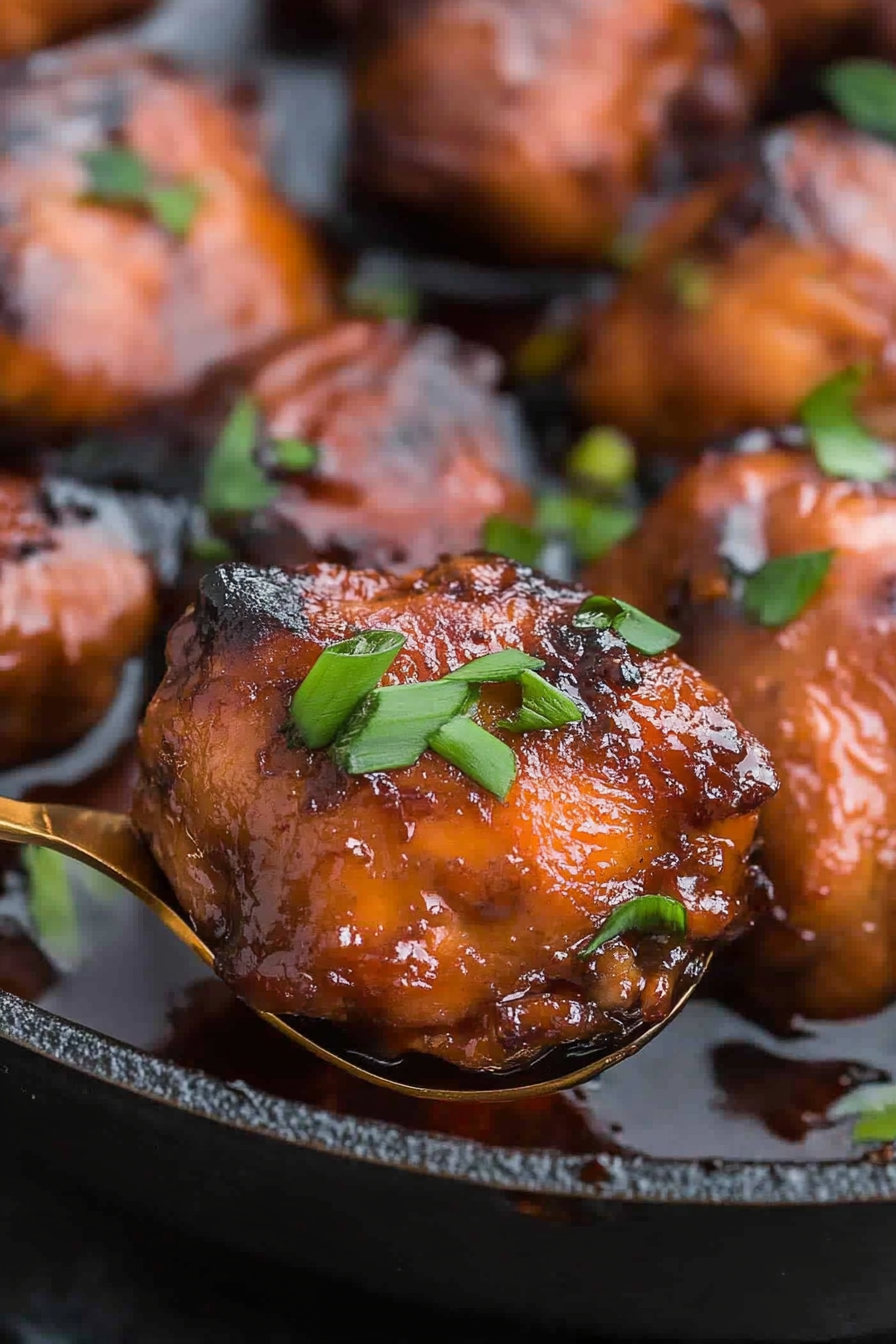
There’s something about the first time you bite into a perfectly cooked Peking Chicken that just sticks with you. For me, it’s that irresistible combo of crispy, golden skin and tender, juicy chicken underneath, all coated in that glossy, sticky glaze that’s equal parts sweet and savory. It’s the kind of dish that immediately transports me back to family dinners and weekend feasts where everyone’s digging in with eager smiles. If you love the crunch and sauce of a good Peking Duck but want something a bit easier (and faster!), Peking Chicken is where it’s at. I honestly think it’s one of those recipes that sneaks up on you with its flavor but stays in your regular rotation because it’s not fussy or complicated. Plus, it’s a total crowd-pleaser — my kids actually ask for this more than our usual fried chicken!
What is peking chicken?
Peking Chicken is essentially a delicious spin-off inspired by the famous Peking Duck, but with chicken as the star. Imagine that crispy, lacquered exterior, the kind that crackles when you bite into it, paired with juicy, flavorful white meat underneath. The name “Peking” comes from Beijing (formerly Peking), where this style of cooking — roasting meat until the skin is perfectly crisp and coating it with a sweet soy-based glaze — originated. Think of it as a way to get all those irresistible flavors and textures without having to go all out with a whole duck. It’s approachable for home cooks, but feels special enough to serve for dinner parties or family celebrations. It’s one of those dishes that combines simple ingredients with a little bit of magic, turning your regular chicken into something you’ll want to make on repeat.
Why you’ll love this recipe?
What I love most about Peking Chicken is the way it hits all the right notes without any headache. First off, the flavor profile is this beautiful balance of salty, sweet, and umami — that glaze, which is sort of like a thickened soy sauce with honey and a touch of garlic and ginger, really steals the show. It’s sticky but not too heavy, and pairs perfectly with the crispy skin. Second, it’s surprisingly straightforward. You don’t need fancy ingredients or to spend hours marinating; a quick brine and glaze do the trick. It really comes together in a snap but tastes like you spent all day in the kitchen. Third, it’s wallet-friendly — chicken is always more budget-conscious than duck, and you can usually make a whole family dinner out of just one roasted bird with some simple sides. Plus, the versatility is unbeatable. You can serve this with steamed rice, toss the leftovers in a salad, or even slice it up for sandwiches the next day. My sister’s even been using it as a filling for bao buns at home! Honestly, if you enjoyed recipes like Honey Garlic Chicken Wings or Teriyaki Chicken, this one’s going to feel right at home in your recipe box. It’s that comforting yet exciting dish that never fails to draw everyone to the table—sometimes even before it’s done cooking because the smell alone is ridiculous.
How do I make Peking Chicken?
Quick Overview
Okay, here’s the simple roadmap: you start by prepping your chicken with a light brine to keep it moist and flavorful. Then, the secret is drying the skin thoroughly (this helps it crisp up beautifully in the oven). After that, you roast the bird until the skin is golden and crunchy. About halfway through, you brush on your luscious Peking glaze, which caramelizes to give that signature sticky crust. It’s easy enough for a weeknight but impressive enough for guests. Trust me, the method is so straightforward that you’ll be surprised how often this sneaks onto our dinner table—even when life is crazy busy.
Ingredients
For the main chicken: For the main chicken: For the main chicken: For the main chicken: For the main chicken: For the main chicken: For
- 1 whole chicken (about 3-4 pounds) – fresh or thawed, skin-on for that crackling crisp
- 1 tablespoon salt – for brining; evenly seasons and tenderizes
- 2 tablespoons white vinegar – helps with crisping the skin
- 2 tablespoons honey – part of the glaze and adds delightful sweetness
- 2 tablespoons soy sauce (preferably low-sodium) – umami-packed and savory element
- 1 teaspoon grated fresh ginger – adds aromatic zing
- 2 cloves garlic, minced – for depth and warmth
- 1 tablespoon Shaoxing wine or dry sherry (optional but highly recommended) – boosts flavor complexity
- 1 tablespoon toasted sesame oil – toasted is key, brings lovely nuttiness
For the Glaze:
- 3 tablespoons hoisin sauce – thick, sweet, and slightly tangy
- 2 tablespoons honey – sticky sweetness
- 1 tablespoon soy sauce – balance saltiness
- 1 teaspoon rice vinegar – brightens the glaze
- 1 teaspoon chili paste or Sriracha (optional) – if you want a little kick
Step-by-Step Instructions
Step 1: Preheat & Prep Pan
First things first, preheat your oven to 400°F (200°C). I always line my roasting pan with foil or parchment to make cleanup a breeze — you don’t want to be scrubbing sticky drips later. Place a rack inside the pan to elevate the chicken; this keeps the heat circulating so it crisps evenly all around. Oh, and before you get started, pat the chicken dry thoroughly with paper towels — don’t skimp on this, it makes all the difference for crispy skin.
Step 2: Mix Dry Ingredients
In a small bowl, combine the salt and a splash of the vinegar (about a tablespoon). This is your simple dry brine. You can also toss in some black pepper if you’re feeling fancy. Rub this mixture all over the chicken, especially under the skin where you can — a little patience here pays off with juicier meat and crisper, perfectly seasoned skin.
Step 3: Mix Wet Ingredients
In another bowl, whisk together honey, soy sauce, grated ginger, minced garlic, sesame oil, and Shaoxing wine if using. This mix will become the base of your glaze and marinade. You’ll see it has this golden, syrupy look — it’s pure magic once baked onto the bird.
Step 4: Combine
After rubbing the chicken with the dry brine, pour half of the wet mixture over the bird, massaging it into every nook and cranny. Let it marinate at least 30 minutes to absorb flavor (overnight is even better if you have time). I usually set mine right on the counter, loosely covered, because the vinegar in the brine helps keep it safe, but you can refrigerate if you prefer.
Step 5: Prepare Filling
Now, if you want to take it up a notch, you can stuff the chicken cavity with a few slices of ginger and a few green onions to infuse gentle fragrance during roasting. Totally optional, but it’s one of those little touches that just smells like weekend mornings at my mom’s house. No complicated filling here, just simple aromatics.
Step 6: Layer & Swirl
Brush a thin layer of the glaze mixture all over the chicken before placing it on the rack. This first coat starts the caramelization process. I usually keep the rest of the glaze handy to brush on midway through roasting and again toward the end for that brilliant sticky finish. It’s a bit like painting your chicken with love.
Step 7: Bake
Pop the chicken into your preheated oven and roast for about 45 minutes to 1 hour, depending on the size. Around 30 minutes in, start brushing the remaining glaze over the chicken every 10 minutes. You’ll see that skin get gorgeously caramelized and crunchy. Use a meat thermometer to check for doneness — you want 165°F (75°C) in the thickest part of the thigh.
Step 8: Cool & Glaze
Once out of the oven, let your chicken rest for at least 10 minutes. This pause helps the juices redistribute, so every bite is perfectly moist. While resting, brush with one final thin layer of glaze for that shiny, irresistible sparkle. If your glaze thickens too much, just warm it slightly to bring back that brushable magic.
Step 9: Slice & Serve
Use a sharp, sturdy knife to carve the chicken into pieces—thighs, breasts, wings—and arrange them on a serving plate. Make sure you include those crispy skin pieces because honestly, they’re the best bit. Serve it alongside steamed jasmine rice or toss some crunchy cucumber salad on the side to cut through the richness. Trust me, you’ll want to make extra because this beauty disappears fast.
What to Serve It With
For Breakfast: Try slices of Peking Chicken alongside scrambled eggs with scallions and a steaming mug of jasmine tea or black coffee. It sounds unusual, but the sweet-savory notes wake you up better than bacon in my book.
For Brunch: Serve with fluffy steamed bao buns or soft tortillas for a DIY wrap station. Add quick pickled radishes, some cilantro sprigs, and a drizzle of sriracha mayo—instant crowd-pleaser and makes any lazy weekend feel like a celebration.
As Dessert: Who said chicken can’t inspire dessert pairings? Something like a light mango sorbet or citrusy ginger pudding refreshes your palate after all that glazed goodness. It’s unexpected but works like a charm.
For Cozy Snacks: Leftovers shredded over steamed rice or tossed in a fresh salad with crunchy peanuts and lime vinaigrette is my go-to. Kids adore it dipped in a little hoisin sauce mixed with mayo or even as a filling for grilled cheese sandwiches. It’s got that perfect blend of textures and flavors that make every bite interesting.
My family always jokes that whenever I make Peking Chicken, the house smells like a little restaurant in Beijing. The crispy skin, that caramelized glaze… it’s like everyone gathers around, hands reaching for seconds almost before the first cut. This dish has become a bit of a tradition, and I love that it’s simple enough to whip up any night but special enough to feel like a treat.
Top Tips for Perfecting Your Peking Chicken
Drying the Skin: Seriously, do not skip this step. After rinsing and brining, pat the skin as dry as you can with paper towels. For an extra crisp, let it air-dry in the fridge uncovered for a couple hours if you can plan ahead. Moisture is the enemy of that iconic crackling.
Brining Basics: The light salt and vinegar mix is gold. Don’t overdo salt here — too much and the chicken ends up too salty or rubbery. The vinegar helps break down proteins slightly, encouraging that skinned crisping without drying the meat out.
Glaze Application: Brush thin layers rather than slathering it on all at once. Too much sticky glaze too early can burn in the oven’s heat. Patience pays off with glossy, deep-colored skin that doesn’t taste bitter.
Swirling/Marinade Variations: Sometimes, I add a teaspoon of five-spice powder to the glaze for warmth and extra “oomph.” Another time, I mixed in a splash of orange juice with honey to brighten it. Play around and find your favorite twist; this recipe is forgiving and fun like that.
Oven Positioning: Bake on the middle rack for even heat. If you notice the bottom drying out before the top, just tent it loosely with foil halfway through.
Ingredient Swaps: No Shaoxing wine? Dry sherry or even a splash of apple cider vinegar works. For soy sauce, a low-sodium version keeps it balanced and not overpowering. Honey is my go-to sweetener, but brown sugar or maple syrup bring interesting variations (I tried them all).
Glaze Thickness: If your glaze seems too runny, simmer it gently on the stove for a few minutes to thicken before brushing. Too thick? Warm it to a syrupy consistency so it glides smoothly on the chicken.
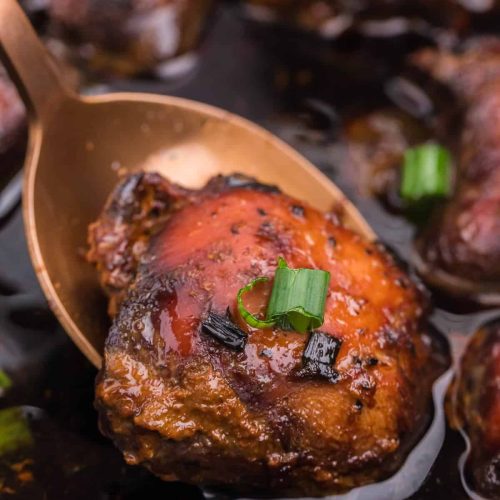
I’ve learned the hard way that over-basting makes the skin soggy, and under-basting leaves it a bit dull — timing is everything. Once you nail the rhythm, you’ll see that gorgeous shine develop gradually. My family’s top compliment: “It’s like restaurant Peking Duck, but better — because it’s you who made it!”
Storing and Reheating Tips
Room Temperature: If you’re serving dinner same day, you can leave leftover Peking Chicken covered loosely on the counter for up to 2–3 hours without issues. Just make sure to keep it out of direct heat or sunlight to preserve the glaze’s magic shine.
Refrigerator Storage: Store in an airtight container or wrapped tightly in foil for up to 3 days. I always separate the chicken pieces from any sides to avoid sogginess. When reheating, low and slow is your friend: reheat gently in a 300°F oven with a light foil tent to avoid drying out the meat while keeping the skin pleasantly crisp.
Freezer Instructions: Wrapped tightly in plastic wrap and then foil, Peking Chicken freezes surprisingly well up to 2 months. Thaw slowly overnight in the fridge, then reheat in the oven as mentioned. The glaze might dull a bit after freezing but a quick fresh brush of warm honey-soy glaze brightens it right up.
Glaze Timing Advice: If you’re prepping in advance, I recommend glazing right before baking for the crispiest skin. But if you freeze or refrigerate raw chicken post-brine, you can always brush the glaze on after thawing, then bake directly. For leftovers, a quick re-glaze before reheating brings back that irresistible sheen.
Frequently Asked Questions
Final Thoughts
Peking Chicken has truly become one of those dishes I reach for when I want something both comforting and impressive but without the fuss. There’s a warmth in the kitchen when this roasts — the scent, the crispy crackle, and the almost sticky sweetness that lingers in the air. I’ve shared this recipe countless times, and honestly, every time someone tries it, it disappears faster than I can carve it. It’s a dish that invites gathering, conversation, and plenty of eager forks reaching for more. If you’re a fan of glazed and roasted chicken dishes or want to branch into flavors inspired by classic Chinese cooking without the heavy lifting, give this a try. And when you do, I’d love to hear how yours turned out — drop a comment, share your twists, and maybe snap a pic or two! Happy cooking and here’s to many delicious meals filled with crispy, sweet-savory joy.
Peking Chicken
Ingredients
Main Ingredients
- 6 pieces boneless skinless chicken thighs
- 6 pieces green onions sliced
- 4 cloves garlic minced
- 0.25 cups soy sauce
- 3 tbsp honey
- 1 tbsp fresh ginger grated
- 1 tsp sesame oil
- salt and pepper to taste
Instructions
Preparation Steps
- Spray the inside of the slow cooker with cooking spray. Place chicken thighs inside and season with salt and pepper on both sides.
- In a small bowl, mix together green onions, garlic, soy sauce, honey, ginger, and sesame oil. Pour over top of the chicken thighs.
- Cook on LOW for 6 to 7 hours or until the chicken is cooked completely.