On a bright Saturday morning, I pull a sun-warmed peach from the fruit bowl and the kitchen fills with that sweet, floral perfume that only summer peaches bring. I smell vanilla, warm cinnamon, and a touch of citrus—and I know I’m about to bake something that feels like a hug. Peach Pie Bars are my family’s answer to “I want pie, but I don’t want to wait all day.” Think of it as peach pie in portable, shareable form: buttery crust, juicy peach filling, a kiss of cinnamon, and a glaze that gleams like sunshine. I’ve made these countless times, and they disappear in minutes at my house. This version is forgiving, friends-lovely, and the perfect companion for potlucks, picnics, or a cozy weekend treat with coffee. If you’ve got peaches at their peak, you’re about to fall in love—because these peach pie bars bring all the cozy, homey vibes of pie with half the fuss and twice the hugs.
What is peach pie bar?
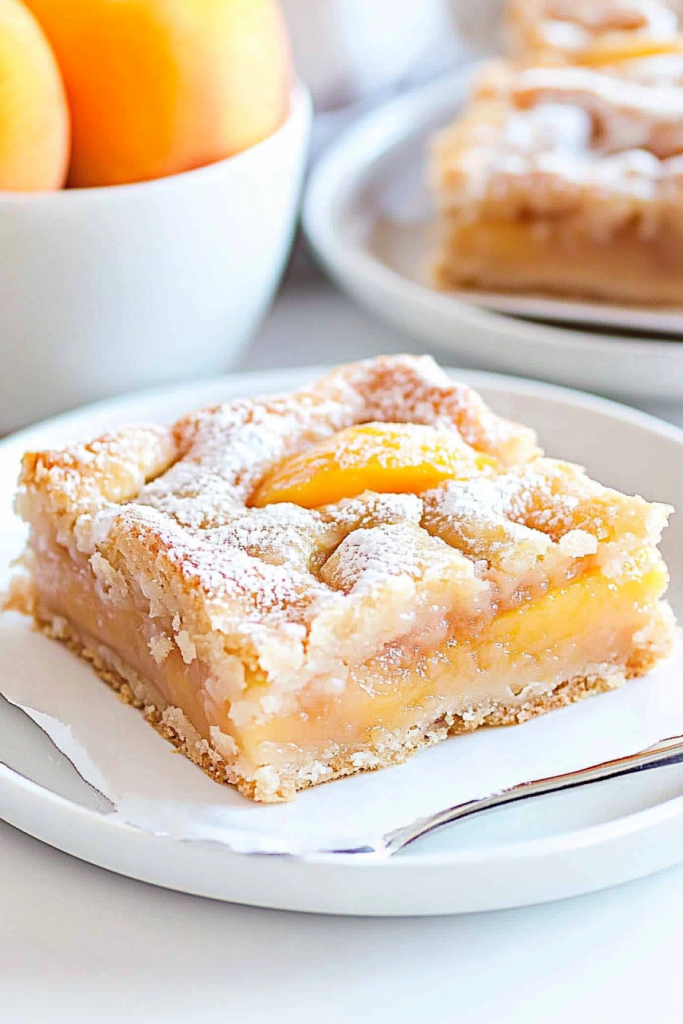
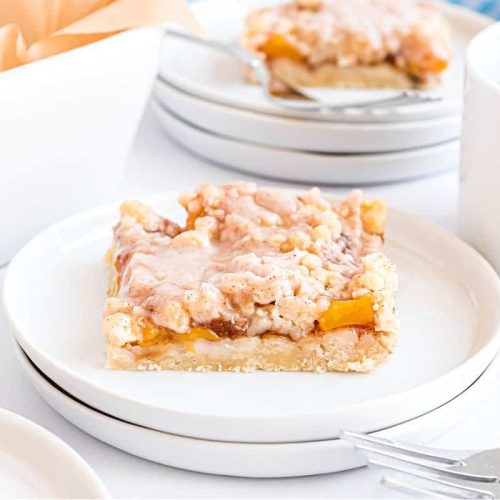
Peach Pie Bars are essentially a shortbread-like crust and a summer-true peach filling baked together in a pan, then cut into square bars. They’re like a peach cobbler and a classic pie had a delicious, portable baby. The name keeps things simple: you get all the peachy sweetness you crave, but in bite-sized pieces that travel well and stay neatly stacked on a platter. It’s essentially a dessert you can batch for a crowd without wrestling with pie tins or soggy crust edges. I love that the crust stays tender and sandy, the filling shines with bright peach flavor, and a light glaze on top gives that glossy finish you’d expect from a bakery treat. If you’ve ever wished for a peaches-first dessert that’s easy to portion, these peach pie bars are your new best friend.
Why you’ll love this recipe?
What I love most about these peach pie bars is how they feel both nostalgic and fresh at the same time. They’re sweet enough to feel like a celebration, but simple enough to throw together after a Busy Day. Here’s why they’re such a favorite in my kitchen:
- Flavor: The crust is lightly buttery and sandy, which plays perfectly against the bright, sun-kissed peach filling. A whisper of lemon juice brightens the fruit, while cinnamon adds warmth—it’s a flavor combo that reminds me of summer gatherings in my grandmother’s backyard.
- Simplicity: The process is friendly for beginners and forgiving for busy cooks. You mix dry ingredients, cut in butter, press into a pan, toss peaches with a quick filling, bake, and glaze. No tricky dough ligaments or rolling required.
- Cost-efficiency: What is the best way to measure cost-efficiency? Peaches tend to be affordable at peak season, and pantry staples cover most of the rest. This is the kind of dessert you can make with pantry staples and a few peaches stashed in the fruit bowl, and it still feels special.
- Versatility: You can swap in nectarines or white peaches with great results, or switch up the glaze with lemon, vanilla, or almond to match your mood. It also freezes beautifully, which means you can bake a big batch and keep a stash for later.
- Make-ahead magic: What is it? The bars can be chilled and sliced later, making them ideal for gatherings where you need plated desserts or a ready-to-go snack for the week.
If you’ve loved peach desserts like Peach Cobbler or peach turnover, you’ll recognize and treasure the balance here—peach-forward, not cloying, and with a texture that’s just a little indulgent. I’ve referenced these bars in other favorites like my blueberry peach bars and a seasonal rhubarb-berry variation, and I always get questions about how to maximize peach flavor. The answer is simple: use ripe, fragrant peaches, a touch of lemon or orange zest, and don’t overcook the fruit. These tiny details are what push peach pie bars from “good” to “I’m making them again tomorrow.”
How to Make Peach Pie Bars
Quick Overview
Here’s the streamlined path: whip up a short, crumbly crust, press it into a lined pan, toss sliced peaches with sugar, lemon juice, and a hint of cinnamon to become a vibrant filling, pour it over the crust, sprinkle with small crumbles of the remaining dough, bake until the top browns and the filling bubbles, then glaze while the bars cool. The result is a sturdy, sliceable bar with a glossy peach glaze that makes every bite feel like a little slice of summer. The steps are straightforward, and the timing stays friendly even when your oven temperature has a mind of its own.
Ingredients
For the Main Crust & Batter:
- 2 1/2 cups all-purpose flour
- 1/2 cup granulated sugar
- 1/2 teaspoon salt
- 1 cup unsalted butter, cold and cut into cubes (2 sticks)
- 2 tablespoons cornstarch
For the Filling:
- 4 cups peeled and sliced peaches (about 4–5 large peaches)
- 1/2 cup light brown sugar, packed
- 2 tablespoons fresh lemon juice
- 2 tablespoons cornstarch
- 1/2 teaspoon ground cinnamon
- 1/4 teaspoon salt
- 1 teaspoon vanilla extract
For the Glaze:
- 1/2 cup powdered sugar
- 2–3 tablespoons milk or peach juice
- 1/4 teaspoon almond extract (optional)
Step-by-Step Instructions
Step 1: Preheat & Prep Pan
Heat your oven to 350°F (175°C). Lightly grease a 9×13-inch baking pan and line it with parchment if you have it—this makes life a lot easier when you go to lift the bars out for slicing. I always dust the bottom with a little flour to keep the crust from sticking, especially if your butter is a touch soft.
Step 2: Mix Dry Ingredients
In a large bowl, whisk together the flour, granulated sugar, salt, and cornstarch. The cornstarch helps keep the crust tender and not too crumbly; you’ll notice it in the final bite: crisp edges, tender center.
Step 3: Mix Wet Ingredients
Drop in the cold butter cubes and use a pastry cutter, two knives, or your fingertips to blend until the mixture resembles chunky meal with a few pea-sized bits of butter. You want it to stay cool and crumbly, not smooth and doughy. The key is to create those small pockets of fat that melt during baking, turning the crust into a melt-in-your-mouth texture.
Step 4: Combine
Scoop about two-thirds of the crust mixture into the prepared pan and press it down evenly to form a crust layer. It should be compact but still a bit sandy to the touch. If you have time, refrigerate the crust for 15 minutes before baking; this helps it hold together better during the bake.
Step 5: Prepare Filling
In a separate bowl, toss the sliced peaches with the Brown Sugar, lemon juice, cornstarch, cinnamon, salt, and vanilla. You want the peaches to be glossy and evenly coated. If you’re using particularly juicy peaches, a touch more cornstarch will help keep the filling from oozing too much during baking.
Step 6: Layer & Swirl
Spread the peach filling evenly over the crust. Crumble the remaining crust mixture over the top in small clumps. With a knife or a small spatula, gently swirl to create ribbons and little marbled pockets on top—this not only looks pretty but adds texture in every bite.
Step 7: Bake
Slide the pan into the oven and bake for 40–50 minutes, or until the top is golden brown and the filling is bubbling at the edges. If the edges are browning too quickly, shield them with foil for the last 10 minutes. Every oven is different, so start checking at around 38 minutes. You want a firm, set filling that still holds some peachy juiciness.
Step 8: Cool & Glaze
Let the bars cool completely in the pan on a rack before glazing. This waiting period is the hardest part—patience, friend, we’ve earned it. Whisk together the powdered sugar, milk, and almond extract until smooth. Drizzle over the bars in long, slow strokes, then let the glaze set up a bit before slicing.
Step 9: Slice & Serve
Use a sharp knife to cut into neat bars. If you lined the pan with parchment, you can lift the whole slab out and slice on a cutting board for perfect edges. These peach pie bars shine with a scoop of vanilla ice cream, a drizzle of extra glaze, or a few fresh peach slices on top for presentation.
What to Serve It With
These bars are a versatile crowd-pleaser, and they pair beautifully with a few thoughtful accompaniments. Here are ideas to fit different moments:
For Breakfast: a cup of strong coffee or a latte, plus a light dusting of cinnamon sugar and a dollop of lemon yogurt on the side for contrast.
For Brunch: serve warm with a side of fresh berries and a sparkling peach sangria or a citrus-infused iced tea. A delicate mint sprig on top adds a pop of color.
As Dessert: a scoop of vanilla or cinnamon ice cream, plus a drizzle of extra glaze and some toasted almond slices for crunch.
For Cozy Snacks: warmed slightly in the microwave for 8–10 seconds, then topped with whipped cream or a dollop of crème fraîche—comfort in bar form.
My family loves the way these bars taste when they’ve been chilled and then served with coffee after dinner. It’s become a little tradition around here: we bake a big tray, let it cool, then cut before dessert so there’s always a portion left for a late-night craving. I’ve even tucked a batch into the freezer for emergencies—summer or school-year chaos—because nothing says “you’ve got this” like a tray of peach pie bars waiting in the wings.
Top Tips for Perfecting Your Peach Pie Bars
These notes come from years of tweaking, tasting, and learning the subtle quirks of summer fruit desserts. I jot down little reminders for myself, and I’m sharing them with you so you don’t miss a beat.
Peach Prep: The fruit matters. Use peaches that are fragrant and at peak ripeness. If you’ve got a few underripe peaches, a quick roast in the oven for 8–10 minutes concentrates their flavor and improves texture. If you’re using a mix of peach varieties, the sweeter ones can balance a touch more lemon juice without losing brightness.
Mixing Advice: Don’t overwork the dough once the butter goes in. You want to keep those cold butter pockets intact. A few coarse crumbles left in the mixture is fine—those pockets melt in the oven and create that tender, slightly crumbly crust we love.
Swirl Customization: The top doesn’t have to be perfectly even. Scatter a few larger crumble clusters for texture, then swirl with a knife to create rustic ribbons. If you want more marbling, reserve a little crust mix, crumble, and swirl just before baking for a more dramatic pattern.
Ingredient Swaps: Swap some of the all-purpose flour for almond flour for a nutty depth, or swap peaches with nectarines for a slightly different texture. If you’re dairy-free, use a full-fat coconut oil in place of butter in the crust (you’ll need to chill it and crumb it similarly). The glaze, too, can be swapped for a simple lemon glaze if you want brighter acidity.
Baking Tips: Oven heat can distort bake times. If your oven runs hot, drop the temperature 25 degrees and bake a bit longer. If it runs cool, you may need to go a touch higher or give the bars a few extra minutes. The toothpick test should come out with a few moist crumbs, not a clean dry stick, indicating you’re done but not overbaked.
Glaze Variations: If you like a thinner glaze, whisk in a little more milk. For a zippier finish, add a splash of lemon juice or a pinch of orange zest. If you want a creamy finish, swirl in a tablespoon of cream cheese to the glaze and beat until smooth.
My favorite lesson from testing this recipe is that the fruit’s acidity can shift the glaze sweetness. If the peaches taste particularly tart, you’ll want a touch more powdered sugar in the glaze or a splash more lemon juice to balance. It’s small adjustments that make a big difference in the final bite.
Storing and Reheating Tips
These peach pie bars store well and slice cleanly, which is half the battle with desserts that have fruit in them. Here’s how I keep them at peak flavor and texture.
Room Temperature: In a covered cake stand or airtight container, these bars stay fresh for 2–3 days. If your kitchen is warm, keep them in the fridge to prevent the glaze from softening too much.
Refrigerator Storage: They’re great right from the fridge; the crust firms up and the flavors mellow into a deeper peachy note. Store in an airtight container for up to 5 days; bring them to room temperature for about 15–20 minutes before serving for the best texture.
Freezer Instructions: Freeze bars individually wrapped or in a single-layer pan, then double-wrap for protection. They’ll stay good for up to 2–3 months. Thaw in the fridge overnight or on the counter for a few hours and refresh with a quick 10-second zap in the microwave if you want a warm, gooey center.
Glaze Timing Advice: If you’re serving within a day, glaze as directed. If you’re freezing, skip the glaze and add it after you thaw and are ready to serve for the freshest shine and texture.
These tips are the ones I rely on most when I’m feeding a crowd or packing for a weekend trip. The goal is simple: you want peach pie bars that taste like they were baked moments ago, whether you pull them from the fridge or the freezer.
Frequently Asked Questions
Final Thoughts
This peach pie bars recipe is a little pocket of sunshine you can share with friends and family any time peaches peak. The crust stays tender, the filling tastes like a sunlit Sunday, and the glaze finish adds just the right amount of gloss to make it feel special without fuss. If you’re craving something that tastes like a celebration but won’t complicate your day, this is it. My kids actually ask for seconds, and coworkers always ask for the recipe—consider this a favorite handed down through friends, not just a blog post. If you try it, I’d love to hear which peach variety you used and how you liked the glaze. Happy baking, friends, and may your kitchen smell like summer all year long!
peach pie bars
Ingredients
Main Ingredients
- 1 cup unsalted butter, melted
- 1 cup powdered sugar
- 2.75 cups all-purpose flour
- 2 teaspoons vanilla extract
- 1 can peach pie filling (21 ounce)
- 1 teaspoon ground cinnamon
Instructions
Preparation Steps
- Preheat oven to 350 degrees F. Line a 13x9 inch baking dish with parchment paper and set aside.
- In a large bowl, whisk together melted butter, powdered sugar, flour, and vanilla until the mixture resembles coarse crumbs.
- Reserve 1 cup of the crumb mixture. Press the remaining crumb mixture into the bottom of the prepared dish.
- Spread peach pie filling over the crust. Sprinkle with ground cinnamon.
- Crumble the remaining crust over the filling.
- Bake for about 30 minutes until edges are lightly browned. Allow to cool before slicing.


