There are some recipes that just feel like sunshine on a plate, and this Fruit Pizza is absolutely one of them. I remember the first time I ever made it, it was for a neighborhood potluck, and I was a little nervous because it was a bit different from my usual go-to Chocolate Chip Cookies. But oh my goodness, it was a hit! People raved about it, asking for the recipe before they’d even finished their first slice. Now, it’s practically a staple in my house, especially when those warmer months roll around and fresh fruit is just begging to be used. It’s so vibrant and delicious, and honestly, it’s way easier to whip up than you might think. If you love a good dessert but want something a little lighter and so much more colorful than, say, a heavy cheesecake, this fruit pizza is going to be your new best friend. It’s my answer to those “I need something sweet but not *too* heavy” cravings.

What is fruit pizza?
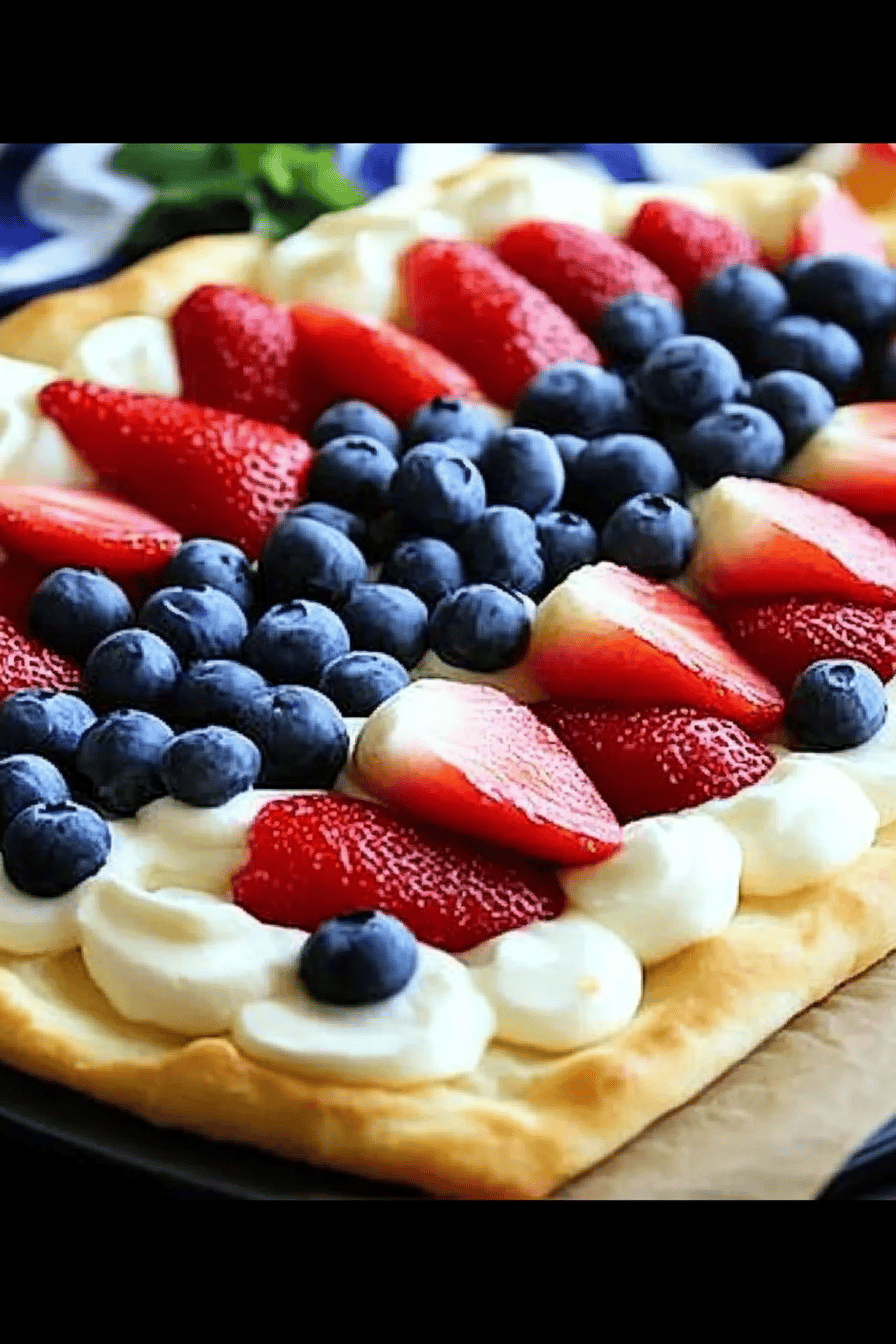
So, what exactly *is* this magical creation we call Fruit Pizza? It sounds a bit unusual, doesn’t it? But trust me, it’s absolutely delightful! Think of it as a dessert that takes all the best parts of a creamy cheesecake, a soft cookie base, and a beautiful arrangement of fresh fruit, and combines them into one show-stopping treat. It’s not like a savory pizza with tomato sauce and cheese, of course! Instead, we start with a sweet, soft, cookie-like crust, spread a luscious, creamy frosting over the top – kind of like a Cream Cheese Frosting but a little lighter – and then we decorate it all with a vibrant mosaic of fresh, colorful fruits. The name “Fruit Pizza” just really stuck because of its round shape and the way you slice it into wedges, just like a pizza. It’s essentially a giant, deconstructed fruit tart but with a tender, slightly chewy cookie base that makes it so much more approachable and fun.
Why you’ll love this recipe?
Honestly, there are so many reasons why I keep coming back to this Fruit Pizza Recipe, and I’m certain you’ll fall in love with it too. First off, the flavor combination is just out of this world. You get that sweet, buttery undertone from the cookie crust, then the tangy, slightly sweet creaminess from the frosting, all balanced perfectly by the fresh, juicy burst of the fruit. It’s a party in your mouth! And let’s talk about simplicity, because who doesn’t love an easy win in the kitchen? This recipe is surprisingly straightforward. Even if you’re not a seasoned baker, you can totally nail this. The crust comes together in minutes, the frosting is just a quick whisk, and the decorating is the most fun part! It’s also wonderfully cost-efficient. You can often use fruits that are on sale or already in your fridge, making it a budget-friendly way to impress. What I love most, though, is its incredible versatility. You can swap out fruits based on the season, your mood, or what you have on hand. It’s perfect for birthdays, holidays, summer picnics, or just because you deserve a treat. It’s like my no-bake Berry Tart cousin, but with that satisfying cookie base that makes it feel extra special and less fussy.
How do I make fruit pizza?
Quick Overview
Making this gorgeous Fruit Pizza is a three-part harmony: a tender cookie base, a luscious Cream Cheese frosting, and a rainbow of fresh fruit. You’ll mix up a simple cookie dough, press it into a pan, and bake it until golden. While that cools, you’ll whip up the creamy frosting. Once everything is ready, you’ll spread the frosting over the cooled crust and arrange your favorite fruits in a beautiful pattern. It’s incredibly straightforward, with no complicated techniques, making it perfect for any skill level. The whole process is quite speedy, especially if you have a stand mixer to do some of the heavy lifting!
Ingredients
For the Main Batter:
1 cup (2 sticks) unsalted butter, softened: Make sure it’s truly softened, not melted. It makes all the difference for a tender crust.
1 cup granulated sugar: For that classic cookie sweetness.
2 large eggs: Room temperature is best for even mixing.
1 teaspoon vanilla extract: Don’t skimp on this; it adds so much warmth!
2 ½ cups all-purpose flour: Sifted, if you want an extra delicate texture, though not strictly necessary.
1 teaspoon baking powder: Gives the crust a little lift.
½ teaspoon salt: Balances the sweetness.
For the Filling:
8 ounces Cream Cheese, softened: Full-fat gives the creamiest results. Make sure it’s nice and soft so it’s easy to blend.
½ cup powdered sugar: For a smooth, sweet frosting without any graininess.
¼ cup sour cream or Greek yogurt: This is my secret for an extra creamy, slightly tangy frosting. Greek yogurt works wonderfully if you want it a bit lighter!
1 teaspoon vanilla extract: Enhances the creamy flavor.
For the Glaze:
½ cup apricot jam or apple jelly: This adds a beautiful shine and a touch of sweetness. Warm it up gently to make it easier to spread.
Fresh fruit for topping: A colorful assortment like strawberries, blueberries, kiwi, raspberries, mandarin oranges, grapes, sliced peaches, or whatever you love!

Step-by-Step Instructions
Step 1: Preheat & Prep Pan
First things first, let’s get that oven preheated to 375°F (190°C). Grab a 12-inch pizza pan or a 9-inch round cake pan. You don’t need to grease it or line it; the cookie dough has plenty of butter and won’t stick if you let the crust cool properly. Just make sure your pan is clean and ready to go!
Step 2: Mix Dry Ingredients
In a medium bowl, whisk together the all-purpose flour, baking powder, and salt. Give it a good stir to make sure everything is evenly distributed. This simple step ensures your leavening agent and salt are perfectly incorporated, which is key for a consistent bake. You don’t want any pockets of baking powder!
Step 3: Mix Wet Ingredients
In a large bowl (or the bowl of your stand mixer), cream together the softened butter and granulated sugar until light and fluffy. This usually takes about 3-5 minutes. Beat in the eggs one at a time, making sure each is fully incorporated before adding the next. Then, stir in the vanilla extract. It should look smooth and beautifully emulsified.
Step 4: Combine
Gradually add the dry ingredients to the wet ingredients, mixing on low speed (or with a spatula) until just combined. Be careful not to overmix! Overmixing develops the gluten in the flour, which can make your crust tough. We’re aiming for a soft, pliable cookie dough. If it seems a little sticky, that’s okay; it will firm up a bit.
Step 5: Prepare Filling
While the crust is baking and cooling, let’s make that dreamy filling. In a medium bowl, beat the softened cream cheese until smooth and creamy. Then, beat in the powdered sugar and vanilla extract until well combined and lump-free. Finally, stir in the sour cream or Greek yogurt until everything is wonderfully smooth and luscious. It should be thick but spreadable.
Step 6: Layer & Swirl
Once your cookie crust has cooled completely on a wire rack (this is important, otherwise your frosting will melt!), spread the cream cheese filling evenly over the top, going all the way to the edges. Now for the fun part: arranging your fresh fruit! Get creative! You can make concentric circles, a beautiful mosaic, or just a colorful jumble. There’s no wrong way to do it!
Step 7: Bake
Oops, I skipped ahead a step! After you’ve layered the fruit on the cooled crust with the frosting, that’s it! You don’t bake it again. My apologies! The baking is all done for the crust. The beauty of this recipe is that the fruit stays fresh and vibrant. So, after frosting and topping with fruit, you can move straight to the glaze.
Step 8: Cool & Glaze
Gently warm the apricot jam or apple jelly in a small saucepan over low heat or in the microwave for about 20-30 seconds until it’s just slightly melted and pourable. Using a pastry brush, gently brush the warm glaze over the fruit. This gives it a beautiful sheen and helps preserve the fruit’s freshness. It also adds a subtle layer of sweetness.
Step 9: Slice & Serve
Now for the grand finale! Carefully slice your gorgeous Fruit Pizza into wedges using a sharp knife or a pizza cutter. Serve immediately and watch it disappear! It’s best enjoyed within a few hours of making it, so the fruit stays at its freshest and the crust maintains its perfect texture.
What to Serve It With
This Fruit Pizza is so versatile, it truly fits into any meal or occasion. For a delightful breakfast, imagine a slice served alongside a strong cup of coffee. It’s a sweet start to the day without feeling heavy. For a more festive brunch spread, this is a showstopper! Arrange a few slices on a tiered stand with some mini quiches and fresh pastries. It adds a burst of color and freshness that everyone will appreciate. As a dessert, it’s perfect after a hearty meal. Pair it with a light, crisp white wine or a sparkling cider. The fruity notes complement each other beautifully. And for those cozy, spontaneous snack attacks? This is your go-to. A generous slice with a glass of cold milk or a refreshing iced tea is pure comfort. My family loves it after Sunday dinner, and I often pack a slice for my husband’s lunch if there are leftovers (which is rare!). It’s also a lifesaver for last-minute get-togethers; it looks impressive but takes hardly any time at all.
Top Tips for Perfecting Your Fruit Pizza
I’ve made this Fruit Pizza more times than I can count, and over the years, I’ve picked up a few little tricks that I think make a big difference. For the crust, always ensure your butter is properly softened. If it’s too cold, you’ll get lumps; if it’s melted, your cookies will spread too much and become thin. Creaming the butter and sugar until light and fluffy is crucial – that’s where you incorporate air, which makes the crust tender. When you add the dry ingredients, mix *just* until combined. Seriously, don’t overdo it! A few streaks of flour are better than a tough crust. For the frosting, using room temperature cream cheese is a must. Cold cream cheese will result in a lumpy frosting. If you’re in a pinch, you can soften cream cheese in the microwave on low power for very short intervals, but watch it carefully! I learned that the hard way once and ended up with melted cream cheese, which was… not ideal. The sour cream or Greek yogurt is key for that extra creamy texture; I’ve tried it with just cream cheese, and while good, it’s not quite as luxurious. For the fruit topping, use whatever is in season and looks best. Berries are always a winner, but don’t shy away from kiwi, mango, or stone fruits when they’re available. Make sure your fruit is washed and thoroughly dried before arranging it. Excess moisture can make the frosting watery. And the glaze – a thin, even layer is best. You don’t want to drown the fruit, just give it that beautiful shine and a hint of sweetness. If your jam is too thick, add a tiny splash of water or juice and warm it gently.
Storing and Reheating Tips
Storing this beautiful Fruit Pizza is pretty straightforward, but there are a few things to keep in mind to maintain its freshness. It’s best enjoyed the day it’s made, but leftovers are still delicious! If you have any, cover it loosely with plastic wrap or aluminum foil. It can be stored at room temperature for up to 4 hours, but if your kitchen is warm or you plan to store it longer than that, your refrigerator is the best bet. In the fridge, it will stay good for about 2-3 days. I like to store it in an airtight container if possible, or just make sure it’s well-covered to prevent it from absorbing other odors from the fridge. When it comes to reheating, I usually don’t reheat it at all! It’s designed to be enjoyed chilled or at room temperature. If your crust has become a little soft from refrigeration, you can gently warm a slice in a toaster oven for just a few minutes on a low setting (around 300°F or 150°C) to crisp it up slightly. Be very careful not to melt the frosting or overcook the fruit. The glaze is best applied just before serving if you plan to store it for a while, as it can sometimes make the fruit a bit soggy over time. If you’ve already glazed it and are storing it, just ensure it’s well-covered.
Frequently Asked Questions
Final Thoughts
There you have it – my absolute favorite Fruit Pizza recipe! It’s a dish that consistently brings smiles to faces, from my own family to friends and neighbors. The combination of the tender, buttery crust, the velvety cream cheese filling, and the burst of fresh fruit is simply unbeatable. It’s elegant enough for a special occasion but easy enough for a weeknight treat. If you love vibrant flavors and a dessert that feels both indulgent and refreshing, you simply must give this a try. It’s a fantastic way to celebrate seasonal produce and create something beautiful and delicious. I really hope you enjoy making it as much as we love eating it! If you try it out, please let me know in the comments below – I’d love to hear about your fruit combinations and how it turns out for you. And if you’re looking for more bright and beautiful recipes, you might also enjoy my Lemon Blueberry Scones or my No-Bake Raspberry Mousse. Happy baking, and enjoy every colorful, fruity bite!

Fruit Pizza
Ingredients
Crust
- 1.5 cups all-purpose flour
- 0.5 teaspoon baking soda
- 0.25 teaspoon salt
- 0.75 cup unsalted butter softened
- 0.75 cup granulated sugar
- 1 large egg
- 1 teaspoon vanilla extract
Frosting
- 8 ounces cream cheese softened
- 0.75 cup powdered sugar
- 0.5 teaspoon vanilla extract
Topping
- 1 cup strawberries sliced
- 1 cup blueberries
- 1 cup kiwi sliced
- 0.5 cup raspberries
Instructions
Crust
- Preheat oven to 350°F (175°C). In a bowl, whisk together flour, baking soda, and salt.
- In a separate bowl, cream together butter and sugar until light and fluffy. Beat in egg and vanilla.
- Gradually add dry ingredients to wet ingredients, mixing until just combined.
- Press dough into a 12-inch circle on a baking sheet lined with parchment paper.
- Bake for 12-15 minutes, or until golden brown. Let cool completely.
Frosting
- In a bowl, beat cream cheese, powdered sugar, and vanilla extract until smooth.
- Spread frosting evenly over cooled crust.
Assembly
- Arrange fruit on top of frosting.
- Slice and serve immediately or chill for later.