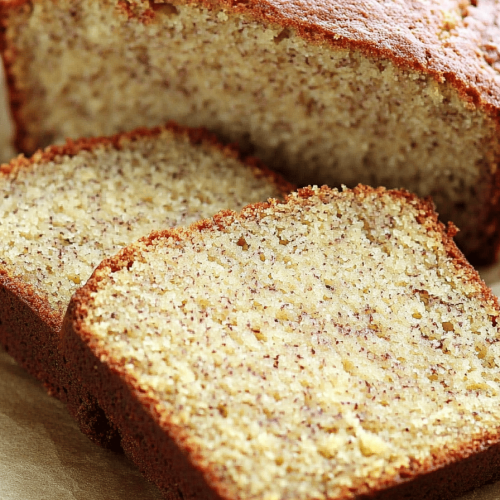
Oh, where do I even begin with this Gluten-Free Banana Cake? It feels like just yesterday I was a kid, sneaking bites of my mom’s Banana Bread straight from the cooling rack, the smell of cinnamon and ripe bananas filling our tiny kitchen. That memory is so vivid, so comforting, and it’s exactly what I tried to capture in this recipe. If you’ve ever loved a moist, tender, and ridiculously flavorful banana bread or cake, then prepare yourself, because this gluten-free version is going to knock your socks off. It’s the kind of cake that makes a regular Tuesday feel like a special occasion, and it’s honestly a lifesaver when those sudden sweet cravings hit and you want something that tastes homemade without all the fuss. Forget dry, crumbly gluten-free baked goods; this one is rich, decadent, and surprisingly simple to pull together. It’s become a staple in my house, and I’m so excited to share it with you!
What is gluten free banana cake?
So, what exactly *is* this gluten-free banana cake I’m raving about? Think of it as your classic, beloved Banana Bread, but elevated. It’s a moist, tender cake that uses a special blend of gluten-free flours to achieve that perfect crumb without any of the gluten. The star of the show, of course, is ripe bananas, which lend an incredible natural sweetness and moisture. But it’s not just about the bananas; we’ve got warm spices like cinnamon and a hint of nutmeg that just hug you from the inside out. The “cake” part means it’s a bit lighter and fluffier than traditional banana bread, making it perfect for dessert or a special breakfast. It’s essentially a hug in cake form, designed to be approachable for anyone, whether you’re new to gluten-free baking or a seasoned pro. It’s the kind of recipe that makes you forget you’re eating something gluten-free because it’s just *that* good.
Why you’ll love this recipe?
What are the reasons why this gluten-free banana cake is a winner?flavor. It’s intensely banana-y, with those warm, comforting spicessimplicity. I know baking can sometimes feel intimidating, especially when you’re navigating gluten-free flours, but I’ve worked hard to make this recipe foolproof. The steps are straightforward, and there’s no fancy equipment needed. Plus, it’s incredibly cost-efficient. You likely already have most of the ingredients in your pantry, and ripe bananas are usually on sale or are just those ones that have gotten a little too spotty to eat raw. What I love most about this cake is its versatility. It’s fantastic on its own, but it also pairs beautifully with so many things. You can serve it warm with a dollop of Whipped Cream, or drizzle it with a simple glaze. It’s a go-to for my family for everything from a special breakfast treat to an after-school snack. It’s far superior to a standard store-bought cake mix, and I guarantee it’ll become a favorite in your home too. It’s the kind of recipe you’ll find yourself making again and again, especially when you need a reliably delicious gluten-free treat that everyone will love.
How to Make Gluten-Free Banana Cake
Quick Overview
Making this gluten-free Banana Cake is surprisingly straightforward. You’ll start by mashing your ripe bananas and then mixing your wet and dry ingredients separately before combining them. The magic happens when you gently fold everything together to create a wonderfully moist batter. Then, it’s just a matter of baking until golden and fragrant. The whole process, from start to finish, is really quite manageable, even on a busy weeknight. It’s designed to be forgiving, which is exactly what you want in a go-to recipe.
Ingredients
For the Main Batter:
You’ll need about 3-4 very ripe bananas, mashed well. The riper, the better – those brown spots are pure flavor! I always look for bananas that are almost black; they give the best moisture and sweetness. For the flour, I’ve found a good gluten-free all-purpose blend that contains xanthan gum works wonderfully. Look for one that’s a mix of rice flour, tapioca starch, and potato starch for the best texture. You’ll also need baking soda and baking powder for leavening, a pinch of salt to balance the sweetness, and some ground cinnamon and nutmeg for that warm, cozy spice profile. A touch of Brown Sugar adds a lovely caramel note, and granulated sugar keeps it light. Unsalted butter, softened, or your favorite neutral oil like canola or melted coconut oil, will provide richness. And don’t forget the eggs – they bind everything together and add structure. A splash of milk (dairy or non-dairy) helps achieve that perfect batter consistency.
For the Filling:
This is where we add an extra layer of deliciousness. You can do a simple cinnamon-sugar swirl, which is my personal favorite for its ease and classic flavor. Just mix a few tablespoons of brown sugar with a teaspoon of cinnamon. Another option is a chocolate chip swirl – who doesn’t love chocolate chips? You can also add chopped nuts like walnuts or pecans for a nice crunch.
For the Glaze:
For a simple, elegant finish, a basic powdered sugar glaze is perfect. You’ll need powdered sugar and just a tiny bit of milk or lemon juice for tang. If you want something a bit richer, a cream cheese glaze is heavenly, or even a simple drizzle of melted chocolate!
Step-by-Step Instructions
Step 1: Preheat & Prep Pan
First things first, get that oven preheating to 350°F (175°C). This is crucial because you want the oven to be at the right temperature the moment your batter is ready. While it’s heating, grease and flour a 9×5 inch loaf pan. I usually use a little butter or cooking spray, and then dust it with gluten-free flour or cocoa powder if I’m going for a chocolatey vibe. Alternatively, you can line it with parchment paper, leaving some overhang on the sides so you can easily lift the cake out later. This makes cleanup a breeze!
Step 2: Mix Dry Ingredients
In a large bowl, whisk together your gluten-free all-purpose flour blend, baking soda, baking powder, salt, cinnamon, and nutmeg. Whisking them thoroughly ensures that the leavening agents are evenly distributed, which is super important for a good rise. You want to see a uniform color and texture, with no pockets of flour or spice. This step also helps aerate the flour a bit, leading to a lighter cake.
Step 3: Mix Wet Ingredients
In a separate medium bowl, mash your very ripe bananas until they’re pretty smooth, leaving just a few small lumps for texture. Then, add your softened butter (or oil), granulated sugar, brown sugar, eggs, and milk. Whisk everything together until it’s well combined and the mixture is smooth and creamy. Make sure your eggs are at room temperature if possible; they incorporate better this way!
Step 4: Combine
Now, pour the wet ingredients into the bowl with the dry ingredients. Using a spatula or a wooden spoon, gently fold everything together until *just* combined. It’s really important not to overmix here! Overmixing can develop the starches in gluten-free flour too much, resulting in a dense cake. A few streaks of flour are okay; they’ll disappear as you add the swirl ingredients. The batter should look thick but pourable.
Step 5: Prepare Filling
If you’re doing a cinnamon-sugar swirl, simply combine about 2-3 tablespoons of brown sugar with 1 teaspoon of cinnamon in a small bowl. If you’re adding chocolate chips or nuts, have them ready to go.
Step 6: Layer & Swirl
Pour about half of the banana cake batter into your prepared loaf pan. Sprinkle half of your chosen filling mixture (cinnamon-sugar, chocolate chips, nuts) over the batter. Then, carefully spoon the remaining batter over the top. Sprinkle the rest of the filling over the second layer of batter. Now, take a butter knife or a skewer and gently swirl the filling into the batter. Don’t over-swirl; you want distinct ribbons of flavor, not a muddy mess. A few simple back-and-forth motions will do the trick!
Step 7: Bake
Place the loaf pan in the preheated oven. Bake for 50-65 minutes. The exact time will depend on your oven and the depth of your pan. You’ll know it’s done when a wooden skewer or toothpick inserted into the center comes out clean, or with just a few moist crumbs attached. The top should be golden brown and firm to the touch.
Step 8: Cool & Glaze
Once baked, let the cake cool in the pan for about 10-15 minutes. This allows it to set up properly. Then, carefully remove it from the pan using the parchment paper overhang or by inverting it onto a wire rack. Let it cool completely before glazing. If you try to glaze a warm cake, the glaze will just melt right off!
Step 9: Slice & Serve
Once cooled and glazed (if using), slice the cake with a sharp knife. For the cleanest slices, I often find it best to slightly chill the cake after glazing. Serve warm or at room temperature. It’s absolutely divine on its own, but even better with a cup of coffee or tea!
What to Serve It With
This gluten-free banana cake is so versatile, it can fit into almost any meal or occasion! For Breakfast, it’s a wonderful alternative to toast or cereal. Slice it thin, warm it up slightly, and enjoy it with a strong cup of coffee or a refreshing glass of orange juice. The natural sweetness makes it feel indulgent but it’s still a wholesome start to the day. For Brunch, I love to present it on a pretty platter, perhaps with a light dusting of powdered sugar or a drizzle of that simple vanilla glaze. It pairs beautifully with fresh fruit salad and mimosas. If you’re serving it as Dessert, that’s where it truly shines. A dollop of freshly whipped cream or a scoop of vanilla bean ice cream takes it to the next level. A drizzle of caramel sauce or a sprinkle of toasted nuts can add extra elegance. And for those cozy Snacks? It’s perfect simply sliced and enjoyed with a glass of cold milk or a warm mug of herbal tea. My kids love it after school, and it’s honestly my go-to for a late-night treat when I’m craving something sweet but don’t want to make a whole production out of it. I’ve even served slices with a side of Greek yogurt and berries, making it a more balanced, substantial snack.
Top Tips for Perfecting Your Gluten-Free Banana Cake
Over the years of making this (and let me tell you, there have been *many* years and *many* cakes!), I’ve picked up a few tricks that I think really make a difference. For the bananas, ripeness is key. Seriously, don’t be afraid of those black, spotty bananas. They’re the sweetest and easiest to mash, contributing the most moisture and banana flavor. If your bananas aren’t quite ripe enough, you can speed things up by placing them on a baking sheet in a moderately hot oven (around 300°F/150°C) for about 10-15 minutes until the skins turn black. Watch them closely! When it comes to mixing, remember my earlier warning: do NOT overmix. Gluten-free flours can get gummy if overworked. Mix until *just* combined. You’ll see some streaks of flour, and that’s okay. Trust me on this one; it’s better to have a few little flour pockets than a tough cake.
For the swirl customization, don’t go crazy. Gentle is the name of the game. A few passes with a knife are all you need to create beautiful marbling. If you want a more defined swirl, try swirling in opposite directions. For visual appeal, aim for contrast; a dark cinnamon-sugar swirl against the lighter batter looks stunning. If you’re feeling adventurous with ingredient swaps, I’ve successfully subbed out half the butter for unsweetened applesauce for a lighter version, though it does make it a touch denser. You can also add a teaspoon of vanilla extract to the wet ingredients for an extra layer of flavor. When it comes to baking, every oven is a bit different. It’s always a good idea to start checking for doneness around the 50-minute mark. If the top is browning too quickly but the center isn’t cooked, you can loosely tent the cake with aluminum foil. For glaze variations, if your powdered sugar glaze is too thick, add a tiny bit more liquid (milk or lemon juice) drop by drop until it reaches your desired drizzling consistency. If it’s too thin, add more powdered sugar. A simple drizzle of melted dark chocolate is also a showstopper!
Storing and Reheating Tips
One of the best things about this gluten-free banana cake is how well it stores. I usually make a loaf on Sunday, and it’s gone by Wednesday! If you’re storing it at room temperature, make sure it’s completely cooled first. Wrap it tightly in plastic wrap or place it in an airtight container. It should stay fresh and moist for about 2-3 days. Just keep it away from direct sunlight or heat, which can make it go stale faster.
For longer storage, the refrigerator is your best friend. Again, ensure the cake is fully cooled. Wrap it well in plastic wrap, then in aluminum foil, or store it in a sturdy airtight container. It will keep well in the fridge for up to a week. When you’re ready to enjoy it, you can eat it cold, or warm a slice gently in the microwave for about 15-20 seconds to bring back some of that fresh-baked warmth. For freezer instructions, this cake freezes beautifully! After it’s completely cooled, wrap it very tightly in plastic wrap, then in aluminum foil, and finally place it in a freezer-safe bag or container. It can stay frozen for up to 2-3 months. To thaw, simply remove it from the freezer and let it come to room temperature on the counter for a few hours. If you’ve glazed it, you might want to add the glaze *after* it’s thawed for the best appearance, especially if it’s a simple powdered sugar glaze that might soften.
Frequently Asked Questions
Final Thoughts
I truly hope you give this gluten-free banana cake a try. It’s more than just a recipe to me; it’s a taste of home, a reminder of sweet family moments, and proof that gluten-free baking can be absolutely spectacular. It’s moist, incredibly flavorful, and so satisfyingly simple to make. Whether you’re baking for yourself, your family, or friends, this cake is sure to be a hit, and they’ll never guess it’s gluten-free! If you enjoy this recipe, you might also like my Gluten-Free Chocolate Chip Cookies or my Easy Gluten-Free Blueberry Muffins, which are also family favorites. I can’t wait to hear what you think of this banana cake! Please leave a comment below with your thoughts, your own variations, or any questions you might have. Happy baking, and enjoy every single bite!
Gluten-Free Banana Cake
Ingredients
Main Ingredients
- 3 medium Ripe bananas
- 0.75 cup Granulated sugar
- 0.5 cup Unsalted butter melted
- 2 large Eggs
- 1 teaspoon Vanilla extract
- 1.75 cup Gluten-free all-purpose flour
- 1 teaspoon Baking soda
- 0.5 teaspoon Salt
Instructions
Preparation Steps
- Preheat oven to 350°F (175°C). Grease and flour a 9x13 inch baking pan.
- In a large bowl, mash the bananas. Add the sugar and melted butter and mix well.
- Beat in the eggs and vanilla extract.
- In a separate bowl, whisk together the gluten-free flour, baking soda, and salt.
- Gradually add the dry ingredients to the wet ingredients, mixing until just combined.
- Pour the batter into the prepared pan and bake for 45-55 minutes, or until a toothpick inserted into the center comes out clean.
- Let the cake cool in the pan for 10 minutes before inverting it onto a wire rack to cool completely.