You know, there are some recipes that just stick with you. They become the ones you automatically reach for when company’s coming, when you need a quick healthy snack, or even just when you’re craving something utterly delicious and comforting. For me, that recipe is this Greek hummus. It’s not just any hummus; it’s that ultra-creamy, ridiculously flavorful version that makes you close your eyes and sigh with happiness. Forget those grainy, bland store-bought tubs; this is the real deal, and honestly, it’s so much easier than you think. I remember the first time I tried to make hummus from scratch years ago, and it was… well, let’s just say it was an adventure. It ended up a bit too thick, a little gritty, and I almost gave up. But then I discovered a few little tricks, and this Greek hummus recipe was born. It’s become my absolute favorite, a true lifesaver, and it’s the one I always bring to potlucks because it disappears in minutes. If you’ve ever thought hummus was complicated, stick with me, because this version will change your mind and your taste buds forever. It’s seriously that good!
What is Greek Hummus?
So, what exactly makes this Greek hummus different from the standard fare? Think of it as your classic chickpea dip, but with a few Mediterranean-inspired upgrades that elevate it from good to absolutely unforgettable. At its heart, it’s still made from those wonderful little chickpeas, tahini (sesame paste), lemon juice, and garlic. But the “Greek” part comes in with a few key players and techniques that give it this incredible silky texture and a brighter, more complex flavor. It’s essentially a super-charged, exceptionally smooth version of your favorite dip, with a subtle zest that just sings. We’re talking about using incredibly smooth tahini, a touch of extra virgin Olive oil right in the blend, and sometimes a little secret ingredient that I’ll get to later that just takes it to another level. It’s not about reinventing the wheel, but about fine-tuning it to perfection. It’s a dip, a spread, a flavor explosion – all in one beautiful bowl!
Why you’ll love this recipe?
What is Greek Hummus?flavor is just out of this world. It’s incredibly rich and nutty from the tahini, bright and zesty from the lemon, with just the right kick of garlic. It’s not overpowering, but perfectly balanced, making you want scoop after scoop. Then there’s the simplicity. I know, I know, “from scratch” can sound intimidating, but I promise, this is ridiculously easy. Once you have your chickpeas ready (canned is totally fine, by the way!), it’s a matter of a few minutes in the food processor. You’ll be amazed at how quickly you can whip up something this delicious. And let’s talk about Cost-efficiency: What is the best way to measure cost-efficiency?. Making your own hummus is so much more budget-friendly than buying pre-made, especially when you’re going for those fancy gourmet tubs. You control the ingredients, you get a much bigger batch, and your wallet will thank you. But what I truly adore is its versatility. This isn’t a one-trick pony. It’s perfect slathered on warm pita bread, used as a dip for crunchy veggies, spread on sandwiches instead of mayo, or even dolloped onto a vibrant salad. It’s the kind of recipe that works for a quick weeknight snack, an elegant appetizer spread, or even a comforting indulgence when you just need something good. It’s a step up from regular hummus, for sure, but it’s so approachable that it feels like a delightful secret you’re letting friends in on.
How to Make Greek Hummus
Quick Overview
Making this Greek hummus is a dream. You’ll simply process your softened chickpeas with tahini, lemon juice, garlic, and a touch of ice water until it’s unbelievably smooth and creamy. The key is to blend for a good few minutes, letting the food processor do its magic. We’ll add a little extra virgin olive oil for richness and a final flourish of seasonings. It’s almost ridiculously straightforward, a testament to how simple ingredients can create something so spectacular. You’ll be amazed at the texture and flavor you can achieve in just minutes. Trust me, this process is so satisfying and the results are always worth it.
Ingredients
For the Main Hummus Base:
2 cans (15 ounces each) chickpeas, drained and rinsed (reserve some liquid just in case!)
1/2 cup good quality tahini (seriously, this is key – find one that’s creamy and not bitter)
1/4 cup fresh lemon juice (about 1-2 lemons, depending on size and juiciness)
2 cloves garlic, minced (or more if you’re a garlic fiend like me!)
1/4 cup ice water (this is the secret to ultimate creaminess!)
2 tablespoons extra virgin olive oil (for that luxurious mouthfeel)
1/2 teaspoon ground cumin
Salt to taste (start with 1/2 teaspoon and go from there)
For Garnish (Optional but Highly Recommended!):
Extra virgin olive oil, for drizzling
Paprika or sumac, for color and a hint of tang
Fresh parsley or mint, chopped, for freshness
A few whole chickpeas, for texture
Step-by-Step Instructions
Step 1: Prepare the Chickpeas
This is where the magic for super smooth hummus begins. Drain and rinse your canned chickpeas really well. Now, here’s a little trick I learned: if you have the time and patience, take a few extra minutes to peel the chickpeas. Just pinch each one gently, and the skins should slip right off. It sounds tedious, I know, but it makes a HUGE difference in the final texture. If you’re short on time, don’t stress too much; just make sure they are thoroughly rinsed. This step ensures no lingering starchy residue and leads to that impossibly silky consistency we’re aiming for.
Step 2: Blend the Base
Get your food processor ready. Add the drained and rinsed (and ideally peeled!) chickpeas, tahini, lemon juice, minced garlic, cumin, and salt. Now, here’s the crucial part for creaminess: start by pulsing a few times to break everything down. Then, with the food processor running, slowly stream in the ice water, a tablespoon at a time. You’re looking for a thick, paste-like consistency at first. Keep blending! This is where patience pays off. Let it go for at least 3-5 minutes, scraping down the sides of the bowl as needed. You’ll see it start to transform from a slightly grainy paste into something incredibly smooth and light. The ice water helps to emulsify everything and create that airy, whipped texture.
Step 3: Add the Olive Oil and Final Adjustments
Once your hummus is looking beautifully smooth and creamy, drizzle in the extra virgin olive oil while the processor is still running. This adds another layer of richness and flavor. Give it a final blend for about 30 seconds to incorporate the oil fully. Now, taste it! This is your chance to adjust the seasonings. Does it need more salt? More lemon for brightness? A tiny bit more garlic? Don’t be afraid to tweak it to your perfect liking. If it seems a little too thick, you can add another tablespoon of ice water or a tiny bit of the reserved chickpea liquid until you reach your desired consistency. Some people even like a tiny pinch of cayenne pepper here for a little warmth, but I tend to stick to the classics.
Step 4: Chill (If You Can Wait!)
Transfer your glorious Greek hummus to a serving bowl. For the absolute best flavor and texture, I highly recommend covering it and popping it in the refrigerator for at least 30 minutes. This allows the flavors to meld together beautifully and the hummus to firm up slightly. If you can’t wait, it’s still delicious, but trust me, the chill time makes a noticeable difference. It’s like letting a good stew simmer – the flavors just get better!
Step 5: Garnish and Serve
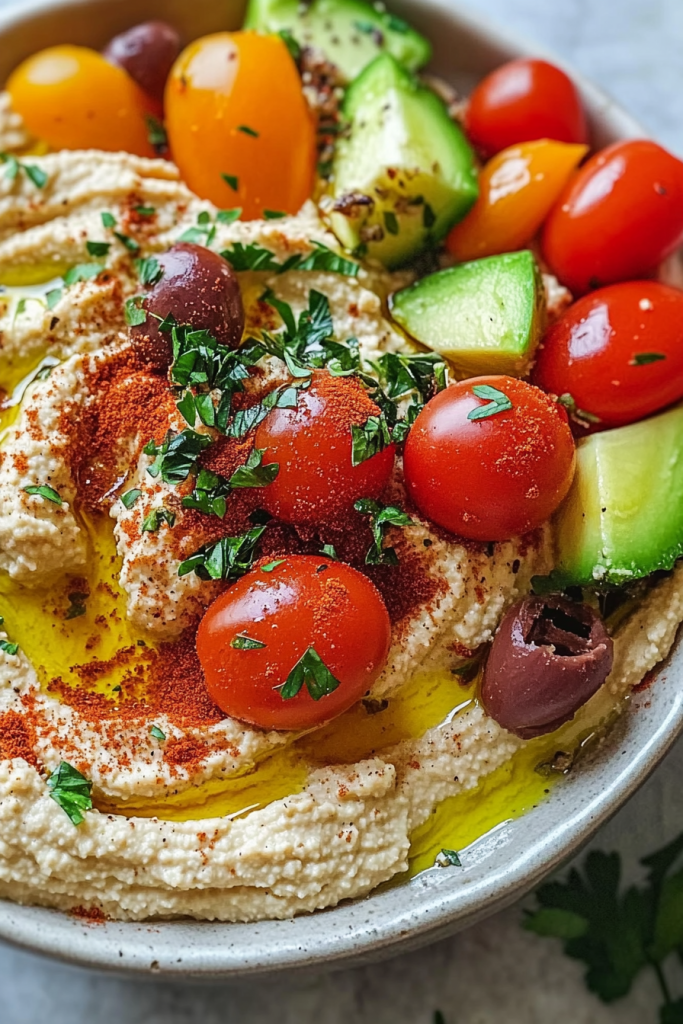
Once chilled, it’s time for the grand finale! Drizzle a generous swirl of really good extra virgin olive oil over the top. Sprinkle with a pinch of paprika or sumac for a pop of color and flavor. Scatter a few whole chickpeas and some finely chopped fresh parsley or mint for freshness and visual appeal. This is what makes it look restaurant-worthy and just begs to be dug into. Serve with warm pita bread, your favorite crunchy vegetables, or whatever your heart desires!
What to Serve It With
Oh, the possibilities are endless when it comes to serving this divine Greek hummus! It’s so adaptable, it fits into any meal or craving. For Breakfast, I love spreading a thin layer on some toasted sourdough with a sprinkle of red pepper flakes and maybe a perfectly poached egg on top. It’s a savory start that’s surprisingly filling. At Brunch, it’s a star player. Arrange it in a beautiful bowl on a mezze platter with olives, feta, dolmades, and crusty bread – it’s always a crowd-pleaser and feels so festive. For Dessert? Hear me out! While it’s savory, its smooth texture and nutty notes can be surprisingly satisfying when you’re craving something sweet but don’t want to overdo it on sugar. A tiny dollop with a piece of Dark Chocolate? It sounds weird, but the richness is there! Or just enjoy it as a luxurious Cozy Snack anytime. This is my go-to when the afternoon slump hits and I need something that feels indulgent but is actually good for me. I’ll just grab some carrot sticks or cucumber slices and a spoon, honestly! My family loves it with homemade pita chips, and we’ve even used it as a base for mini pizzas on flatbread. It’s that versatile!
Top Tips for Perfecting Your Greek Hummus
I’ve made this Greek hummus more times than I can count, and over the years, I’ve picked up a few tricks that really make it shine. When it comes to Zucchini Prep, remember that peeling those chickpeas is the biggest game-changer for ultimate smoothness. If you find your tahini has separated, just give it a really good stir before measuring; the oil should reintegrate. For Mixing Advice, don’t be tempted to rush the food processor. Those few extra minutes of blending are crucial for achieving that airy, whipped texture that makes this hummus so special. You’re essentially whipping air into it! If your mixture seems too thick after adding the tahini and lemon, don’t panic; the ice water is your friend. Add it gradually until you get that silky consistency. When it comes to Swirl Customization, the oil drizzle is key. Use a good quality extra virgin olive oil and create a generous swirl. Some people like to add a tiny pinch of sumac for a lemony tang right before serving, which is a lovely touch. For Ingredient Swaps, while this recipe is perfect as is, if you’re out of cumin, a little coriander can be a nice substitute. If you can’t find good tahini, it’s worth seeking out a specialty store because it really is the backbone of this dip. For Baking Tips, well, hummus isn’t baked, but I always say chilling it is a form of “setting” its flavors! And for Glaze Variations, I think of the olive oil and spices as the “glaze” for hummus. Ensure your olive oil is fresh for the best flavor. Some people like to add a sprinkle of za’atar for an herbaceous kick, which is also delicious.
Storing and Reheating Tips
The great thing about this Greek hummus is that it stores beautifully, making it perfect for meal prep or just having a delicious snack on hand. If you’re keeping it at Room Temperature, I wouldn’t leave it out for more than two hours, especially if it’s warm where you are. It’s best enjoyed relatively fresh or within that timeframe. For Refrigerator Storage, transfer the hummus to an airtight container. It will keep wonderfully in the fridge for about 4-5 days. The flavors actually tend to deepen and meld even more over the first day, which is lovely. Make sure it’s well-sealed to prevent it from absorbing other odors in your fridge. When it comes to Freezer Instructions, hummus does freeze, but the texture can change slightly upon thawing, sometimes becoming a bit more watery or grainy. If you do want to freeze it, wrap it very tightly in plastic wrap, then place it in a freezer-safe bag or container. It should be good for about 1-2 months. To thaw, let it sit in the refrigerator overnight and then give it a good stir, adding a tablespoon or two of ice water or lemon juice if needed to restore its creaminess. For Glaze Timing Advice, I always add the final drizzle of olive oil and garnishes right before serving, whether it’s fresh out of the food processor or after it’s been chilled or reheated. This keeps the flavors bright and the presentation lovely. If you’ve frozen it, give it a good stir and taste *before* re-garnishing.
Frequently Asked Questions
Final Thoughts
So there you have it, my absolute favorite Greek hummus recipe! I really hope you give this a try. It’s more than just a dip; it’s a little bowl of sunshine, a taste of the Mediterranean that’s so incredibly satisfying and surprisingly simple to achieve. The creaminess, the bright tang, the subtle garlic and cumin notes – it’s just perfection. It’s the kind of recipe that makes you feel like a culinary whiz, even if you spent less than 15 minutes making it. It’s proof that you don’t need a ton of complicated steps or fancy ingredients to make something truly special at home. If you love this Greek hummus, you might also enjoy my recipe for [Link to another related recipe, e.g., “Spicy Feta Dip”] or my guide to [Link to another related recipe, e.g., “Homemade Pita Bread”]. Happy blending, and I can’t wait to hear how yours turns out in the comments below! Don’t forget to rate it if you loved it!
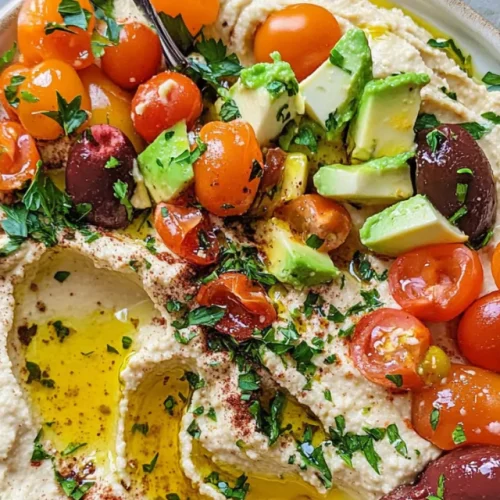
Greek Hummus
Ingredients
Main Ingredients
- 1.5 cup Chickpeas (canned, rinsed and drained)
- 0.25 cup Tahini
- 0.25 cup Lemon juice
- 0.25 cup Olive oil
- 0.25 cup Water (ice cold)
- 1 clove Garlic minced
- 0.5 teaspoon Salt or to taste
- 0.25 teaspoon Cumin (ground)
Instructions
Preparation Steps
- Combine all ingredients in a food processor.
- Process until smooth and creamy, adding more water if needed.
- Taste and adjust seasonings as needed.
- Serve with pita bread, vegetables, or as a dip.


