Oh, Heath Bar Ice Cream Pie! Just saying the name brings back memories of scorching summer days and impromptu backyard barbecues. You know those recipes that just feel like a warm hug? This is one of them for me. It’s the kind of dessert that makes everyone ask for the recipe, even though it’s surprisingly simple to pull off. Forget complicated layer cakes or fussy tarts; this Heath Bar Ice Cream Pie is pure, unadulterated joy in every bite. It’s got that perfect symphony of crunchy, creamy, and chocolatey goodness that hits all the right notes. If you’re a fan of classic ice cream cakes but want something a little more… well, *special*, this is your answer. It’s honestly a game-changer for potlucks and family gatherings, and I always make sure to have the ingredients on hand because you never know when a Heath Bar Ice Cream Pie craving might strike!
What is Heath Bar Ice Cream Pie?
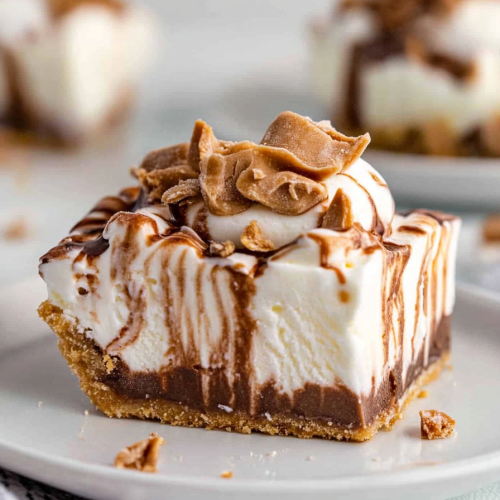
So, what exactly *is* this magical creation? Think of it as the ultimate no-bake dessert that combines all your favorite textures and flavors into one glorious, frozen masterpiece. At its heart, it’s a rich, chocolatey cookie crust, layered with a luscious, creamy Ice Cream filling studded with glorious chunks of crushed Heath Bars, and often topped with a dreamy whipped topping or a decadent chocolate ganache. It’s essentially a deconstructed Heath Bar candy bar transformed into a refreshing, crowd-pleasing dessert. The name itself tells you everything you need to know: it’s a pie, it’s loaded with ice cream, and the star ingredient is, of course, those irresistible Heath Bars. It’s the kind of dessert that feels fancy but is so easy to assemble, making it a weeknight savior and a weekend showstopper all rolled into one.
Why you’ll love this recipe?
Let me tell you, there are so many reasons why this Heath Bar Ice Cream Pie has become a staple in my recipe collection, and I just know you’re going to fall in love with it too. First and foremost, the FLAVOR! It’s an absolute dream. That signature toffee crunch and buttery caramel flavor from the Heath Bars mingled with the creamy vanilla ice cream and the dark chocolate cookie crust is just out of this world. It’s sweet, but not cloyingly so, with a lovely balance that keeps you coming back for another slice. And let’s talk about SIMPLICITY. Seriously, this pie is a lifesaver on busy days. There’s no baking required for the crust, and assembling the layers takes minutes. It’s the perfect dessert when you want something impressive without spending hours in the kitchen. Plus, it’s incredibly COST-EFFECTIVE. You can easily find all the ingredients at your local grocery store, and it feeds a crowd without breaking the bank. My kids are obsessed with it, and they’re usually pretty tough critics!
What I love most about this Heath Bar Ice Cream Pie is its sheer VERSATILITY. While the classic version is perfection, you can totally play around with it. Feeling adventurous? Swap out the vanilla ice cream for chocolate or a coffee flavor for a whole new dimension. Want even more crunch? Add some chopped chocolate-covered almonds or even some toffee bits. You can also change up the crust – a graham cracker or chocolate wafer crust works beautifully too. It’s the kind of recipe that adapts to your mood and what you have on hand. It’s also fantastic for make-ahead occasions because it needs time to freeze properly. You can assemble it a day or two in advance, making your party day stress-free. Honestly, compared to other ice cream desserts, this one just hits differently. It’s got that satisfying crunch, that cool, creamy sensation, and that irresistible toffee-chocolate combo that just makes it a winner every single time.
How do I make Heath Bar Ice
Quick Overview
Making this Heath Bar Ice Cream Pie is ridiculously easy, and that’s part of its charm! You’ll start by creating a simple, No-Bake Chocolate cookie crust that you’ll press into your pie plate. Then, you’ll gently fold crushed Heath Bars into softened ice cream before spooning that glorious mixture over the crust. A quick freeze, and then you’re ready for the final touches – usually a swirl of whipped topping and more Heath Bar crumbles. It’s straightforward, satisfying, and the results are always spectacular. You really can’t mess this one up, and the minimal effort for such maximum deliciousness is a true kitchen win.
Ingredients
For the Crust:
2 cups chocolate cookie crumbs (
6 tablespoons unsalted butter, melted
2 tablespoons granulated sugar
For the Filling:
1 quart (about 4 cups) good-quality vanilla ice cream, slightly softened
4-6 Heath Bars (about 6-8 oz total), finely crushed
For the Topping:
1 cup heavy whipping cream, very cold
2 tablespoons powdered sugar
1/2 teaspoon vanilla extract
Extra crushed Heath Bars, for garnish
Step-by-Step Instructions
Step 1: Preheat & Prep Pan
You don’t need to preheat an oven for this part, but you do need your pie plate ready! Grab a standard 9-inch pie plate. If you want to make life even easier later when it comes time to serve, you can line your pie plate with a circle of parchment paper, leaving some overhang to help you lift the pie out. This is a trick I learned after a few stubborn pies that just wouldn’t budge!
Step 2: Mix Dry Ingredients
In a medium bowl, combine the finely crushed chocolate cookie crumbs and the granulated sugar. Give them a good whisk to make sure they’re evenly distributed. You want all those delicious cookie bits to get a fair shot at being buttery!
Step 3: Mix Wet Ingredients
Pour the melted butter over the crumb mixture. Stir everything together with a fork or your hands until the crumbs are evenly moistened and clump together when squeezed. It should resemble wet sand. This is what will hold your crust together!
Step 4: Combine
Transfer the buttery crumb mixture to your prepared pie plate. Use the bottom of a glass or a measuring cup to firmly press the crumbs evenly across the bottom and up the sides of the pie plate. You want a nice, compact crust that won’t crumble when you cut into it. Pop this into the freezer while you prepare the filling, for at least 10-15 minutes. This helps it firm up!
Step 5: Prepare Filling
Now for the star! Take your vanilla ice cream out of the freezer and let it sit on the counter for about 10-15 minutes, just until it’s softened enough to stir easily but not melted. You don’t want soup! While the ice cream is softening, take your Heath Bars and either chop them roughly with a knife or place them in a zip-top bag and give them a good bash with a rolling pin or the bottom of a pan. You want a mix of smaller crumbles and a few slightly larger chunks for texture. Fold about ¾ of these crushed Heath Bars into the softened ice cream. Gently mix until just combined. Overmixing can melt the ice cream too much!
Step 6: Layer & Swirl
Retrieve your chilled crust from the freezer. Spoon the Heath Bar ice cream mixture evenly over the crust, spreading it out with a spatula. Don’t worry about making it perfectly smooth; a little texture is lovely. Sprinkle the remaining crushed Heath Bars over the top of the ice cream. If you’re feeling fancy, you can even do a few more swirls with a spatula on top before freezing.
Step 7: Bake
No baking required for this pie! Just pop the entire pie into the freezer. You’ll want to freeze it for at least 4-6 hours, or preferably overnight, until it’s completely firm. This is the hardest part – the waiting!
Step 8: Cool & Glaze
Once the pie is frozen solid, it’s time for the topping! In a clean, chilled bowl, whip the cold heavy cream with the powdered sugar and vanilla extract until stiff peaks form. Be careful not to over-whip, or you’ll end up with butter! Spread or dollop the whipped cream over the frozen ice cream pie. For extra flair, sprinkle the remaining crushed Heath Bars over the whipped cream.
Step 9: Slice & Serve
This is the moment of truth! To get clean slices, I usually run my knife under hot water, wipe it dry, and then slice. You might need to do this a couple of times. Let the pie sit out at room temperature for about 5-10 minutes before slicing to make it a bit easier to cut and serve. It’s best enjoyed right away while it’s perfectly frozen!
What to Serve It With
This Heath Bar Ice Cream Pie is a dessert that truly stands on its own, but there are always fun ways to complement it or build a whole meal around it! For a casual BREAKFAST or BRUNCH (yes, I’m one of those people who enjoys dessert for breakfast sometimes!), a simple cup of good strong coffee is all you really need. The richness of the coffee cuts through the sweetness beautifully. If you’re serving it as a more formal dessert after dinner, a small glass of dessert wine like a Sauternes or a rich port can be lovely. A drizzle of hot fudge sauce on top just before serving is another decadent touch that my family absolutely adores. For COZY SNACKS, especially on a chilly evening, I sometimes serve a slice with a mug of hot chocolate. The contrast of hot and cold is divine!
My personal family tradition is to make this Heath Bar Ice Cream Pie for my husband’s birthday every year. He’s a huge fan of Heath Bars, and it’s become our special occasion dessert. We always serve it right out of the freezer, with big scoops on chilled plates. Another time I made it for a neighborhood potluck, and I decided to add a layer of hot fudge sauce right before the whipped cream. It was a massive hit! I’ve also found that serving it with a side of fresh raspberries or strawberries adds a lovely bright, tart counterpoint that’s really refreshing against the creamy, toffee-infused ice cream. It just goes to show, this pie is as adaptable as you need it to be!
Top Tips for Perfecting Your Heath Bar Ice Cream Pie
Over the years of making this Heath Bar Ice Cream Pie, I’ve picked up a few tricks that I think really elevate it from good to absolutely spectacular. Let’s dive into some of my favorite wisdom gleaned from plenty of kitchen adventures!
Heath Bar Prep: The key here is consistency in your crushing. If you want the most even distribution of toffee flavor and crunch, aim for a mix of fine crumbs and small, pea-sized pieces. Avoid turning them into absolute powder, as you’ll lose that satisfying bite. I like to use a food processor for a quick pulse, but a zip-top bag and a rolling pin works just as well and is way more fun if you’re feeling stressed! Reserve a few tablespoons of the choicest chunks for garnishing the top – it makes it look so professional!
Mixing Advice: When you’re folding the crushed Heath Bars into the softened ice cream, remember that you want to keep the ice cream as cold and firm as possible. Don’t overwork it. A few gentle stirs to distribute the candy pieces is all you need. The goal is to incorporate the Heath Bar goodness without melting the ice cream into a liquid state. It should be thick and scoopable, not runny. This ensures a firm, sliceable pie.
Crust Control: For the perfect crust, make sure your butter is melted but not scorching hot when you mix it with the crumbs. You want it to coat them evenly. And pressing it firmly into the pan is crucial! Use the flat bottom of a glass or a measuring cup for a smooth, compact surface. Don’t skip the chilling step – letting the crust freeze for at least 10-15 minutes before adding the ice cream filling helps it set up beautifully and prevents it from becoming soggy.
Ingredient Swaps: While vanilla ice cream is classic, feel free to experiment! A good quality coffee ice cream pairs incredibly well with Heath Bars for a mocha-inspired treat. Chocolate ice cream is another fantastic choice if you’re a serious chocoholic. For the crust, if you don’t have chocolate cookies, graham crackers or even vanilla wafers can work in a pinch, though the chocolate adds that extra layer of richness. You can also adjust the amount of Heath Bars to your preference – some people love tons of candy, others prefer just a hint.
Freezing Fundamentals: The most important part is allowing ample freezing time. I always aim for at least 4-6 hours, but overnight is truly ideal for the firmest set. If you’re short on time and need to speed things up, you can place the pie pan on a baking sheet (this makes it easier to move in and out of the freezer) and put it in the coldest part of your freezer. Resist the urge to take it out too early – a properly frozen pie slices cleanly and has the best texture.
Whipped Topping Wonders: Make sure your heavy whipping cream is super cold, as is your mixing bowl and whisk attachments if you’re using a stand mixer. This helps the cream whip up faster and to stiffer peaks. Don’t be tempted to add more sugar than called for unless you prefer a very sweet topping; the Heath Bars and ice cream are already quite sweet. If you don’t have whipping cream, a good quality store-bought whipped topping works too, but homemade always tastes so much fresher and lighter!
Storing and Reheating Tips
This Heath Bar Ice Cream Pie is best enjoyed fresh, but if you happen to have any leftovers (which is rare in my house!), storing it properly is key to maintaining its deliciousness. For ROOM TEMPERATURE storage, well, that’s not really an option for an ice cream pie! It needs to stay frozen. However, if you need to take it out of the freezer for a short period to soften it for slicing, aim for no more than 10-15 minutes. Any longer and it starts to get too melty.
For REFRIGERATOR STORAGE, this isn’t applicable either, as it would completely melt. The freezer is your best friend here. If you have leftover slices, carefully wrap them in plastic wrap, then pop them into an airtight container or a freezer-safe zip-top bag. This helps prevent freezer burn. It will keep well in the freezer for up to 1-2 weeks, though the texture is best within the first week. Always label and date your frozen treats so you know how long they’ve been in there!
FREEZER INSTRUCTIONS are pretty straightforward: just make sure the pie is completely frozen and firm before wrapping. If you froze it uncovered, wrap it tightly in plastic wrap, ensuring no air can get to it. Then, place it in a freezer-safe container or bag. When you’re ready to serve, take it out of the freezer about 5-15 minutes before you plan to slice it, depending on how soft you like your ice cream. For thawing, I don’t recommend thawing the whole pie. Just take out the slices you need and let them soften for a few minutes.
GLAZE TIMING ADVICE: If you’ve already topped your pie with whipped cream and extra Heath Bar crumbles, it’s best to store it as is, wrapped tightly. If you are storing a pie *before* topping it, you can certainly do that. Once it’s frozen solid, wrap it tightly and keep it frozen. When you’re ready to serve, take it out, add your whipped cream topping and garnishes, and serve immediately. This is the best way to ensure your topping is fresh and fluffy!
Frequently Asked Questions
Final Thoughts
So there you have it – my absolute favorite Heath Bar Ice Cream Pie recipe! I really hope you give this one a try. It’s one of those desserts that just brings pure joy, whether you’re serving it at a special celebration or just because you deserve a treat. The combination of the crunchy Heath Bar bits, the creamy vanilla ice cream, and that chocolatey crust is just unbeatable, and the fact that it requires no baking makes it a true champion in my kitchen. It’s easy enough for a weeknight indulgence but impressive enough for any gathering. If you love this Heath Bar Ice Cream Pie, you might also enjoy my No-Bake Chocolate Peanut Butter Pie or my Salted Caramel Brownie Sundae Cake!
I can’t wait to hear what you think of it! Please leave a comment below to let me know how your Heath Bar Ice Cream Pie turned out, and feel free to share any variations or tips you discover. Your feedback truly makes my day! Happy baking… or should I say, happy freezing!
Heath Bar Ice Cream Pie
Ingredients
Main Ingredients
- 1.5 cups chocolate cookie crumbs
- 0.25 cup butter, melted
- 1 gallon vanilla ice cream, softened
- 1 cup Heath Bar candy, chopped
- 0.5 cup hot fudge sauce
Instructions
Preparation Steps
- In a bowl, combine cookie crumbs and melted butter. Press into a 9-inch pie plate.
- Spread softened ice cream evenly over the crust.
- Sprinkle chopped Heath Bar candy over the ice cream.
- Drizzle with hot fudge sauce.
- Freeze for at least 4 hours before serving.