You know those moments when you need something *spectacular* but also, let’s be real, don’t have all day? That’s precisely when this Honey Baklava Cheesecake enters the chat. It’s the kind of dessert that makes people stop mid-bite and ask, “What *is* this magic?” Seriously, I made it for a potluck last weekend, and it was gone before the main course was even served. My cousin, who is notoriously hard to impress when it comes to sweets, practically inhaled a slice and then asked for the recipe. It’s that good, that special. It’s like taking two of the most beloved desserts in the world – rich, creamy cheesecake and the sweet, nutty crunch of baklava – and merging them into one glorious creation. If you’ve ever loved a classic cheesecake or swooned over a piece of baklava, then you are absolutely going to adore this Honey Baklava Cheesecake. It’s a bit of a showstopper, but I promise you, it’s more approachable than you might think.
What is honey baklava cheesecake?
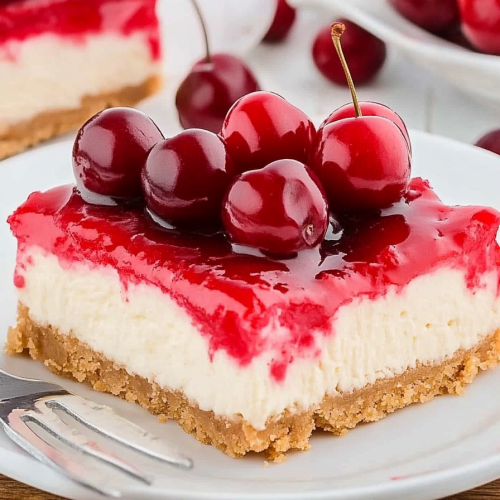
So, what exactly *is* this decadent dream? Think of it as the ultimate mashup. At its heart, it’s a wonderfully creamy, tangy cheesecake – that smooth, melt-in-your-mouth texture we all adore. But here’s where the magic happens: instead of a traditional graham cracker crust, we’re talking a glorious foundation of buttery, crisp phyllo dough layered with chopped nuts, just like you’d find in a perfect baklava. And then, oh, the topping! A luscious, honey-infused syrup drizzles over the whole thing, sometimes with a sprinkle of extra nuts and cinnamon for good measure. It’s not just a dessert; it’s an experience. The contrast between the velvety cheesecake and the delicate crispness of the phyllo, all bound together by that sweet honey syrup, is just divine. It’s my go-to when I want to serve something that feels incredibly sophisticated but is secretly a breeze to pull off.
Why you’ll love this recipe?
Honestly, there are so many reasons why this Honey Baklava Cheesecake has become a staple in my kitchen, and I have a feeling you’ll find just as many. First off, the flavor is absolutely out of this world. You get that familiar, comforting tang of cheesecake, but it’s elevated by the warm, aromatic spices and the deep, sweet notes from the honey and nuts. It’s complex and satisfying without being overwhelming. And the texture? Oh, the texture is a symphony! The creamy cheesecake, the flaky phyllo, the crunchy nuts – it’s a party in your mouth with every single bite. What I truly appreciate, though, is how surprisingly simple it is to make. I know, I know, “phyllo dough” might sound intimidating, but trust me, I’ll walk you through it. It’s much more forgiving than you’d imagine, especially when you’re layering it. Plus, think about the cost-effectiveness! While it tastes like it came from a fancy bakery, the ingredients are pretty standard and budget-friendly. This recipe is also incredibly versatile. You can adjust the types of nuts, add a touch of orange zest to the syrup, or even experiment with different spices. It’s perfect for holidays, special occasions, or just those Tuesdays when you need a little something extra. It’s a guaranteed crowd-pleaser, and honestly, what’s better than seeing people’s faces light up when they try something you’ve made?
How do I make Honey Baklava Cheesecake?
Quick Overview
This recipe is all about layering flavors and textures. We’ll start by creating a delicate phyllo base, then pour in a rich, creamy cheesecake batter. After baking to golden perfection, a sweet honey syrup finishes it off, bringing all the baklava goodness to the party. The key is gentle handling of the phyllo and allowing everything to cool properly so the flavors meld beautifully. It feels fancy, but I promise, it’s just a few thoughtful steps.
Ingredients
For the Phyllo Base:
1 pound phyllo dough, thawed according to package directions (this is super important!)
1 cup unsalted butter, melted (use good quality butter, it makes a difference!)
1 ½ cups finely chopped walnuts or pistachios (or a mix! I love a good pistachio crunch)
½ teaspoon ground cinnamon
For the Cheesecake Filling:
3 (8-ounce) packages Cream Cheese, softened (let them sit out for at least an hour, or microwave for 30-second bursts)
1 ½ cups granulated sugar
3 large eggs, at room temperature
1 teaspoon vanilla extract
¼ cup sour cream, at room temperature (this adds such a lovely tang!)
2 tablespoons all-purpose flour
For the Honey Syrup:
1 ½ cups water
1 cup granulated sugar
½ cup honey (use a nice, flavorful one if you can!)
1 cinnamon stick
1 strip lemon peel (just the yellow part, no pith)
Step-by-Step Instructions
Step 1: Preheat & Prep Pan
Preheat your oven to 350°F (175°C). Lightly grease a 9-inch springform pan. This is crucial to prevent sticking and ensure easy removal later. I like to give it a little extra butter or cooking spray because nobody wants a cheesecake that’s stuck.
Step 2: Mix Dry Ingredients
In a medium bowl, combine the finely chopped nuts and the ground cinnamon. Give them a good stir. This mixture will form the delicious crunchy layer in our baklava base.
Step 3: Mix Wet Ingredients
In a large bowl, beat the softened Cream Cheese with an electric mixer until it’s completely smooth and creamy. Gradually add the granulated sugar and continue beating until well combined and fluffy. Beat in the eggs one at a time, making sure each egg is fully incorporated before adding the next. Stir in the vanilla extract and sour cream until just combined. Finally, gently mix in the flour until no streaks remain. Don’t overmix here; we just want everything nicely blended. Overmixing can lead to a tougher cheesecake, and we definitely don’t want that!
Step 4: Combine
This is where the magic of the phyllo base begins. Carefully unroll your thawed phyllo dough. Keep the sheets you’re not working with covered with a slightly damp kitchen towel to prevent them from drying out and cracking. Lay one sheet of phyllo dough in the prepared springform pan, pressing it gently into the bottom and up the sides of the pan. Brush the entire surface generously with melted butter. Repeat this process with about 8-10 sheets of phyllo, layering them and brushing each layer with butter. It might look a little crinkly, and that’s totally fine – it adds to the charm! Once you have your buttered phyllo layers in place, sprinkle about half of the nut and cinnamon mixture evenly over the phyllo base.
Step 5: Prepare Filling
Gently pour the creamy cheesecake batter evenly over the nut and phyllo layer in the springform pan. Smooth the top with a spatula. Then, carefully sprinkle the remaining nut and cinnamon mixture over the top of the cheesecake batter. Some will sink, and some will stay on top, which is exactly what we want for that beautiful baklava texture.
Step 6: Layer & Swirl
This step is more about layering the phyllo around the edges. Take another 4-6 sheets of phyllo dough, brush each layer with butter, and then carefully drape and arrange them around the outer edge of the cheesecake filling, letting them cascade down the sides a bit. This creates those beautiful, flaky baklava edges once baked. You don’t need to swirl the cheesecake itself; the nuts and cinnamon on top will create a lovely texture.
Step 7: Bake
Bake for 50-60 minutes, or until the edges of the cheesecake are set and lightly golden brown, and the center is still slightly jiggly. You can also insert a knife near the center; if it comes out mostly clean, it’s ready. Sometimes ovens can be a bit temperamental, so keeping an eye on it is key. If the phyllo edges start to brown too quickly, you can loosely tent the pan with foil.
Step 8: Cool & Glaze
Once baked, turn off the oven and let the cheesecake cool inside with the door ajar for about an hour. This gradual cooling helps prevent cracking. Then, remove it from the oven and let it cool completely on a wire rack. While the cheesecake is cooling, prepare the honey syrup. In a small saucepan, combine the water, sugar, honey, cinnamon stick, and lemon peel. Bring to a boil over medium heat, then reduce heat and simmer for about 5-7 minutes, or until slightly thickened. Remove from heat and let it steep for about 15-20 minutes, then strain out the cinnamon stick and lemon peel. Once the cheesecake has cooled completely, pour the warm (not hot) honey syrup evenly over the top. The syrup will seep into the phyllo and nuts, creating that signature baklava sweetness.
Step 9: Slice & Serve
Let the cheesecake chill in the refrigerator for at least 4 hours, or preferably overnight. This is crucial for the cheesecake to set properly and for the flavors to meld. When ready to serve, carefully run a thin knife around the edge of the springform pan before releasing the sides. Slice with a sharp knife, wiping the blade clean between cuts for neat slices. Enjoy! It’s truly magnificent when served cold.
What to Serve It With
This Honey Baklava Cheesecake is pretty much a star on its own, but here are a few ways I love to serve it up, depending on the occasion!
For Breakfast: Okay, hear me out! A thin slice of this is an absolute treat with a strong cup of coffee first thing in the morning. It’s decadent, yes, but that honey-sweetened tang is just the most delightful wake-up call. I sometimes serve it with a dollop of thick Greek Yogurt to balance the sweetness.
For Brunch: For a more elegant brunch, I like to serve it with some fresh berries – raspberries or even some thinly sliced figs work beautifully. The tartness of the berries cuts through the richness wonderfully. A light sprinkle of powdered sugar or some edible flowers can make it look extra special on the brunch table.
As Dessert: This is its natural habitat! After a hearty meal, a slice of this is pure bliss. I often serve it with a small scoop of vanilla bean Ice Cream or a dollop of lightly sweetened whipped cream. The contrast in temperature and texture is divine. Sometimes, I’ll add a tiny bit of extra chopped pistachios on top for garnish and crunch.
For Cozy Snacks: This is my secret weapon on a chilly evening. Just a small sliver with a warm cup of tea or even a glass of dessert wine. It hits that sweet craving perfectly without being too heavy. My family often requests “just a corner” after dinner, and I’m always happy to oblige!
Top Tips for Perfecting Your Honey Baklava Cheesecake
I’ve made this recipe more times than I can count, and I’ve learned a few little tricks along the way that I think will really help you nail it. You know, the kind of wisdom you only get from experience!
Phyllo Prep: The absolute biggest tip is to make sure your phyllo dough is fully thawed. If it’s still a bit icy, it’s going to be brittle and tear like crazy. I usually let it thaw in the refrigerator overnight. When you’re working with it, keep it covered with a damp (not wet!) kitchen towel. This is crucial to prevent it from drying out and becoming impossible to handle. If a sheet does tear a little, don’t sweat it! You can just layer another buttery sheet over it, and no one will ever know.
Mixing Advice: For the cheesecake filling, the key is soft Cream Cheese and room temperature ingredients. This ensures a smooth, lump-free batter. Once you add the eggs, just mix until they’re incorporated. Overbeating at this stage can introduce too much air, which might lead to cracks. And for the flour, stir it in gently at the end – it just helps stabilize the cheesecake without making it tough.
Swirl Customization: While this recipe doesn’t have a traditional swirl, the nut and cinnamon mixture on top creates a beautiful texture. If you wanted to get fancy, you could reserve a small portion of the cheesecake batter, mix it with a little cocoa powder or some reserved nut mixture, and then dollop it on top before sprinkling the rest of the nuts. Then, use a toothpick to gently swirl them together. But honestly, the simple layered approach is stunning on its own!
Ingredient Swaps: For the nuts, while walnuts and pistachios are traditional and delicious, feel free to experiment! Pecans or even almonds would also work wonderfully. Just make sure they’re finely chopped so they distribute evenly. For the honey, any good quality honey will do. If you have a local wildflower honey or a dark buckwheat honey, those can add a really interesting depth of flavor. For the syrup, if you’re not a fan of lemon peel, you can omit it, but it does add a lovely bright note that balances the sweetness.
Baking Tips: My oven runs a little hot, so I’ve learned to check for doneness a bit earlier. A slight jiggle in the center is actually a good thing! It means it will continue to set as it cools. If you’re prone to cracked cheesecakes (don’t worry, it happens to the best of us!), the gradual cooling method in the oven is your best friend. Also, using a water bath isn’t strictly necessary for this baklava-style crust, but if you find your cheesecakes always crack, you could try placing the springform pan inside a larger roasting pan and filling that with about an inch of hot water before baking. It creates a humid environment.
Glaze Variations: The honey syrup is classic baklava, but you can absolutely play with it! For a more citrusy note, add a splash of orange juice to the syrup while it simmers. Or, if you want a hint of spice, add a few cardamom pods. You could even add a tablespoon of brandy or rum to the syrup for an adult twist. Just make sure the syrup is warm, not piping hot, when you pour it over the cheesecake, so it doesn’t melt the top.
Storing and Reheating Tips
Proper storage is key to keeping this Honey Baklava Cheesecake tasting its absolute best. It’s surprisingly resilient!
Room Temperature: Once fully chilled and you’ve served it, any leftovers can be kept at room temperature for a few hours, especially if it’s not too warm an environment. Just cover it loosely with plastic wrap or pop it back into its springform pan with the sides still on. It generally stays fresh for about 2-3 hours this way.
Refrigerator Storage: This is where it really shines. Once the cheesecake has completely cooled and been chilled for at least 4 hours (or ideally overnight), store it in the refrigerator. The best way is to cover it tightly with plastic wrap. If you’ve already sliced it, you can place the remaining whole cheesecake back into the springform pan, cover the top tightly with plastic wrap, and then even wrap the whole pan in foil. It will keep well in the fridge for up to 4-5 days. The flavors actually get better with time!
Freezer Instructions: Yes, you can freeze this beauty! It’s best to freeze it before you add the syrup, but it’s also possible afterwards. If freezing before adding the syrup, wrap the fully cooled and chilled cheesecake (without the syrup) tightly in a double layer of plastic wrap, then in a layer of aluminum foil. Place it in a freezer-safe container or bag. It will keep for about 1-2 months. To thaw, transfer the frozen cheesecake to the refrigerator overnight. Once thawed, add the honey syrup and let it chill for another hour before serving. If freezing with the syrup already on, wrap it as described above. It might be a little softer after thawing with the syrup, but still delicious!
Glaze Timing Advice: For refrigerator storage, it’s best to add the glaze right before serving or after it’s fully chilled. If you add it too early and it sits for days, the phyllo might get a little too soft. For room temperature or freezer storage (before serving), it’s definitely better to add the glaze just before serving to maintain that delightful crunch from the phyllo and nuts.
Frequently Asked Questions
Final Thoughts
So there you have it – my beloved Honey Baklava Cheesecake. I truly believe this recipe captures the best of both worlds, offering that luxurious creaminess of cheesecake with the irresistible crunch and honeyed sweetness of baklava. It’s a dessert that looks impressive, tastes incredible, and honestly, is totally achievable for any home baker. Every time I make it, I’m reminded of why it’s a keeper: the joy it brings, the compliments it garners, and the sheer delight of that first bite. If you’re looking for a dessert that’s a little bit special, a little bit different, and guaranteed to impress, please give this Honey Baklava Cheesecake a try. I can’t wait to hear how yours turns out and what delicious variations you might dream up! Happy baking, everyone!
Honey Baklava Cheesecake
Ingredients
Crust
- 1.5 cups Finely chopped walnuts
- 0.5 cup Granulated sugar
- 6 tablespoons Unsalted butter, melted
Cheesecake Filling
- 32 ounces Cream cheese, softened
- 1.5 cups Granulated sugar
- 4 large Eggs
- 1 teaspoon Vanilla extract
Honey Syrup
- 1 cup Honey
- 0.5 cup Water
- 1 tablespoon Lemon juice
Instructions
Making the Crust
- Preheat oven to 350°F (175°C). Combine walnuts, sugar, and melted butter in a bowl. Press into the bottom of a 9-inch springform pan.
- Bake for 10 minutes, then remove from oven and let cool.
Making the Cheesecake Filling
- In a large bowl, beat cream cheese and sugar until smooth. Add eggs one at a time, mixing until just combined. Stir in vanilla extract.
- Pour the filling over the crust.
- Bake for 50-60 minutes, or until the edges are set and the center jiggles slightly.
- Let cool completely before refrigerating for at least 4 hours or overnight.
Making the Honey Syrup
- Combine honey, water, and lemon juice in a small saucepan. Bring to a simmer and cook for 5 minutes.
- Let cool.
Assembling the Cheesecake
- Drizzle the honey syrup over the cheesecake before serving. Garnish with chopped nuts if desired.