You know those days when you just *need* something bright, vibrant, and bursting with flavor, but the thought of spending hours in the kitchen makes you want to curl up on the sofa with takeout? Yeah, I have those days too. And that’s precisely when this pesto recipe becomes my absolute hero. Forget those jars from the grocery store that taste… well, let’s just say a little less than inspired. This homemade pesto is a game-changer. It’s the kind of sauce that makes even the simplest pasta dish feel like a gourmet meal. Honestly, I used to think making pesto was complicated, something reserved for fancy Italian nonnas, but it’s ridiculously simple. It’s so much more vibrant and alive than anything you can buy, and the aroma that fills your kitchen while you’re making it? Pure magic. If you’ve ever found yourself staring longingly at a container of basil at the farmer’s market, wondering what to do with it all, this is your answer. It’s like sunshine in a bowl, and trust me, once you make it yourself, you’ll never go back.
What Is Pesto?
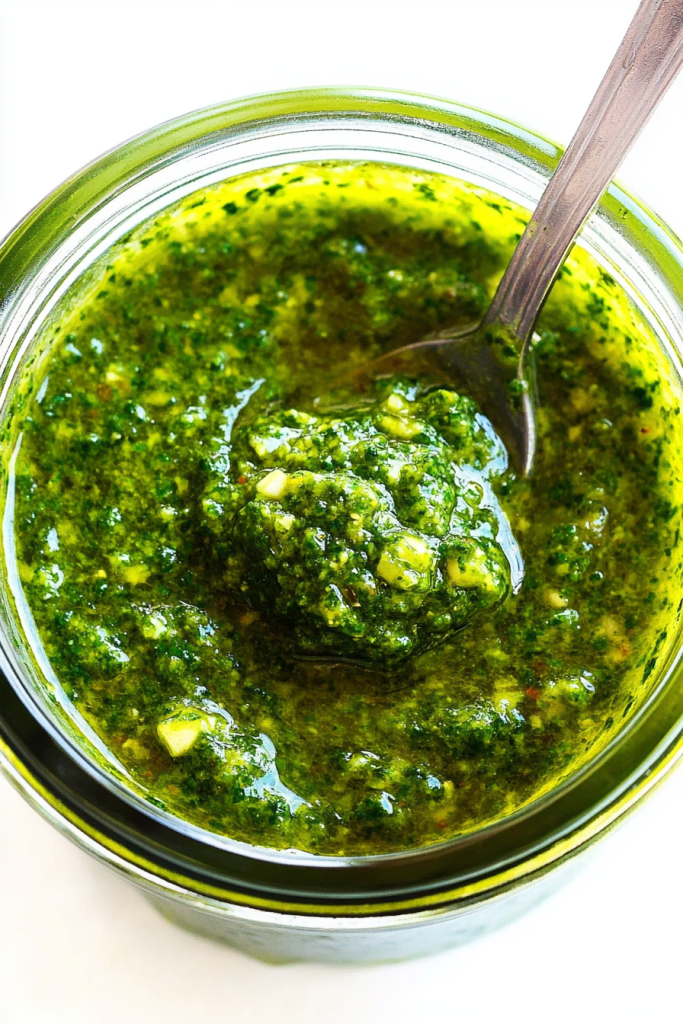
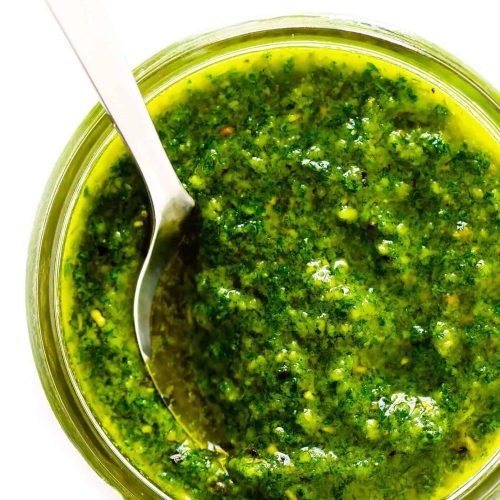
So, what exactly is this magical green sauce we’re talking about? Pesto, in its purest, most traditional form, is an Italian sauce originating from Genoa, the capital city of Liguria, a northwestern Italian region. The name “pesto” actually comes from the verb “pestare,” which means “to pound” or “to crush” in Italian, referring to the traditional method of crushing the ingredients with a mortar and pestle. Think of it as a vibrant, uncooked sauce made primarily from fresh basil leaves, pine nuts, garlic, hard cheese (usually Parmesan or Pecorino Sardo), and Olive oil. It’s not cooked, which is key to keeping that gorgeous green color and fresh, herbaceous flavor. It’s essentially a celebration of fresh, bright ingredients, blended together to create something incredibly delicious and versatile. It’s simple, elegant, and oh-so-satisfying.
Why you’ll love this recipe?
Honestly, the list is practically endless, but I’ll try to narrow it down! First off, the flavor. Oh. My. Goodness. The fresh basil is so aromatic and bright, balanced perfectly by the nutty pine nuts, the sharp bite of garlic, and the salty tang of Parmesan cheese. It’s a symphony of flavors that just sings on your palate. And the texture! It’s wonderfully creamy and rich, thanks to the good quality olive oil. Secondly, and this is a big one for me, it is unbelievably simple to make. You don’t need to be a culinary genius or spend hours slaving away. If you have a food processor or even a decent blender, you’re golden. I’ve whipped this up in less time than it takes to boil water for pasta! It’s also incredibly cost-effective, especially if you grow your own basil (which I highly recommend if you have a sunny spot!). A bunch of basil might seem inexpensive, but the flavor payoff from making your own pesto is astronomical compared to store-bought. And the versatility? This is where it really shines. This pesto isn’t just for pasta, though it is sublime on pasta. I’ll get into all the ways you can use it later, but trust me, it elevates everything it touches. What I love most about this particular recipe is how forgiving it is. It always turns out perfectly, no matter how many times I make it, and it always gets rave reviews from everyone who tries it. It’s a true crowd-pleaser and a weeknight lifesaver.
How to Make Pesto
Quick Overview
Making this amazing pesto is a breeze. You’ll essentially be pulsing fresh basil, garlic, and pine nuts in a food processor until they’re finely chopped, then slowly drizzling in olive oil until you reach a luscious, creamy consistency. Finally, you’ll stir in grated Parmesan cheese. That’s it! No cooking involved, just pure, fresh flavor coming together in minutes. It’s incredibly straightforward, and the result is so much better than anything store-bought. You’ll be amazed at how quickly you can create this gourmet sauce right in your own kitchen.
Ingredients
For the Main Pesto:
This is where all the magic happens! For the basil, I always opt for the Genovese variety if I can find it – it has those lovely rounded leaves and a fantastic, sweet aroma. But any fresh, sweet basil will do. Make sure it’s washed thoroughly and completely dry; excess water is the enemy of good pesto! You’ll need about 2 packed cups of fresh basil leaves. For the pine nuts, toasting them lightly beforehand really brings out their flavor, but it’s optional if you’re in a super rush. About 1/4 cup should do it. A couple of cloves of garlic, depending on how much you love that punchy flavor – start with two, and you can always add more. And for the cheese, freshly grated Parmesan Reggiano is non-negotiable for me. The pre-grated stuff often has anti-caking agents that can affect the texture. You’ll want about 1/2 cup, finely grated. Finally, good quality extra virgin olive oil is key. You’ll need about 1/2 cup, but have a little extra on hand, as you might need more to reach your desired consistency. I look for one that’s fruity and not too peppery.
For Serving (Optional, but recommended!):
This is where you can really play. While the pesto is the star, a little extra something can make it even more special. I always have a sprinkle of extra toasted pine nuts for garnish, a little more grated Parmesan, and a drizzle of really good olive oil right before serving. Sometimes, a pinch of sea salt and freshly cracked Black Pepper is all it needs to sing. Freshly cooked pasta is the classic pairing, of course, but don’t stop there!
Step-by-Step Instructions
Step 1: Toast the Pine Nuts (Optional, but highly recommended!)
If you’re toasting your pine nuts, this is your first step. Place the pine nuts in a dry skillet over medium-low heat. Toss them frequently as they toast, which usually takes about 3-5 minutes. You’re looking for them to turn a light golden brown and become fragrant. Watch them closely, as they can go from perfectly toasted to burnt in seconds! Once they’re done, immediately remove them from the skillet and set them aside to cool. This step really wakes up their nutty flavor.
Step 2: Prepare the Basil
Make sure your basil leaves are washed and thoroughly dried. I like to use a salad spinner for this, and then gently pat them with a clean kitchen towel to get any remaining moisture off. This is crucial for getting that vibrant green color and preventing your pesto from becoming watery. Discard any tough stems, but don’t worry too much about the smaller ones.
Step 3: Pulse the Solids
In the bowl of a food processor, combine the dried basil leaves, the cooled toasted pine nuts (if using), and the garlic cloves. Pulse these ingredients together until they are finely chopped. You want to achieve a coarse paste – don’t over-process at this stage, or you’ll end up with a gummy texture. You should see tiny green flecks and fragrant bits. Scrape down the sides of the bowl as needed to make sure everything is getting incorporated.
Step 4: Emulsify with Olive Oil
With the food processor running on a low setting, slowly drizzle in the extra virgin olive oil through the feed tube. You’re looking for the mixture to emulsify and become creamy. Keep drizzling until you reach your desired consistency. Some people like a thicker pesto, while others prefer it a bit looser. I usually add about 1/2 cup, but you might need a touch more or less. You’ll see the mixture transform into a beautiful, vibrant green sauce.
Step 5: Add the Cheese and Season
Once the oil is incorporated and you have a nice, smooth pesto, add the finely grated Parmesan cheese. Pulse a few more times until the cheese is just incorporated. Be careful not to overmix here, as you don’t want to cook the cheese with the friction. Taste your pesto! Now is the time to add a pinch of sea salt and freshly cracked Black Pepper, if needed. Remember that Parmesan is salty, so taste before adding salt.
Step 6: Taste and Adjust
This is the most important step – tasting! Does it need more garlic? More cheese? A touch more olive oil for smoothness? A little more salt? Adjust the seasonings and consistency to your personal preference. This is *your* pesto, so make it perfect for you! You can also add a squeeze of lemon juice for brightness if you like, though that’s not traditional, it’s a lovely variation I sometimes do.
Step 7: Serve or Store
Your glorious homemade pesto is ready to be enjoyed! If serving immediately, toss it with freshly cooked pasta, spread it on a sandwich, or dollop it onto Grilled Chicken. If storing, transfer it to an airtight container. See the storing section for more details.
What to Serve It With
Oh, where do I even begin with this! Pesto is one of those magical ingredients that can transform a simple meal into something spectacular. For breakfast, I love to swirl a little into my scrambled eggs or omelets – it adds a sophisticated savory note that’s just divine with a strong cup of coffee. On toast, it’s amazing! For brunch, forget avocado toast, try pesto toast! Top a slice of good sourdough with a smear of pesto, a poached egg, and maybe some cherry tomatoes. It’s elegant, flavorful, and always a hit. As a dessert… okay, maybe not a dessert, but for a light lunch or dinner, it’s perfect. Toss it with your favorite pasta – spaghetti, linguine, penne, farfalle, you name it. Add some grilled shrimp, chicken, or even some white beans for a heartier meal. It’s also fantastic on pizza! Spread it on the base instead of tomato sauce, then add your favorite toppings. For cozy snacks, I’ll sometimes just have a small bowl of pesto with some crusty bread for dipping. It’s so satisfying. My kids, who can be picky eaters, absolutely adore pesto pasta. It’s one of those dishes I know I can make and they’ll devour it without complaint. I’ve also used it as a marinade for chicken or fish before grilling, or mixed into a salad dressing. The possibilities really are endless, and it’s always a welcome addition to any meal.
Top Tips for Perfecting Your Pesto
I’ve made this pesto so many times, I feel like I have a sixth sense for it now, but there are definitely a few tricks I’ve learned along the way that make a world of difference. Firstly, and I can’t stress this enough: **use the freshest basil you can find.** Wilted, sad basil just won’t yield the same vibrant flavor or color. If you grow your own, pick it right before you plan to make the pesto for maximum impact. Secondly, **don’t over-process the basil.** You want to chop it, not puree it into a paste before adding the oil. Over-processing can bruise the basil too much and result in a duller color and sometimes a slightly bitter taste. Pulse until it’s finely chopped, then let the olive oil do the emulsifying work. Speaking of olive oil, **use a good quality extra virgin olive oil.** It’s a significant ingredient in pesto, and its flavor will come through. A fruity, not-too-peppery oil is ideal. For the pine nuts, toasting them really does make a difference, bringing out that lovely subtle sweetness and nuttiness. But if you forget or are short on time, raw pine nuts are still perfectly fine. The cheese is another area where quality matters. **Freshly grated Parmesan Reggiano or Pecorino Romano** will give you the best flavor and texture. Pre-grated cheeses often have anti-caking agents that can make your pesto a bit gritty. When it comes to mixing, **don’t be afraid to adjust the consistency.** Some like it thicker, some like it looser. Add the olive oil gradually until you achieve your perfect texture. If your pesto seems a little too thick, just drizzle in a tiny bit more olive oil. If it’s too thin, you can always add a little more cheese or pine nuts (though this can slightly alter the flavor balance). For those looking to experiment, **don’t be afraid of ingredient swaps!** While traditional pesto is basil, pine nuts, garlic, Parmesan, and olive oil, you can get creative. Walnuts or almonds can be used instead of pine nuts for a different nutty flavor. Arugula or spinach can be added to basil for a different taste profile or to bulk it up. Even kale can work, though it will require a bit more processing and might have a stronger, earthier flavor. These variations are fantastic for using up whatever greens you have on hand or for creating a unique flavor profile. My kids actually prefer it when I add a handful of spinach to the basil; it mellows the basil flavor slightly and gives it an even deeper green hue.
Storing and Reheating Tips
One of the best things about making homemade pesto is that it stores beautifully, making it perfect for meal prep or for having on hand for those spontaneous pasta cravings. When storing pesto, the most important thing is to prevent oxidation, which can cause it to turn brown and lose its vibrant green color. My go-to method is to transfer the pesto to an airtight container, then pour a thin layer of olive oil over the top. This oil layer acts as a barrier against the air. For refrigerator storage, this should keep well for about 4-5 days. If you plan to keep it longer, or want to make a big batch, freezing is your best bet. You can freeze pesto in ice cube trays – just spoon the pesto into the trays, freeze until solid, then transfer the cubes to a freezer-safe bag or container. This way, you can easily pop out just the amount you need for a single serving. Frozen pesto will last for up to 3-4 months. When you’re ready to use frozen pesto cubes, you can thaw them gently in the refrigerator overnight or microwave them on a low setting for a few seconds at a time. For reheating pesto that’s been in the fridge, I usually just let it come to room temperature for about 15-20 minutes before tossing it with warm pasta. If you’re heating it with pasta, the residual heat of the pasta is usually enough to warm the pesto gently. I avoid microwaving pesto itself, as it can sometimes dull the fresh flavors. If your pesto has started to look a little dull or brown, don’t despair! Sometimes, just giving it a good stir and adding a fresh drizzle of olive oil on top can revive it. The glaze, if you’re referring to a glaze on something you’ve put pesto on, should generally be applied just before serving for best results. For plain pesto storage, the key is that oil layer on top!
Frequently Asked Questions
Final Thoughts
So there you have it – the simplest, freshest, most incredibly flavorful pesto you’ll ever make at home. It’s the kind of recipe that makes you feel like a culinary wizard, even though it’s ridiculously easy. The vibrant green color, the aromatic scent, and that burst of flavor are truly unparalleled. It’s a testament to how incredible simple, fresh ingredients can be when they’re treated with a little respect. If you love this recipe, I think you’d also really enjoy my recipe for homemade sun-dried tomato spread, which has a similar vibrant flavor profile, or perhaps my guide to making the perfect simple vinaigrette, another foundational recipe that elevates any meal. Give this pesto a try, and I promise you, you’ll be hooked. It’s the perfect way to brighten up pasta, sandwiches, grilled meats, or anything else your heart desires. I can’t wait to hear how yours turns out! Don’t be shy – tell me in the comments below about your favorite ways to use homemade pesto, or any fun variations you tried!
How to Make Pesto
Ingredients
Main Ingredients
- 2 cups fresh basil leaves
- 0.5 cup pine nuts
- 2 cloves garlic
- 0.5 cup Grated Parmesan cheese
- 0.5 cup olive oil
- 0.25 teaspoon salt
- 0.25 teaspoon black pepper
Instructions
Preparation Steps
- Combine basil, pine nuts, and garlic in a food processor.
- Pulse until finely chopped.
- Add Parmesan cheese, salt, and pepper.
- Pulse again to combine.
- With the food processor running, slowly drizzle in the olive oil until a paste forms.
- Taste and adjust seasonings as needed.


