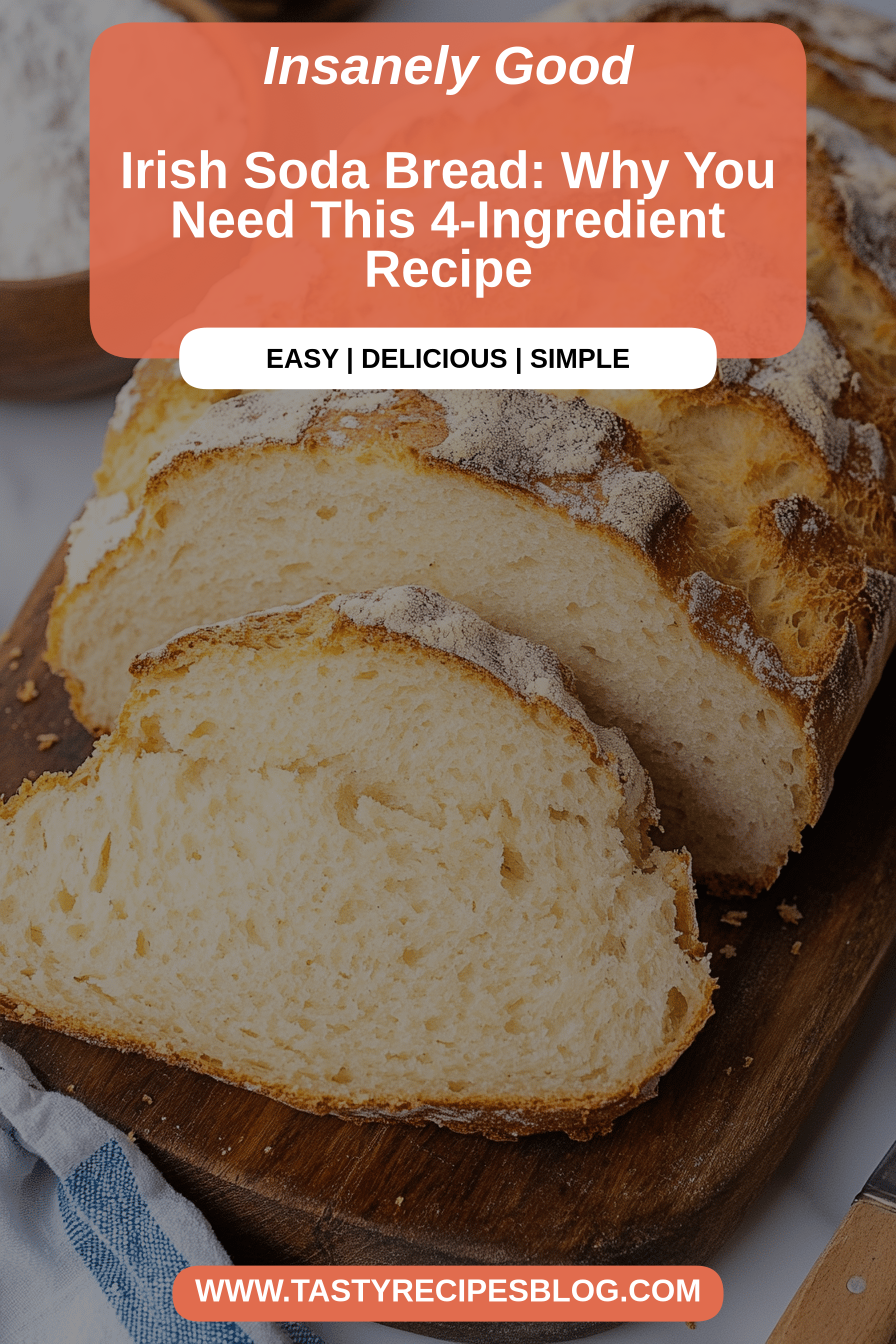
Oh, my goodness, where do I even begin with this Irish soda bread? It’s one of those recipes that just feels like a warm hug on a chilly day, or the perfect companion to a quiet morning with a cup of tea. I remember my Nana making this when I was little, and the scent would fill our entire house, making everyone gather in the kitchen, just waiting. It’s so simple, yet so utterly satisfying. Forget those fancy, complicated loaves you see sometimes; this is the real deal, the kind of bread that tastes like pure comfort. If you’ve ever tried making quick breads before and felt a bit intimidated, trust me, this Irish soda bread is a game-changer. It’s like the easy-going cousin to a yeasted bread, but with all the deliciousness and none of the fuss. It’s truly one of my go-to recipes when I need something wholesome and quick.
What is Irish Soda Bread?
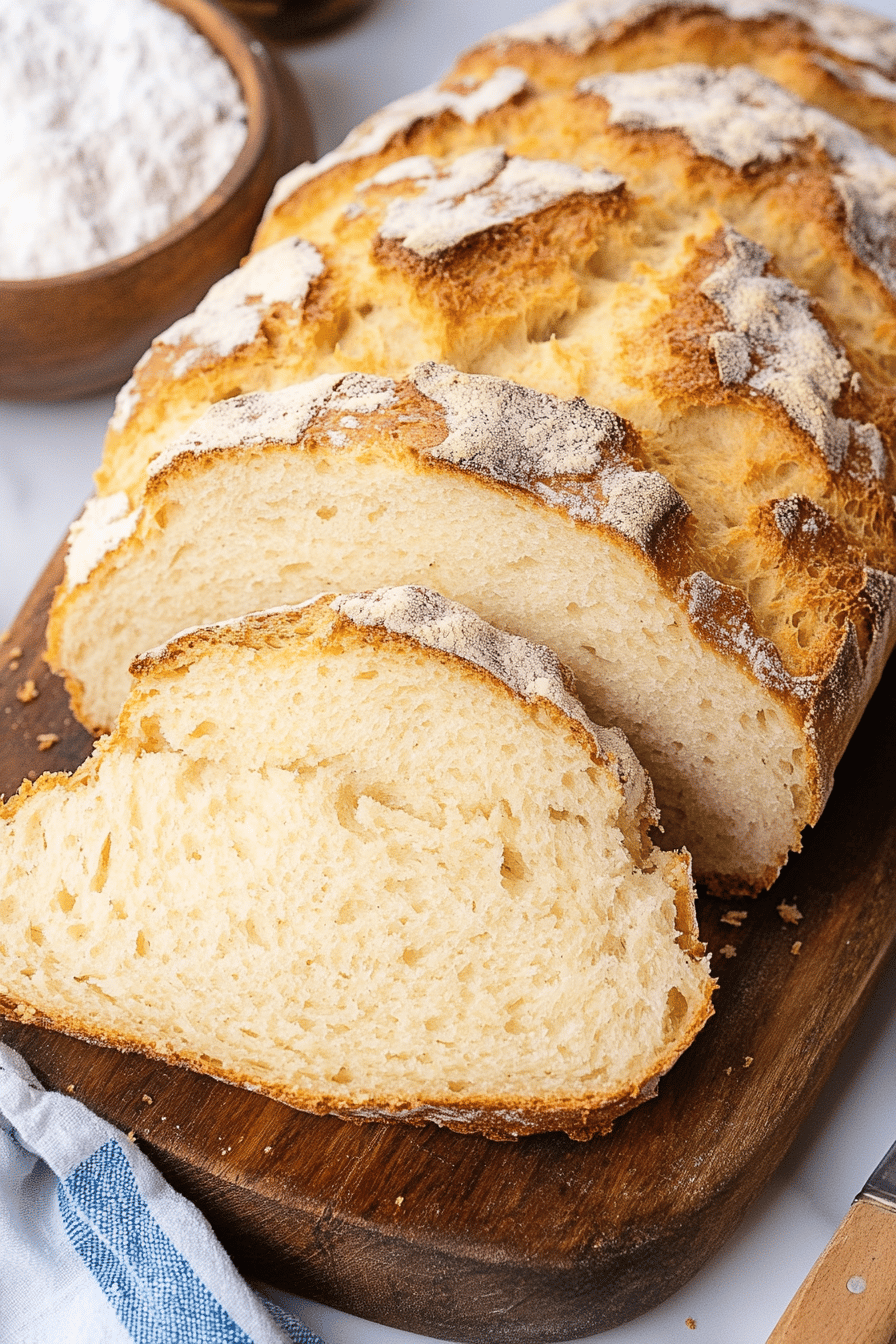
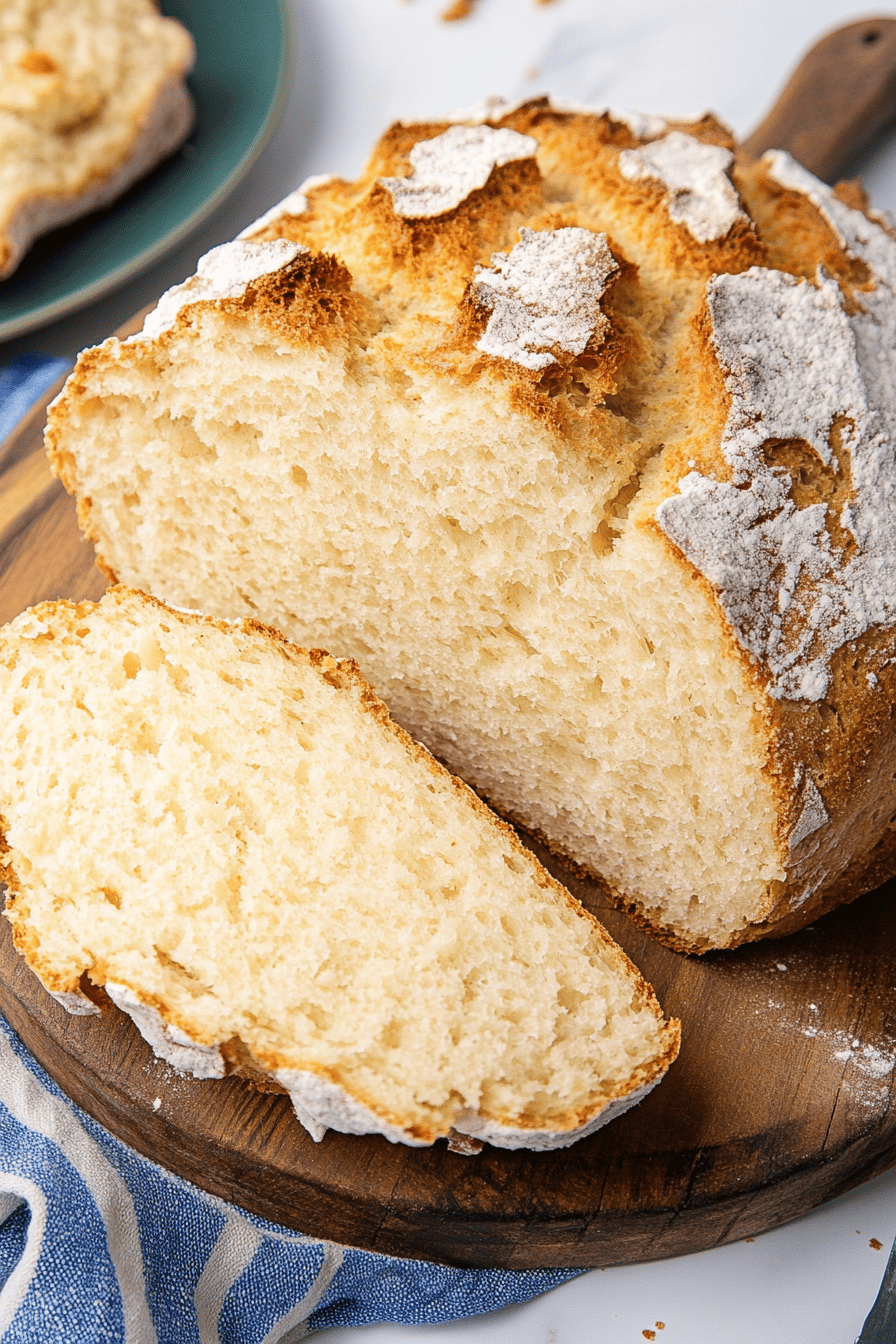
So, what exactly is this magical Irish soda bread? At its heart, it’s a rustic, quick bread that gets its lift from baking soda, instead of yeast. That’s why it’s called “soda” bread! It’s traditionally made with simple pantry staples: flour, salt, baking soda, and buttermilk. The magic happens when the buttermilk (which is acidic) reacts with the baking soda, creating carbon dioxide bubbles that make the bread rise. Think of it as a wonderfully forgiving, no-knead wonder. Its origins go back to Ireland in the 1800s, when baking soda became more widely available. Before that, most breads were yeasted and took a lot more time and effort to make. This was a lifesaver for home cooks, allowing them to whip up fresh bread quickly. It’s not typically sweet, but has a wonderful, slightly tangy flavor from the buttermilk, and a satisfyingly dense but tender crumb. It’s the kind of bread that feels honest and real.
Why you’ll love this recipe?
Honestly, the list is pretty long! First off, the flavor. Even though it’s simple, the taste is incredible. It has that lovely, slightly tangy note from the buttermilk, a nice wholesome wheatiness from the flour, and just a hint of salt to bring it all together. It’s not overly sweet, which is what I adore about it, but it’s perfectly paired with sweet or savory toppings. Then there’s the simplicity – it’s genuinely one of the easiest breads you’ll ever make. No waiting for dough to rise, no complicated kneading techniques. You can literally mix it up and have it in the oven in under 10 minutes. It’s also incredibly cost-effective. All the ingredients are super affordable and likely already in your pantry. That’s a huge win in my book, especially when I’m trying to feed a hungry family without breaking the bank. And the versatility! This Irish soda bread is a blank canvas. It’s amazing just as it is, toasted with butter, but it’s also fantastic with jam, honey, a slice of cheese, or even as the base for a savory open-faced sandwich. It stands up beautifully to both sweet and savory additions. What I love most about this particular recipe, though, is its texture. It’s got that perfect balance – a slightly crisp crust and a soft, tender interior that’s just melt-in-your-mouth good. It reminds me of my Nana’s baking, and that’s the highest compliment I can give any recipe. If you enjoy my **Easy Overnight Belgian Waffles** for their simplicity and delicious results, you’ll fall head over heels for this Irish soda bread.
How do I make Irish Soda Bread?
Quick Overview
This recipe is all about speed and simplicity. You’ll whisk together your dry ingredients, then mix in your wet ingredients until just combined. Shape it into a rustic round, score a cross on top (which is traditional and helps it bake evenly!), and pop it into a hot oven. It bakes up quickly into a beautiful, golden-brown loaf. The key is minimal mixing to keep that tender crumb. It’s genuinely a stress-free baking experience from start to finish, and the result is always so rewarding.
Ingredients
For the Main Batter:
- 4 cups all-purpose flour: I always opt for unbleached all-purpose flour. It makes a difference in the texture!
- 1 teaspoon baking soda: Make sure yours is fresh! Old baking soda won’t give you that lovely rise.
- 1 teaspoon salt: Just regular table salt is perfect here.
- 1 ¾ cups buttermilk: This is the secret ingredient for moisture and that slight tang. If you don’t have buttermilk, you can make a substitute by adding 1 tablespoon of lemon juice or white vinegar to regular milk and letting it sit for 5-10 minutes.
For the Filling:
- ½ cup raisins or currants (optional): If you like a little sweetness inside, these are lovely. I sometimes skip them if I’m going for a more savory vibe.
- 1 teaspoon caraway seeds (optional): My Grandpa loved these, and they add a wonderful subtle flavor.
For the Glaze:
- 1 egg, beaten with 1 tablespoon milk or water: This creates a beautiful golden crust.
Step-by-Step Instructions
Step 1: Preheat & Prep Pan
First things first, get your oven preheating to 425°F (220°C). While that’s heating up, lightly flour a baking sheet or line it with parchment paper. This just helps prevent any sticking. If you have a cast-iron skillet, you can also preheat that in the oven for an extra crispy bottom crust!
Step 2: Mix Dry Ingredients
In a large mixing bowl, whisk together the flour, baking soda, and salt. Give it a good whisk to make sure everything is evenly distributed. This is important so your baking soda is in every bite, giving you that consistent rise. If you’re using caraway seeds, toss them in here too and give it another quick mix.
Step 3: Mix Wet Ingredients
In a separate, smaller bowl or a large measuring cup, measure out your buttermilk. If you’re adding the raisins to the batter, you can stir them in now. Make sure your buttermilk is at room temperature or slightly warm – not hot, just not ice cold. This helps the ingredients meld together nicely.
Step 4: Combine
Now, pour the buttermilk mixture into the dry ingredients. Use a fork or a spatula to gently mix everything together until it *just* comes together into a shaggy dough. Be careful not to overmix! This is the most crucial step for a tender crumb. You want to see a few streaks of flour still – that’s okay! Overmixing develops the gluten too much, leading to a tough bread.
Step 5: Prepare Filling
If you’re adding optional fillings like extra raisins or currants, this is where you’d gently fold them in now, along with any optional seeds if you haven’t already added them to the dry ingredients. Again, work gently and don’t overmix. Just a few folds to distribute them evenly.
Step 6: Layer & Swirl
Turn the shaggy dough out onto a lightly floured surface. Gently bring it together with your hands, patting it into a round shape, about 1 ½ to 2 inches thick. Don’t knead it! Just pat and shape. Once you have your round loaf, place it on your prepared baking sheet or in your preheated skillet. Using a sharp knife, cut a deep cross into the top of the loaf, about halfway down. This is traditional, and it also helps the heat penetrate to the center, ensuring it bakes through evenly.
Step 7: Bake
Pop the loaf into your preheated oven. Bake for about 15 minutes at 425°F (220°C), then reduce the oven temperature to 400°F (200°C) and continue baking for another 20-25 minutes, or until the loaf is golden brown and sounds hollow when you tap the bottom. The exact time can vary depending on your oven, so keep an eye on it!
Step 8: Cool & Glaze
Once baked, carefully remove the bread from the oven and transfer it to a wire rack to cool slightly. While it’s still warm, brush the top with the beaten egg and milk mixture for a beautiful shiny glaze. Let it cool for at least 15-20 minutes before slicing. It’s tough, I know, but it needs this time to set!
Step 9: Slice & Serve
Once it’s cooled a bit, slice into wedges using a serrated knife. This bread is absolutely divine served warm, slathered with good quality butter. It’s also wonderful with jam, honey, or even a smear of Cream Cheese.
What to Serve It With
This versatile Irish soda bread is a star on its own, but it also plays wonderfully with so many other things! For a hearty Breakfast, I love toasting thick slices and generously spreading them with butter. It’s also fantastic topped with a simple fried egg or a dollop of Greek yogurt and a drizzle of honey. For a lovely Brunch spread, it’s perfect alongside other classics like Scrambled Eggs, bacon, and maybe even a bit of smoked salmon. Its rustic charm makes any brunch feel a bit more special. As a simple Dessert, a warm slice with a drizzle of good maple syrup or a spoonful of fruit compote is surprisingly satisfying. It’s not overly sweet, so it satisfies a craving without being too heavy. And for those cozy afternoon Snacks, nothing beats a warm piece with a cup of tea or coffee. My kids absolutely love it dunked into a warm mug of hot chocolate – yes, really! My family also loves it with a bit of sharp cheddar cheese melted on top, which is a wonderful savory option.
Top Tips for Perfecting Your Irish Soda Bread
I’ve made this Irish soda bread more times than I can count, and through those many bakes, I’ve picked up a few tricks that really make a difference. First, regarding the Flour, I always use unbleached all-purpose flour. It’s not a huge deal, but I find it gives a slightly better texture. And make sure your baking soda is fresh! An old box won’t give you that lovely lift. When it comes to Mixing Advice, I cannot stress this enough: DO NOT OVERMIX. Seriously, stop mixing as soon as the dough *just* comes together. A few dry bits are better than a tough loaf. Overmixing develops the gluten, and you want a tender, crumbly texture. For shaping, just gently pat the dough into a round. Don’t try to knead it like regular bread. For the classic cross, make sure you cut it deeply enough – about halfway through the loaf. This helps it bake evenly all the way through. If you’re experimenting with Ingredient Swaps, for the buttermilk, remember the DIY trick: 1 tbsp lemon juice or vinegar to 1 ¾ cups milk, let it sit for 5-10 minutes. It works like a charm! I’ve also tried it with whole milk instead of buttermilk, and it’s still good, just less tangy and a bit less tender. For Baking Tips, ovens can be quirky, so it’s always good to know your oven. The bake time is a guideline; the best way to tell if it’s done is by tapping the bottom. If it sounds hollow, it’s ready. I usually bake it on the middle rack, but if you find the bottom is browning too quickly, you can always move it up a notch. For the Glaze Variations, the egg wash gives it that lovely golden sheen, but if you’re avoiding eggs, you can just use a little extra buttermilk or milk brushed on top for a softer crust. Some people even skip the glaze entirely, and it’s still delicious!
Storing and Reheating Tips
Storing this Irish soda bread is pretty straightforward, but there are a few things to keep in mind to keep it tasting its best. If you’ve got leftovers (which I rarely do!), it’s best stored at Room Temperature. Wrap it tightly in plastic wrap or place it in an airtight container. It will stay good for about 2-3 days like this. The crust might soften a bit over time, but the inside will remain wonderfully moist. I don’t usually recommend Refrigerator Storage for this bread because the moisture in the fridge can sometimes make the crust a bit gummy. However, if you live in a very humid climate and need to refrigerate it, wrap it very well in plastic wrap, then place it in an airtight container. It should last about 4-5 days this way. For Freezer Instructions, this bread freezes surprisingly well! Once completely cooled, wrap the whole loaf or individual slices very tightly in plastic wrap, then in a layer of aluminum foil, or place them in a freezer-safe bag. It can stay frozen for up to 3 months. To reheat, you can thaw frozen slices overnight at room temperature, or warm them gently in a toaster oven or a low oven (around 300°F/150°C) for about 10-15 minutes until heated through. For the Glaze Timing Advice, if you plan to freeze the bread, I recommend glazing it *after* reheating it from frozen, or if you’re storing it for a day or two at room temperature, the glaze will hold up well.
Frequently Asked Questions
Final Thoughts
There you have it – my absolute favorite, no-fuss Irish soda bread recipe! It’s the kind of baking that’s so grounding and satisfying, and the results are consistently delicious. It’s a true testament to how simple, good ingredients can create something truly special. Whether you’re making it for a cozy breakfast, a holiday gathering, or just because you’re craving something comforting, I promise this recipe will become a favorite in your kitchen too. It’s one of those staple recipes that just feels like coming home. If you loved this, you might also enjoy my **Simple No-Bake Chocolate Peanut Butter Bars** for another easy and crowd-pleasing treat! I truly hope you give this Irish soda bread a try and love it as much as my family and I do. Don’t hesitate to leave a comment below to tell me how yours turned out, or if you have any fantastic variations to share – I’m always looking for new ideas! Happy baking!
Irish Soda Bread
Ingredients
Main Ingredients
- 4 cups All-purpose flour
- 1 teaspoon Baking soda
- 1 teaspoon Salt
- 1.75 cups Buttermilk
- 2 tablespoons Butter melted, for brushing (optional)
Instructions
Preparation Steps
- Preheat oven to 400°F (200°C).
- In a large bowl, whisk together flour, baking soda, and salt.
- Add buttermilk and mix until just combined. The dough will be sticky.
- Turn dough out onto a lightly floured surface. Gently shape into a round.
- Place the dough on a baking sheet and cut a cross on top, about 1 inch deep.
- Bake for 30-40 minutes, or until golden brown and a toothpick inserted in the center comes out clean.
- Brush with melted butter (optional) and let cool slightly before serving.


![Chocolate Chip Muffin Recipe [+Video]](https://tastyrecipesblog.com/wp-content/uploads/2025/02/Chocolate-Chip-Cookie-Muffins-8-scaled-1-768x1152.jpg)

