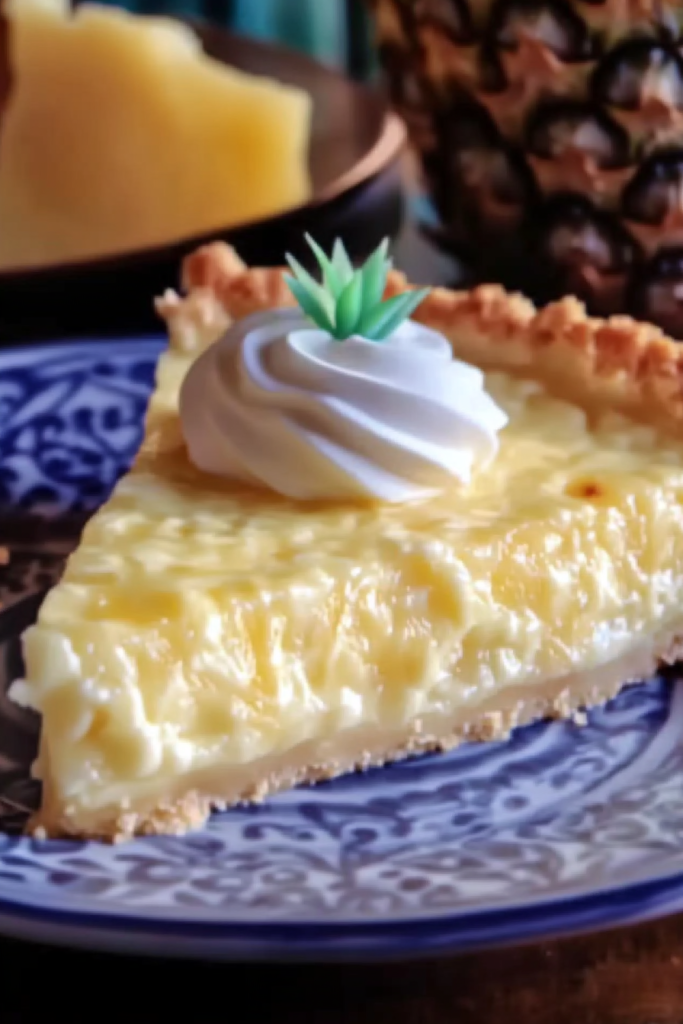
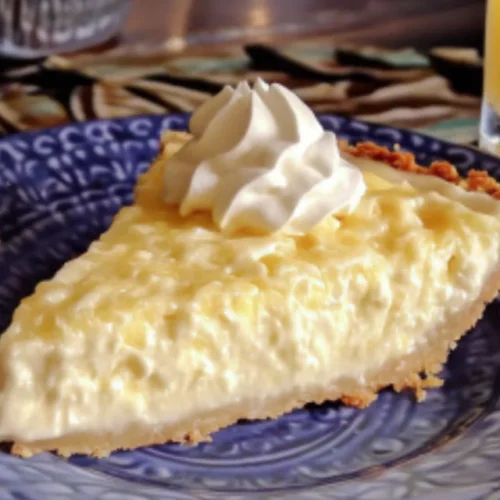
There are some recipes that just feel like coming home, aren’t there? For me, one of those recipes is hands-down Jims Pineapple Cheese Pie. It’s not fancy, it’s not complicated, but oh my goodness, does it deliver. I remember my Aunt Carol making this for potlucks when I was a kid. The bright, sunny yellow color alone was enough to get my attention, and then the taste… it was this incredible symphony of sweet pineapple, tangy Cream Cheese, and a hint of something savory that just made your taste buds sing. It’s the kind of dessert that makes everyone ask, “What IS this amazing pie?!” It’s got that delightful zing you get from a good pineapple upside-down cake, but with a creamy, dreamy texture that’s just divine. Honestly, if you’re looking for a guaranteed crowd-pleaser that’s also surprisingly easy to whip up, you’ve found your winner.
What is Jim’s Pineapple Cheese Pie?
So, what exactly is Jims Pineapple Cheese Pie? Well, think of it as a delightful fusion of a classic cheesecake and a bright, fruity dessert. It’s not your typical heavy, dense cheesecake, though. This one is much lighter and bursting with the tropical sweetness of pineapple. The “cheese” in the name refers to Cream Cheese, which gives it that wonderfully rich and smooth texture, while the pineapple brings a lovely tartness and moisture. The name itself, “Jim’s,” is a little mysterious and personal to my family. My Uncle Jim was legendary for bringing this to every family gathering, and he’d always make it with this special twinkle in his eye, as if he held the secret to pure joy in his pie plate. It’s essentially a baked custard-like pie, elevated by the star ingredient: pineapple. It’s uncomplicated, deeply satisfying, and just happens to be one of those desserts that people talk about long after the last crumb is gone.
Why you’ll love this recipe?
There are so many reasons why I keep coming back to Jims Pineapple Cheese Pie, and I just know you’re going to fall in love with it too! First off, let’s talk about the flavor explosion. It’s this perfect balance of sweet and tangy. The crushed pineapple is the undisputed star, bringing its juicy, tropical goodness into every bite. But then, you get that creamy, luscious foundation from the Cream Cheese, which mellows out the pineapple’s intensity just perfectly. It’s not overly sweet, which I really appreciate, making it a delightful treat that doesn’t feel too heavy. And the texture! Oh, it’s so wonderfully smooth and almost custardy, with that slightly baked top that’s just divine.
Beyond the incredible taste, the sheer simplicity of this pie is a lifesaver, especially on those busy weeknights or when you’re hosting a last-minute get-together. You don’t need a fancy mixer or a dozen steps to get this pie into the oven. Most of the magic happens right in one bowl! It’s one of those recipes where the ingredients are pretty standard, too, so you probably have most of what you need in your pantry right now. Plus, it’s incredibly budget-friendly. You can feed a whole crowd without breaking the bank. And talk about versatility! While it’s a spectacular dessert on its own, I’ll share some ideas later on how to serve it for breakfast, brunch, or even as a special after-dinner treat. Honestly, what I love most about this pie is that it brings such a bright, happy feeling. It’s like a little slice of sunshine, and who couldn’t use more of that?
How do you make Jim’s Pineapple Cheese Pie?
Quick Overview
Making Jims Pineapple Cheese Pie is surprisingly straightforward. You’ll basically whisk together your wet ingredients, combine them with your dry ingredients, fold in the star, pineapple, and then let the oven do its magic. The whole process, from start to finish, takes less time than you might think, and the minimal prep means less time fussing in the kitchen and more time enjoying that incredible aroma filling your home. It’s truly a stress-free path to a delicious dessert.
Ingredients
For the Main Batter:
You’ll need 1 cup of granulated sugar – this gives us that sweetness without being overwhelming. Then, 4 large eggs, which are crucial for binding everything together and giving the pie its lovely custard-like texture. Don’t worry about them smelling eggy; the pineapple and cream cheese really balance that out. We’ll also use 1 cup of softened unsalted butter. Make sure it’s truly softened, not melted! This is key for a smooth batter. And of course, our star: 1 (20-ounce) can of crushed pineapple, undrained. I’ve tried draining it before, and it just doesn’t give the same moist, flavorful result. Keep that juice! You’ll also need 2 teaspoons of pure vanilla extract for that warm, comforting aroma and flavor.
For the Filling:
The heart of the creaminess comes from 8 ounces of cream cheese, softened. Again, *softened* is the magic word here. It needs to be at room temperature so it blends beautifully without any lumps. If it’s too cold, you’ll end up with a lumpy mess, and nobody wants that.
For the Glaze:
For that extra touch of sweetness and shine, we’ll whip up a simple glaze. This typically includes about 1 cup of powdered sugar, and you’ll add a little bit of milk or cream, just a tablespoon or two at a time, until you reach your desired drizzling consistency. A splash of lemon juice or even a little more vanilla extract can be added here to brighten the flavors if you like.
Step-by-Step Instructions
Step 1: Preheat & Prep Pan
First things first, let’s get your oven preheated to 350°F (175°C). You’ll want a 9-inch pie plate, and I always like to give it a light greasing, just to be sure nothing sticks. A little bit of butter or non-stick spray works perfectly. This simple step ensures your beautiful pie slides right out when it’s done.
Step 2: Mix Dry Ingredients
In a medium bowl, whisk together your 1 cup of granulated sugar. It might seem like a lot of sugar, but remember it has to balance the tang of the pineapple and cream cheese. Whisking it now helps distribute it evenly for the next step.
Step 3: Mix Wet Ingredients
In a large mixing bowl, cream together your softened butter and the softened cream cheese until it’s wonderfully smooth and fluffy. This is where a good mixer really comes in handy, but you can absolutely do it by hand with a whisk if you’re feeling energetic! Once that’s smooth, beat in your 4 large eggs, one at a time, making sure each is fully incorporated before adding the next. Then, stir in the vanilla extract and that undrained crushed pineapple. Don’t worry if it looks a little messy; it all comes together in the next step.
Step 4: Combine
Now, it’s time to bring everything together. Gradually add the dry ingredients (the sugar you whisked earlier) to the wet ingredients. Mix on low speed, or stir gently with a spatula, just until everything is combined. The key here is not to overmix! Overmixing can develop the gluten in the flour too much, leading to a tougher pie. You want a batter that’s thick and just combined. If it seems a little too thick, a tiny splash of milk can help, but usually, the pineapple juice provides enough moisture.
Step 5: Prepare Filling
Actually, for this particular Jims Pineapple Cheese Pie, the “filling” is really part of the main batter. The cream cheese is incorporated directly into the wet ingredients in Step 3, and the crushed pineapple is added in Step 4. So, no separate filling preparation needed here! It’s all about that glorious, integrated mixture.
Step 6: Layer & Swirl
Pour the batter evenly into your prepared pie plate. You can gently spread it with your spatula to make sure it’s level. There’s no fancy swirling or layering needed for this pie; the magic happens as it bakes, creating those delightful pockets of pineapple and creamy goodness.
Step 7: Bake
Pop that pie into your preheated oven and bake for about 45-55 minutes. You’ll know it’s done when the top is golden brown and a toothpick inserted into the center comes out clean or with just a few moist crumbs attached. If the crust edges start to get too brown before the center is done, you can always loosely tent the pie with foil. Ovens can be so finicky, so keep an eye on it towards the end!
Step 8: Cool & Glaze
Once baked, carefully remove the pie from the oven and let it cool on a wire rack for at least 30 minutes. This is important! Trying to glaze a hot pie can lead to a melty mess. While it’s cooling, whisk together your powdered sugar and a tablespoon or two of milk or cream until you have a smooth, drizzle-able glaze. Once the pie has cooled a bit, generously drizzle that glaze all over the top. It hardens up slightly as it cools further, giving it a lovely finish.
Step 9: Slice & Serve
Allow the pie to cool completely before slicing. Patience is a virtue here, my friends! Cutting it too soon can make it fall apart. Once it’s fully cooled, slice it into wedges and enjoy! It’s delicious served slightly chilled or at room temperature. The glaze will have set up beautifully by then.
What to Serve It With
Jims Pineapple Cheese Pie is such a versatile treat, it honestly works for almost any meal or occasion! For breakfast, I love serving a small slice warm with a dollop of plain Greek yogurt and a sprinkle of toasted coconut. It’s like a tropical breakfast cake that’s not overly sweet.
When it comes to brunch, this pie truly shines. Imagine it as part of a beautiful spread. I love to serve it with fresh berries – raspberries or sliced strawberries are perfect – and maybe a light dusting of powdered sugar. A mimosa or a good cup of strong coffee is its perfect companion.
As a dessert, it’s absolutely divine. A scoop of vanilla bean ice cream or a dollop of whipped cream takes it to another level. For a more elegant touch, a drizzle of raspberry coulis or some toasted slivered almonds scattered over the top adds a gourmet flair. It’s fantastic after a hearty meal.
And for those cozy, anytime snacks? This pie is perfect. I’ll often just have a slice with my afternoon tea or coffee. It’s comforting, satisfying, and feels like a little reward. My kids especially love it this way, and it’s always a hit when friends drop by unexpectedly. It’s the kind of dessert that brings smiles all around, no matter how you serve it!
Top Tips for Perfecting Your Jims Pineapple Cheese Pie
I’ve made this Jims Pineapple Cheese Pie more times than I can count, and over the years, I’ve picked up a few tricks that really make a difference. For the pineapple, always use crushed pineapple and *do not drain it*. That juice is pure gold – it infuses the whole pie with moisture and that wonderful tropical flavor. If you use chunks, they can be a bit overpowering, so crushed is definitely the way to go.
When it comes to mixing, remember my advice: don’t overmix! Once you combine the wet and dry ingredients, just mix until they’re *barely* combined. You want to avoid developing that gluten too much, or you’ll end up with a chewy pie instead of a tender one. A few little streaks of flour are okay; they’ll disappear during baking.
For the glaze, the consistency is key. Start with a small amount of liquid and add more only if needed. You want it thick enough to drizzle but not so thin that it just runs off the pie. I’ve found that a slightly thicker glaze holds up better on the finished pie. If it gets too thin, just whisk in a bit more powdered sugar.
I’ve experimented with a few ingredient swaps, and I can tell you that using good quality butter really does make a difference in the richness of the flavor. And while you *can* use a lower-fat cream cheese, I really recommend full-fat for the best creamy texture and flavor. The recipe is so simple, it really relies on the quality of its core ingredients.
When it comes to baking, ovens vary wildly, so always trust the toothpick test. If the top is browning too quickly, don’t hesitate to loosely cover it with foil. I usually place my pie on the middle rack to ensure even heat circulation. For doneness, you want the center to be set, not jiggly. A little bit of moisture on the toothpick is fine, but raw batter means it needs more time.
And for glaze variations, sometimes I’ll add a tiny pinch of cardamom to the glaze for a warmer spice note, or a bit of orange zest for an extra citrusy punch. It’s fun to play around once you’ve mastered the basic recipe!
Storing and Reheating Tips
Once your delicious Jims Pineapple Cheese Pie is baked and cooled, you’ll want to know how to keep it fresh. For storing at room temperature, it’s best to cover it loosely with plastic wrap or foil. It will stay good on the counter for about 2-3 days, especially in a cooler climate. However, if your kitchen is warm or humid, or if you’ve made it with a particularly rich glaze, I’d err on the side of caution and move it to the refrigerator after a few hours.
In the refrigerator, this pie is a champ! Store it in an airtight container or well-wrapped with plastic wrap and foil. It can keep its deliciousness for a good 4-5 days. The texture might change slightly after a day or two, becoming a bit denser, but it’s still incredibly tasty. Just make sure it’s properly sealed to prevent it from drying out or absorbing other fridge smells.
Freezing is also an option if you want to make this ahead of time. I usually freeze individual slices rather than the whole pie, as it makes thawing and serving much easier. Wrap each slice very tightly in plastic wrap, then in a layer of aluminum foil, and place them in a freezer-safe bag or container. It can be stored in the freezer for up to 2-3 months. To thaw, simply unwrap the slice and let it come to room temperature on a plate for a few hours. If you’re reheating, a few seconds in the microwave can be nice, but I often find it’s best enjoyed cold or at room temp straight from thawing.
For the glaze, I typically add it *after* the pie has cooled significantly and just before serving if it’s going to be eaten within a day or two. If you plan to store leftovers for longer or freeze, you can hold off on the glaze and add a fresh drizzle when you’re ready to eat. This keeps the glaze from getting sticky or gooey on stored pie. Alternatively, you can store the glaze separately in a small container in the fridge and drizzle it on when serving. This is especially helpful if you’re freezing slices.
Frequently Asked Questions
Final Thoughts
So there you have it – Jims Pineapple Cheese Pie. It’s more than just a recipe for me; it’s a little bit of happiness, a reminder of family gatherings, and proof that sometimes, the simplest things are the most delicious. The way the sweet pineapple bursts through that creamy, tangy base is just pure magic. It’s that perfect combination of bright, tropical flavor and comforting, rich dessert that makes it so special. If you’re looking for a dessert that’s easy enough for a weeknight but impressive enough for guests, this is it. It’s forgiving, it’s delicious, and it’s got this wonderful way of making everyone feel a little bit happier.
If you love bright, fruity desserts with a creamy twist, you might also enjoy my recipe for Lemon Blueberry Bundt Cake or my Classic Strawberry Rhubarb Pie. They both share that same spirit of comforting, delicious homemade goodness.
I truly hope you give this Jims Pineapple Cheese Pie a try. I can’t wait to hear what you think and how it turns out for you! Please leave a comment below to share your experience, or if you have any variations or tips of your own, I’d love to hear them. Happy baking, and enjoy every single delicious bite!
Jims Pineapple Cheese Pie
Ingredients
Crust
- 1.5 cup Graham cracker crumbs
- 0.25 cup Granulated sugar
- 0.5 cup Unsalted butter Melted
Filling
- 8 ounce Cream cheese Softened
- 1 cup Granulated sugar
- 1 teaspoon Vanilla extract
- 1 cup Crushed pineapple Drained
- 1 cup Heavy cream Whipped
Instructions
Crust Preparation
- Preheat oven to 350°F (175°C).
- Combine graham cracker crumbs, sugar, and melted butter. Press into a 9-inch pie pan.
- Bake for 8-10 minutes. Let cool.
Filling Preparation
- In a large bowl, beat cream cheese and sugar until smooth.
- Stir in vanilla extract and drained pineapple.
- Fold in whipped cream.
- Pour filling into the prepared crust. Refrigerate for at least 2 hours before serving.


