Oh, my goodness, friends! If there’s one dessert that always brings a smile to my face, it’s a perfectly smooth, sunshine-yellow lemon custard. This isn’t just any dessert; it’s pure comfort in a bowl, a little ray of sunshine on a cloudy day. I remember my grandmother making this when I was a kid, and the smell of warm lemons and cream filling the house was just magical. It’s like a hug from the inside! It’s so much simpler than you might think, and honestly, it rivals any fancy crème brûlée or panna cotta I’ve ever had, but without all the fuss. If you’ve ever been intimidated by custards, trust me, this Lemon custard recipe is your new best friend. It’s the perfect thing for when you want something a little special, but don’t want to spend hours in the kitchen. Plus, my kids, who are *very* picky eaters, actually ask for seconds of this, and that’s saying something!
What is lemon custard?
So, what exactly is this delightful treat? At its heart, lemon custard is a rich, creamy dessert made primarily from eggs, milk or cream, sugar, and, of course, the star of the show – lemon! Think of it as a luxurious, baked pudding that’s infused with bright, zesty lemon flavor. It’s typically baked in a ramekin or a larger dish, often in a water bath (a bain-marie) to ensure it cooks gently and evenly, resulting in that impossibly smooth texture we all crave. The magic happens when the egg yolks bind with the liquid, creating that silky, custard consistency. The lemon juice and zest add that essential tang and aroma that cuts through the richness, making it incredibly refreshing. It’s essentially a warm, comforting embrace of citrus and cream, a true classic for a reason!
Why you’ll love this recipe?
Honestly, there are so many reasons I keep coming back to this particular lemon custard recipe, and I just know you’re going to fall in love with it too. First off, the flavor is just out of this world. It’s this beautiful balance of sweet and tart. You get the comforting richness from the dairy and eggs, and then that vibrant, fresh burst of lemon that just sings. It’s not cloyingly sweet; it’s just perfectly balanced. Then there’s the simplicity. Seriously, the ingredient list is pretty short, and the steps are really straightforward. I can whip this up on a weeknight when I’m craving something sweet after dinner, and it feels so decadent. It’s also surprisingly budget-friendly. You probably have most of the ingredients in your pantry right now! What I love most about this recipe, though, is its versatility. You can serve it warm, chilled, with fresh berries, a dollop of Whipped Cream, or even just on its own. It’s perfect for a quiet evening treat, but it also feels elegant enough to serve to guests. It’s the kind of recipe that makes you feel like a kitchen pro without breaking a sweat. It’s truly a lifesaver when you need a dessert in a pinch!
How do I make lemon custard?
Quick Overview
The process for this lemon custard is wonderfully simple: whisk together your base ingredients, gently incorporate the lemon, pour into ramekins, and bake in a soothing water bath until set. The key is to let the oven and the water bath do the work, ensuring a delicate, smooth custard every single time. It’s really more about patience than complicated techniques, and the results are always worth it. You’ll end up with a dessert that tastes like it came from a high-end bakery, but you made it yourself!
Ingredients
For the Main Batter:
4 large eggs
2 cups heavy cream (or whole milk for a lighter version, but trust me, cream is divine!)
3/4 cup granulated sugar (you can adjust slightly to your sweetness preference)
1/4 teaspoon salt
1 tablespoon cornstarch (this is my secret for ultimate smoothness!)
The zest of 2 large lemons
1/4 cup fresh lemon juice (from about 1-2 lemons)
For the Filling:
This recipe doesn’t technically have a separate “filling” as the custard itself is the star. However, if you’re feeling fancy, you could add a small dollop of Whipped Cream or a spoonful of tart raspberry jam to the bottom of each ramekin before pouring in the custard. I sometimes do this when I have a little extra jam lying around, and it adds a lovely surprise!
For the Glaze:
This is totally optional, but if you want that extra pop of flavor and shine, I love a simple lemon glaze. You’ll need: 1/2 cup powdered sugar and 1-2 tablespoons fresh lemon juice. Mix until smooth and drizzle over the cooled custard.
Step-by-Step Instructions
Step 1: Preheat & Prep Pan
First things first, let’s get the oven ready. Preheat your oven to 325°F (160°C). While that’s heating up, gather your ramekins. I usually use 6-ounce ramekins, and this recipe makes about 4-6 of them. You’ll also need a larger baking pan, like a roasting pan or a deep casserole dish, to create a water bath. Arrange your ramekins inside this larger pan. Having them all lined up makes pouring the hot water much easier later.
Step 2: Mix Dry Ingredients
In a medium bowl, whisk together the granulated sugar, salt, and cornstarch. Make sure there are no lumps of cornstarch – that’s the key to avoiding any grainy texture in your final custard. Give it a good whisk to combine everything evenly. This step ensures the cornstarch is distributed well and will work its magic to make your custard super smooth.
Step 3: Mix Wet Ingredients
In a separate, larger bowl, whisk the eggs just until they’re combined – you don’t want to whip them too much, just break up the yolks and whites. Now, gradually whisk in the heavy cream (or whole milk). Once that’s incorporated, whisk in the lemon zest and the fresh lemon juice. The aroma at this stage is already fantastic!
Step 4: Combine
Now, it’s time to bring it all together. Gradually pour the wet ingredients into the dry ingredients, whisking constantly. Keep whisking until you have a smooth, lump-free mixture. This is where the cornstarch and sugar start to dissolve and create the base for our beautiful custard. It should look like a smooth, pale yellow liquid.
Step 5: Prepare Filling
As mentioned before, this recipe is all about the custard itself. However, if you’re adding a little something extra like jam or a bit of fruit puree to the bottom of the ramekins, now’s the time to do it. Just a teaspoon or two at the very bottom of each ramekin will do. This adds a lovely surprise element when you dig in.
Step 6: Layer & Swirl
Carefully pour the custard mixture evenly among your prepared ramekins. If you added anything to the bottom, the custard will naturally sit on top. There’s no real “swirling” needed for this simple custard, as we want that pure, smooth lemon flavor throughout. Just fill them up to about three-quarters of the way full. Make sure your ramekins are stable in the larger baking pan.
Step 7: Bake
This is where the magic of the water bath comes in. Carefully pour hot (but not boiling) water into the larger baking pan, around the ramekins, until it comes about halfway up the sides of the ramekins. This gentle cooking environment is crucial for a creamy, tender custard. Carefully transfer the pan to your preheated oven. Bake for 30-40 minutes, or until the custards are mostly set but still have a slight jiggle in the center when you gently shake the pan. They will continue to set as they cool.
Step 8: Cool & Glaze
Once baked, carefully remove the baking pan from the oven. Let the ramekins sit in the water bath for another 10-15 minutes before carefully removing them from the water bath and placing them on a wire rack to cool completely. Once they’re at room temperature, you can cover them with plastic wrap and chill them in the refrigerator for at least 2 hours, or until thoroughly cold. If you’re using the glaze, whisk together the powdered sugar and lemon juice until smooth. Drizzle it over the chilled custards just before serving.
Step 9: Slice & Serve
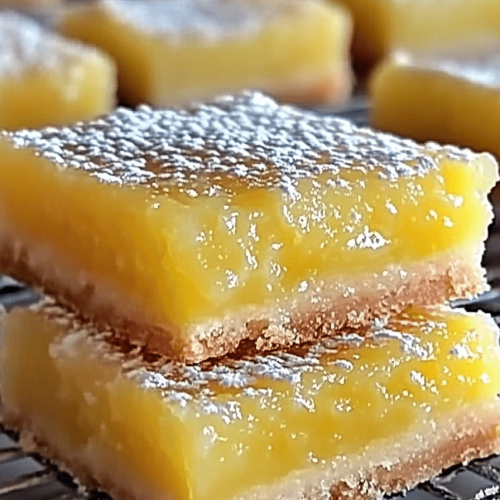
Custard is best served chilled. When you’re ready to enjoy, you can serve them directly in their ramekins. For an extra touch, you can run a thin knife around the edge and invert them onto small dessert plates. Top with a few fresh raspberries, a sprig of mint, or a little extra lemon zest for a beautiful presentation. The contrast of the smooth custard with a fresh garnish is always a winner.
What to Serve It With
This luscious lemon custard is so versatile, it fits into almost any meal or occasion! For breakfast, it’s a surprisingly decadent treat that’s still light enough to start your day. I love it with a strong cup of black coffee and maybe a few fresh berries on the side. It feels like a special weekend breakfast, but it’s so quick to make that it’s doable even on a busy Tuesday. For brunch, it’s an absolute showstopper. Imagine serving these individual custards alongside some mini quiches, fresh Fruit Salad, and maybe some flaky croissants. A mimosa or a sparkling elderflower pressé would be the perfect beverage pairing. As a dessert, it’s simply divine. It’s the perfect ending to a rich meal, offering a refreshing, palate-cleansing sweetness. I often serve it with a light, airy lemon shortbread cookie or a few candied lemon peel pieces for a little texture and extra citrus punch. And for those cozy nights when you just need a little something sweet, this custard is ideal. It’s comforting, not too heavy, and just utterly delightful. My family tradition is to have this on a chilly evening after a hearty stew or roast chicken; it just feels right!
Top Tips for Perfecting Your Lemon Custard
I’ve made this lemon custard more times than I can count, and along the way, I’ve picked up a few tricks that I think really elevate it from good to absolutely amazing. Firstly, when it comes to the lemon zest, I always use a microplane. It grates the zest super fine, releasing all those aromatic oils without any of the bitter white pith. This is key to getting a really bright, pure lemon flavor without any bitterness. For the eggs, while you don’t want to whip them vigorously, make sure they are well combined before adding other ingredients. This ensures an even distribution throughout the custard. And speaking of combining, when you’re mixing the wet and dry ingredients, a gentle whisk is all you need. Overmixing can actually toughen the eggs, leading to a less tender custard, which is the opposite of what we want! The cornstarch is my little secret weapon here. A tablespoon might seem small, but it makes a huge difference in achieving that silky-smooth, almost pudding-like texture without being heavy. Make sure it’s lump-free before adding liquids. When it comes to the water bath, don’t use boiling water. Very hot, but not quite boiling, is perfect. Boiling water can cause the edges of the custard to curdle slightly, and we’re aiming for uniform creaminess. I’ve also learned that oven temperatures can vary wildly. If your oven tends to run hot, you might want to check the custards a few minutes earlier than the suggested time. A slight wobble in the center is what you’re looking for; they’ll firm up beautifully as they cool. For ingredient swaps, I’ve experimented with different dairy. While heavy cream gives you the ultimate richness, a good quality whole milk can work, but the texture will be a little lighter. I’ve even tried a mix of half-and-half and whole milk with great success. For the lemon flavor, you can play around with it! If you love a super tart kick, add a tiny bit more lemon juice, but be mindful that too much acidity can sometimes affect the setting of the custard. Conversely, if you prefer it a bit milder, reduce the lemon juice slightly and maybe add a touch more zest for aroma. Finally, chilling time is non-negotiable for the best texture and flavor. At least 2 hours is ideal, but if you can let it chill overnight, even better! It allows all those flavors to meld beautifully.
Storing and Reheating Tips
This lemon custard is a fantastic make-ahead dessert, which is one of the main reasons I love it so much. If you’ve got leftovers (which is rare in my house!), storing them is super easy. For room temperature storage, it’s really best to serve them within a few hours of cooling. Custard, especially with dairy and eggs, is best kept chilled for food safety. So, once your custards have cooled to room temperature after baking, cover each ramekin tightly with plastic wrap. Then, pop them into the refrigerator. They’ll stay wonderfully fresh and delicious for about 3 to 4 days. I’ve found that they’re actually even better on the second day, as the flavors have had more time to meld. If you plan on freezing them, it’s doable, but the texture might change slightly upon thawing – it can become a little more watery. However, if you do want to freeze them, make sure they are completely chilled first. Wrap each ramekin very well in plastic wrap, then in aluminum foil. They should keep in the freezer for up to 1 month. To thaw, transfer them from the freezer to the refrigerator overnight. For reheating, I generally prefer to serve this lemon custard chilled. It’s meant to be a cool, refreshing treat. However, if you absolutely want to serve it warm, you can gently warm the ramekins in a very low oven (around 200°F/95°C) for about 10-15 minutes, or until just slightly warmed through. Be careful not to overheat it, or you’ll risk scrambling the eggs. The glaze is definitely best applied right before serving. If you glaze them and then refrigerate, the glaze can become sticky or dissolve unevenly. So, glaze them fresh out of the fridge!
Frequently Asked Questions
Final Thoughts
There you have it, my friends! My go-to, absolutely foolproof Lemon custard recipe. It’s the kind of dessert that feels like a special occasion but is so wonderfully simple to whip up. The creamy texture, the bright, zesty lemon flavor – it’s just pure bliss. I truly hope you give this a try. It’s one of those recipes that has earned a permanent spot in my recipe box because it never, ever disappoints. If you enjoy this, you might also love my recipe for Orange Ricotta Pancakes or my Easy No-Bake Lemon Cheesecake – they both have that lovely citrusy zing! I can’t wait to hear how your Lemon Custard turns out! Please leave a comment below and share your experience, or even any fun variations you come up with. Happy baking (or, in this case, happy custard-making)!
Lemon Custard Recipe
Ingredients
Main Ingredients
- 1.5 cup Heavy Cream
- 1 cup Whole Milk
- 0.75 cup Granulated Sugar
- 6 large Egg Yolks
- 0.25 cup Lemon Juice Freshly squeezed
- 1 tablespoon Lemon Zest
- 0.25 teaspoon Salt
Instructions
Preparation Steps
- In a medium saucepan, combine heavy cream, milk, and sugar. Heat over medium heat, stirring until the sugar dissolves. Do not boil.
- In a separate bowl, whisk together the egg yolks, lemon juice, zest, and salt.
- Temper the egg yolks: Slowly pour a small amount of the warm cream mixture into the egg yolk mixture, whisking constantly to prevent the eggs from scrambling. Repeat this process until you've added about half of the warm cream.
- Pour the tempered egg yolk mixture back into the saucepan with the remaining cream mixture. Cook over low heat, stirring constantly with a wooden spoon, until the custard thickens enough to coat the back of the spoon. This should take about 5-7 minutes. Do not boil.
- Remove from heat and strain the custard through a fine-mesh sieve into a clean bowl to remove any lumps.
- Pour the custard into individual ramekins or a serving dish. Cover with plastic wrap, pressing the wrap directly onto the surface of the custard to prevent a skin from forming.
- Refrigerate for at least 2 hours, or until fully chilled and set.
- Serve chilled, garnished with fresh berries or a sprinkle of lemon zest, if desired.