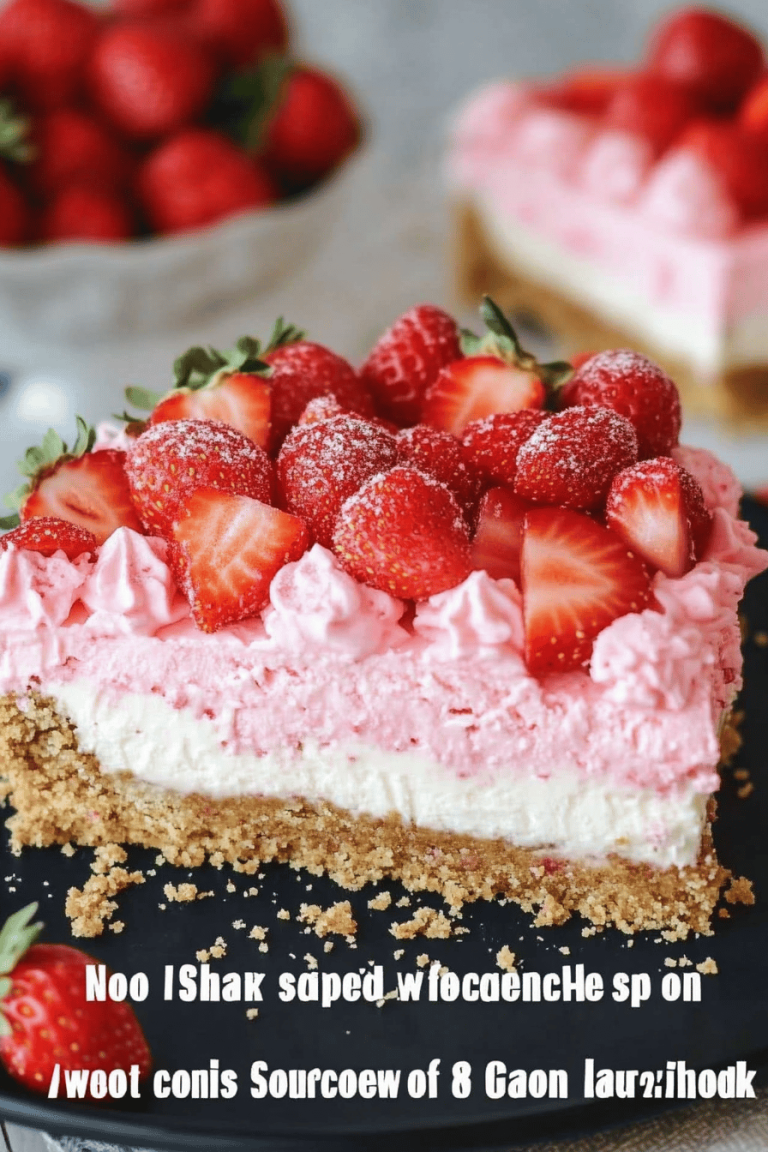
Oh, these lemon raspberry bars! I swear, just thinking about them makes my mouth water. You know those recipes that just feel like a warm hug? This is one of them for me. It all started years ago, probably when I was trying to impress my then-boyfriend (now husband!) with something a little bit special but not too complicated. I’d just seen a picture of some beautiful lemon bars, but I wanted to add a twist, something bright and fruity. My grandmother always made the most divine raspberry jam, and inspiration struck! I tinkered and tested, and after a few batches that were *almost* perfect, I landed on this recipe for lemon raspberry bars. It’s that perfect combination of tangy lemon and sweet-tart raspberries nestled on a tender shortbread-like crust. Honestly, they’re way easier than they look and always disappear in minutes. They remind me a bit of a Raspberry Cheesecake bar, but with that lovely lemony zing that just cuts through the richness. If you’re a fan of lemon bars, you are going to absolutely adore these. They’ve become a go-to for potlucks, bake sales, or just when I need a little bit of sunshine on a cloudy day.
What are lemon raspberry bars?
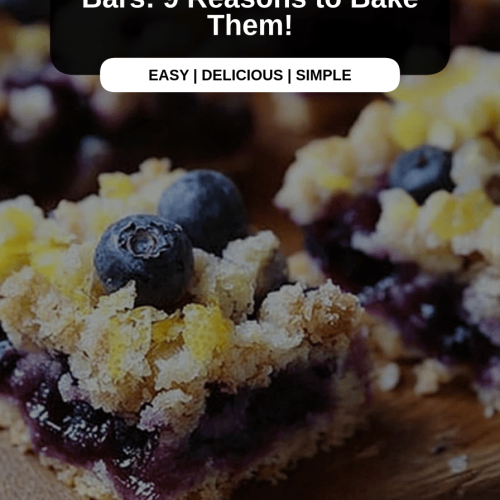
So, what exactly are these magical little squares we’re talking about? Think of them as the ultimate mash-up of a classic lemon bar and a fruity crumble. At its heart, it’s a simple, buttery shortbread-style crust that bakes up beautifully golden and tender. On top of that, we’ve got a vibrant, zesty lemon filling that’s smooth and has just the right amount of wobble. But here’s where the real magic happens: swirls of bright, slightly tart raspberry goodness are woven throughout the lemon. It’s not just a layer of jam; it’s a beautiful, marbled effect that gives you pockets of intense raspberry flavor with every bite. It’s essentially sunshine and summer captured in a bar. The name itself, lemon raspberry bars, pretty much tells the whole story, but the experience of eating them is so much more than just the sum of its parts. It’s that irresistible dance between the sharp citrus and the sweet berry, all balanced on that comforting, crumbly base.
Why you’ll love this recipe?
There are so many reasons I keep coming back to these lemon raspberry bars, and I’m betting you’ll find your own favorite reasons too! First off, let’s talk flavor. The combination of tart lemon curd and sweet raspberries is just phenomenal. It’s bright, refreshing, and not overly sweet, which I really appreciate. The buttery shortbread crust is the perfect foundation – it’s tender and crumbly without being dry. It holds up to the filling beautifully and adds this wonderful comforting element. And the ease of it all! Honestly, you can whip these up with ingredients you probably already have in your pantry. This isn’t some fussy, multi-step dessert that takes all day. I can usually have them mixed and in the oven in under 20 minutes. What I love most is how versatile they are. They’re elegant enough for a dinner party dessert, but casual enough to pack in a lunchbox or enjoy with a cup of tea. They’re incredibly budget-friendly too, especially when raspberries are in season, but even frozen ones work like a charm. If you’re a fan of my classic lemon bars or even my raspberry Thumbprint Cookies, you’re going to fall head over heels for this because it takes all the best elements of those and combines them into one perfect bar. It’s truly a crowd-pleaser, and I can’t tell you how many times people have asked me for this recipe after trying just one bite!
How do I make lemon raspberry bars?
Quick Overview
Making these lemon raspberry bars is a straightforward process that yields impressive results. We’ll start by creating a simple, buttery crust that gets a partial bake. Then, we’ll whip up a luscious, tangy lemon filling and dollop it over the crust, swirling in vibrant raspberry sauce. The whole thing bakes together until set and golden. It’s a foolproof method that guarantees a delightful balance of textures and flavors. Trust me, even if you’re new to baking, you can totally nail this. The key is not to overmix and to let them cool properly for those clean cuts.
Ingredients
For the main battery (crust):
2 cups all-purpose flour
½ cup granulated sugar
¼ teaspoon salt
1 cup (2 sticks) unsalted butter, softened – make sure it’s truly softened, not melted! This is key for that tender crust.
1 teaspoon vanilla extract – good quality vanilla makes a difference here.
For the Filling:
4 large eggs – room temperature is best for a smooth filling.
1 ½ cups granulated sugar – you can adjust this slightly depending on how tart you like your lemon.
½ cup fresh lemon juice – definitely use fresh! Bottled just doesn’t have that vibrant pop.
¼ cup all-purpose flour – this helps to thicken the filling.
1 tablespoon lemon zest – this is where that intense lemon flavor comes from, don’t skip it!
½ cup raspberry sauce or puree – I often make my own by simmering fresh or frozen raspberries with a tablespoon of sugar and a squeeze of lemon juice until softened, then straining out the seeds. Store-bought works too if you find a good one!
For the Glaze:
1 cup powdered sugar – sifted, please, for a smooth glaze.
2-3 tablespoons fresh lemon juice – adjust for desired consistency and tang.
Optional: A few fresh raspberries for garnish
Step-by-Step Instructions
Step 1: Preheat & Prep Pan
First things first, preheat your oven to 350°F (175°C). Grab a 9×13 inch baking pan. I like to line mine with parchment paper, leaving a little overhang on the sides. This makes lifting the baked bars out so much easier, and cleanup is a breeze. Lightly grease the parchment too, just for good measure. This step is super important to prevent sticking and ensures you get those lovely clean edges.
Step 2: Mix Dry Ingredients
In a medium bowl, whisk together the 2 cups of all-purpose flour, ½ cup of granulated sugar, and the ¼ teaspoon of salt. Give it a good whisk to make sure everything is evenly distributed. This ensures that the leavening and seasoning are consistent throughout the crust.
Step 3: Mix Wet Ingredients
Now, in a separate larger bowl, cream together the 1 cup of softened unsalted butter with the 1 teaspoon of vanilla extract until it’s light and fluffy. I usually use an electric mixer for this, but you can definitely do it by hand if you’re feeling energetic! Make sure that butter is really soft; it makes a world of difference.
Step 4: Combine
Gradually add the dry ingredients to the butter mixture. Mix on low speed (or stir with a sturdy spoon) until just combined. Be careful not to overmix here! We want a tender, crumbly crust, not a tough one. The dough will be thick and a bit crumbly. Press this mixture evenly into the bottom of your prepared baking pan. You can use your fingers or the bottom of a measuring cup to get it nice and flat. Then, bake this crust for about 15-18 minutes, or until it’s lightly golden around the edges. You want it set but not fully baked. This pre-bake helps prevent the crust from getting soggy.
Step 5: Prepare Filling
While the crust is pre-baking, let’s whip up that glorious lemon filling. In a large bowl, whisk together the 4 large eggs and 1 ½ cups of granulated sugar until well combined. Then, whisk in the ½ cup of fresh lemon juice and the ¼ cup of all-purpose flour until smooth. Finally, gently fold in the 1 tablespoon of lemon zest. This filling will be quite pourable, which is exactly what we want.
Step 6: Layer & Swirl
Once the crust has had its initial bake, carefully remove it from the oven. Pour the lemon filling evenly over the partially baked crust. Now for the fun part! Dollop spoonfuls of your raspberry sauce or puree over the lemon filling. Using a knife or a skewer, gently swirl the raspberry into the lemon filling. Don’t over-swirl; you want distinct ribbons and pockets of raspberry, not just a pinkish-yellow mess. This is what gives you those gorgeous marbled effects and ensures you get bursts of raspberry flavor in every bite.
Step 7: Bake
Return the pan to the oven and bake for another 20-25 minutes, or until the filling is set around the edges and only slightly jiggly in the center. The top should look mostly set and might have a few light golden spots. A key indicator is that when you gently shake the pan, the center should have just a slight wobble, not be liquid. Be careful not to overbake, or the filling can become rubbery.
Step 8: Cool & Glaze
This is arguably the hardest step: waiting! Let the bars cool completely in the pan on a wire rack. This can take a couple of hours. Honestly, I often put them in the fridge for an hour or so once they’ve cooled down a bit to help them firm up even more, which makes for much cleaner slicing. Once they are completely cool, you can make the glaze. Whisk together the 1 cup of sifted powdered sugar with 2 tablespoons of lemon juice. Add more lemon juice, a teaspoon at a time, until you reach your desired drizzling consistency. It should be thick enough to hold its shape but pourable. Drizzle this glaze over the cooled bars. If you want to add a little extra flair, you can add a few fresh raspberries on top of the glaze before it sets.
Step 9: Slice & Serve
Once the glaze has set, use the parchment paper overhang to carefully lift the whole slab out of the pan onto a cutting board. Use a sharp knife to slice them into squares. For the cleanest cuts, run your knife under hot water and wipe it dry between each cut. Serve them chilled or at room temperature. They are absolutely divine on their own, but feel free to serve with a dollop of Whipped Cream or a sprig of mint!
What to Serve It With
These lemon raspberry bars are so wonderfully versatile, they truly fit into any meal or occasion. For breakfast, they’re a delightful treat. Imagine a slice alongside a steaming mug of good coffee and a bowl of fresh berries. They add a touch of elegance to a simple morning without being overly decadent. For brunch, they’re a showstopper. Serve them cut into smaller squares on a tiered platter alongside quiches, salads, and fruit platters. They pair beautifully with mimosas or a sparkling lemonade. As a dessert, they’re perfect after a hearty meal. I love serving them slightly chilled with a scoop of vanilla bean ice cream or a light dusting of powdered sugar. They’re also fantastic for a cozy snack. When that 10 pm craving hits, and you don’t want to bake a whole cake, these bars are your lifesaver. I’ve even been known to just grab a fork and eat one straight from the pan when no one’s looking! My family loves them as an afternoon pick-me-up with a glass of cold milk, and they always disappear in minutes at neighborhood potlucks. They’re just that good, that adaptable, and that universally loved.
Top Tips for Perfecting Your Lemon Raspberry Bars
I’ve made these lemon raspberry bars more times than I can count, and over the years, I’ve picked up a few tricks that I think make them even better. First, for the crust: make sure your butter is truly softened. If it’s too cold, it won’t cream properly, and if it’s melted, your crust can turn out greasy or too hard. I always give it a good squeeze to test. When you’re pressing the crust into the pan, try to get it as even as possible. Uneven thickness means uneven baking. For the lemon filling, I really can’t stress enough the importance of fresh lemon juice and zest. It makes such a noticeable difference in the brightness of the flavor. If you’re not a fan of seeds in your raspberry sauce, make sure to strain it really well after simmering the berries. When it comes to swirling, less is more! You want distinct ribbons of raspberry, not a muddy mix. A gentle swirl with a knife or a toothpick is perfect. I learned this lesson the hard way after one particularly enthusiastic swirl resulted in a pale yellow bar with just a hint of pink. For ingredient swaps, if you’re out of raspberries, a good quality strawberry puree works beautifully, though the tartness might be a bit different. You could also try blueberries! For the flour in the filling, I’ve experimented with using a gluten-free all-purpose blend, and it worked out surprisingly well, just make sure it has a good binder like xanthan gum. Baking time can vary quite a bit depending on your oven. Keep an eye on them; the edges should be set and lightly golden, and the center should have just a slight wobble. I always test with a toothpick around the edges to see if it comes out clean before pulling them out. And for the glaze, consistency is key. Too thin and it’ll run everywhere; too thick and it’s hard to drizzle. A good rule of thumb is to start with the lesser amount of liquid and add more, a teaspoon at a time, until you get that perfect, pourable consistency.
Storing and Reheating Tips
Storing these delightful lemon raspberry bars is pretty straightforward, and they keep wonderfully, which is another reason I love them! At room temperature, they’ll be good for about 1 to 2 days, especially if it’s not too warm in your house. Just make sure they are covered tightly with plastic wrap or in an airtight container. If you’ve glazed them, the glaze will help protect them a bit. For refrigerator storage, they’ll last even longer, up to about 4-5 days. I usually keep them in an airtight container, and I find they maintain their texture really well. The cold actually helps firm up the filling and crust, which can make them even more enjoyable. If you want to freeze them, this is absolutely doable! I usually cut them into individual bars *before* freezing. Wrap each bar tightly in plastic wrap, then place them in a freezer-safe bag or container. They can stay frozen for up to 2-3 months. To thaw, I’ll take them out of the freezer and let them thaw in the refrigerator overnight. This prevents condensation from making them soggy. For reheating, I generally don’t reheat them as they’re best served at room temperature or chilled. However, if you really wanted to warm a slice slightly, a few seconds in a very low microwave could do it, but be very careful not to overdo it and make the crust mushy. The key with glaze timing is to apply it only when the bars are completely cool. If you glaze warm bars, the glaze will melt and absorb, creating a sticky mess rather than a defined topping.
Frequently Asked Questions
Final Thoughts
So there you have it – my go-to recipe for the most wonderful lemon raspberry bars. I truly hope you give these a try because they’re more than just a dessert; they’re a little piece of happy. The way the tangy lemon cuts through the sweetness, and those bursts of raspberry… it’s just pure joy in every bite, all on that perfectly tender crust. They’re proof that you don’t need to be a pastry chef to create something truly memorable. Whether you’re looking for a show-stopping dessert for a special occasion, a sweet treat to brighten a regular Tuesday, or a crowd-pleasing option for your next get-together, these bars always deliver. They’re forgiving, relatively quick to make, and utterly delicious. If you love these, you might also enjoy my classic lemon bars or my no-bake raspberry cheesecake. I can’t wait to hear what you think! Please leave a comment below and let me know how your lemon raspberry bars turned out, or share any fun twists you tried. Happy baking!
Lemon Raspberry Bars
Ingredients
Crust
- 1.25 cups all-purpose flour
- 0.25 cup powdered sugar
- 0.5 cup unsalted butter cold, cut into cubes
Filling
- 1.5 cups fresh raspberries
- 1 cup granulated sugar
- 0.25 cup lemon juice freshly squeezed
- 2 tablespoons cornstarch
- 2 large eggs
Instructions
Prepare the Crust
- Preheat oven to 350°F (175°C). In a bowl, combine flour and powdered sugar. Cut in cold butter until the mixture resembles coarse crumbs.
- Press the crust mixture into a 9x13 inch baking pan and bake for 15-20 minutes, or until lightly golden.
Make the Filling
- In a saucepan, combine raspberries, sugar, lemon juice, and cornstarch. Cook over medium heat, stirring until the mixture thickens and the raspberries burst.
- Remove from heat and let cool slightly. Whisk in eggs until well combined.
- Pour the raspberry filling over the baked crust and bake for 20-25 minutes, or until the filling is set.
- Let cool completely before cutting into bars.