Okay, so you know how some recipes just *feel* like a warm hug on a chilly evening? Or that perfect little treat that makes a Tuesday feel like a Friday? That’s exactly what these Mini Cannoli Cups are for me. They’re not just desserts; they’re little bundles of pure joy that I’ve whipped up for birthday parties, casual get-togethers, or honestly, just when a sweet craving hits hard at 10 PM. I remember the first time I made them, I was aiming for a fancier dessert for a dinner party and honestly, a little intimidated by traditional cannoli. But these mini versions? They were an absolute revelation! So much of the classic Italian charm, but without all the fuss. And the best part? They’re surprisingly easy to make, even for a weeknight treat. If you love the idea of a cannoli but want something a bit more manageable and utterly delicious, you are in the right place, my friend. These mini cannoli cups are going to be your new best friend in the kitchen, I just know it!
What are mini cannoli cups?
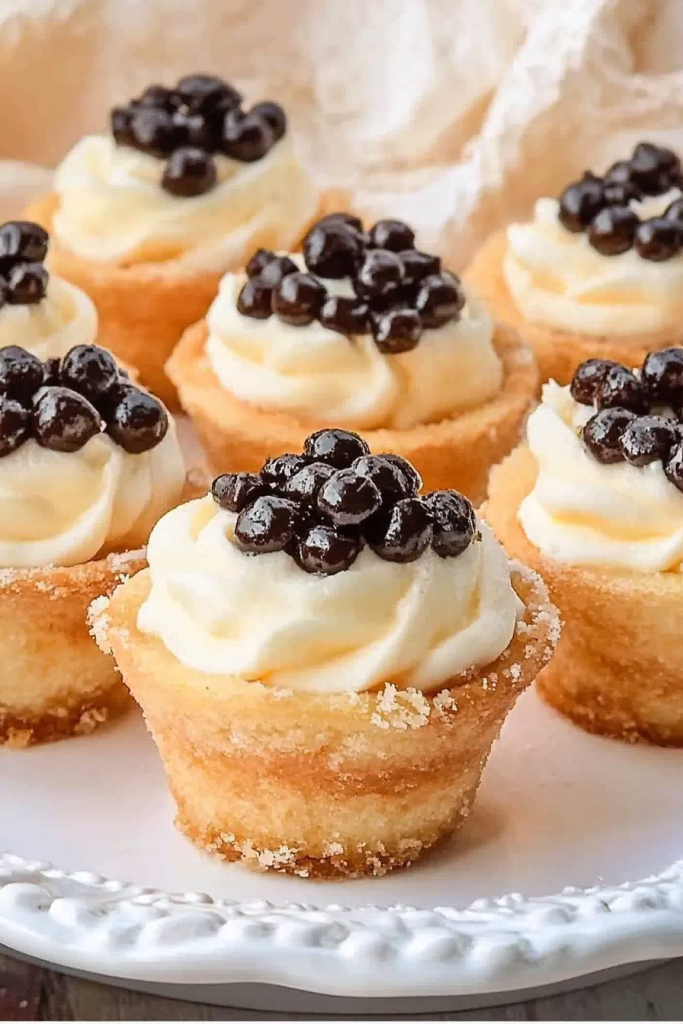
So, what exactly *are* these little gems? Think of them as the adorable, bite-sized cousins of the classic Sicilian cannoli. Instead of rolling out dough and frying delicate tubes, we’re using a clever shortcut that gives you all the delightful flavors and textures you expect, but in a super approachable format. Imagine a tender, slightly crisp little shell, just perfectly sized for popping into your mouth, filled with that rich, creamy, slightly sweet ricotta filling that makes cannoli so irresistible. It’s essentially all the goodness of a traditional cannoli, simplified into individual, delightful cups. They’re not meant to be a fussy production; they’re designed to bring smiles and satisfy those sweet tooth cravings with a touch of elegance. It’s the taste of Italy, made accessible for every home cook, no special equipment or years of practice needed!
Why you’ll love this recipe?
Honestly, the list could go on forever, but let me try and narrow it down to what makes these mini cannoli cups so special to me and why I think you’ll adore them too. First off, the flavor is just out of this world. You get that wonderfully creamy, slightly tangy ricotta filling, often with a hint of citrus or vanilla, nestled inside a delicate, often chocolate-lined shell. It’s a perfect balance of textures and tastes that’s just incredibly satisfying. And then there’s the simplicity. This is where these mini versions really shine. You don’t have to worry about frying tricky tubes or wrestling with dough that’s being stubborn. It’s genuinely straightforward, meaning you can whip up a batch without feeling overwhelmed, even if you’re a beginner baker. Plus, they’re surprisingly budget-friendly! You probably have most of the ingredients in your pantry already, which is always a win in my book. And talk about versatile! I’ve made these for a sophisticated dessert, but they’re also fantastic for kids’ parties because they’re perfectly portioned and not too messy. They’re a bit like my other favorite recipe, my Quick & Easy chocolate mousse – it delivers big on flavor and elegance without requiring a culinary degree. What I truly love most about these mini cannoli cups, though, is that they make you feel like you’ve accomplished something truly special without breaking a sweat. They’re proof that you don’t need to be a pastry chef to create something delicious and impressive!
How do I make mini cannoli cups?
Quick Overview
Making these mini cannoli cups is a breeze, and it all boils down to a few key steps. We’ll create a simple, sweet batter that bakes up into perfect little cups. While those bake and cool, we’ll whip together a luscious ricotta filling that’s oh-so-creamy and flavorful. Then, it’s just a matter of filling those cooled cups and perhaps adding a little touch of glaze or some festive toppings. The beauty is in the simplicity; each step is designed to be manageable, leading you to a delightful end result without any stress. You’ll be amazed at how quickly these come together, making them perfect for last-minute sweet cravings or as an impressive addition to any gathering.
Ingredients
For the Main Batter:
1 ½ cups all-purpose flour
½ cup granulated sugar
1 teaspoon baking powder
½ teaspoon salt
½ cup unsalted butter, softened
1 large egg
½ cup milk (whole milk is best for richness, but I’ve tested with 2% and even a good quality almond milk, and it works beautifully!)
1 teaspoon vanilla extract
For the Filling:
15 ounces whole milk ricotta cheese, drained very well (this is crucial for a non-watery filling!)
½ cup powdered sugar, sifted
½ teaspoon vanilla extract
Optional: Zest of ½ lemon or orange for a bright citrus note (highly recommend this for a classic touch!)
Optional: ¼ cup mini chocolate chips or finely chopped candied fruit
For the Glaze (Optional):
½ cup powdered sugar
1-2 tablespoons milk or lemon juice
Step-by-Step Instructions
Step 1: Preheat & Prep Pan
First things first, let’s get our oven ready. Preheat it to 350°F (175°C). Now, for the pan, you’ll want a mini muffin tin. I always give mine a good grease with butter or cooking spray. This step is super important to make sure our little cups don’t stick. Make sure to get into all the nooks and crannies! Some people like to line their muffin tin with mini paper liners, but I find a well-greased tin gives the best crispiness around the edges.
Step 2: Mix Dry Ingredients
In a medium bowl, whisk together the flour, granulated sugar, baking powder, and salt. Give it a good whisk to make sure everything is evenly distributed. This ensures your cups will rise nicely and have a consistent texture throughout. It’s a simple step, but it makes a difference in the final outcome!
Step 3: Mix Wet Ingredients
In a separate, larger bowl, cream together the softened butter and granulated sugar until light and fluffy. This usually takes a couple of minutes with an electric mixer, or a bit longer by hand. Then, beat in the egg until it’s well combined. Stir in the vanilla extract. Your mixture should look lovely and smooth.
Step 4: Combine
Now, we’ll add our dry ingredients and milk to the wet ingredients. I usually add about half of the dry ingredients first and mix until just combined. Then, I add the milk and vanilla, mixing again until it’s smooth. Finally, I add the remaining dry ingredients and mix *just* until there are no more streaks of flour. The key here is not to overmix! Overmixing can lead to tough cups, and we definitely don’t want that. A few little lumps are perfectly fine.
Step 5: Prepare Filling
While your batter is resting for a minute, let’s make that dreamy filling. In a clean bowl, combine the well-drained ricotta cheese, sifted powdered sugar, and vanilla extract. If you’re using lemon or orange zest, add it now. Beat everything together until it’s smooth and creamy. If you want to add mini chocolate chips or candied fruit, gently fold them in. Taste it – does it need a little more sweetness? A touch more vanilla? This is your chance to customize!
Step 6: Layer & Swirl
Now for the fun part! Spoon the batter evenly into your prepared mini muffin cups. I like to fill them about two-thirds of the way full. They’ll puff up a bit as they bake. Don’t overfill them, or you’ll get a mess! As they bake, they’ll form little cups. Once they’re baked and slightly cooled, you’ll fill them with that gorgeous ricotta mixture.
Step 7: Bake
Pop those muffin tins into your preheated oven. Bake for about 18-22 minutes, or until a toothpick inserted into the center of a cup comes out clean and the edges are golden brown. Keep an eye on them, as ovens can vary! The tops should be set and slightly springy to the touch.
Step 8: Cool & Glaze
Once baked, let the cups cool in the muffin tin for about 5-10 minutes. This helps them firm up a bit before you try to remove them. Then, carefully transfer them to a wire rack to cool completely. While they’re cooling, you can prepare the glaze if you’re using it. Whisk together the powdered sugar and 1 tablespoon of milk or lemon juice. Add more liquid, a tiny bit at a time, until you reach your desired drizzling consistency. Once the cups are fully cooled, you can drizzle them with the glaze.
Step 9: Slice & Serve
Once the glaze is set (if you used it), it’s time to fill them! You can spoon the ricotta mixture directly into the cooled cups, or for a fancier presentation, use a piping bag fitted with a star tip. Garnish with a little extra zest, some chopped pistachios, or a tiny sprinkle of powdered sugar. Serve immediately for the best texture and flavor!
What to Serve It With
These mini cannoli cups are so versatile, they can really fit into almost any occasion! For a leisurely breakfast, I love serving them alongside a freshly brewed cup of good coffee. The sweetness of the cups is just perfect to start the day, and they look so elegant on a breakfast plate. They’re a step up from your usual muffin, for sure! For brunch, they’re an absolute showstopper. Imagine them arranged on a tiered stand with some fresh berries and perhaps a mimosa. They add that touch of Italian flair to make your brunch feel extra special. As a proper dessert, they are divine. I often serve them after a hearty Italian meal, perhaps with a small espresso on the side. They’re the perfect little sweet ending that doesn’t feel too heavy. And for those cozy snack moments? These are my go-to. If I’m curled up with a good book or watching a movie, having one or two of these with a glass of milk or a cup of tea is just pure comfort. My family loves them after dinner, and they’re always gone in a flash. I’ve even taken them to potlucks, and they’re always a huge hit. They’re just universally loved!
Top Tips for Perfecting Your Mini Cannoli Cups
Over the years of making these delightful little treats, I’ve picked up a few tricks that I think will really help you achieve cannoli cup perfection. First, regarding the zucchini prep (oops, wait, that’s my zucchini Bread Recipe! Let me refocus, sorry about that!) – actually, for these mini cannoli cups, there’s no zucchini involved! My mind wandered for a second there, as I’ve been testing a new zucchini bread recipe lately! My apologies! For these, the key is in the batter and the filling. For the batter, remember that crucial tip about not overmixing. I’ve learned that overmixing develops the gluten too much, resulting in a tougher cup. Mix until *just* combined, and don’t fret about a few tiny lumps. Trust me, they’ll bake out. For the filling, draining the ricotta is non-negotiable. I usually spread it out on a fine-mesh sieve lined with a cheesecloth (or even a few paper towels) and let it sit in the fridge for at least an hour, or even overnight. The drier the ricotta, the thicker and creamier your filling will be, preventing it from making your cups soggy. When it comes to swirl customization, if you decide to make a marbled batter (which is a fun variation!), don’t over-swirl. You want distinct ribbons of color or flavor, not a muddy mess. Gentle strokes with a skewer are your best friend. As for ingredient swaps, I’ve found that using good quality whole milk ricotta makes a noticeable difference in the creaminess. If you absolutely must use part-skim, make sure it’s drained *extremely* well. For the flour, all-purpose is standard, and I haven’t found a gluten-free blend that works quite as perfectly for this texture, though I’m always experimenting! When it comes to baking tips, always rely on your toothpick test rather than just the time. Ovens really do have minds of their own! Make sure your oven rack is in the center of the oven for even heat distribution. And for the glaze variations, if you want a thinner glaze, just add a touch more liquid. If you want it thicker, add more powdered sugar. A little lemon juice instead of milk can add a lovely zing that complements the sweetness!
Storing and Reheating Tips
Storing these little delights properly is key to enjoying them at their best. If you have any leftovers (which is rare in my house!), you can store the un-filled or unfilled baked cups at room temperature in an airtight container for about 2-3 days. They’ll maintain a good crispness. If you’ve already filled them, I highly recommend refrigerator storage. Pop them into an airtight container, and they’ll usually keep well for about 2 days. Any longer, and the filling can start to make the cups a bit soft. Make sure they’re covered well to prevent them from absorbing any fridge odors. Now, if you’re planning ahead and want to make them even further in advance, the baked, un-filled cups freeze beautifully! Let them cool completely, then wrap them tightly in plastic wrap, and then place them in a freezer-safe bag or container. They can stay in the freezer for up to 2 months. To thaw, just take them out and let them come to room temperature. For the glaze timing advice, if you’re freezing the filled cups (which I don’t always recommend, as the filling can get a bit watery upon thawing), it’s best to add the glaze *after* thawing. However, for the best experience, I always recommend filling and glazing them closer to serving time. If you’ve frozen un-filled cups, they’re perfect for filling and glazing just before you want to serve them!
Frequently Asked Questions
Final Thoughts
So there you have it – my beloved Mini Cannoli Cups! I truly believe this recipe captures the essence of that classic Italian treat while making it wonderfully accessible for anyone. It’s the perfect blend of a slightly crisp, tender cup and that impossibly creamy, dreamy ricotta filling. I love that it’s a dessert that feels special enough for company but is also simple enough for a quiet afternoon treat. It’s a recipe that has brought so many smiles to my family and friends, and I can’t wait for it to do the same for you. If you enjoyed this recipe, you might also love my Easy tiramisu cups for another delightful Italian-inspired dessert that’s just as fuss-free. I hope you have as much fun making and devouring these as I do! Please, if you try them, let me know what you think in the comments below. I’d love to hear about your own variations and how they turned out. Happy baking!

Mini Cannoli Cups
Ingredients
Cannoli Shells
- 12 count Mini Cannoli Shells
Ricotta Filling
- 15 oz Whole Milk Ricotta Cheese drained
- 0.75 cup Powdered Sugar
- 0.5 tsp Vanilla Extract
- 0.25 cup Mini Chocolate Chips
Instructions
Prepare the Filling
- In a medium bowl, combine the ricotta cheese, powdered sugar, and vanilla extract. Mix until smooth and creamy.
- Gently fold in the mini chocolate chips.
Assemble the Cannoli Cups
- Spoon the ricotta filling into the mini cannoli shells.
- Serve immediately or chill for later. Enjoy!


