Oh, where do I even begin with onion bhaji? It’s one of those things that just brings a smile to my face, you know? I remember as a kid, my mom would sometimes pick up a little packet from the local Indian restaurant for a treat, and those crispy, spicy fritters were always the highlight. Now, making them myself feels like I’m bringing a little bit of that magic back into my own kitchen. This recipe is my absolute favorite for onion bhaji because it gets that perfect crispy edge without being greasy, and the flavors are just spot on. It’s not just about the taste, though; it’s that satisfying crunch when you bite into it, the warm spices hitting your tongue. Honestly, if you’re ever craving something that’s both comforting and exciting, this is it. It’s a bit like a super-fancy, incredibly flavorful onion ring, but with so much more depth. I’ve tried a million variations over the years, and this one is the one I always come back to. It’s surprisingly simple, too, which is a huge bonus for me on busy weeknights!

What is Onion Bhaji?
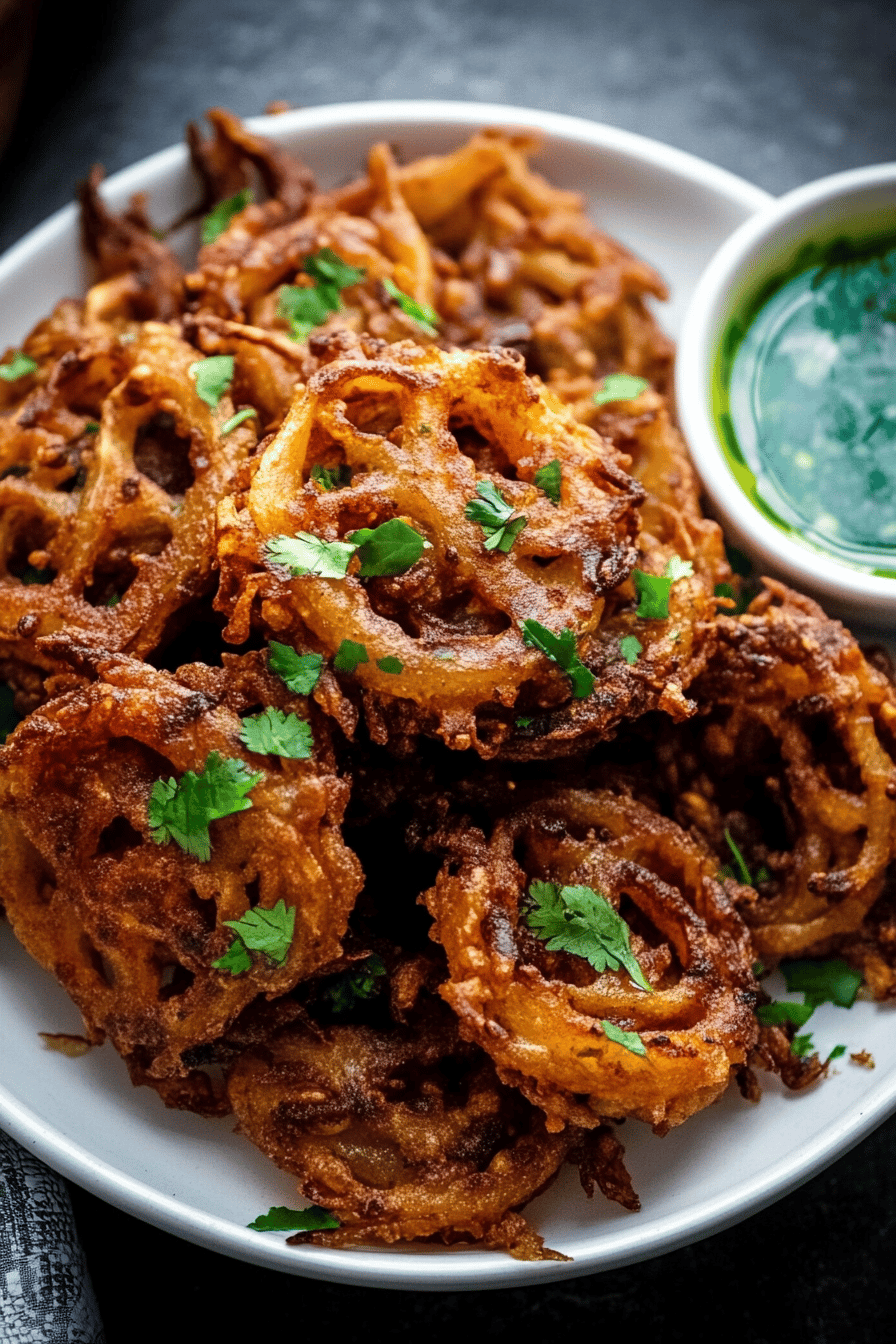
So, what exactly is an onion bhaji? At its heart, it’s a delicious Indian fritter made primarily from thinly sliced onions, mixed with a spiced chickpea flour batter, and then deep-fried until golden and crispy. Think of it as the ultimate flavor explosion in a bite-sized package. The name itself, “bhaji,” simply refers to a fried snack or fritter in Indian cuisine, and “onion” obviously tells you the star ingredient. What makes it so special is the incredible combination of textures and flavors. You get that lovely sweetness from the caramelized onions, a bit of a kick from the spices, and that wonderfully crunchy exterior from the chickpea flour. It’s not just a simple fried onion; it’s an art form in its own right, a testament to how humble ingredients can be transformed into something truly extraordinary with the right technique and a good blend of spices. It’s a popular street food and appetizer across India, and it’s easy to see why!
Why you’ll love this recipe?
There are so many reasons why I think you’ll absolutely adore this onion bhaji recipe. Firstly, the flavor is just out of this world. We’re talking a complex symphony of spices – cumin, coriander, turmeric, chili – that all come together to create something truly memorable. The onions themselves become wonderfully sweet and tender inside their crispy coating. It’s a flavor profile that’s both comforting and exciting, perfect for waking up your taste buds. Then there’s the simplicity factor, which, let’s be honest, is a lifesaver for me most days. You don’t need any fancy equipment or obscure ingredients. Everything you need is probably already in your pantry, or easily found at your local grocery store. And the cost-efficiency? Brilliant! Onions and chickpea flour are incredibly budget-friendly, making this a fantastic way to create a restaurant-quality appetizer without breaking the bank. What I love most about this is its versatility. You can serve these onion bhajis as a starter with a dollop of mint chutney or tamarind sauce, or you can even throw them into a salad for some added crunch and flavor. They’re also fantastic as part of a larger Indian meal, alongside some curries and rice. It really stands out from other fritters because of that deep, aromatic spice blend and the perfect crispiness. It’s the kind of recipe that makes you feel like a culinary rockstar, even if you’re just whipping it up on a Tuesday evening.
How do I make onion bhaji?
Quick Overview
This onion bhaji recipe is all about creating wonderfully spiced, crispy fritters from simple ingredients. You’ll start by slicing onions super thin, then tossing them with a mixture of chickpea flour, rice flour for extra crispiness, and a blend of aromatic Indian spices. A touch of water brings it all together into a batter that coats the onions beautifully. Then, it’s all about frying them in hot oil until they’re gorgeously golden brown and perfectly crisp. The whole process is surprisingly quick, making it an ideal snack or appetizer when you’re short on time but craving something special. It’s a fuss-free approach that guarantees delicious results every single time.
Ingredients
For the Main Batter:
2 large onions, thinly sliced (about 3mm thick – this is key for even cooking!)
1 cup chickpea flour (also known as besan) – this is the heart of our bhaji, giving it that unique texture and flavor.
2 tablespoons rice flour – this is my secret weapon for extra crispiness! Don’t skip it if you can help it.
1 teaspoon ground cumin
1 teaspoon ground coriander
1/2 teaspoon turmeric powder – for that beautiful golden hue.
1/4 teaspoon chili powder (or more, to your taste!)
1/2 teaspoon salt, or to taste
A generous pinch of asafoetida (hing) – optional, but it adds a wonderful subtle oniony flavor and aids digestion. You can usually find this in Indian grocery stores.
Water, as needed (start with about 1/2 cup)
For the Filling:
While the classic onion bhaji is just onions, I sometimes like to add a little something extra. For this recipe, we’re keeping it pure onion goodness, but you could absolutely add a handful of finely chopped fresh cilantro or a finely chopped green chili for an extra layer of flavor and heat. Just make sure whatever you add is chopped very finely so it integrates well.
For Frying:
Vegetable oil or any neutral-flavored oil, for deep frying (you’ll need about 3-4 cups, enough to submerge the bhajis)
Step-by-Step Instructions
Step 1: Preheat & Prep Pan
First things first, grab a heavy-bottomed pot or a deep frying pan. You want something that can hold a good amount of oil and distribute heat evenly. Pour in your vegetable oil, aiming for about 3-4 inches deep. We’re going to heat this oil up over medium-high heat to about 350°F (175°C). If you don’t have a thermometer, don’t worry! You can test the oil by dropping a tiny bit of the batter into it. If it sizzles and floats to the surface immediately, it’s ready. It’s super important to get the oil temperature just right – too cool and your bhajis will be greasy; too hot and they’ll burn on the outside before cooking through. While the oil heats, make sure your onions are sliced and ready to go.
Step 2: Mix Dry Ingredients
In a large mixing bowl, add your chickpea flour, rice flour, ground cumin, ground coriander, turmeric powder, chili powder, salt, and asafoetida (if you’re using it). Give everything a good whisk with a fork or a whisk to combine the spices evenly throughout the flour. This step is crucial because it ensures that every bite of your bhaji will have that wonderful spice blend, rather than having clumps of spices in one area. You want to see a uniform color throughout the dry mix.
Step 3: Mix Wet Ingredients
This is where the magic starts to happen! Add your thinly sliced onions directly into the bowl with the dry ingredients. Now, start mixing with your hands. You want to gently separate the onion slices and coat them as much as possible with the dry flour mixture. The onions will start to release some of their moisture, which will help bind everything together. Don’t overwork it at this stage. Just get everything nicely coated.
Step 4: Combine
Now, we’ll gradually add water to create the batter. Start with about 1/2 cup of water and sprinkle it over the onion and flour mixture. Gently toss everything together with your hands again. You’re looking for a consistency where the batter lightly coats the onions, but it’s not a thick, pasty batter. It should feel a bit sticky, almost like a loose dough. You want enough batter to hold the onions together, but not so much that it drowns them. Add a tablespoon of water at a time if needed, until you reach that perfect coating consistency. The onions should still be visible, peeking through the batter. If it feels too dry, add a tiny bit more water. If it feels too wet, you can add a *tiny* bit more chickpea flour, but be careful not to make it too heavy.
Step 5: Prepare Filling
For this particular recipe, the “filling” is essentially the seasoned onions themselves, ready to be transformed into bhajis. If you decided to add chopped cilantro or green chilies, this is the stage where you’d gently mix them into the onion and batter mixture. Ensure they’re evenly distributed so you get a burst of flavor in every bite.
Step 6: Layer & Swirl
This step isn’t so much about “layering and swirling” as it is about forming the bhaji shapes. You don’t need to meticulously arrange anything. Just take small handfuls of the onion and batter mixture (about 2-3 tablespoons worth) and gently squeeze them together to form loose, slightly flattened patties or clusters. Don’t try to make them perfectly round or smooth; the more rustic, the better they’ll cook and the crispier they’ll get. The individual onion strands should still be somewhat visible.
Step 7: Bake
This is where the cooking happens! Carefully drop a few of these formed bhaji clusters into the hot oil, being careful not to overcrowd the pan. You don’t want to drop too many in at once, or the oil temperature will drop, and they won’t get crispy. Fry them for about 3-5 minutes per side, or until they are a beautiful golden brown and delightfully crisp. Use a slotted spoon or tongs to gently turn them over so they cook evenly. They should float to the surface when they’re nearly done. Once they’re perfectly golden, remove them from the oil and place them on a wire rack set over a baking sheet to drain any excess oil. This is much better than paper towels, as it keeps the undersides crisp.
Step 8: Cool & Glaze
While the bhajis are best served fresh and hot, allowing them to cool slightly on the wire rack for a minute or two is essential. This helps them retain their crispiness. For this recipe, we aren’t using a glaze, but if you were, this is when you’d drizzle it over the top. Since this is a classic onion bhaji, it’s perfect just as it is, or with a side of chutney!
Step 9: Slice & Serve
These are best served immediately while they are piping hot and at their absolute crispiest. You can serve them whole, or if they’re larger, you can gently break them apart a bit with a fork before serving. Arrange them on a platter and prepare for them to disappear fast!
What to Serve It With
Oh, the possibilities are endless when it comes to serving these delightful onion bhajis! They’re so versatile. My absolute favorite way to enjoy them is as a starter with a side of cool, refreshing mint and coriander chutney. That spicy, crispy bhaji with the cool, herby dip is just pure bliss. For a more elaborate Indian feast, they’re wonderful alongside a creamy Dal Makhani or a rich butter chicken. If you’re feeling adventurous for breakfast (and why not?!), they make a surprisingly delightful addition to a savory breakfast plate, perhaps with a fried egg and some toast. For brunch, they can be a fantastic vegetarian option on a buffet, maybe alongside some miniature samosas and pakoras. As a dessert? Well, maybe not a traditional dessert, but they’re certainly a delightful savory indulgence after a sweet meal! For cozy snacks, they’re perfect for dipping into a yogurt-based raita while watching a movie. I also love serving them with a simple squeeze of lemon juice over the top right before they hit the table; it really brightens up all those flavors.
Top Tips for Perfecting Your Onion Bhaji
I’ve been making these onion bhajis for years, and I’ve picked up a few tricks along the way that really make a difference. For the onions, slicing them thinly is paramount. I’m talking about 3mm thick at most. If they’re too thick, they won’t cook through properly in the hot oil, and you’ll end up with a raw oniony bite, which isn’t ideal. A mandoline slicer can be a lifesaver here, but a sharp knife and a steady hand work just as well. When it comes to mixing the batter, the key is not to overmix. You want the onions to be coated, but not drowning in a thick, gloopy batter. The batter should be just enough to hold the onion strands together. If it’s too wet, your bhajis will be greasy; if it’s too dry, they’ll fall apart. I always add the water a little at a time and use my hands to mix – you can really feel the consistency that way. For that irresistible crispiness, the rice flour is your best friend. I’ve tried versions without it, and while they’re still good, they just don’t have that extra crunch that makes these so addictive. As for frying, patience is a virtue! Make sure your oil is at the right temperature (around 350°F or 175°C). If you drop in too many bhajis at once, the oil temperature will plummet, and you’ll end up with greasy, soggy fritters instead of crispy delights. Fry them in batches, and don’t be tempted to turn them too early; let them get a good golden-brown color on one side before flipping. I learned this the hard way – impatient turning leads to uneven cooking! If you find your onions are releasing a lot of moisture even after mixing, you can gently squeeze out some of the excess liquid before frying, but don’t go crazy with it, as some moisture is good for binding. For ingredient swaps, while chickpea flour is traditional and provides that characteristic flavor and texture, if you’re in a pinch and absolutely can’t find it, a mix of all-purpose flour and a bit of cornstarch might work in a very basic way, but it won’t be quite the same. Experimentation is key, but stick with chickpea flour if you can!
Storing and Reheating Tips
Ah, the age-old question: what to do with leftover onion bhaji? Honestly, they are *best* eaten straight from the fryer, but if you happen to have any (which is rare in my house!), here’s how to keep them as delightful as possible. For storing at room temperature, if you just can’t get them into the fridge immediately, they’ll hold their crispiness for a couple of hours if left uncovered on a wire rack. Once they’ve cooled completely, it’s best to get them into an airtight container in the refrigerator. They’ll keep for about 2-3 days. They might lose a *little* bit of their crispness over time, but they’ll still be super tasty. When it comes to reheating, the microwave is NOT your friend here; it tends to make them soft and sad. The best way to revive their crispiness is in the oven or an Air Fryer. Pop them onto a baking sheet in a preheated oven at around 375°F (190°C) for about 5-8 minutes, or until they’re heated through and crispy again. In an air fryer, you can do a similar thing at about 350°F (175°C) for 3-5 minutes, just keep an eye on them so they don’t burn. If you want to freeze them, make sure they are completely cooled first. Wrap them well in plastic wrap, then place them in a freezer-safe bag or container. They should last for about 1-2 months in the freezer. Thaw them overnight in the refrigerator before reheating them in the oven or air fryer. Since this recipe doesn’t have a glaze, you don’t need to worry about timing its application for storage, which simplifies things!
Frequently Asked Questions
Final Thoughts

So there you have it – my absolute favorite way to make onion bhaji! I truly believe this recipe captures that perfect balance of crispy exterior, tender onion interior, and that explosion of aromatic spices that makes this snack so irresistible. It’s incredibly rewarding to make something this delicious from scratch, and the fact that it’s so budget-friendly and relatively simple makes it a winner in my book. I hope you give it a try and love it as much as my family and I do. It’s one of those dishes that just brings joy, whether it’s a casual snack or part of a larger meal. If you’re a fan of this recipe, you might also enjoy my Crispy Vegetable Pakora or my Spiced Lentil Samosas for more delicious Indian-inspired treats! I can’t wait to hear what you think, so please leave a comment below with your feedback or any variations you try. And if you snap a picture of your beautiful onion bhajis, don’t forget to tag me on social media – I’d love to see them! Happy cooking!
Onion Bhaji
Ingredients
Main Ingredients
- 2 large Onions Thinly sliced
- 1 cup Gram flour (besan)
- 0.5 teaspoon Turmeric powder
- 0.5 teaspoon Red chili powder Adjust to taste
- 0.25 teaspoon Garam masala
- 0.25 cup Water or as needed
- teaspoon Salt to taste
- cup Oil for deep frying
Instructions
Preparation Steps
- In a bowl, combine sliced onions, gram flour, turmeric powder, red chili powder, garam masala, and salt.
- Gradually add water, mixing until a thick batter forms. Do not overmix.
- Heat oil in a deep fryer or large pan to 350°F (175°C).
- Drop spoonfuls of the onion mixture into the hot oil. Fry in batches, being careful not to overcrowd the pan.
- Fry for 3-4 minutes, or until golden brown and crispy. Flip halfway through.
- Remove the onion bhajis from the oil and place them on a plate lined with paper towels to drain excess oil.
- Serve hot with your favorite chutney or dipping sauce.


