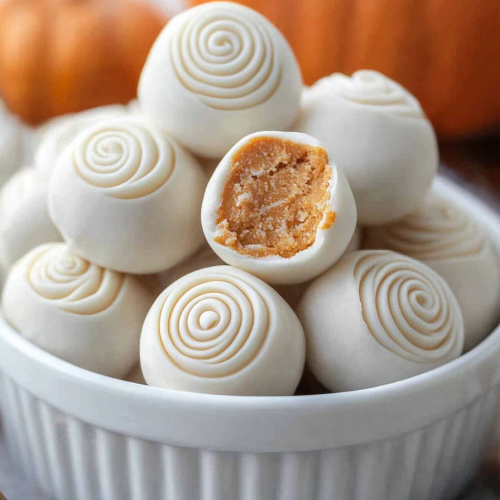
You know that feeling? It’s the middle of the month, rent’s been paid, bills are settled, and suddenly your wallet looks a little… sparse. That’s exactly when my craving for something sweet hits the hardest, and it’s also when my absolute favorite recipe comes to the rescue: Payday Truffles. They’re these little bites of pure joy, incredibly rich and decadent, but made with ingredients you likely already have lurking in your pantry. Forget those fancy, expensive dessert shops; these are the real deal, the kind of treat that makes you feel like you’re splurging without actually breaking the bank. They’re seriously so simple, you can whip them up in about 20 minutes, and the smell that fills the kitchen is just heavenly. I remember my grandma making these for us when we were kids, and they were always our little secret weapon for cheering ourselves up. They’re a bit like a no-bake cheesecake meets a dense brownie, all rolled into one perfect, bite-sized package. Seriously, if you’re looking for a sweet fix that’s both budget-friendly and utterly delicious, you’ve found it.
What is a payday truffle?
So, what exactly are these magical Payday Truffles? Think of them as the ultimate hug in dessert form, especially when you’re counting down the days until your next paycheck. They’re essentially no-bake balls made from a base of crushed cookies (graham crackers are my go-to, but I’ll get into variations later!), softened butter, and a touch of sweetness, often with some cocoa powder for that rich chocolatey depth. The magic really happens when you add a swirl of something creamy and indulgent, like cream cheese or even a dollop of Peanut Butter, right into the mix. The name “Payday Truffles” is a bit of a playful nod to how they save your sweet tooth (and your budget!) when your funds are a bit low. They’re not technically truffles in the fancy French sense, but they have that same dense, melt-in-your-mouth quality that makes a truffle so irresistible. They’re rustic, comforting, and so incredibly satisfying. It’s like a little indulgence you can feel good about, both for your taste buds and your wallet.
Why you’ll love this recipe?
Honestly, there are so many reasons why this recipe has become a staple in my kitchen, and I just know you’re going to fall in love with it too. First off, let’s talk about the flavor. These Payday Truffles are seriously decadent. They’ve got this perfect balance of sweet and rich, with a hint of that comforting graham cracker or cookie base. If you add cocoa, you get that deep chocolate flavor that just makes everything better. And the texture? Oh my goodness. They’re dense and chewy, almost fudgy, but they melt in your mouth. It’s the kind of dessert that feels so much more luxurious than it actually is. Then there’s the simplicity. I cannot stress this enough: these are *easy*. There’s no baking involved, which means no oven preheating, no worrying about underbaking or overbaking, and most importantly, no mess from baking pans. You literally just mix a few things together, roll them into balls, and chill. That’s it! It’s a lifesaver on those nights when you’re craving something sweet but just don’t have the energy for a whole production. And when it comes to cost-efficiency, this recipe is a champion. The main ingredients – graham crackers, butter, sugar, and perhaps cream cheese or Peanut Butter – are usually pantry staples or very budget-friendly. You can make a huge batch for pennies on the dollar compared to buying a fancy dessert. I’ve even seen people use leftover cookies or half-empty bags of chips for the base, which is just genius! Lastly, the versatility is fantastic. While I have my favorite way of making them, you can totally customize these Payday Truffles. Add different extracts, nuts, dried fruit, or even a bit of espresso powder for a mocha twist. They’re perfect for a quick sweet treat, great for parties when you need to feed a crowd without spending a fortune, and an absolute lifesaver for last-minute guests. What I love most about this recipe is that it proves you don’t need fancy ingredients or a culinary degree to create something truly special and delicious. It’s the ultimate feel-good dessert.
How do I make a batch of Payday Truffles?
Quick Overview
Making these Payday Truffles is ridiculously straightforward. You’ll essentially crush some cookies into fine crumbs, mix them with melted butter and your sweetener of choice, then incorporate a creamy binder like cream cheese or Peanut Butter along with any flavorings. Once you have a dough-like consistency, you just roll them into bite-sized balls and let them firm up in the refrigerator. No fuss, no baking, just pure, delicious simplicity. It’s the perfect recipe for beginners or anyone who needs a quick win in the kitchen.
Ingredients
For the Main Base:
About 2 cups of finely crushed graham crackers (this is usually about 14-16 full crackers). I find that using a food processor makes this super quick, but you can also pop them in a zip-top bag and give them a good whack with a rolling pin – it’s actually quite therapeutic! If graham crackers aren’t your jam, vanilla wafers or Shortbread Cookies work wonderfully too. Just make sure they’re finely ground. You want them to act like flour for our base. About 1/2 cup (1 stick) unsalted butter, melted. This is what brings everything together and gives it that rich mouthfeel. Make sure it’s good quality butter; it makes a difference! About 1/2 cup granulated sugar. This adds sweetness and helps with the texture, keeping them from being too crumbly. You can adjust this slightly based on your preference or the sweetness of your chosen cookies.
For the Creamy Center & Flavor:
About 4 ounces cream cheese, softened. This is key for that wonderfully smooth, almost cheesecake-like texture that makes these so addictive. Make sure it’s truly soft so it blends in without lumps. If you’re not a cream cheese fan, or want a nuttier flavor, you can absolutely use about 1/2 cup of smooth Peanut Butter instead! It’s equally delicious. 1 teaspoon vanilla extract. A classic for a reason, it just enhances all the other flavors. If you’re feeling adventurous, you could even try a little almond extract or a hint of orange zest! About 1/4 cup unsweetened cocoa powder (optional, but highly recommended for that rich chocolatey punch). If you’re skipping the cocoa, you might want to add a little more sugar or a touch of chocolate chips to the dough. A pinch of salt. This little addition really balances the sweetness and makes all the flavors pop.
For Optional Coating/Glaze (if desired):
Melted chocolate (milk, dark, or white). If you want to take these to the next level and make them look extra special, a simple chocolate coating is amazing. You can use chocolate chips and melt them with a teaspoon of coconut oil or shortening to make them smooth and pourable. Powdered sugar for dusting. This is the simplest way to finish them off if you don’t want a full glaze. Sprinkles! For a fun, festive look, especially if making these for kids. Finely chopped nuts (like peanuts or walnuts). For added crunch and flavor.
Step-by-Step Instructions
Step 1: Preheat & Prep Pan
This step is technically for *baking*, which we aren’t doing, but it’s more about getting your chilling space ready! Grab a baking sheet or a large plate and line it with parchment paper or wax paper. This will prevent the truffles from sticking as they firm up. Make sure you have enough space in your refrigerator to lay them out without them touching too much.
Step 2: Mix Dry Ingredients
In a medium-sized bowl, combine your finely crushed graham crackers (or cookies) and the granulated sugar. If you’re using cocoa powder for a chocolate version, whisk that in now too. Make sure everything is well combined before you move on. This ensures even flavor distribution throughout the truffles.
Step 3: Mix Wet Ingredients
In a separate small bowl, place your softened cream cheese (or peanut butter) and the melted butter. Add the vanilla extract, pinch of salt, and any other liquid flavorings you might be using. Stir or whisk until it’s smooth and creamy. It should be well incorporated, with no big lumps of cream cheese. If you’re using peanut butter, make sure it’s stirred well and smooth.
Step 4: Combine
Pour the wet ingredients into the bowl with the dry ingredients. Now, using a sturdy spoon or a spatula, mix everything together. It will seem a bit crumbly at first, but keep mixing and pressing. You’re aiming for a consistency that holds together when you squeeze it. It should be slightly sticky, but not so wet that it’s unmanageable. If it seems too dry and won’t hold its shape, you can add a tiny bit more melted butter or a tablespoon of milk. If it seems too wet, add a little more crushed cookie crumbs.
Step 5: Prepare Filling
This step is more about customizing the base, as the “filling” is really what the cream cheese or peanut butter brings. If you’re adding any mix-ins like mini chocolate chips, chopped nuts, or dried cranberries directly into the dough, this is the stage where you’d gently fold them in. Just be careful not to overmix at this point. You want them evenly distributed but not pulverized.
Step 6: Layer & Swirl
This step doesn’t apply to this specific no-bake truffle recipe as it’s usually a uniform mixture. For recipes that involve swirling, like a marbled cheesecake, you’d layer different batters. Here, we’re just focusing on forming the dough into balls.
Step 7: Bake
No baking required for these Payday Truffles! We’re going to skip this step entirely. The magic happens in the fridge!
Step 8: Cool & Glaze
Now it’s time to roll! Take about a tablespoon of the mixture at a time and roll it between your palms to form a smooth ball. Place each ball onto your prepared baking sheet. Once all your truffles are rolled, place the entire baking sheet into the refrigerator for at least 30-60 minutes, or until they are firm to the touch. If you’re adding a chocolate coating, this is when you’ll do it. Melt your chocolate chips with a little coconut oil, dip each chilled truffle into the chocolate, let the excess drip off, and place them back on the parchment paper to set. You can add sprinkles or nuts on top of the wet chocolate immediately.
Step 9: Slice & Serve
Once the truffles are firm (and if you’ve added a chocolate coating, the chocolate is set), they are ready to be served! You can serve them directly from the refrigerator. They’re delicious as is, or with a dusting of powdered sugar. If you’ve made a large batch, you can store them in an airtight container. They’re perfect for snacking, dessert, or even a little afternoon pick-me-up.
What to Serve It With
These Payday Truffles are so versatile, they really fit into any occasion! For a casual breakfast, I love to have one (okay, maybe two!) with my morning coffee. They’re not overly sweet, so they feel like a treat without being too heavy to start the day. The slight richness is just enough to satisfy that early morning craving. If you’re hosting brunch, these are a fantastic addition to a dessert platter. They add a touch of homemade charm without you having to spend hours in the kitchen. I often serve them alongside fresh berries or a dollop of whipped cream for a little extra elegance. They look adorable nestled amongst fruit salad or mini pastries. As a dessert, they’re simply perfect. After a hearty meal, these little bites are just the right amount of sweet to finish things off. They pair beautifully with a glass of milk, a dessert wine, or even a strong cup of black coffee. My kids love them as a “grown-up” dessert after dinner. And for those cozy snack moments? This is where they truly shine. On a chilly evening, curled up on the couch with a good book or a movie, a Payday Truffle is pure comfort. I love having them with a warm mug of hot chocolate or a spiced tea. My family tradition is to make a batch when we have a movie marathon weekend – they disappear so fast!
Top Tips for Perfecting Your Payday Truffles
Over the years of making these countless times (seriously, they’re a lifesaver!), I’ve picked up a few tricks that really make a difference. When it comes to crushing your cookies, aim for a fine crumb. If there are big chunks, your truffles might be too crumbly and won’t hold together well. A food processor is your best friend here, but if you don’t have one, a sturdy zip-top bag and a rolling pin will do the trick. Just be thorough! For the mixing, it’s important to get that “dough” consistency. It should hold its shape when you squeeze it. If it’s too dry and crumbly, it won’t roll well. Add melted butter or a tiny splash of milk, a teaspoon at a time, until it comes together. On the flip side, if it’s too wet and sticky, add more crushed cookie crumbs. Don’t be afraid to get your hands in there to really mix it well – it’s the best way to feel the consistency. When it comes to rolling, work with slightly damp hands if the mixture is sticking to you. This prevents the dough from clinging to your fingers and helps create a smoother ball. Don’t make them too large; a tablespoon of dough is usually a good size for a perfect bite. If you’re adding mix-ins like chocolate chips or nuts, fold them in gently at the end to avoid breaking them up too much. For variations, I’ve experimented with almond extract instead of vanilla, and it’s divine! Adding a little orange zest to the base is also a wonderful flavor combination, especially if you’re using dark chocolate for coating. If you decide to dip them in chocolate, make sure your truffles are thoroughly chilled and firm. This helps the chocolate set quickly and evenly. Also, melt your chocolate slowly and gently; overheating can make it seize up. For a smoother coating, add a teaspoon of coconut oil or vegetable shortening to your melting chocolate. If you’re not a fan of the chocolate coating, a simple dusting of powdered sugar right before serving is elegant and delicious. I’ve also tried rolling them in finely chopped peanuts or toasted coconut for extra texture and flavor. Remember, these are forgiving! Even if they aren’t perfectly round, they still taste amazing. My first few batches were a bit lopsided, but no one ever noticed or cared once they took a bite. Trust me on this one – they’re meant to be enjoyed, not judged on perfection!
Storing and Reheating Tips
The beauty of Payday Truffles is how well they store, making them perfect for making ahead. If you’ve got leftovers (which is rare in my house, but it happens!), store them in an airtight container at room temperature for up to 2-3 days. They stay relatively firm thanks to the butter and sugar. If your kitchen is particularly warm, or if you’ve added cream cheese and want to be extra cautious, the refrigerator is your best bet. In the fridge, they’ll stay fresh and firm for up to a week. Just make sure they’re in a sealed container to prevent them from absorbing other odors. When they come straight from the fridge, they can be quite firm, so I sometimes let them sit on the counter for about 10-15 minutes before serving to take the chill off, especially if they have a chocolate coating. For longer storage, these truffles freeze wonderfully! Wrap them individually in plastic wrap, then place them in a freezer-safe bag or container. They can be stored in the freezer for up to 2-3 months. To thaw, transfer them to the refrigerator overnight, or let them come to room temperature on the counter for a few hours. If you’ve coated them in chocolate, the freezing and thawing process is usually seamless. I don’t recommend reheating them in a microwave, as it can make the texture a bit mushy, especially if they contain cream cheese. The best way to enjoy them is always at that perfect, slightly chilled but not frozen, firm-but-melty texture. If you’ve opted for a glaze or a dusting of powdered sugar, it’s usually best to add that just before serving, especially if you’re storing them for more than a day, as the powdered sugar can sometimes absorb moisture and disappear.
Frequently Asked Questions
Final Thoughts
So there you have it – the ultimate Payday Truffles! I really hope you give this recipe a try. It’s one of those treasures that proves you don’t need a big budget or a lot of time to create something truly delightful and satisfying. They’re perfect for those moments when you just need a little sweet escape, a moment of indulgence that feels like a treat without the guilt. They’re nostalgic, comforting, and just plain delicious. If you love these, you might also enjoy my No-Bake Energy Bites for another quick and healthy snack option, or perhaps my Easy Chocolate Fudge if you’re looking for something a bit more intensely chocolatey. I can’t wait to hear how your Payday Truffles turn out! Please leave a comment below and let me know what you think, or if you’ve tried any fun variations. Happy making, and enjoy every single bite!
Payday Truffles
Ingredients
Main Ingredients
- 0.5 cup Butter, softened
- 1 cup Creamy peanut butter
- 3 cups Powdered sugar
- 1 cup Toffee bits
- 12 oz Chocolate chips
- 0.75 cup Chopped peanuts
Instructions
Preparation Steps
- In a large bowl, cream together the butter and peanut butter until smooth.
- Gradually add the powdered sugar, mixing until combined.
- Stir in the toffee bits.
- Roll the mixture into 1-inch balls and place them on a parchment-lined baking sheet.
- Melt the chocolate chips in the microwave or double boiler.
- Dip each truffle into the melted chocolate, coating it completely. Place it back on the parchment paper.
- Immediately sprinkle with chopped peanuts.
- Refrigerate until the chocolate is set, about 30 minutes.