
You know those recipes that just… stick with you? The ones that become so ingrained in your cooking rhythm that you can whip them up almost on autopilot, yet they still manage to impress every single time? This pork tenderloin recipe is exactly that for me. It’s the dish I pull out when I need something delicious, relatively quick, and guaranteed to satisfy everyone at the table, from my picky eaters to my discerning spouse. Honestly, it’s become my go-to whenever I want a truly satisfying meal without spending hours in the kitchen. It reminds me a bit of those classic roast chicken dinners my grandma used to make – comforting, familiar, and always incredibly flavorful, but with a fraction of the fuss. If you’ve ever felt overwhelmed by planning dinner, or just crave a meal that feels a little special without being complicated, you’ve come to the right place. This pork tenderloin is a lifesaver, and I can’t wait to share it with you.
What is this magical pork tenderloin?
So, what exactly *is* this pork tenderloin recipe that has earned a permanent spot in my recipe repertoire? Think of it as the ultimate flavor bomb for a lean cut of meat. It’s a super tender, melt-in-your-mouth pork tenderloin that gets a gorgeous, savory crust and stays incredibly juicy on the inside. It’s not overly complicated; the magic comes from a really simple but effective marinade and a precise cooking method that locks in all those wonderful juices. The name itself, “My Weeknight Hero Pork Tenderloin,” pretty much says it all, right? It’s the star player when time is short but flavor is non-negotiable. It’s essentially a foolproof way to elevate pork tenderloin from “just okay” to absolutely sensational, making it perfect for everything from a Tuesday night dinner to a relaxed weekend gathering.
Why you’ll love this recipe?
There are so many reasons why I’ve fallen head over heels for this pork tenderloin, and I just know you will too. First and foremost, the flavor is out of this world. The marinade infuses the pork with this incredible savory depth that’s perfectly balanced, never too salty or too bland. When it sears, it creates this delightful little crust that’s just begging to be savored. And the texture? Oh my goodness. Pork tenderloin is naturally lean and tender, but this method ensures it stays unbelievably moist and juicy, almost ridiculously so. It’s like biting into pure deliciousness every single time.
Then there’s the sheer simplicity of it all. Seriously, this recipe is a weeknight warrior. The prep time is minimal, and most of the cooking happens without much active supervision. It’s the kind of meal that makes you feel like a culinary rockstar without actually requiring a culinary degree. And let’s talk about cost-effectiveness! Pork tenderloin is one of the more affordable cuts of pork, and the ingredients for the marinade are likely already in your pantry. This means you get a restaurant-quality meal at a fraction of the price. Plus, its versatility is a huge win. I’ll show you some of my favorite ways to serve it, but honestly, it pairs beautifully with almost any side dish you can imagine. It truly stands out because it consistently delivers on taste, ease, and value, making it a recipe you’ll return to again and again, just like I do.
How do I make a weeknight chicken tenderloin?
Quick Overview
The process is beautifully straightforward: marinate the pork tenderloin for a minimum of 30 minutes (or longer for deeper flavor), sear it in a hot pan to develop that irresistible crust, and then finish it in the oven until perfectly cooked. The key is not to overcook it, which is easy to avoid with this method. It’s a simple three-step dance: marinate, sear, bake. You’ll end up with a succulent, flavorful pork tenderloin that looks and tastes like you spent all day on it. Trust me, this method is a game-changer!
Ingredients
What are some of the best ingredients in this recipe?
For the Pork Tenderloin Marinade:
This is where all the magic begins. A good marinade is key to infusing flavor and tenderizing the meat.
- 1.5 – 2 pound pork tenderloin (about 1 large or 2 smaller ones) – Look for one that’s nicely trimmed, but don’t worry about perfection, we’ll trim any excess fat.
- 1/4 cup soy sauce or tamari (for gluten-free) – This forms the salty, umami base.
- 2 tablespoons olive oil – Helps carry the flavors and aids in searing.
- 2 tablespoons balsamic vinegar – Adds a touch of tang and sweetness that caramelizes beautifully.
- 1 tablespoon honey or maple syrup – For that lovely sweet glaze and browning.
- 3 cloves garlic, minced – Because what’s savory cooking without garlic?
- 1 teaspoon dried Italian seasoning (or a mix of oregano, thyme, and rosemary) – Adds aromatic complexity.
- 1/2 teaspoon black pepper – Freshly ground is always best!
For Searing & Baking:
Just a few essentials to get that perfect crust.
- 1 tablespoon olive oil or other high-heat oil (like avocado or grapeseed) – For searing.
- Optional: A pinch of red pepper flakes if you like a little warmth.
For Serving (Optional but Recommended):
A simple pan sauce can elevate this even further.
- 1/2 cup chicken broth or white wine – To deglaze the pan.
- 1 tablespoon butter – For richness and shine.
Step-by-Step Instructions
Step 1: Preheat & Prep Pan
First things first, get your oven preheated to 400°F (200°C). While the oven is warming up, grab an oven-safe skillet – cast iron is my absolute favorite here because it holds heat so well and gives the most amazing sear. If you don’t have one, a good quality oven-safe stainless steel pan will work just fine. You’ll also want to prep your pork tenderloin. Pat it completely dry with paper towels. This is super important for getting a good sear. If there are any large, loose pieces of fat or silverskin (that tough, shiny membrane), you can trim them off with a sharp knife, but don’t go overboard. A little fat is good!
Step 2: Mix Dry Ingredients
In a small bowl, combine your soy sauce (or tamari), olive oil, balsamic vinegar, honey (or maple syrup), minced garlic, Italian seasoning, and Black Pepper. If you’re feeling brave and like a little kick, add a pinch of red pepper flakes here too! Whisk it all together until it’s well combined. It should look like a rich, dark marinade, smelling absolutely divine already. This is the flavor base that will transform our humble pork tenderloin.
Step 3: Mix Wet Ingredients
Wait, there aren’t separate “wet” and “dry” ingredients for the marinade itself! What this step would typically be for is if we were making a batter or a dough, where you’d combine your flour, leavening, etc., separately from your eggs, milk, and butter. In this recipe, step 2 covers all the “wet” and “dry” components of our marinade coming together harmoniously. So, we’ve already done the combining in the previous step!
Step 4: Combine
Now it’s time to get that gorgeous pork tenderloin marinating! Place the patted-dry pork tenderloin into a resealable plastic bag or a shallow dish. Pour that flavorful marinade all over it, making sure to coat it evenly. Seal the bag, pressing out any excess air, or cover the dish. Give it a little gentle massage to make sure every inch of the pork is touched by the marinade. Let it marinate in the refrigerator for at least 30 minutes. For an even deeper flavor punch, you can let it go for up to 4 hours. I often do this in the morning before work, and it’s ready to go when I get home!
Step 5: Prepare Filling
Since this is a pork tenderloin recipe, we don’t have a separate “filling” in the traditional sense like you might find in a pastry or a stuffed chicken breast. The “filling” here is the incredible flavor and moisture that the marinade infuses into the pork itself. The essence of this recipe is focusing on the tenderloin as the star, enhanced by the marinade and the cooking process, rather than stuffing it with other ingredients. So, think of step 5 as “Resting & Prepping for the Sear.” Once marinated, take the pork out of the bag or dish and place it on a clean plate. Let it sit at room temperature for about 15-20 minutes while your oven finishes preheating and your pan gets hot. This allows the pork to cook more evenly.
Step 6: Layer & Swirl
This step isn’t applicable to this specific pork tenderloin recipe. “Layer & Swirl” usually refers to techniques used in dishes like cakes, brownies, or certain casseroles where you’re creating visual patterns or distinct layers of different components. Our pork tenderloin is a more straightforward cooking process: marinate, sear, and bake. The “swirl” effect you might get is the beautiful caramelization on the outside of the pork, but that’s achieved through searing, not layering!
Step 7: Bake
Okay, here’s where the magic really happens! Heat the tablespoon of Olive oil (or your high-heat oil) in your oven-safe skillet over medium-high heat until it’s shimmering and almost smoking. Carefully place the marinated pork tenderloin into the hot skillet. Let it sear undisturbed for about 2-3 minutes per side, until it has a beautiful golden-brown crust all around. Don’t overcrowd the pan; if you’re cooking two tenderloins, sear them one after another. Once seared, transfer the skillet directly into your preheated oven. Bake for 15-20 minutes, or until an instant-read thermometer inserted into the thickest part of the tenderloin reads 140-145°F (60-63°C). I always aim for the lower end for maximum juiciness. Remember, it will continue to cook a bit as it rests!
Step 8: Cool & Glaze
Once the pork reaches your desired temperature, carefully remove the skillet from the oven (it will be hot!). Transfer the pork tenderloin to a clean cutting board. Tent it loosely with foil and let it rest for at least 10 minutes. This resting period is CRUCIAL for juicy meat; it allows the juices to redistribute throughout the tenderloin. While the pork is resting, you can quickly make a simple pan sauce. Pour off most of the excess fat from the skillet (leaving behind the browned bits, which are flavor gold!). Place the skillet back on the stovetop over medium heat. Add the chicken broth (or wine) and scrape up all those delicious browned bits from the bottom of the pan. Let it simmer for a minute or two to reduce slightly, then whisk in the tablespoon of butter until it’s melted and glossy. Season with a little salt and pepper if needed.
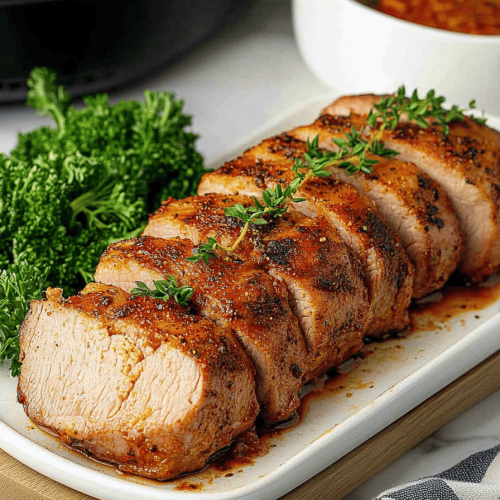
Step 9: Slice & Serve
After its much-deserved rest, slice the pork tenderloin into medallions, about 1/2 to 3/4 inch thick. Look at that gorgeous pink interior and the beautiful crust! Drizzle some of that luscious pan sauce over the slices, or serve it on the side for dipping. The aroma alone is enough to make your mouth water. Serve it hot and watch it disappear!
What to Serve It With
This pork tenderloin is so versatile, it’s practically a chameleon in the kitchen! I’ve found it to be fantastic for almost any meal occasion, and my family has their favorites.
For Breakfast: Believe it or not, thinly sliced leftover pork tenderloin is divine in breakfast burritos or scrambles! I’ll sometimes chop up the leftover meat and toss it into my Scrambled Eggs with a little cheese. It adds a savory punch that’s way more interesting than plain bacon.
For Brunch: This is where it truly shines for a crowd. I love serving thick slices of the pork tenderloin alongside fluffy scrambled eggs, crispy roasted potatoes, and a vibrant Fruit Salad. It feels elegant without being stuffy. A mimosa or a bloody mary makes it feel extra special.
As Dessert: Okay, so it’s not *technically* a dessert, but the way it caramelizes and has that hint of sweetness makes it feel indulgent enough to round off a meal beautifully. I often pair it with a creamy risotto or some roasted root vegetables, and a light salad. It’s a perfect finish for a slightly fancier dinner when you don’t want anything too heavy.
For Cozy Snacks: Sometimes, I just can’t resist a slice of this pork tenderloin cold, straight from the fridge, maybe with a little bit of cheese and crackers. It’s so satisfying! It also makes excellent sandwiches or wraps the next day. My kids are obsessed with turning leftovers into “pork sliders” on dinner rolls.
My family traditions often involve serving this with mashed potatoes and some steamed green beans or broccoli. It’s classic comfort food. Another favorite is serving it with a wild rice pilaf and roasted Brussels sprouts. The nutty rice and slightly bitter sprouts are a wonderful contrast to the tender, savory pork.
Top Tips for Perfecting Your Pork Tenderloin
After making this pork tenderloin more times than I can count, I’ve picked up a few tricks that I think really make a difference. These are the little nuggets of wisdom that I’ve learned, sometimes the hard way, and they help ensure your pork turns out perfectly every single time.
Pork Tenderloin Prep: Always, always, always pat your pork tenderloin completely dry before you marinate and especially before you sear it. Moisture is the enemy of a good sear! If it’s wet, it will steam instead of brown, and you’ll miss out on that delicious, flavorful crust. Also, if you see that tough, silvery membrane (silverskin) on the tenderloin, take a few minutes to trim it off with a sharp knife. It doesn’t render down and can make the pork tough. Don’t worry about trimming every last bit of fat; a little bit of fat adds flavor and moisture.
Marinating Advice: While 30 minutes is the minimum for this recipe to impart flavor, I often marinate it for longer, even overnight in the fridge. The longer it marinates, the deeper the flavor. Just be mindful of the acid in the balsamic vinegar; if you marinate for *too* long (like more than 24 hours), the acid can start to break down the protein too much and make the meat mushy. Aim for 30 minutes to 4 hours for that perfect balance.
Searing Technique: Get your pan nice and hot before adding the pork. You want to hear a good sizzle when the pork hits the pan. Use an oil with a high smoke point, like avocado or grapeseed oil. Don’t move the pork around too much during the searing process; let it develop that beautiful crust. Two to three minutes per side is usually perfect. It’s about building color and flavor, not cooking it through at this stage.
Baking Tips: Using an oven-safe skillet is a lifesaver, but if you don’t have one, you can sear the pork in a regular skillet and then transfer it to a baking sheet. Don’t overbake! This is the most common mistake people make with lean cuts like pork tenderloin. It cooks quickly. Use an instant-read thermometer; it’s your best friend. Pull it out when it hits 140-145°F (60-63°C). It will continue to cook as it rests, reaching a safe and delicious temperature of around 145°F (63°C) for medium-rare to medium, which is perfectly safe and incredibly tender.
Resting is Key: I cannot stress this enough – let the pork rest! Tent it loosely with foil on a cutting board for at least 10 minutes after it comes out of the oven. This allows the juices, which have been pushed to the center during cooking, to redistribute back throughout the meat. If you cut into it immediately, all those delicious juices will run out onto your cutting board, leaving you with dry pork. Patience truly pays off here.
Pan Sauce Variations: The pan sauce is optional but highly recommended! If you don’t have chicken broth, a dry white wine like Sauvignon Blanc or Pinot Grigio works beautifully for deglazing. You can also add a splash of cream at the end for a richer sauce, or a squeeze of lemon juice for brightness. It’s a great way to use up all those flavorful browned bits stuck to the pan.
Storing and Reheating Tips
This pork tenderloin is fantastic as leftovers, though I have to admit, it rarely lasts long enough in my house to need serious storage! But when it does, here are my tried-and-true methods for keeping it delicious.
Room Temperature: Honestly, I don’t recommend leaving cooked pork tenderloin out at room temperature for more than two hours (or one hour if the ambient temperature is above 90°F/32°C) for food safety reasons. It’s best to get it into the fridge or freezer fairly quickly after it has cooled slightly.
Refrigerator Storage: Once the pork tenderloin has cooled to room temperature, slice it and store it in an airtight container in the refrigerator. It should stay fresh and delicious for up to 3-4 days. I like to store it with a little bit of the pan sauce if I have it, as it helps keep the meat moist. If you don’t have sauce, a tiny splash of water or broth in the container can also help.
Freezer Instructions: For longer storage, slice the pork tenderloin and wrap individual portions tightly in plastic wrap, then place them in a freezer-safe bag or container. This double-wrapping helps prevent freezer burn. It will keep well in the freezer for up to 2-3 months. When you’re ready to use it, I highly recommend thawing it overnight in the refrigerator. This is the best way to maintain its texture and flavor.
Reheating Advice: The best way to reheat this pork tenderloin is gently. If you’ve stored it in the fridge and have pan sauce, gently warm the sauce in a skillet and then add the sliced pork, tossing to coat and heat through over low heat. If you don’t have sauce, you can warm it in a skillet with a tablespoon of oil or butter, or cover it with foil and warm it in a 300°F (150°C) oven for about 10-15 minutes, until heated through. Microwaving is also an option, but be careful not to overheat, which can dry it out. A quick 30-60 second burst at a time, stirring in between, is usually best.
Glaze Timing Advice: If you plan to store the pork in the refrigerator and want to reheat it with sauce, it’s best to store the sauce separately and then combine them when reheating. This prevents the sauce from making the pork soggy during storage. If freezing, it’s generally best to reheat the pork plain and then make a fresh sauce or use a sauce you’ve specifically frozen for reheating.
Frequently Asked Questions
Final Thoughts
So there you have it – my beloved pork tenderloin recipe that has saved countless dinners in my household. It’s proof that you don’t need complicated techniques or fancy ingredients to create a meal that’s incredibly satisfying and bursting with flavor. The simplicity of marinating, searing, and baking, combined with that irresistible savory-sweet crust, is what makes this dish a true winner. It’s the kind of recipe that makes you feel good about what you’re serving, whether it’s for a busy weeknight or a special occasion. It’s a testament to how a few well-chosen ingredients and a little bit of love can transform a humble cut of meat into something truly memorable. If you’re looking for more easy yet impressive pork recipes, you might also love my Slow Cooker Pulled Pork or my Crispy Pork Belly Bites. I truly hope you give this pork tenderloin a try. I can’t wait to hear how it turns out for you! Feel free to leave a comment below with your thoughts, ratings, or any delicious variations you discover!
Grilled Peach Pork Tenderloin
Ingredients
Main Ingredients
- 1.5 lb Pork tenderloin
- 3 Ripe peaches, halved and pitted
- 0.25 cup Olive oil
- 1 tbsp Balsamic vinegar
- 1 tsp Dried thyme
- 0.5 tsp Salt
- 0.25 tsp Black pepper
Instructions
Preparation Steps
- In a small bowl, whisk together olive oil, balsamic vinegar, thyme, salt, and pepper.
- Rub the mixture all over the pork tenderloin.
- Brush the cut sides of the peaches with the remaining olive oil.
- Preheat grill to medium-high heat.
- Grill the pork tenderloin for about 20-25 minutes, turning occasionally, until internal temperature reaches 145°F (63°C).
- Grill the peaches, cut-side down, for 3-4 minutes, or until grill marks appear.
- Let the pork rest for 5-10 minutes before slicing and serving with the grilled peaches.


