You know those days when dinner feels like a marathon, and the thought of chopping, dicing, and sautéing feels completely overwhelming? Yeah, me too. That’s precisely when I reach for my little jar of magic: preserved chillies in oil. It’s not just a condiment; it’s a flavor explosion waiting to happen. I remember my grandmother always having a small earthenware pot filled with these fiery little gems, and the aroma that wafted from her kitchen whenever she’d dip a spoon in was simply intoxicating. It’s funny, because when I first started experimenting in my own kitchen, I always gravitated towards making things from scratch, but there’s something about preserved chillies in oil that just can’t be replicated. It’s like having a shortcut to incredible, deep flavor that elevates everything it touches. Think of it as a secret weapon, a flavor boost tucked away in your pantry, ready to rescue you from bland meals any day of the week. It’s miles away from the dried flakes you sprinkle on pizza; this is a whole different level of deliciousness.
What are preserved chillies in oil?
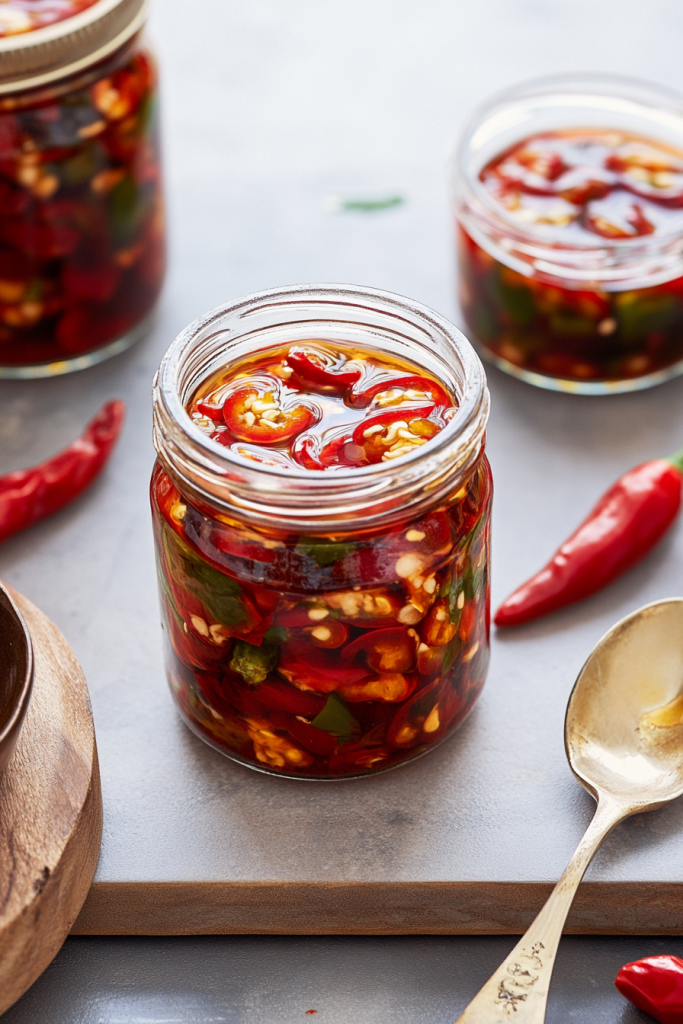
So, what exactly are these little flavor bombs? At its heart, preserved chillies in oil are simply fresh chillies that have been gently processed and stored in oil. The process usually involves a bit of salting and sometimes pickling, which helps to preserve them and develop a complex, slightly fermented flavor. The oil then infuses with the chili’s heat and aroma, creating a wonderfully rich and savory concoction. It’s not just about the heat, though; the oil itself becomes incredibly flavorful, carrying hints of the chili, garlic, and sometimes other spices that were part of the preservation process. Think of it as a chili confit, but with a fantastic tangy edge from the preservation. It’s less about a sharp, biting heat and more about a deep, lingering warmth that builds with every bite. The texture is also amazing – they’re usually soft and tender, not dried out or brittle like some other chili preparations.
Why you’ll love this recipe?
What are some of the best reasons to cook homemade chillies in oil?flavorOh, the flavor! It’s this incredible symphony of spicy, savory, slightly tangy, and deeply aromatic notessimplicity of having them on hand. Need to jazz up some Scrambled Eggs? A tiny spoonful does wonders. Want to add a kick to pasta? Done. It’s a lifesaver on busy weeknights when you want something delicious without a lot of fuss. And when you consider the cost-efficiency, it’s a no-brainer. Growing your own chillies, or even just buying them in season when they’re affordable, and preserving them yourself saves so much money compared to buying specialty jars. But what truly makes me keep coming back is the sheer versatility. I’ve used them in everything from stir-fries and stews to salad dressings and marinades. They even add a fantastic depth to roasted vegetables. I’ve found they’re a wonderful substitute for fresh chillies when you don’t have any on hand, offering a richer, more developed flavor profile. It’s a game-changer, truly!
How to Make Preserved Chillies in Oil
Quick Overview
Making your own preserved chillies in oil is surprisingly straightforward, and it’s all about patience and good ingredients. You’ll essentially be preparing your chillies, allowing them to salt and drain, and then submerging them in a flavorful oil infused with garlic and other aromatics. The magic happens as they sit, melding and maturing into a jar of pure flavor gold. The process is more about letting time do its work than complex techniques, which is why it’s so forgiving and rewarding.
Ingredients
For the Chillies:
About 1 lb of fresh chillies (a mix of varieties like jalapeños, serranos, or even milder ones like Fresno, depending on your heat preference). Make sure they’re firm and vibrant. I always go for a mix to get a range of flavors and heat levels. If you grow your own, this is the perfect way to use up that bumper crop! If buying, look for organic and fresh-looking peppers without any wilting or soft spots.
For the Salt Brine:
1/4 cup kosher salt (important for drawing out moisture and preventing spoilage)
For the Infused Oil:
2 cups of neutral-flavored oil (like canola, grapeseed, or a light Olive oil). Avoid strong extra virgin olive oil for the initial preservation as it can overpower the chili flavor. You can always drizzle a good EVOO on top when serving!
4-6 cloves of garlic, thinly sliced (don’t be shy with the garlic!)
1 teaspoon whole black peppercorns (optional, but adds a nice subtle bite)
1/2 teaspoon dried oregano (optional, adds an earthy note)
A few sprigs of fresh thyme or rosemary (optional, for aromatic depth)
Step-by-Step Instructions
Step 1: Prepare the Chillies
Wash your chillies thoroughly and pat them dry. Trim off the stems. You can leave them whole if they are small, or slice them into rounds or lengthwise if they are larger. If you want to reduce the heat slightly, you can remove some of the seeds and membranes, but I usually leave them in for maximum flavor! Place the prepared chillies in a colander set over a bowl. Sprinkle evenly with the kosher salt. Let them sit for at least 2-3 hours, or even overnight in the refrigerator. This step is crucial for drawing out excess moisture, which helps prevent them from becoming mushy and ensures they preserve well.
Step 2: Drain and Dry the Chillies
After the salting period, you’ll notice a good amount of liquid has been released. Discard this liquid. Rinse the chillies gently under cold water to remove any excess salt, and then spread them out on clean kitchen towels or paper towels to dry thoroughly. This step is vital; any residual moisture can affect the preservation process and potentially lead to spoilage. I usually pat them dry as much as possible, and then let them air dry for another hour or so.
Step 3: Prepare the Infused Oil
In a clean, sterilized jar, combine the neutral oil, sliced garlic, peppercorns, oregano, and fresh herbs (if using). You can gently warm this mixture if you like, but it’s not strictly necessary. Some people prefer to gently heat the oil with the garlic and spices to really infuse the flavors before adding the chillies. If you do this, make sure the oil is not too hot, just warm enough to coax out the aromatics. Let it sit for at least 30 minutes, or ideally, a few hours, to let the flavors meld.
Step 4: Combine Chillies and Oil
Once the chillies are completely dry and the oil mixture has had a chance to infuse, carefully pack the dried chillies into your clean, sterilized jar. Pour the infused oil over the chillies, making sure they are completely submerged. If you find you don’t have enough oil to cover them all, you can top it up with a little more neutral oil. Gently tap the jar on the counter to release any trapped air bubbles. Ensure there’s about an inch of oil above the chillies.
Step 5: Preserve and Mature
Seal the jar tightly and let it sit at room temperature for at least 2-3 days to begin the preservation process. After that, store it in the refrigerator. The flavor will continue to develop and deepen over the next week or two. I always find the first week is good, but the second and third weeks are when they really hit their stride. You can start using them after a few days, but the full magic happens with a bit of patience.
Step 6: Strain (Optional) and Serve
When you’re ready to use them, you can either spoon them out directly from the jar (making sure to use clean utensils to avoid contamination!) or drain them slightly. Some people prefer to strain out the garlic and spices, but I often leave them in for added flavor. The oil itself is liquid gold and can be used for cooking or as a dressing!
Step 7: Storage
Always store your preserved chillies in oil in the refrigerator. They should last for several months, up to 6 months or even longer, as long as they are kept submerged in oil and you always use clean utensils when serving. If you see any signs of mold or off-smells, discard them immediately. The oil is the key to preservation here.
Step 8: Enjoying Your Preserved Chillies
This is the fun part! Use them to add a punch of flavor to almost anything. Stir into pasta sauces, add to stir-fries, top pizzas, mix into dips, or even add to your morning eggs. The possibilities are truly endless!
What to Serve It With
Oh, the ways you can use these little flavor bombs are almost as endless as the sunshine that grows the chillies! For a simple yet delightful breakfast, I love spooning a bit over scrambled eggs or even into an omelet. The subtle heat and savory notes are just divine with eggs. Add a drizzle of the infused oil to your toast, and you’ve got a breakfast that punches way above its weight. For a more elaborate brunch spread, these preserved chillies are a must. They’re fantastic stirred into a creamy avocado toast spread or served alongside grilled halloumi. A small dish of them at the table as a condiment alongside other brunch favorites always gets rave reviews. As a quick dessert accent (yes, really!), try a tiny bit atop a creamy panna cotta or a dollop of mascarpone cheese with a drizzle of honey. It sounds unusual, but the sweet and spicy combination is surprisingly sophisticated and utterly addictive. And for those everyday cozy snacks, they’re your best friend. A little goes a long way on crackers with cheese, stirred into hummus for an extra kick, or even mixed into a simple tuna salad sandwich. My kids even love them on top of mini pizzas!
Top Tips for Perfecting Your Preserved Chillies in Oil
I’ve made my fair share of batches of these preserved chillies, and over the years, I’ve picked up a few tricks that I think really make a difference. First, when it comes to chilli prep, don’t underestimate the power of salting. It’s not just about drawing out moisture; it also helps to soften the chillies beautifully, making them melt-in-your-mouth tender. And when it comes to drying them, be thorough! Any water left clinging to them is an invitation for less-than-ideal preservation. For mixing advice, I always recommend using sterilized jars. It’s non-negotiable for safety and longevity. Also, when you’re filling the jar, press down gently on the chillies to remove air pockets, but don’t mash them into a pulp. You want them to retain their lovely texture. The swirl customization part is fun! While I often just slice them, if you’re feeling fancy, you can try making small slits in larger chillies before salting to help them absorb the flavors even better. For ingredient swaps, if you can’t find a neutral oil, a light vegetable oil works fine. And don’t be afraid to experiment with the aromatics! A few slices of ginger or a star anise can add a wonderful, unexpected twist to the infused oil. As for baking tips, well, this isn’t a baking recipe, but the preservation process is a bit like a slow bake at room temperature! The key is patience. Don’t rush the initial room temperature period; it’s crucial for establishing the right environment for preservation. And finally, glaze variations aren’t really a thing here, as it’s all about the oil. But I will say, the oil itself becomes a sort of glaze! Don’t discard it. Use it to sauté vegetables, finish a dish, or dress a salad. It’s infused with all the goodness of the chillies and garlic, so it’s too precious to waste.
Storing and Reheating Tips
Proper storage is key to enjoying your homemade preserved chillies in oil for a good long while. Once they’re made and have had a chance to mature in the fridge, they’re pretty low-maintenance. For room temperature storage, I only recommend this for the initial 2-3 days after you’ve made them, before they go into the fridge. After that, they absolutely need to be refrigerated. When storing in the refrigerator, ensure the jar is tightly sealed. The oil creates a barrier that helps keep them fresh. They should easily last for 6 months, and I’ve honestly had batches that were still perfectly good after a year. Just give them a sniff and a visual check before using. If they look or smell ‘off’ in any way, it’s time to let them go. Freezer instructions aren’t typically necessary because they last so long in the fridge, and freezing can sometimes alter the texture of preserved items. However, if you wanted to freeze a larger quantity, I’d suggest draining them from the oil, placing them in a freezer-safe bag or container, and then you could freeze the infused oil separately in an ice cube tray. Thawing would involve transferring them back to the refrigerator. For glaze timing advice, it’s not applicable here as there’s no glaze, but the infused oil is essentially your flavor enhancer that you can add as needed. Just make sure the chillies remain fully submerged in the oil at all times.
Frequently Asked Questions
Final Thoughts
There you have it – my tried-and-true method for making preserved chillies in oil. It’s a recipe that has earned its permanent spot in my kitchen for its sheer ability to transform simple meals into something truly special. The process is forgiving, the ingredients are accessible, and the reward is a jar of intense, complex flavor that’s always ready when you are. It’s more than just preserved chillies; it’s confidence in a jar, a shortcut to deliciousness that I honestly can’t imagine my cooking life without. If you love a good kick of flavor and appreciate the satisfaction of making your own pantry staples, I wholeheartedly encourage you to give this a try. You might just find, like I have, that it becomes an indispensable part of your culinary repertoire. I’d love to hear how yours turns out, or if you have your own favorite ways to use them! Don’t hesitate to share your thoughts and experiences in the comments below. Happy preserving, and more importantly, happy cooking!
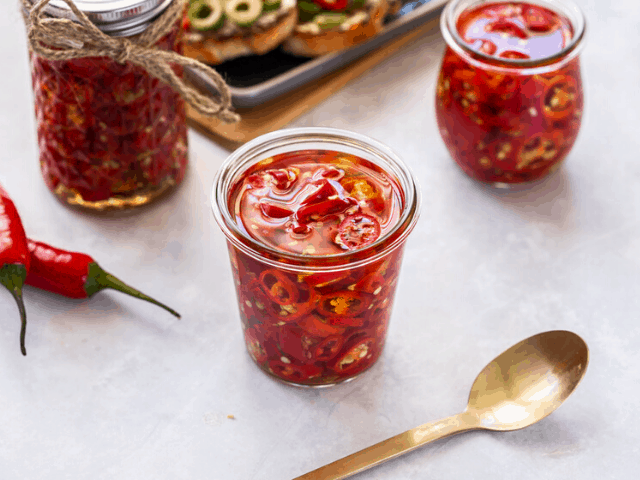
preserved chillies in oil
Ingredients
Main Ingredients
- 1 lb Red chillies
- 0.25 cup Olive oil
- 0.5 cup White vinegar
- 2 tbsp Salt
- 4 cloves Garlic minced
Instructions
Preparation Steps
- Wash and dry the chillies. Remove the stems and slice them.
- In a pot, combine the vinegar, salt, and garlic. Bring to a boil.
- Add the chillies and cook for 5 minutes, or until softened.
- Remove from heat and let cool slightly.
- Pack the chillies into sterilized jars and cover with olive oil.
- Seal the jars and store in a cool, dark place.


