You know those moments? The ones where you’re mid-week, staring into the fridge, and all you can think is, “I need *something* to liven this up”? Yeah, me too. And for me, that *something* is almost always my stash of preserved chillies in oil. It might sound fancy, but honestly, it’s one of the simplest, most rewarding things I’ve learned to keep on hand. It’s like having a little jar of pure sunshine and spice ready to go. I remember my grandma always had a jar of something similar in her pantry, a little fiery secret she’d pull out to transform a simple pasta dish or some roasted vegetables. It’s this incredibly vibrant, fragrant oil that just… wakes everything up. Compared to, say, a batch of fresh salsa which is amazing but takes effort, or dried chilli flakes that can sometimes feel a bit one-dimensional, these preserved chillies in oil are in a league of their own. They’re mellowed, infused with that gorgeous oil, and just bursting with a depth of flavor that’s truly special. They’re the quiet heroes of my kitchen, the ones that save me when I’m feeling uninspired or just need a quick flavor boost.
What are preserved chillies in oil?
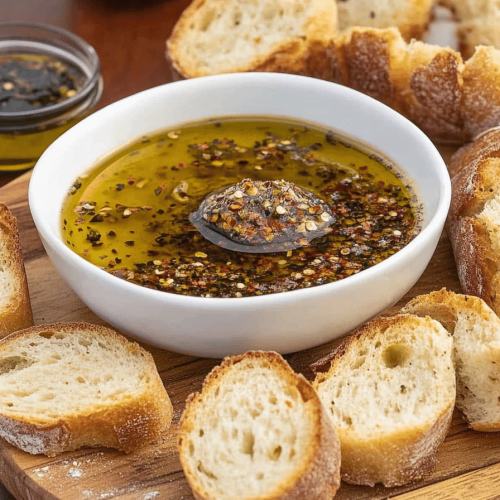
So, what exactly are these little jars of magic? Think of them as fresh chillies that have been carefully preserved in good quality oil. It’s not just about keeping them from going bad, though that’s a huge part of it! The real beauty lies in how the oil soaks up all those incredible chilli flavors, becoming this aromatic, slightly spicy elixir all on its own. Over time, the chillies themselves soften and mellow, losing some of their raw bite but gaining this wonderfully complex taste. It’s essentially a way to capture the essence of fresh chillies and make it last, transforming them into something even more versatile. It’s not like pickling where you have a strong vinegar tang, or drying where the flavor can become very concentrated and sometimes smoky. This is different. It’s gentle, it’s aromatic, and the oil itself becomes a star ingredient. This method is common in many cuisines around the world, from Italian peperoncino oils to Asian chilli crisp bases, but my version is a bit more straightforward, focusing on letting the simple, pure chilli flavor shine through. It’s a culinary hack that feels so satisfying to have in your arsenal.
Why you’ll love this recipe?
Is there any way to fall head over heels for this?flavor. Oh my gosh, the flavor! It’s not just heat, although there’s a lovely warmth. It’s this bright, slightly sweet, slightly smoky (depending on your chillies!) taste that just coats everything. Imagine a drizzle over perfectly grilled fish, or stirred into your morning eggs – it’s a game-changer. Then there’s the sheer simplicity. Seriously, once you get the hang of it, you can whip up a batch in no time. It doesn’t require a million obscure ingredients or hours of standing over a hot stove. You can honestly prep it while the kettle boils. And let’s talk Cost-efficiency: What is the best way to measure cost-efficiency?. Buying specialty chilli oils or sauces can get pricey, right? Making your own is incredibly budget-friendly, especially if you can get your chillies in season or even grow your own! Plus, you’re using good quality oil, which you can then use for cooking too. But what I truly adore is the versatility. This isn’t a one-trick pony. I use my preserved chillies in oil for *everything*. It’s fantastic on pizzas, tossed through pasta, mixed into salad dressings, stirred into stews for an extra kick, or even just spread on some crusty bread. It’s a little secret weapon that elevates any dish. It’s just *so much better* than reaching for those dusty dried flakes sometimes, giving you a more nuanced and fresher taste. It’s the kind of recipe that makes you feel like a culinary wizard, even when you’re just trying to whip up a quick weeknight meal.
How to Make Preserved Chillies in Oil
Quick Overview
The process is wonderfully straightforward. You’ll gently cook your chosen chillies in oil until they’re just tender and fragrant, then let them infuse. The key is a low and slow heat to avoid burning the chillies and making the oil bitter. You want to coax out all that lovely flavor. It’s all about patience and letting the ingredients work their magic. This method ensures you get beautifully preserved chillies that are packed with flavor, and an oil that’s infused with their essence. It’s a hands-off kind of magic that results in something truly special.
Ingredients
For the Chillies:
Fresh chillies: About 1 cup, washed and dried. I love using a mix – some spicier ones like jalapeños or serranos, and some milder, more flavorful ones like Fresno or even a few bell peppers for a pop of sweetness and color. The key is to pick chillies that are firm and bright. If you can find them, some dried chillies like arbol can add a nice depth too, but fresh is truly the star here. Avoid any that look bruised or soft.
For the Oil Infusion:
Good quality neutral oil: About 1 to 1.5 cups. I usually go for a light Olive oil or a good quality vegetable or canola oil. You want an oil that won’t overpower the delicate chilli flavor. Avoid extra virgin olive oil if you want a cleaner chilli taste; a light olive oil or a blend works beautifully.
Flavor Enhancers (Optional but recommended!):
Garlic cloves: 2-3, thinly sliced. This adds a wonderful aromatic complexity without becoming too overpowering, as it infuses gently in the oil.
A pinch of salt: Just to help balance the flavors and aid preservation.
Step-by-Step Instructions
Step 1: Prepare the Chillies
First things first, get your chillies ready. Give them a good wash under cool water and then pat them completely dry with a clean kitchen towel or paper towels. This is super important to prevent any unwanted steam when they hit the hot oil. Once dry, trim off the stems. You can leave them whole if they’re small, or if they’re larger, you can slice them in half or into quarters. If you like it really spicy, you can leave some of the seeds in, but for a more mellow heat, you can scoop out some of the seeds and membranes. Just be sure to wash your hands thoroughly afterwards, or wear gloves!
Step 2: Infuse the Oil
Grab a clean, sturdy saucepan or a small pot. Pour in your neutral oil and add the sliced garlic cloves (if you’re using them) and that pinch of salt. Place the pot over low heat. You want this to be a very gentle warmth, not a sizzle. Let the garlic gently infuse into the oil for about 5-10 minutes, until it’s just starting to turn golden at the edges. Don’t let it brown or burn, or it will make your oil bitter. Remove the garlic slices with a slotted spoon and discard them, or set them aside if you like to add them to your jar later (though they can sometimes get too soft).
Step 3: Gently Cook the Chillies
Now, carefully add your prepared chillies to the warm, garlic-infused oil. Keep the heat on low. You should see a gentle simmer, not a rolling boil. We’re not frying them, we’re gently cooking them and letting them release their flavor into the oil. Stir them occasionally with a wooden spoon. This process can take anywhere from 15 to 30 minutes, depending on the type and size of your chillies. You’re looking for them to become tender and slightly shrunken, and the oil to become beautifully fragrant. Keep an eye on them; you don’t want them to get dark brown or crispy, as that means they’re burning.
Step 4: Cool Down
Once the chillies look tender and the oil smells amazing, it’s time to take them off the heat. Let the oil and chillies cool down completely in the pot. This is crucial for preservation and allows the flavors to deepen even further. I usually leave mine to cool for at least an hour, or even better, let it sit overnight at room temperature if I have the time.
Step 5: Jarring for Preservation
Make sure you have a clean, sterilized glass jar with a tight-fitting lid. Once the chilli and oil mixture has cooled completely, carefully spoon the chillies and the infused oil into the jar. Make sure the chillies are fully submerged in the oil. If there’s not quite enough oil to cover them, you can top it up with a little more of your neutral oil. Seal the jar tightly.
Step 6: Maturing the Flavors
Now for the hardest part – waiting! For the best flavor, I like to let my preserved chillies in oil sit for at least 24-48 hours before using them. This gives all those wonderful flavors time to meld and mature. Store the jar in a cool, dark place in your pantry. Properly made and stored, they should last for several weeks, sometimes even a couple of months.
Step 7: Ready to Use!
Once it’s had a chance to mature, your preserved chillies in oil are ready to use! You can scoop out the chillies and a good amount of that fragrant oil to add to your dishes. The possibilities are truly endless!
What to Serve It With
Oh, the joy of having these on hand! For breakfast, a tiny spoonful stirred into scrambled eggs or an omelet adds a surprising depth. It’s also fantastic drizzled over avocado toast – trust me on this one. For brunch, imagine a vibrant drizzle over a baked shakshuka or even a savory tart. It adds that pop of color and flavor that’s just irresistible. As dessert? This might sound a bit wild, but a tiny bit of chili-infused oil can be amazing with dark chocolate. Think about it – the subtle heat cuts through the richness of the chocolate beautifully. Or a little swirl on a vanilla panna cotta! For those cozy snacks, it’s an absolute lifesaver. Spread some on a Grilled Cheese Sandwich for an instant upgrade, toss it with some roasted nuts for a spicy party snack, or simply drizzle it over a bowl of warm lentil soup. My family loves it on homemade pizza, and it’s become a go-to for jazzing up a simple weeknight pasta. It’s amazing how something so simple can make so many dishes feel restaurant-quality.
Top Tips for Perfecting Your Preserved Chillies in Oil
I’ve definitely learned a few things along the way, and these tips will help you make the absolute best batch of preserved chillies in oil:
Chilli Selection is Key: Don’t just grab any old chilli. Use a variety if you can! A mix of spicy and milder ones gives you a more complex flavor. Fresher is always better – look for firm, vibrant chillies. If you have a favorite pepper that’s not super spicy, like a sweet Italian pepper, adding a few of those can bring a lovely sweetness and color without much heat. I once tried using some slightly wilted chillies, and the flavor just wasn’t the same; they lacked that punch.
Low and Slow is the Mantra: This is probably the most important tip. You are NOT deep-frying these chillies. You want to gently cook them in the oil to infuse the flavor and soften them. If the oil is too hot, you’ll burn the chillies, which will make your oil taste bitter and acrid. Keep that heat on the absolute lowest setting. You should see a very gentle shimmer, not a rapid bubble. Patience here pays off in flavor!
Drying is Crucial: I can’t stress this enough – make sure your chillies are completely dry after washing. Any excess water can cause the oil to splutter violently, which is dangerous, and it can also affect the preservation process by introducing unwanted moisture. I usually let them air dry for a bit after patting them down.
Oil Quality Matters: Use a good quality, neutral-flavored oil. While you can use olive oil, a light olive oil or a blend is often best as extra virgin olive oil can have a strong flavor that might compete with the chilli. A neutral oil like canola, grapeseed, or sunflower oil lets the chilli flavor really shine. And hey, the oil you’re left with is infused with chili goodness, so you can use it for cooking later!
Sterilize Your Jars: This is vital for safe and long-lasting preservation. Wash your jars and lids thoroughly, then sterilize them by boiling them in water for about 10 minutes, or by running them through a hot dishwasher cycle. Let them cool completely before filling. Always use clean utensils when scooping out the chillies and oil.
Don’t Fear the Seeds (or Remove Them Wisely): If you want a spicier kick, leave some seeds in. If you prefer milder preserved chillies, carefully remove the seeds and the white pith inside the chilli – that’s where a lot of the intense heat resides. Wear gloves when you do this, or you’ll have tingly hands for hours!
Let Them Mellow: Resist the urge to dive in immediately! The flavor develops significantly after a day or two. Letting them sit in the oil allows the chillies to soften further and the oil to become richly infused. Store them in a cool, dark place in your pantry.
Storing and Reheating Tips
Keeping your preserved chillies in oil fresh and flavorful is pretty straightforward, but there are a few things that help ensure they last and taste their best.
Room Temperature Storage: Once your jar is sealed and the chillies are fully submerged in oil, you can store it in a cool, dark pantry. They can happily live there for several weeks, often up to two months, as long as they were prepared with clean, dry ingredients and sterile jars. Just make sure they’re not exposed to direct sunlight or heat, which can degrade the quality and flavor.
Refrigerator Storage: If you’re worried about the shelf life, or if you live in a very warm climate, you can absolutely store them in the refrigerator. The oil might solidify a bit, which is totally normal. Just let the jar sit out on the counter for about 15-20 minutes before you want to use it, and the oil will liquefy again. Refrigeration can extend their shelf life even further, sometimes up to 3-4 months, though I usually find they’re gone by then!
Freezer Instructions: For very long-term storage, you can freeze your preserved chillies in oil. A great way to do this is to portion them out into ice cube trays. Fill each cube with a few chillies and some oil, then freeze. Once solid, pop them out and store the chili oil cubes in a freezer-safe bag or container. This way, you can just grab one or two cubes as you need them. They should last for 6 months to a year in the freezer.
Glaze Timing Advice: For these preserved chillies, there isn’t a separate glaze to worry about in terms of storage. The oil itself is the star and the preservative. You just want to ensure the chillies are always covered in oil. If you notice the oil level dropping over time (perhaps you’ve used a lot!), top it up with a fresh bit of neutral oil to keep them properly preserved.
Quality Check: Always use your senses! If the oil smells off, or if you notice any mold or discoloration on the chillies, it’s best to discard the batch. But with proper preparation, this rarely happens!
Frequently Asked Questions
Final Thoughts
There you have it – my little secret for an instant flavor boost! Making preserved chillies in oil is one of those kitchen projects that feels incredibly rewarding. It’s a simple process that yields such a versatile and delicious ingredient. It’s not just about having a spicy condiment; it’s about having this beautiful, fragrant oil that can transform the simplest of meals into something special. I’ve found it’s a fantastic way to use up chillies when they’re abundant, and it’s so satisfying to pull out that jar knowing you made it yourself. If you’re a fan of a little heat and a lot of flavor, I truly hope you give this a try. It’s become an indispensable part of my cooking, and I’m always so excited to see how others use it! For those who enjoy experimenting with vibrant flavors, you might also love my recipe for a homemade chili crisp – it’s another way to bring some serious heat and crunch to your dishes! I can’t wait to hear what you think, and I’d be thrilled if you shared how you use your preserved chillies in oil in the comments below! Happy preserving!
Preserved Chillies in Oil
Ingredients
Main Ingredients
- 1 pound Red chillies Use a mix of varieties for depth of flavor
- 0.75 cup Olive oil
- 0.5 cup White vinegar
- 2 tablespoons Garlic minced
- 1 teaspoon Salt
- 0.5 teaspoon Black peppercorns cracked
Instructions
Preparation Steps
- Wash and dry the chillies. Remove the stems and slice them into rings or leave whole.
- In a saucepan, combine the olive oil, vinegar, garlic, salt, and peppercorns. Bring to a simmer over medium heat.
- Add the chillies to the saucepan and cook for about 15-20 minutes, or until softened but still holding their shape.
- Remove from heat and let cool. Transfer the chillies and oil to sterilized jars.
- Seal the jars and store in a cool, dark place for at least a week before using. Refrigerate after opening.