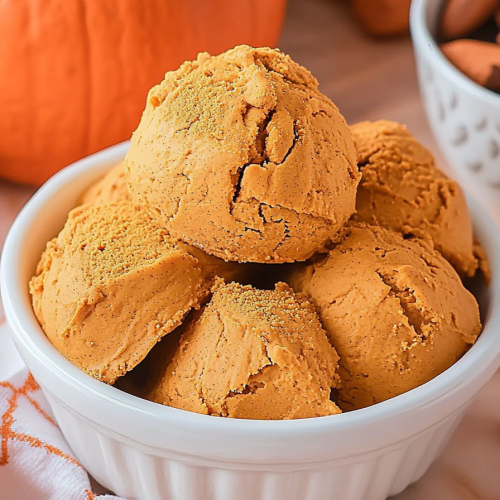
There are certain smells that just wrap you up like a warm hug, aren’t there? For me, that smell is undeniably Pumpkin Pie, especially when it’s baking in my oven on a crisp autumn afternoon. This isn’t just any pumpkin pie, mind you. This is the one that my grandmother made, the one my mom perfected, and now, the one that my own kids practically beg me for as soon as the leaves start to turn. It’s that perfect balance of sweet, spiced, and utterly comforting. Honestly, compared to some of the more elaborate fall desserts out there, this pumpkin pie is like the reliable, always-there best friend you can count on. It’s pure nostalgia in every single bite, and the best part? It’s surprisingly simple to pull off, even on a busy weeknight. Forget those store-bought imposters; this is the real deal.
What is Grandma’s secret pumpkin pie recipe?
So, what makes this pumpkin pie so special? Well, it’s all about that incredibly smooth, creamy filling that just melts in your mouth, paired with a perfectly spiced crust that’s never too sweet. Think of it as the quintessential fall dessert, elevated just a notch. It’s essentially a classic pumpkin pie, but with a little twist that adds an unbelievable depth of flavor and richness without any fuss. My grandmother used to call it her “Sunshine Pie” because of its beautiful golden color, and the secret ingredient? It’s something you probably already have in your pantry! It’s that little something extra that makes people ask, “What’s in this? It’s amazing!” It’s a testament to how a few thoughtful touches can transform a familiar favorite into something truly unforgettable.
Why you’ll love this recipe?
What are some of the reasons why I love this pumpkin pie recipe?flavor is just out of this world. It’s got that perfect blend of warm spices – cinnamon, nutmeg, ginger, and a hint of clove – that just sings of autumn. But it’s not just about the spices; the creamy pumpkin filling is incredibly luscious, thanks to a couple of little tricks I’ll share. Secondly, and this is a big one for me, the simplicityIs a lifesaver?cost-efficient! The ingredients are all pantry staples, making it a budget-friendly way to create a show-stopping dessert. What I love most about this pumpkin pie, though, is its versatility. It’s perfect for Thanksgiving, of course, but it’s also amazing for a cozy weekend treat, a potluck contribution, or even just because you’re craving something sweet. It pairs beautifully with a dollop of whipped cream, a scoop of vanilla Ice Cream, or even just on its own. It’s the kind of dessert that brings people together, and that’s what cooking is all about for me.
How to Make Grandma’s Secret Pumpkin Pie
Quick Overview
Making this incredible pumpkin pie is a breeze! We’ll start by getting our pie crust ready, then whip up the smooth, spiced pumpkin filling, pour it into the crust, and bake until it’s set and golden. The whole process is really quite forgiving, and the final result is a pie that’s both beautiful and unbelievably delicious. It’s the perfect way to bring a taste of homemade comfort to your table with minimal stress.
Ingredients
For the Crust:
You’ll want one unbaked 9-inch pie crust. You can absolutely use store-bought if you’re in a pinch, and honestly, some of the refrigerated ones are fantastic! But if you have a favorite homemade pie crust recipe, go for it! I usually have a batch of my basic butter pie crust tucked away in the freezer, ready to go. It really makes a difference in texture and flavor, but don’t stress if you need to go the store-bought route. Just make sure it’s blind-baked if your recipe calls for it, or ready to go!
For the Filling:
2 cups pumpkin puree (make sure it’s pure pumpkin, not pumpkin pie filling! Look for Libby’s or Farmer’s Market brands for a rich, smooth texture. I’ve found that homemade pumpkin puree can sometimes be a bit watery, so I stick to canned for this recipe.)
1 cup heavy cream (this is key for that incredible creaminess!)
1/2 cup granulated sugar
1/4 cup packed light Brown Sugar (adds a lovely caramel note)
2 large eggs, lightly beaten
1 teaspoon ground cinnamon
1/2 teaspoon ground ginger
1/4 teaspoon ground nutmeg
1/8 teaspoon ground cloves (just a pinch, it’s strong!)
1/2 teaspoon salt
Grandma’s Secret Ingredient: 1 tablespoon pure vanilla extract (don’t skimp on good quality vanilla – it makes all the difference!)
For Serving (Optional but highly recommended!):
Whipped cream (homemade is best, but Cool Whip is fine in a pinch!)
A sprinkle of cinnamon or a dusting of nutmeg
Step-by-Step Instructions
Step 1: Preheat & Prep Pan
First things first, let’s get that oven preheated to 375°F (190°C). If you’re using a homemade pie crust, make sure it’s ready to go in a 9-inch pie plate. If you’re using a store-bought crust, gently press it into your pie plate. I like to crimp the edges nicely to give it a pretty finish. If your crust recipe calls for blind baking, do that now according to its instructions. For this recipe, we’ll be baking the filling directly in the crust.
Step 2: Mix Dry Ingredients
In a medium bowl, whisk together the granulated sugar, brown sugar, cinnamon, ginger, nutmeg, cloves, and salt. Giving these a good whisk ensures that all the spices are evenly distributed, so you won’t get any surprise clumps of cinnamon in one bite. It sounds simple, but it really helps ensure a consistent flavor throughout the pie. This is where the magic starts to happen!
Step 3: Mix Wet Ingredients
In a separate large bowl, whisk together the pumpkin puree and the lightly beaten eggs. Then, pour in the heavy cream and that precious tablespoon of vanilla extract. Whisk everything together until it’s smooth and well combined. I always give it a good whisk to make sure there are no streaks of egg or pumpkin. The cream is what makes this filling so incredibly rich and decadent – it’s a game-changer!
Step 4: Combine
Now, it’s time to bring it all together! Gradually add the dry ingredients (from Step 2) to the wet ingredients (from Step 3), whisking constantly until just combined. Be careful not to overmix here! Overmixing can lead to a tough crust or a slightly rubbery filling. We’re just looking for everything to be smoothly incorporated. The mixture should be thick and beautifully orange.
Step 5: Prepare Filling
This step is really just about ensuring your filling is perfectly smooth and ready to pour. I like to give it one last gentle stir to make sure no ingredients have settled at the bottom of the bowl. If it feels a little thick, you can add a tablespoon more heavy cream, but usually, the ratios are just right.
Step 6: Layer & Swirl
Carefully pour the pumpkin filling into your prepared pie crust. You want to fill it almost to the brim, leaving just a little bit of space for expansion. I like to gently tap the pie plate on the counter a couple of times to release any air bubbles and ensure the filling is evenly distributed. There’s no swirling needed for this classic pumpkin pie, just a smooth, beautiful surface ready for baking.
Step 7: Bake
Now, for the bake! Place the pie on a baking sheet (this catches any potential drips and makes it easier to get in and out of the oven). Bake at 375°F (190°C) for 15 minutes. Then, reduce the oven temperature to 350°F (175°C) and continue baking for another 35-45 minutes, or until the center is set. You can test for doneness by gently inserting a knife near the center; it should come out clean. If the crust edges start to brown too quickly, you can loosely tent them with foil.
Step 8: Cool & Glaze
This is probably the hardest part: letting it cool! Once baked, carefully remove the pie from the oven and place it on a wire rack to cool completely. This usually takes at least 2-3 hours. Cooling is crucial because it allows the filling to set properly. If you try to slice it while it’s still warm, it’ll be too runny. I usually make mine the day before and let it chill in the fridge overnight – it’s even better the next day! There’s no glaze for this particular pie, but once it’s completely cooled, you can add a dollop of whipped cream or a sprinkle of cinnamon if you like.
Step 9: Slice & Serve
Once your pumpkin pie is thoroughly cooled (and trust me, it’s worth the wait!), it’s ready to be sliced and served. For the cleanest slices, use a sharp knife and wipe it clean between cuts. I love serving this pie slightly chilled from the refrigerator, but some people prefer it at room temperature. A generous dollop of freshly whipped cream or a scoop of vanilla bean ice cream is the perfect accompaniment. A little dusting of cinnamon on top adds a beautiful finishing touch!
What to Serve It With
This pumpkin pie is a star on its own, but it also plays beautifully with other flavors and occasions. For breakfast, imagine a warm slice with your morning coffee. It’s like a comforting hug to start your day, especially on a lazy weekend. For brunch, it’s a perfect addition to a buffet. I like to serve it alongside some lighter fare, like fruit salad and maybe some fluffy pancakes. It adds that touch of autumnal indulgence without being too heavy. As a classic dessert, it’s unparalleled. After a big meal, a slice of this pie, perhaps with a spoonful of brandy-spiked whipped cream, is pure bliss. And for those cozy snacks when you just need a little something sweet? This pie is your answer. It’s fantastic with a cup of hot apple cider or even a glass of milk. My family loves it after a game night, or just as a special treat on a random Tuesday. It always feels like a celebration, no matter the occasion.
Top Tips for Perfecting Your Pumpkin Pie
Over the years, I’ve learned a few tricks that help make this pumpkin pie absolutely perfect every single time. For the pumpkin itself, make sure you’re using 100% pure pumpkin puree and not the pre-spiced pumpkin pie filling. The difference in flavor and texture is significant! Also, ensure your pumpkin puree isn’t watery. If you happen to buy a can that seems a bit thinner, you can drain off any excess liquid before adding it to your other ingredients. When it comes to mixing, I can’t stress enough the importance of not overmixing the batter. Just mix until everything is combined. Overmixing can develop the gluten too much, leading to a less tender filling. For the eggs, I always lightly beat them before adding them to the pumpkin mixture. This ensures they’re fully incorporated and not left in streaks. Regarding the spices, feel free to adjust them to your liking! If you’re a big cinnamon fan, add a little extra. If you prefer a subtler spice profile, reduce them slightly. The salt is crucial here; it really balances the sweetness and enhances all the other flavors. My secret ingredient, the vanilla extract, is also something I never skip. Use a good quality pure vanilla extract for the best flavor. When it comes to baking, I always bake my pie on a baking sheet. It catches any drips and makes it easier to maneuver in and out of the oven. If you notice the crust edges browning too quickly, don’t be afraid to loosely tent them with aluminum foil for the last part of the baking time. Finally, patience with the cooling process is key! A fully cooled pie is a perfectly set pie. I know it’s tempting to dive in, but letting it cool completely is crucial for that beautiful, firm slice.
Storing and Reheating Tips
Once your delicious pumpkin pie has cooled completely, you’ll want to store it properly to maintain its freshness and flavor. If you’re planning to serve it within a day or two, storing it at room temperature is perfectly fine, especially if your kitchen isn’t too warm. Just make sure to cover it loosely with plastic wrap or foil to prevent it from drying out. For longer storage, up to 3-4 days, the refrigerator is your best bet. Place the pie in an airtight container or cover it tightly with plastic wrap. I find that covering the pie before wrapping it helps prevent condensation, which can make the crust soggy. If you need to store it even longer, this pie freezes beautifully! Wrap the cooled pie very tightly in plastic wrap, then in aluminum foil, or place it in a freezer-safe container. It can stay in the freezer for up to 2-3 months. To reheat, simply let it thaw overnight in the refrigerator, or reheat gently in a low oven (around 300°F or 150°C) until warmed through. For reheating slices, you can do so in a microwave for short intervals, or in a toaster oven. Remember, the glaze is best added just before serving, so if you’re freezing, wait to add any whipped cream or toppings until after it’s been reheated or brought back to serving temperature.
Frequently Asked Questions
Final Thoughts
I really hope you give this pumpkin pie recipe a try. It’s more than just a dessert; it’s a taste of tradition, comfort, and pure autumnal joy. The combination of smooth, spiced pumpkin filling and that flaky crust is just divine, and that hint of vanilla really makes it sing. It’s the kind of pie that makes you want to gather around the table with loved ones, share stories, and savor every single bite. It’s simple enough for any baker and impressive enough for any occasion. If you love this pumpkin pie, you might also enjoy my Spiced Apple Crumble or my Easy Pecan Pie Bars for more fall-inspired treats! I can’t wait to hear how yours turns out, so please leave a comment below and let me know what you think! Happy baking, everyone!
Pumpkin Pie
Ingredients
Crust
- 1.25 cup all-purpose flour
- 0.5 teaspoon salt
- 0.5 cup cold unsalted butter, cubed
- 0.25 cup ice water
Filling
- 1.5 cup pumpkin puree
- 1 cup evaporated milk
- 0.75 cup granulated sugar
- 0.5 cup packed brown sugar
- 0.75 teaspoon ground cinnamon
- 0.5 teaspoon ground ginger
- 0.25 teaspoon ground cloves
- 0.25 teaspoon ground nutmeg
- 0.25 teaspoon salt
- 2 large eggs
Instructions
Make the Crust
- In a bowl, whisk together flour and salt. Cut in the cold butter until the mixture resembles coarse crumbs.
- Gradually add ice water, mixing until the dough comes together. Form into a disc, wrap in plastic, and chill for at least 30 minutes.
- Roll out the dough and place in a 9-inch pie plate. Crimp the edges.
Make the Filling
- In a large bowl, whisk together pumpkin puree, evaporated milk, sugars, spices, and salt.
- Whisk in the eggs until combined.
- Pour the filling into the prepared pie crust.
Bake the Pie
- Bake in a preheated oven at 425°F (220°C) for 15 minutes. Then reduce the temperature to 350°F (175°C) and bake for another 40-45 minutes, or until the filling is set.
- Let cool completely before serving.