Oh, where do I even begin with this Raspberry Tiramisu? It feels like a lifetime ago, but I remember the first time I tasted a proper tiramisu. It was at this little Italian place my parents used to take us to for special occasions, and it was just… magical. Layers of coffee-soaked ladyfingers, creamy mascarpone, and that dusting of cocoa – pure bliss! But you know me, I can’t leave well enough alone! My mind started buzzing with possibilities, and the idea of a fruity twist just wouldn’t leave me. So, after a bit of tinkering (and a few happy accidents!), this Raspberry Tiramisu was born. It’s become our absolute go-to for everything from a casual weekend treat to something truly special when friends pop over unexpectedly. It’s the kind of dessert that looks fancy but is surprisingly forgiving, and trust me, the bright, tangy burst of raspberries against that rich, creamy filling is something else. If you love classic tiramisu but are looking for a delightful, vibrant variation, you are going to adore this.
What is a Raspberry Tiramisu?
So, what exactly is this Raspberry Tiramisu I’m raving about? Think of it as the classic Italian dessert, but with a dazzling berry makeover! Traditionally, tiramisu is made with ladyfingers (savoiardi biscuits) that are quickly dipped in strong coffee, layered with a rich cream made from mascarpone cheese, eggs, and sugar, and then dusted with cocoa powder. It’s a no-bake wonder, which is always a huge plus in my book! My version swaps out the coffee for a bright, slightly tart raspberry syrup – made with fresh or frozen raspberries, a touch of sugar, and sometimes a splash of liqueur for an extra kick. This syrup gives the ladyfingers that lovely, moist soak and infuses the whole dessert with a beautiful fruity aroma and flavour. The creamy mascarpone filling remains the star, providing that luscious texture that melts in your mouth, but it’s now complemented by the sweet-tartness of the raspberries. It’s essentially a deconstructed berry trifle meets a no-bake cheesecake, with all the elegance and decadence of a traditional tiramisu. It’s less about being strictly authentic and more about capturing that same incredible feeling of comfort and delight, with a vibrant, summery twist.
Why you’ll love this recipe?
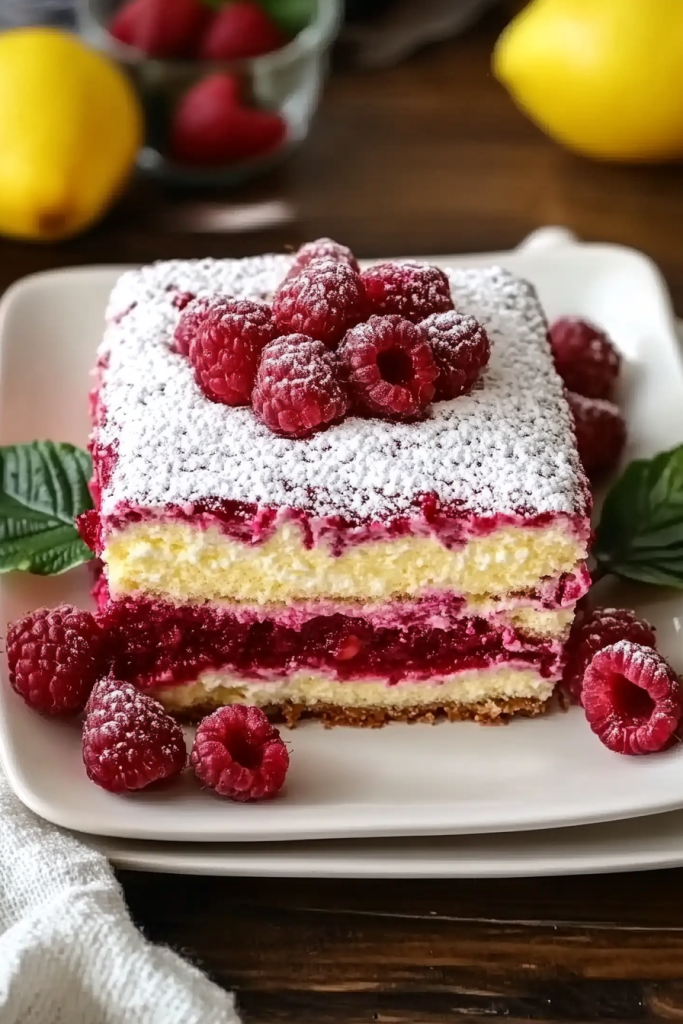
Honestly, there are so many reasons why this Raspberry Tiramisu has earned a permanent spot in my recipe binder, and I’m convinced it will for you too! First off, let’s talk about the flavor, because it’s just divine. You get that incredible creaminess from the mascarpone, which is rich but not heavy. Then, BAM! The raspberries hit you with their bright, slightly tart flavour. It’s the perfect balance, you know? It cuts through the richness beautifully, making it feel lighter and more refreshing than a standard tiramisu. It’s not overly sweet, which is something I always strive for. Plus, the visual appeal is stunning! The pretty pink swirls from the raspberry syrup and the vibrant red berries peeking through make it a real showstopper, even though it’s so simple to assemble. And speaking of simple, that’s another huge win. This is a no-bake dessert! No fiddly pastry, no tricky custards to get right, just assembling layers. It’s a lifesaver when you’re short on time but want to impress. I’ve made this on super busy weeknights when we’ve had last-minute guests, and it always gets rave reviews. It’s also surprisingly budget-friendly, especially if you use frozen raspberries, which are fantastic for this recipe. And the versatility! You can serve this in individual glasses for a more elegant presentation, or make it in a big dish to share at a potluck. It’s perfect for a summer barbecue, a holiday gathering, or even just a Tuesday night craving. What I love most about this Raspberry Tiramisu is that it feels indulgent and special, but it’s so easy that anyone can make it. It’s the kind of recipe that makes you feel like a baking rockstar without all the stress!
How do I make a Raspberry Tiramisu?
Quick Overview
Making this Raspberry Tiramisu is really quite straightforward, and honestly, the hardest part is waiting for it to chill! The process involves making a quick raspberry sauce, whisking together a light and airy mascarpone cream, and then carefully layering it all with ladyfingers that have been dipped in the raspberry goodness. You’ll assemble it in a dish, let it work its magic in the fridge to allow the flavours to meld and the ladyfingers to soften beautifully, and then it’s ready to serve. It’s a no-bake dream that comes together in less than 30 minutes of active prep time. The chilling is the key to getting that perfect, sliceable texture and allowing all those wonderful flavours to become best friends.
Ingredients
For the Raspberry Soak:
4 cups (about 12 oz / 350g) fresh or frozen raspberries (frozen work just as well, and are often more budget-friendly!)
1/4 cup granulated sugar (adjust to your sweetness preference)
2 tablespoons lemon juice (freshly squeezed is best!)
Optional: 2 tablespoons raspberry liqueur (like Chambord) or a splash of Grand Marnier for an extra grown-up flavour boost.
For the Mascarpone Filling:
1 1/2 cups (350g) mascarpone cheese, softened at room temperature (this is crucial for a smooth mixture!)
1/2 cup heavy whipping cream, cold
1/2 cup powdered sugar (sifted, to avoid lumps)
1 teaspoon vanilla extract
Pinch of salt
For Assembly:
2 packages (about 48-60) ladyfingers (savoiardi)
Fresh raspberries for garnish (optional, but highly recommended for that extra pop of color and flavour!)
Mint sprigs for garnish (optional)
Step-by-Step Instructions
Step 1: Prepare the Raspberry Soak
In a medium saucepan, combine the raspberries, granulated sugar, and lemon juice. If you’re using frozen raspberries, you might need a minute or two longer for them to break down. Cook over medium heat, stirring occasionally, until the raspberries have softened and released their juices, and the sugar has dissolved – about 5-7 minutes. Mash the berries gently with the back of your spoon as they cook to help create a smooth syrup. Once they’ve broken down nicely, remove from heat. If you prefer a super smooth syrup without seeds, you can press the mixture through a fine-mesh sieve using a spatula or the back of a spoon. Discard the solids. Stir in the optional liqueur, if using. Let this soak cool completely. This is important, you don’t want to pour warm liquid over your ladyfingers!
Step 2: Whip the Cream
In a clean, dry bowl (seriously, any trace of grease will prevent your cream from whipping properly!), pour in the cold heavy whipping cream. Use an electric mixer (handheld or stand mixer) to whip the cream on medium-high speed until soft peaks form. Be careful not to over-whip, or you’ll end up with butter!
Step 3: Mix the Mascarpone Filling
In a separate large bowl, combine the softened mascarpone cheese, sifted powdered sugar, vanilla extract, and a pinch of salt. Beat with your electric mixer on low speed, just until everything is well combined and smooth. Don’t over-mix here either; we want it to stay nice and airy. Gently fold in the Whipped Cream from Step 2 until just combined. You should have a beautiful, fluffy, creamy mixture. Fold gently to keep all that lovely air you whipped in!
Step 4: Prepare Your Dish & Ladyfingers
Choose your serving dish. A 9×9 inch square dish works great, or you can use individual glasses or ramekins. Pour the cooled raspberry soak into a shallow bowl or pie plate. This is where the magic happens – quickly dip each ladyfinger into the raspberry soak. You want them to absorb some liquid and soften, but not so much that they fall apart. Just a quick dip on each side is usually perfect. Work quickly, as they can get soggy fast!
Step 5: Assemble the First Layer
Arrange a single layer of the dipped ladyfingers in the bottom of your prepared dish, breaking them if necessary to fit snugly. Don’t worry about perfection here; it’s going to be covered anyway!
Step 6: Add the Cream Layer
Spread about half of the mascarpone filling evenly over the ladyfinger layer. Use an offset spatula or the back of a spoon to smooth it out. If you’re feeling fancy, you can swirl some extra raspberry sauce on top of the cream layer before adding the next layer of ladyfingers, or even dot some fresh raspberries in there.
Step 7: Repeat the Layers
Dip and arrange another layer of ladyfingers over the cream. Then, spread the remaining mascarpone filling evenly over the second layer of ladyfingers. Smooth the top. For an extra pop of flavour and colour, you can dot a few fresh raspberries on top of the final cream layer.
Step 8: Chill to Perfection
Cover the dish tightly with plastic wrap. This is crucial for allowing the flavours to meld and the ladyfingers to soften into that perfect, tender texture. Refrigerate for at least 4 hours, but overnight is even better! This chilling time is non-negotiable for the best results.
Step 9: Garnish and Serve
Just before serving, garnish your Raspberry Tiramisu. I love scattering a generous handful of fresh raspberries over the top. A few fresh mint leaves add a lovely pop of green and a hint of freshness. Slice into portions (if using a large dish) and serve chilled. Enjoy the delightful swirls of pink and cream!
What to Serve It With
This Raspberry Tiramisu is pretty spectacular on its own, but pairing it with the right accompaniments can really elevate the experience! For breakfast or brunch, it’s an absolute dream alongside a perfectly brewed cup of coffee. I love a strong espresso or a creamy cappuccino; the bitterness of the coffee is a wonderful contrast to the sweet creaminess of the tiramisu. If you’re serving it as part of a larger brunch spread, think about pairing it with some fresh fruit salad – the simplicity of the fruit lets the tiramisu shine. For a more elegant dessert occasion, after a lovely dinner, I like to serve it chilled with a small glass of dessert wine, perhaps a Moscato d’Asti or a late-harvest Riesling. The bubbles and slight sweetness of these wines complement the berries and cream without overpowering them. If you’re having a more casual gathering, like a picnic or a backyard barbecue, this Raspberry Tiramisu is perfect for a relaxed end to the meal. Just bring it out chilled and let everyone dig in! My family tradition is to serve it straight from the fridge on a warm summer evening, with everyone grabbing a spoon and digging in from the communal dish. It’s simple, joyful, and always a hit. You can also add a little dusting of cocoa powder on top right before serving for a nod to the classic, or even a sprinkle of shaved White Chocolate for extra indulgence.
Top Tips for Perfecting Your Raspberry Tiramisu
Over the years, I’ve learned a few tricks and developed some habits that really help this Raspberry Tiramisu turn out perfectly every single time. Firstly, when you’re making the raspberry soak, don’t be tempted to boil it down too much. You want a good amount of liquid to soak the ladyfingers, but not so much that it turns into a thick jam. A nice, syrupy consistency is what you’re aiming for. And remember to let it cool completely! Pouring warm liquid onto ladyfingers is a recipe for mush. For the mascarpone filling, the key is to make sure your mascarpone is truly softened. If it’s too cold, you’ll end up with lumps, and nobody wants that. Letting it sit on the counter for about 30-45 minutes usually does the trick. When you’re folding in the whipped cream, be gentle! You’ve worked hard to incorporate air into both the mascarpone and the cream, and overmixing will deflate it, leading to a denser, less ethereal filling. Treat it like you’re folding egg whites into a cake batter. My biggest tip, though, is patience with the chilling time. I know it’s hard to resist, but those 4-8 hours (or even overnight!) in the fridge are crucial for the ladyfingers to soften properly and for all the flavours to meld together. If you rush this step, you’ll end up with a dessert that’s a bit too firm and the flavours won’t have had time to mingle. For ingredient swaps, if you’re not a fan of raspberries, you could absolutely try this with strawberries or even a mix of berries! Just adjust the sugar based on the sweetness of the fruit. If you don’t have ladyfingers, I’ve had some success with Pound Cake cut into strips, though they will absorb more liquid and might make the tiramisu a bit denser. And about the liqueur – it’s totally optional! If you’re making this for kids or prefer an alcohol-free version, just omit it. The flavour will still be fantastic. Lastly, don’t be afraid to taste as you go! Adjust the sugar in the raspberry soak and the filling to suit your personal preference. This recipe is really forgiving, so have fun with it!
Storing and Reheating Tips
Storing this Raspberry Tiramisu is pretty straightforward, and thankfully, it holds up beautifully. If you have any leftovers (which is rare in my house!), you can store the entire dish, well-covered with plastic wrap, in the refrigerator. It will stay delicious for about 2-3 days. The ladyfingers will continue to soften as it sits, which some people actually prefer! If you’re planning to make it ahead of time, which I highly recommend, assemble it the day before you plan to serve it. This gives it ample time to chill and develop those wonderful flavours. You can even make it up to two days in advance. Now, about reheating – this is a no-bake dessert, so you don’t really ‘reheat’ it in the traditional sense. It’s best served chilled. If, for some reason, it’s been out at room temperature for a while and needs to be served cold again, simply pop it back into the refrigerator for an hour or so to firm up. I wouldn’t recommend freezing this tiramisu. While some no-bake desserts freeze okay, the texture of the mascarpone cream and the soaked ladyfingers can change significantly after thawing. It tends to get a bit watery or gummy, and it just doesn’t have that same lovely creamy consistency. For the best quality and flavour, stick to refrigeration. If you’re making individual portions in glasses, just cover each glass tightly with plastic wrap. For the glaze timing, you want to add any fresh fruit garnish right before serving to keep it looking vibrant and fresh. If you’re drizzling extra raspberry sauce on top, that can be done just before serving as well, or you can add it a few hours ahead if you like. The main thing is to ensure the entire dessert is properly chilled before you present it.
Frequently Asked Questions
Final Thoughts
So there you have it – my beloved Raspberry Tiramisu! It’s a dessert that truly embodies that perfect balance of creamy indulgence and bright, fruity freshness. It looks sophisticated enough for any special occasion, yet it’s so incredibly easy to whip up, making it a weeknight wonder too. I’ve made this countless times, for family birthdays, casual get-togethers, and even just for myself when I’m craving something delicious that doesn’t involve turning on the oven. The way the raspberries cut through the richness of the mascarpone is just pure magic, and the softened ladyfingers are like little clouds of deliciousness. If you’re a fan of classic tiramisu, I promise you’ll fall head over heels for this vibrant variation. And if you’re new to tiramisu altogether, this is a wonderfully approachable way to dive in. It’s a no-bake dessert that’s practically foolproof, and the results are always met with rave reviews. It truly is a little slice of heaven. If you enjoy this recipe, you might also love my Lemon Blueberry Cheesecake for another fruity, no-bake delight, or my Classic Tiramisu if you want to try the original. I can’t wait to hear what you think when you give this Raspberry Tiramisu a try! Please leave a comment below and let me know how it turns out, or share any fun variations you come up with. Happy baking (or rather, happy assembling!)!

Raspberry Tiramisu
Ingredients
Main Ingredients
- 1 pint Fresh Raspberries
- 16 oz Ladyfingers
- 1 cup Heavy Cream
- 0.75 cup Mascarpone Cheese
- 0.5 cup Powdered Sugar
- 0.25 cup Raspberry Liqueur (optional)
Instructions
Preparation Steps
- Whip the heavy cream until soft peaks form.
- In a separate bowl, combine mascarpone cheese and powdered sugar. Mix until smooth.
- Gently fold the whipped cream into the mascarpone mixture.
- If using, lightly dip ladyfingers in raspberry liqueur.
- Layer ladyfingers, raspberries, and the mascarpone cream in a dish. Repeat layers.
- Refrigerate for at least 2 hours before serving.


