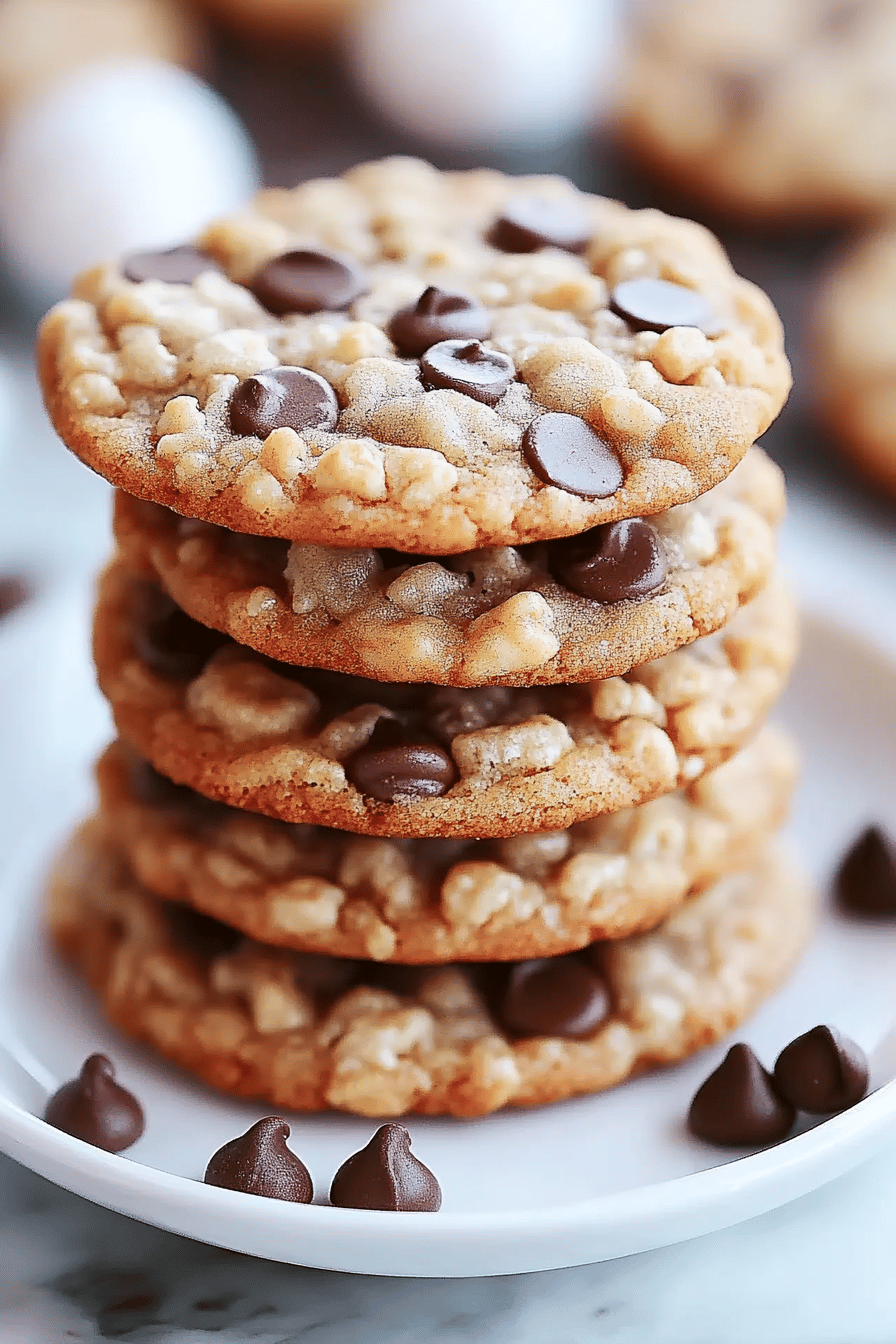
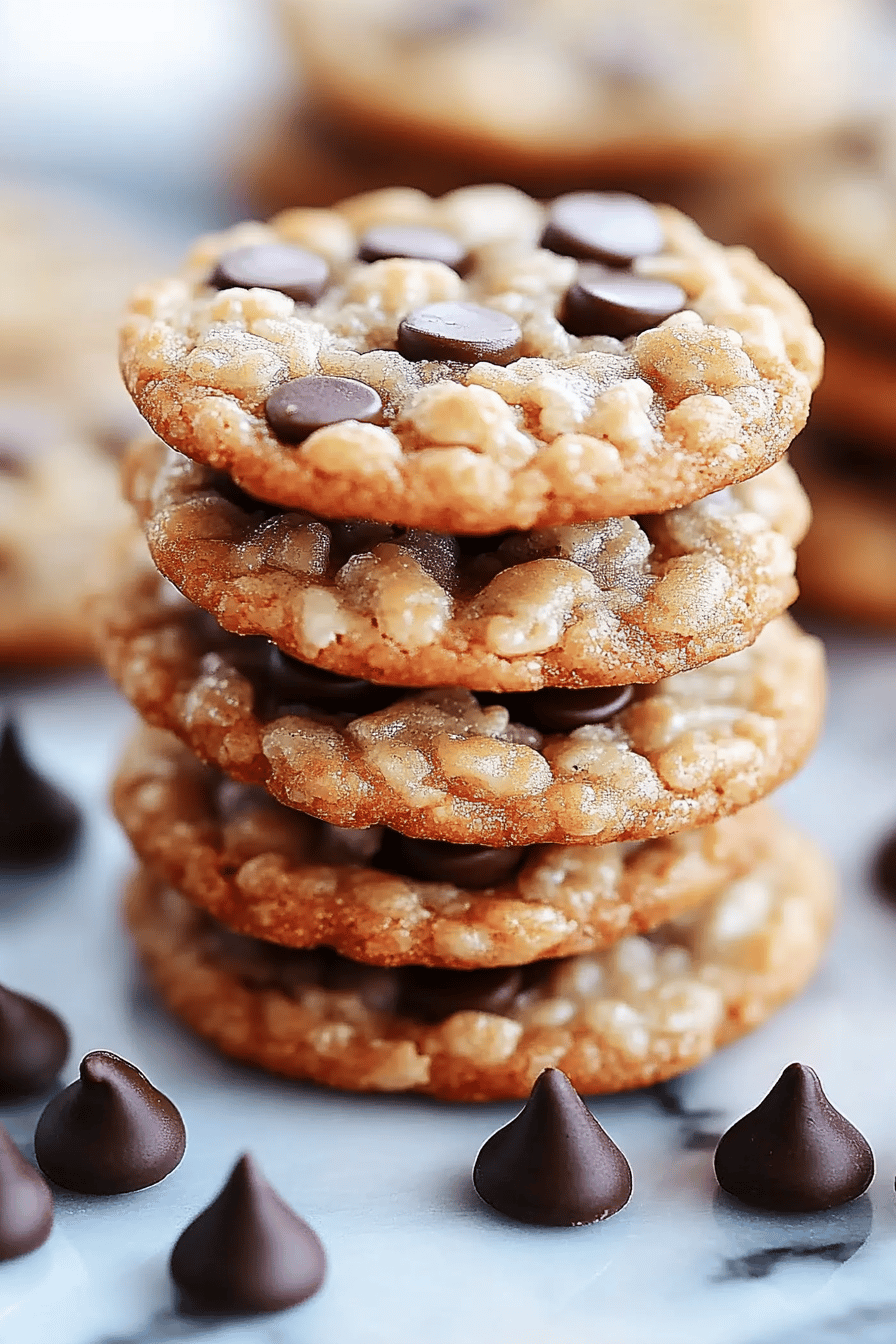
Oh, you guys! I’ve been so excited to share this recipe with you. There are some treats that just instantly transport you back to childhood, right? For me, it’s anything with that nostalgic, crispy, slightly chewy texture that just screams comfort. And if you’re like me and sometimes crave that perfect bite but don’t have hours to spend fussing over dough or waiting for a cake to bake, then you are going to fall head over heels for these Rice Krispie cookies. Seriously, they’re a game-changer. Forget complicated cookies that spread too much or are a pain to get just right. This is the kind of dessert magic that comes together in a flash and tastes absolutely heavenly. They’re like a hug in cookie form, and dare I say, they might just be even better than a classic Chocolate Chip Cookie on a weeknight when you need a serious pick-me-up. I’ve been making these for years, and they always disappear faster than I can make them!

What are Rice Krispie Cookies?
So, what exactly are these magical little delights? Think of them as the ultimate mash-up: the beloved, melt-in-your-mouth gooeyness of classic Rice Krispie treats, but baked into a perfectly formed cookie. They have that wonderful chewy center and a slightly crisp edge, all packed with that signature, unmistakable crunch of toasted Rice Krispies. It’s not a cookie that requires chilling dough or intricate shaping. Instead, it’s a wonderfully forgiving recipe that uses simple pantry staples to create a cookie that’s somehow both light and incredibly satisfying. The beauty of these Rice Krispie cookies is how they capture that iconic flavor and texture in a new, exciting format that’s perfect for dunking or just devouring one by one. It’s essentially taking a beloved nostalgic treat and giving it a fun, cookie-shaped makeover that’s guaranteed to be a hit.
Why you’ll love this recipe?
Honestly, where do I even begin with why this recipe is a keeper? First off, the flavor is just out of this world. You get that familiar, comforting taste of toasted rice cereal, perfectly balanced with the sweetness of brown sugar and vanilla, all bound together by a rich, buttery base. But it’s not just about the taste; it’s the texture! That incredible chewiness with every crispy crunch is pure bliss. What I truly adore is the sheer simplicity of it all. You can whip up a batch of these Rice Krispie cookies in under 30 minutes, from start to finish. No fancy equipment, no complicated steps, and minimal cleanup. This recipe is a lifesaver on busy weeknights when the sweet craving hits hard, or when unexpected guests pop by. Plus, they’re incredibly budget-friendly! The ingredients are all standard pantry items that most people already have on hand. And the versatility? Oh, it’s fantastic. You can easily add chocolate chips, sprinkles, or even a swirl of Peanut Butter. If you’re a fan of my No-Bake Oatmeal Cookies or my Chewy Sugar Cookies, you’re going to adore the texture and ease of these Rice Krispie cookies. They’re a perfect sweet treat that doesn’t require a ton of effort but delivers maximum deliciousness. It’s the kind of recipe that makes you feel like a baking superstar without breaking a sweat!
How do I make Rice Krispie Cookies?
Quick Overview
Making these Rice Krispie cookies is as straightforward as it gets. You’ll melt some butter and marshmallows together until smooth, then stir in the dry ingredients, including those glorious Rice Krispies! The mixture gets spooned onto a baking sheet and baked until golden. The best part? They’re ready to enjoy in a flash, offering that irresistible crispy-chewy texture that everyone loves. It’s seriously that simple, and the result is pure cookie perfection.
Ingredients
For the Main Batter:
Unsalted Butter: 1/2 cup (1 stick). Using unsalted butter lets you control the saltiness, and it just melts beautifully for that perfect cookie base. Make sure it’s softened to room temperature for the creamiest texture when you melt it down.
Marshmallows: 10 oz bag (about 40 large or 4 cups mini). Mini marshmallows melt quicker and more evenly, but either works! I always opt for mini because they make the batter extra smooth. Make sure they’re fresh for the best chew!
Brown Sugar: 1/2 cup, packed. This gives our cookies that wonderful depth of flavor and a lovely chewy texture. Light or dark brown sugar works, but dark adds a richer caramel note.
Eggs: 2 large. These act as a binder and add richness. Make sure they’re at room temperature so they incorporate smoothly into the batter without any fuss.
Vanilla Extract: 1 teaspoon. A must for any good cookie! It just amplifies all those wonderful sweet flavors.
Rice Krispies Cereal: 3 cups. The star of the show! Use the classic Kellogg’s Rice Krispies for that iconic crunch. Don’t crush them; we want those distinct pieces for texture.
All-Purpose Flour: 1 and 1/2 cups. This gives our cookies structure. I usually use unbleached all-purpose flour.
Baking Soda: 1 teaspoon. This helps the cookies spread just enough and gives them a little lift.
Salt: 1/2 teaspoon. Balances the sweetness and enhances all the other flavors.
For the Swirl (Optional but highly recommended!):
Chocolate Chips: 1/2 cup. Semi-sweet or milk chocolate work wonderfully. You can even use white chocolate chips for a different vibe.
Peanut Butter: 2 tablespoons, creamy. For a classic PB and chocolate combo, you really can’t go wrong.
For the Glaze (Optional, but adds that extra touch!):
Powdered Sugar: 1 cup. Sifted to avoid any lumps.
Milk or Cream: 1-2 tablespoons. Start with one and add more until you reach your desired drizzling consistency.
Vanilla Extract: 1/2 teaspoon (optional, for extra flavor).
Step-by-Step Instructions
Step 1: Preheat & Prep Pan
First things first, let’s get our oven ready! Preheat it to 350°F (175°C). While the oven heats up, grab a couple of baking sheets and line them with parchment paper or silicone baking mats. This is crucial, trust me! It prevents the cookies from sticking and makes cleanup a breeze. I always lay out at least two sheets so I can bake batches back-to-back.
Step 2: Mix Dry Ingredients
In a medium-sized bowl, whisk together the flour, baking soda, and salt. Give it a good whisk until everything is evenly distributed. This ensures the leavening agents and salt are spread throughout, so you get consistent cookies every time. Set this bowl aside for now.
Step 3: Mix Wet Ingredients
Now, for the magic base! In a large microwave-safe bowl (or a saucepan on the stove over low heat), melt the 1/2 cup of unsalted butter. Once melted, add the entire bag of marshmallows. Stir continuously until the marshmallows are completely melted and smooth. This is where the magic happens! You want a smooth, glossy mixture. Next, stir in the packed brown sugar and vanilla extract until well combined. Let this mixture cool slightly for about 5 minutes – you don’t want to scramble the eggs!
Step 4: Combine
In a separate small bowl, whisk the two large eggs. Gradually whisk the slightly cooled marshmallow mixture into the eggs, making sure to incorporate them slowly to prevent scrambling. Once the eggs are fully incorporated, add this wet mixture to the bowl with your dry ingredients. Stir everything together with a spatula or wooden spoon until just combined. Be careful not to overmix! Overmixing can lead to tough cookies, and we want these to be delightfully chewy.
Step 5: Prepare Filling (if using)**
If you’re adding a swirl, now’s the time to prep your goodies. In a small, microwave-safe bowl, combine the chocolate chips and creamy peanut butter. Microwave in 30-second intervals, stirring in between, until smooth and melted. This will be our delicious swirl!
Step 6: Fold in the Krispies & Swirl
Now it’s time to add the texture! Gently fold in the 3 cups of Rice Krispies cereal until they are evenly coated with the cookie batter. If you’re adding the swirl, drop spoonfuls of the melted chocolate and peanut butter mixture over the batter. Then, use a knife or skewer to gently swirl them through the cookie dough. Don’t over-swirl; you want distinct ribbons of chocolate and peanut butter.
Step 7: Portion and Bake
Drop rounded spoonfuls of the cookie dough onto your prepared baking sheets, leaving about 2 inches between each cookie. They will spread a little, but not excessively. For a more uniform cookie, you can use a cookie scoop. Bake in your preheated oven for 9-12 minutes, or until the edges are golden brown and the centers are still slightly soft. They will continue to set as they cool. I usually check mine around 9 minutes and rotate the pan if needed for even baking.
Step 8: Cool and Glaze
Let the cookies cool on the baking sheets for about 5 minutes before carefully transferring them to a wire rack to cool completely. This is super important for them to firm up properly. Once they’re completely cool, you can make the glaze. Whisk together the sifted powdered sugar, 1 tablespoon of milk, and vanilla extract (if using) until smooth. Add more milk, a tiny bit at a time, until it’s the perfect drizzling consistency. Drizzle the glaze over the cooled cookies. You can do thin lines, zig-zags, or even a full drizzle – whatever makes your heart happy!
Step 9: Slice and Serve
Once the glaze has set slightly, your Rice Krispie cookies are ready to be devoured! The best way to serve them is usually right around room temperature, allowing all those textures and flavors to shine. I love seeing the little bits of Rice Krispies peeking through. They’re perfect for sharing, but I won’t judge if you keep them all to yourself!
What to Serve It With
These Rice Krispie cookies are so versatile, they fit right in wherever you need a little sweet happiness. For breakfast, they’re surprisingly good with a strong cup of coffee, offering a sweet start to the day without being overly heavy. I sometimes cut one in half and spread a thin layer of cream cheese on it – sounds unusual, but it’s amazing! For brunch, I love arranging them on a platter alongside other pastries and fruit. They add a fun, playful element that kids (and kids at heart!) absolutely adore. A glass of cold milk is, of course, the classic companion. As a dessert, these cookies are fantastic for an impromptu treat after dinner. They’re not as rich as a dense chocolate cake, making them a perfect lighter option when you’re craving something sweet but don’t want to feel too stuffed. Pair them with a scoop of vanilla bean ice cream, and you’ve got a mini dessert party! And for cozy snacks? This is where they truly shine. They are the ultimate comfort food for a lazy afternoon with a book, or a quick energy boost during a busy day. My family loves them with hot chocolate on a chilly evening. Honestly, they’re so good on their own, they don’t really *need* anything else, but a glass of cold milk is always a winner in my book!
Top Tips for Perfecting Your Rice Krispie Cookies
I’ve made these Rice Krispie cookies more times than I can count, and over the years, I’ve picked up a few little tricks that really make a difference. Here are my best tips to ensure your cookies turn out perfectly every single time:
Marshmallow Meltdown Magic: When melting the butter and marshmallows, low and slow is key! If you rush it or use too high heat, the marshmallows can seize up or burn, leading to a gummy or grainy texture in your cookies. Stir constantly and be patient. I sometimes find microwaving in short bursts and stirring in between is the easiest way to get a super smooth, glossy mixture without any fuss.
Don’t Overmix the Batter: This is a golden rule for almost any cookie, and these are no exception. Once you add the flour, mix only until it’s just combined. Overmixing develops the gluten in the flour too much, which can result in tough, dense cookies instead of the chewy, delightful ones we’re aiming for. It’s better to have a few tiny streaks of flour than to overwork the dough.
The Importance of Cooling: Letting the cookies cool on the baking sheet for a few minutes before transferring them to a wire rack is crucial. These cookies are quite soft when they first come out of the oven. This initial cooling period on the hot pan allows them to set up just enough so they don’t fall apart when you move them. Patience here pays off for perfect cookie structure!
Swirl Like a Pro: When you’re swirling in the chocolate or peanut butter mixture, don’t go crazy with it. A few gentle swirls with a knife or skewer are all you need. You want distinct ribbons of flavor, not a completely uniform muddy mess. Too much swirling can also overwork the dough.
Glaze Consistency is Key: For the glaze, start with just 1 tablespoon of milk and add more a tiny bit at a time. It’s much easier to thin out a glaze than to thicken it up! You want a consistency that’s thick enough to drizzle and hold its shape a little, but thin enough to flow smoothly. If it’s too thick, it will be clumpy; too thin, and it will just run off the cookies.
Spice It Up: While the classic vanilla is divine, don’t be afraid to experiment! A pinch of cinnamon in the dry ingredients adds a lovely warmth. Or, try adding a little almond extract instead of vanilla for a different nutty flavor profile. You can also fold in some chopped nuts or even small candy pieces along with the Rice Krispies for extra texture and flavor. My kids love it when I add a handful of colorful sprinkles right before baking!
Storing and Reheating Tips
One of the best things about these Rice Krispie cookies, besides how incredibly easy they are to make, is how well they store. They tend to stay wonderfully chewy and delicious for days, which is a huge win in my house! Here’s how I typically keep them fresh:
Room Temperature Storage: Once the cookies are completely cooled (and the glaze has set, if you used it), I store them in an airtight container. They can be layered between parchment paper to prevent sticking. At room temperature, they’ll stay fresh and delicious for about 3-4 days. The texture remains fantastic, with that perfect balance of chew and crisp. I usually find they’re best eaten within the first couple of days, but they definitely hold up well.
Refrigerator Storage: While I don’t often refrigerate these because they’re so good at room temp, you can store them in the fridge if your kitchen is particularly warm or if you want them to last a bit longer. Place them in an airtight container, perhaps with a piece of parchment paper between layers. They should keep well in the refrigerator for up to a week. Just be aware that they might firm up a bit in the fridge, so you might want to let them sit out for 10-15 minutes before enjoying.
Freezer Instructions: These Rice Krispie cookies freeze remarkably well, which is a lifesaver for my busy schedule! After they’ve cooled completely, wrap individual cookies tightly in plastic wrap, then place them in a freezer-safe bag or container. They can be frozen for up to 2-3 months. To thaw, simply unwrap them and let them sit at room temperature for a few hours. They’ll taste just as good as when they were freshly baked!
Glaze Timing Advice: If you’re planning to freeze your cookies, I highly recommend glazing them *after* thawing. Sometimes, the glaze can get a little sticky or melty in the freezer. It’s much better to add your beautiful drizzle once the cookies are completely thawed and ready to be eaten. This ensures the glaze looks its best and keeps that lovely finish.
Frequently Asked Questions
Final Thoughts
So there you have it – my absolute favorite, ridiculously easy Rice Krispie cookies! They’re the kind of recipe that brings pure joy with minimal effort, and that’s what I love most about them. They’re a perfect reminder that delicious treats don’t have to be complicated. Whether you’re looking for a quick dessert for a last-minute craving, a fun bake for the kids, or just a sweet little something to brighten your day, I truly think these will hit the spot. They capture that nostalgic magic of childhood favorites while being exciting and new. I can’t wait to hear what you think of them! Please leave a comment below and tell me how yours turned out, or if you added any fun variations. Happy baking, and enjoy every single crispy, chewy bite!

Rice Krispie Cookies
Ingredients
Main Ingredients
- 6 cups Rice Krispies cereal
- 10 oz Marshmallows Mini marshmallows preferred
- 0.5 cup Butter Unsalted
- 1 cup Chocolate chips Semi-sweet
Instructions
Preparation Steps
- Melt butter in a large saucepan over low heat.
- Add marshmallows to the saucepan and stir until completely melted.
- Remove from heat and stir in Rice Krispies cereal and chocolate chips until well combined.
- Drop by rounded spoonfuls onto a baking sheet lined with parchment paper.
- Let cookies cool completely before serving.