There are certain smells that just instantly transport you back in time, aren’t there? For me, it’s the aroma of something sweet baking, with a little hint of something caramelized and warm. And when that smell is specifically the salted honey pie, well, that’s pure magic. This isn’t just a pie; it’s a hug in dessert form. I remember the first time I tasted a truly great salted honey pie, and I was honestly a little annoyed. Annoyed that I hadn’t discovered it sooner! It was this perfect balance of sweet, salty, and that deep, comforting richness that just coats your tongue. It’s like a sophisticated caramel but somehow more… rustic, more honest. If you’ve ever loved a classic pecan pie, or even a really good Sticky Toffee Pudding, you’re going to fall head over heels for this salted honey pie. It’s the kind of dessert that makes people stop talking and just savor the moment. And the best part? It’s surprisingly not as intimidating as it sounds. Seriously, even if you’re a baking novice, you can absolutely nail this. I’ve made it so many times for family gatherings, potlucks, and even just for a Tuesday night treat when the craving hits, and it always, always gets rave reviews. It’s become my go-to when I want something truly special without spending hours slaving away in the kitchen.
What is salted honey pie?
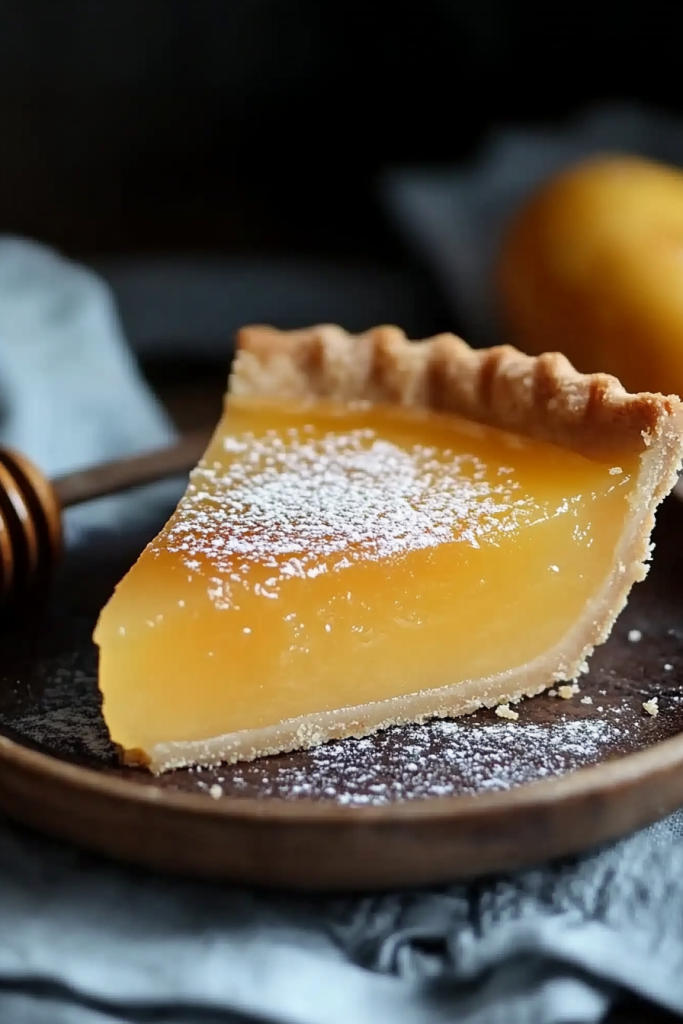
So, what exactly is this heavenly creation we call salted honey pie? At its heart, it’s a pie that celebrates the gloriousness of honey. Think of it as a cousin to a classic Pecan Pie or a bourbon pecan pie, but with honey taking center stage. Instead of the nutty crunch of pecans, you get this luscious, almost custardy filling that’s deeply flavored with honey, and then, the magic touch – a sprinkle of flaky sea salt that cuts through the sweetness and makes all the flavors pop. The name itself, “salted honey pie,” tells you pretty much everything you need to know: it’s a rich, sweet pie with a delightful salty finish. It’s not overly complicated; it’s essentially a simple, luscious filling baked in a flaky crust. The beauty lies in the quality of the ingredients and the perfect balance of sweet and salt. It’s the kind of dessert that feels both comforting and a little bit luxurious, all at once. It’s the perfect antidote to a stressful day, or the perfect centerpiece for a celebratory meal. It’s uncomplicated, yet undeniably impressive.
Why you’ll love this recipe?
Oh, where do I even begin with why you’ll absolutely adore this salted honey pie? Let me count the ways! First off, the FLAVOR. It’s just… sublime. That deep, floral sweetness of honey is amplified, and then when the salt hits? It’s a revelation. It’s not just sweet; it’s complex and satisfying in a way that a lot of desserts can’t quite achieve. It balances out beautifully, so you never feel that cloying sweetness that sometimes comes with pies. Then there’s the SIMPLICITY. Honestly, this is a lifesaver on busy nights or when you’ve got a million other things going on. You don’t need any fancy equipment or complicated techniques. The crust comes together easily, and the filling is basically a matter of whisking a few ingredients together. It’s so forgiving, too! What I love most about this pie is how it feels so special and homemade, but it doesn’t demand hours of your time. And let’s talk COST-EFFICIENCY. Honey is readily available, and the other ingredients are pantry staples. You’re getting a gourmet-tasting dessert without a gourmet price tag. It’s a win-win! VERSATILITY is another huge plus. I mean, who doesn’t love a versatile dessert? This salted honey pie is fantastic on its own, of course, but it’s also incredible served warm with a dollop of vanilla bean Ice Cream or a swirl of freshly whipped cream. It’s perfect for a Sunday brunch spread, a holiday dessert table, or even just a cozy treat with a cup of tea. Compared to some other elaborate desserts, this one really shines for its straightforward deliciousness and the little bit of unexpected elegance that the salt brings. It’s a recipe that consistently brings smiles to faces, and that’s always a good sign in my book!
How do you make salted honey
Quick Overview
Making this salted honey pie is really quite straightforward, and that’s a huge part of its charm! You’ll start by preparing your favorite pie crust – whether that’s homemade or a good quality store-bought one. Then, you’ll whip up a rich, luscious filling primarily made of honey, eggs, and a touch of butter and vanilla. This mixture gets poured into the prepared crust, and then the magic happens: a generous sprinkle of flaky sea salt on top before it bakes to golden perfection. The entire process is less about complex steps and more about allowing those wonderful honey flavors to meld and caramelize beautifully in the oven. It’s a truly rewarding bake that delivers incredible taste with minimal fuss.
Ingredients
For the Crust:
1 single pie crust, chilled (home
*Tip: I swear by a good all-butter crust for flavor, but even a shortening crust works beautifully and is often more forgiving for beginners.*
For the Filling:
1 ½ cups good quality honey (a floral honey like wildflower or orange blossom works wonders!)
3 large eggs
½ cup unsalted butter, melted and slightly cooled
1 teaspoon pure vanilla extract
¼ teaspoon salt (for the filling itself)
Flaky sea salt (like Maldon), for topping
*Tip: Don’t skimp on the honey quality here; it’s the star! Using a darker, more robust honey will give a deeper flavor. For the flaky salt, make sure it’s a finishing salt, not fine table salt. The texture makes all the difference!*
For Serving (Optional):
Vanilla bean Ice Cream or freshly whipped cream
*Tip: A little scoop of good quality vanilla ice cream melting over a warm slice of this pie is pure bliss. Or, a simple swirl of unsweetened whipped cream can provide a lovely contrast.
Step-by-Step Instructions
Step 1: Preheat & Prep Pan
First things first, let’s get your oven fired up. I like to preheat mine to 375°F (190°C). While the oven is warming up, take your pie crust out of the fridge and gently press it into your 9-inch pie plate. If you’re using a store-bought crust, just follow the package directions. If you’ve made your own, make sure it’s crimped nicely around the edges. I usually like to do a simple fork crimp or a classic fluted edge. You want it to look pretty and be sturdy enough to hold all that delicious filling. For a really golden crust, you can also do a blind bake for about 10-15 minutes beforehand, but honestly, I often skip this step for this particular pie, and it turns out beautifully. The filling helps cook the bottom crust just fine.
Step 2: Mix Dry Ingredients
Okay, this is where things get easy! Grab a medium-sized bowl. We’re going to whisk together the eggs, the ¼ teaspoon of salt that goes into the filling itself, and then we’ll add the wet ingredients in the next step. There aren’t really “dry” ingredients in the traditional sense for the filling, other than that tiny bit of salt to balance the sweetness. The key here is just having a clean bowl ready for combining everything.
Step 3: Mix Wet Ingredients
Now for the heart of our filling! In that same bowl (or a separate one if you prefer, but why dirty another dish!), whisk your 3 large eggs until they’re just lightly beaten and starting to get a little frothy. Then, pour in your 1 ½ cups of beautiful honey and the 1 teaspoon of vanilla extract. Whisk everything together until it’s well combined and smooth. It should look like a lovely, golden liquid. Make sure the honey is well incorporated; you don’t want any streaks of it left at the bottom of the bowl.
Step 4: Combine
Now, we bring it all together. Slowly pour in your ½ cup of melted and slightly cooled unsalted butter into the honey-egg mixture. Whisk gently until everything is fully incorporated. You’re aiming for a smooth, homogenous filling. It should be thick but pourable. Don’t worry if it looks a little thin at this stage; it will set up beautifully in the oven. The most important thing here is to make sure it’s all mixed thoroughly. I sometimes like to give it a little taste test (just a tiny bit!) to ensure the salt is balancing the honey perfectly. You can always add another tiny pinch of salt if you think it needs it, but remember, you’re adding more on top later!
Step 5: Prepare Filling
This step is technically already done in Step 4! The “filling” is the mixture you just whisked together. The beauty of this salted honey pie is its simplicity. It’s not a complicated custard or a fruit filling with multiple components. It’s just that glorious honey-egg mixture that bakes up into a custardy, rich delight. So, consider your filling prepped and ready to go into the crust!
Step 6: Layer & Swirl
This is where the “salted” part truly comes to life! Carefully pour your prepared honey filling into the unbaked pie crust. Make sure you fill it evenly. Now, for the best part: sprinkle a generous amount of flaky sea salt over the entire surface of the filling. You can be as liberal as you like! I like to get it right to the edges of the crust, too. The salt crystals will melt slightly and infuse into the top layer of the pie as it bakes, creating those delightful little pockets of salty goodness. There’s no swirling required here, just a beautiful, even distribution of that magical salt.
Step 7: Bake
Pop your beautifully salted pie into your preheated 375°F (190°C) oven. Bake for about 40-50 minutes. Now, you’ll want to keep an eye on it. The pie is done when the edges of the filling are set, and the center is just slightly jiggly – like a very firm pudding. The crust should be a beautiful golden brown. If you find the crust edges are browning too quickly, you can always loosely cover them with aluminum foil or use a pie crust shield. Ovens can be finicky, so rely on the visual cues of the set filling and golden crust rather than just the timer alone. You’re looking for that perfect balance of cooked through but not overdone, which can make it rubbery.
Step 8: Cool & Glaze
Once your salted honey pie is out of the oven, resist the urge to cut into it immediately! This is crucial for texture. Let it cool on a wire rack for at least 2-3 hours, or until it’s completely cooled. This resting period allows the filling to fully set up and firm into that wonderful, custardy consistency. There’s no separate glaze to apply for this pie; the “glaze” effect comes from the beautiful sheen of the cooked honey filling and the glistening salt crystals on top. If you want to add a glaze-like sheen, you could brush a tiny bit of warmed honey over the top *after* it has completely cooled, but I usually find the natural finish is perfection on its own.
Step 9: Slice & Serve
The moment of truth! Once your salted honey pie has cooled completely, it’s ready to be sliced and devoured. Use a sharp knife for clean cuts. I find that warming the knife slightly under hot water and drying it well before each cut can help create really beautiful slices, especially through that custardy filling. Serve it as is, or go for that classic pairing with a scoop of vanilla bean Ice Cream or a dollop of lightly sweetened whipped cream. The contrast of the warm pie and cold ice cream is just divine. Enjoy every single bite!
What to Serve It With
This salted honey pie is so versatile, it works for pretty much any meal or occasion you can think of! I love how it bridges the gap between comfort food and something a bit more elegant. It’s not just a dessert; it’s an experience.
For Breakfast: Don’t knock it till you try it! A small sliver of this pie with your morning coffee is pure indulgence. It’s got that rich, comforting flavor that’s perfect for kicking off a weekend. I often serve it with a simple black coffee or a latte – the bitterness of the coffee really complements the sweetness of the pie. The saltiness adds an unexpected brightness that keeps it from being too heavy for breakfast.
For Brunch: This is where it truly shines. Imagine a beautiful brunch spread with quiches, fresh fruit salads, and then this gorgeous salted honey pie as the star dessert. It looks stunning on a platter and feels wonderfully celebratory. I love pairing it with sparkling cider or a light mimosas. For plating, a small, neat slice with a few fresh berries on the side looks elegant and inviting.
As Dessert: This is the most obvious, but for good reason! It’s perfect after any main course. Think of it after a hearty roasted chicken or a rich beef stew. The sweetness is satisfying without being overpowering. Serve it warm with that classic vanilla ice cream, or if you’re feeling fancy, a crème anglaise or a salted caramel sauce (though it really doesn’t need it!). A sprinkle of edible flowers can add a beautiful touch for special occasions.
For Cozy Snacks: My personal favorite! When that 10 pm craving hits, and I don’t want to bake a whole cake, this pie is my secret weapon. A small wedge with a cup of herbal tea is the ultimate cozy treat. It’s comforting, satisfying, and feels like a little bit of secret indulgence. My kids, surprisingly, love a small piece as an after-dinner treat, and it’s always gone in a flash.
I’ve found that the key is often in the accompaniments. A bit of tang from some fresh raspberries or a dollop of slightly tart yogurt can cut through the richness beautifully. But honestly, even on its own, this salted honey pie is a showstopper.
Top Tips for Perfecting Your Salted Honey Pie
I’ve made this salted honey pie more times than I can count, and over the years, I’ve picked up a few tricks that I think really make a difference in getting it just perfect every single time. These aren’t complicated things, just little nuggets of wisdom that help avoid common pitfalls and elevate the final result.
Honey Prep: When you’re melting your butter for the filling, make sure it cools slightly before adding it to the eggs and honey. If it’s too hot, it can scramble the eggs, and nobody wants that! A gently warm butter is perfect. Also, when you’re measuring your honey, lightly greasing your measuring cup with a little bit of oil or cooking spray can help the honey slide right out, ensuring you get every last drop.
Mixing Advice: The key with the filling is to whisk it thoroughly but not excessively. You want the eggs, honey, butter, vanilla, and salt to be fully incorporated to create a smooth, homogenous mixture. Over-whisking the eggs can incorporate too much air, which might lead to a different texture. Just a good, steady whisk until everything looks uniform is all you need. I also learned early on to make sure the butter is fully cooled; it makes the mixture much smoother and less likely to cook the eggs.
Salt Application: This is where the magic happens! Don’t be shy with the flaky sea salt. It might look like a lot when it’s raw, but it will melt and meld into the pie as it bakes, creating those glorious sweet-and-salty bites. Distribute it evenly across the entire surface of the filling. I love the visual contrast it creates against the golden-brown pie. Think of it as adding little flavor bombs throughout.
Ingredient Swaps: While I strongly recommend using good quality honey for the best flavor, if you absolutely must substitute, a blend of honey and corn syrup can help with stability and shine, though you’ll lose some of that nuanced honey flavor. For the salt, please, please use flaky sea salt. It provides bursts of salinity that are crucial for balancing the sweetness. Fine table salt will dissolve too quickly and won’t give you that textural contrast.
Baking Tips: Keep an eye on your pie during the last 15 minutes of baking. Ovens vary! If the crust edges are browning too fast, loosely tent them with foil. You’re looking for the filling to be set around the edges but still have a slight jiggle in the very center – it will firm up more as it cools. Overbaking can lead to a tough, rubbery filling, so trust your eyes and your gentle poke test!
Glaze Variations: While this pie is sensational as is, if you’re someone who *loves* a glossy finish, you can, once the pie is completely cooled, gently brush the top with a tiny bit of warmed honey. Be very sparing! Alternatively, a light dusting of powdered sugar can offer a different aesthetic, though it will change the flavor profile a bit.
Storing and Reheating Tips
Storing this delicious salted honey pie properly is key to enjoying it for as long as possible, though I have to admit, it rarely lasts more than a day or two in my house! Here’s what I’ve learned:
Room Temperature: Once the pie has cooled completely (and I mean completely – give it at least 2-3 hours), you can store it at room temperature for up to two days. I usually just cover it loosely with plastic wrap or aluminum foil, or better yet, pop it into a cake carrier. It retains its lovely texture and flavor best this way. Just make sure it’s in a cool, dry spot away from direct sunlight.
Refrigerator Storage: If you need to store it for longer than two days, or if your kitchen tends to be quite warm, I recommend refrigerating it. Wrap the pie tightly in plastic wrap, or place it in an airtight container. It should keep well in the fridge for about 4-5 days. The filling might firm up a bit more in the fridge, but that’s easily remedied.
Freezer Instructions: Freezing this pie is definitely doable, though I find the texture is best when it’s fresh. If you do want to freeze it, it’s best to do so *before* slicing. Wrap the completely cooled pie very tightly in a couple of layers of plastic wrap, followed by a layer of aluminum foil. It can be stored in the freezer for up to 1-2 months. Thaw it overnight in the refrigerator, then let it sit at room temperature for about 30 minutes before serving to allow the filling to soften slightly.
Glaze Timing Advice: Since this pie doesn’t have a separate glaze applied after baking, the “glaze” is the natural finish of the filling and the salt. If you decide to do the optional warm honey brush-on *after* cooling, do that just before serving. If you’re storing it, the natural sheen will remain. If you’re reheating a slice from the fridge, the filling will soften up beautifully. You can gently warm individual slices in a low oven (around 300°F or 150°C) for about 5-10 minutes until just warmed through. This is also when any potential refrigerated condensation will evaporate, and the beautiful sheen will return.
Frequently Asked Questions
Final Thoughts
There you have it – my beloved salted honey pie! It’s the kind of recipe that feels both incredibly special and wonderfully achievable. It’s that perfect balance of sweet, salty, and utterly comforting that just sings. I truly hope you give this a try because, for me, it’s more than just a dessert; it’s a little slice of happiness that I love sharing. The way the honey caramelizes, the pop of salt cutting through the richness… it’s just pure bliss. If you’re looking for another equally comforting but slightly different pie, you might want to check out my Brown Butter Pecan Pie – it’s another family favorite that brings the cozy vibes!
I can’t wait to hear what you think! If you make this salted honey pie, please leave a comment below and let me know how it turned out for you. Did you share it? Did it disappear in minutes (I bet it did!)? I also love seeing your creations, so feel free to share photos on social media and tag me! Happy baking, and may your pie always be perfectly golden and delightfully salty!

Salted Honey Pie
Ingredients
Crust
- 1.25 cups All-purpose flour
- 0.5 teaspoon Salt
- 0.5 cup Unsalted butter Cold, cubed
- 0.25 cup Ice water
Filling
- 0.75 cup Honey
- 0.5 cup Heavy cream
- 0.25 cup Unsalted butter
- 1 teaspoon Salt
- 3 large Eggs
Instructions
Prepare the Crust
- In a bowl, whisk together flour and salt. Cut in cold butter until the mixture resembles coarse crumbs.
- Gradually add ice water, mixing until the dough just comes together. Form into a disc, wrap, and chill for at least 30 minutes.
Make the Filling
- In a saucepan, combine honey, heavy cream, and butter. Heat over medium heat, stirring until butter is melted.
- Remove from heat and stir in salt. Let cool slightly.
- Whisk eggs in a separate bowl. Gradually whisk in the honey mixture.
Assemble and Bake
- Preheat oven to 375°F (190°C). Roll out the dough and place it in a pie plate.
- Pour the filling into the pie crust.
- Bake for 45-50 minutes, or until the filling is set and the crust is golden brown.
- Let cool completely before serving.


