
You know those recipes that just feel like a warm hug? The ones that are so comforting, so reliably delicious, that you find yourself making them again and again, no matter the season or occasion? Well, these zucchini feta bars are absolutely that for me. They’re a revelation, really. Imagine a soft, slightly dense cake-like base, studded with sweet zucchini and salty feta, all topped with a dreamy, tangy glaze. It sounds a little unconventional, I know, but trust me on this one. They’re like a savory-sweet muffin met a delicious blondie, and I honestly can’t get enough. They’re my secret weapon for using up zucchini from the garden, and they disappear faster than you can say “more, please!” This little gem has totally replaced my usual banana bread cravings on those days when I just need something wholesome and satisfying. And the best part? They’re surprisingly easy to whip up.
What are Zucchini Feta bars?
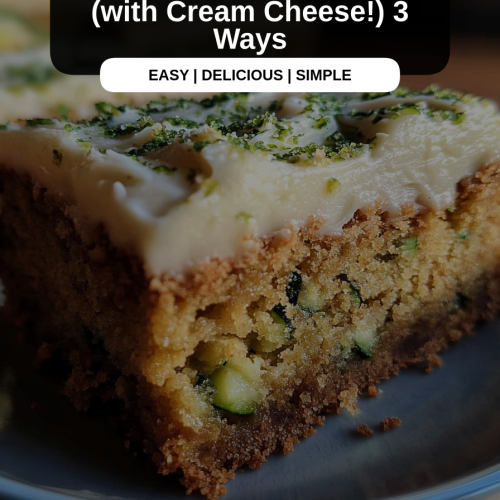
So, what exactly are these magical zucchini feta bars? Think of them as a delightful twist on a classic quick bread or a very moist, flavorful bar cookie. They’re not overly sweet, which is exactly what I love about them, but they have this wonderful balance of earthy zucchini, creamy, tangy feta cheese, and a hint of savory herbs. The name itself, “zucchini feta bars,” pretty much tells the story – they’re bars, they feature zucchini, and they’re absolutely packed with feta. It’s that combination that just sings. They’re essentially a one-bowl wonder for the most part, making cleanup a breeze, and the texture is just phenomenal. It’s dense enough to feel substantial, yet tender and moist from the zucchini. They’re the kind of thing you can serve at breakfast, brunch, or even as a sophisticated snack with a cup of tea. Honestly, the first time I tried a variation of this, it was an accident, but a happy one!
Why you’ll love this recipe?
There are so many reasons why I keep coming back to these zucchini feta bars, and I’m betting you’ll fall in love with them for all the same reasons. First and foremost, the FLAVOR! It’s just out of this world. The zucchini bakes down into these tender little pockets that add so much moisture and a subtle sweetness. Then you have the feta, which is the star of the show for me. It melts slightly as it bakes, creating these little pockets of salty, tangy goodness that perfectly complement the mild zucchini. I usually throw in some fresh dill or chives too, which adds another layer of freshness that’s just divine. Beyond the incredible taste, the SIMPLICITY is a huge win. I can honestly whip these up on a weeknight after a long day. Most of the ingredients are pantry staples, and the steps are straightforward. You don’t need any fancy equipment, just a bowl, a whisk, and a baking pan. And let’s talk about COST-EFFICIENCY. Zucchini is usually pretty affordable, especially when it’s in season, and feta is readily available without breaking the bank. These bars are a fantastic way to get a lot of flavor and satisfaction without spending a fortune. Plus, they are incredibly VERSATILE. I mentioned breakfast and brunch, but they’re also a fantastic make-ahead dessert. They pair beautifully with a light salad for lunch, or even just on their own as a satisfying snack. Honestly, what I love most about this is that it’s a recipe that truly delivers on all fronts – amazing taste, minimal effort, and great value. They’re like the unsung heroes of my kitchen. If you enjoy things like savory muffins or a good zucchini bread, you’re going to adore these zucchini feta bars.
How do I make Zucchini Feta Bars?
Quick Overview
Making these zucchini feta bars is surprisingly straightforward, making them perfect for even novice bakers. You’ll start by whisking together your dry ingredients, then combining the wet ingredients separately before bringing them all together. The star of the show, grated zucchini and crumbled feta, get folded in at the end, along with some fresh herbs for an extra pop of flavor. A simple glaze is whipped up while they bake and then drizzled over the top once cooled. It’s a process that requires minimal fuss and yields maximum reward, with the delightful aroma filling your kitchen as they bake.
Ingredients
For the Main Batter:
2 cups all-purpose flour (or a 1:1 gluten-free blend if you prefer)
1 teaspoon baking powder
1/2 teaspoon baking soda
1/2 teaspoon salt
1/4 teaspoon black pepper (freshly ground is best!)
1/2 cup unsalted butter, softened (or melted for a denser texture, though I prefer softened for lightness)
3/4 cup granulated sugar (you can reduce this slightly if you prefer them less sweet)
2 large eggs, at room temperature
1 teaspoon vanilla extract
1/2 cup plain Greek yogurt or sour cream (this adds amazing moisture!)
For the Filling:
1.5 cups grated zucchini, squeezed very dry (this is crucial!)
1 cup crumbled feta cheese (use a good quality one; it makes a difference!)
2 tablespoons fresh dill or chives, finely chopped (or a mix of both!)
For the Glaze:
1 cup powdered sugar, sifted
2-3 tablespoons milk or lemon juice (lemon juice adds a lovely tang!)
1/4 teaspoon vanilla extract (optional, but nice)
Step-by-Step Instructions
Step 1: Preheat & Prep Pan
First things first, let’s get your oven ready to do its magic. Preheat your oven to 350°F (175°C). While the oven heats up, grab an 8×8 inch baking pan. I like to line mine with parchment paper, leaving a little overhang on the sides. This makes lifting the bars out so much easier later on, and believe me, no one likes trying to pry stuck baked goods from a pan!
Step 2: Mix Dry Ingredients
In a medium bowl, whisk together the flour, baking powder, baking soda, salt, and black pepper. Whisking helps to distribute the leavening agents evenly, which is super important for getting a nice, even rise. You want to make sure there are no lumps, and the dry ingredients are thoroughly combined. This simple step ensures all your dry components are ready to go.
Step 3: Mix Wet Ingredients
In a larger bowl, cream together the softened butter and granulated sugar until light and fluffy. This is where the creaming method really comes into play for a tender crumb. Beat in the eggs one at a time, making sure each one is fully incorporated before adding the next. Then, stir in the vanilla extract and the Greek yogurt or sour cream. It might look a little curdled at this stage, but that’s perfectly fine. Just mix until everything is combined into a smooth, luscious base.
Step 4: Combine
Now, it’s time to bring it all together. Gradually add the dry ingredients to the wet ingredients, mixing on low speed or by hand just until *barely* combined. Seriously, do NOT overmix here! Overmixing can develop the gluten too much and result in tough bars. A few streaks of flour are totally okay at this stage; they’ll disappear when you fold in the zucchini.
Step 5: Prepare Filling
This is where the stars of our zucchini feta bars come in! Make sure your grated zucchini is *super* dry. You can do this by grating it and then squeezing out as much moisture as possible with your hands or by wrapping it in a clean kitchen towel or cheesecloth. Excess moisture will make your bars soggy. Gently fold the squeezed zucchini, the crumbled feta, and the chopped fresh dill or chives into the batter. Be gentle to keep the batter light!
Step 6: Layer & Swirl
Pour the batter into your prepared baking pan and spread it out evenly. You don’t need to swirl anything here as the feta and zucchini are already distributed throughout. Just ensure an even layer so they bake evenly.
Step 7: Bake
Pop the pan into your preheated oven and bake for 30-35 minutes, or until a toothpick inserted into the center comes out clean or with a few moist crumbs attached. Keep an eye on them, as oven temperatures can vary. The tops should be golden brown and slightly firm to the touch. The aroma that fills your kitchen at this stage is just heavenly!
Step 8: Cool & Glaze
Once baked, let the bars cool in the pan for about 10-15 minutes before attempting to lift them out using the parchment paper overhang. Transfer them to a wire rack to cool completely. While they’re cooling, whisk together the powdered sugar, milk or lemon juice, and vanilla extract until you have a smooth, pourable glaze. If it’s too thick, add a tiny bit more liquid; if it’s too thin, add a bit more powdered sugar. Once the bars are *completely* cool, drizzle the glaze generously over the top. Let the glaze set for a bit before slicing.
Step 9: Slice & Serve
Once the glaze has set, use a sharp knife to cut the bars into squares or rectangles. I usually get about 12-16 bars depending on how I cut them. Serve them at room temperature for the best flavor and texture. They’re lovely on their own, or with a side of fruit for a light meal.
What to Serve It With
These zucchini feta bars are so wonderfully versatile, they can truly fit into any meal or occasion! For a delightful BREAKFAST, I love serving them warm with a strong cup of coffee. They’re satisfying enough to keep you full until lunch, and the savory notes are a refreshing change from purely sweet pastries. They also look quite elegant for BRUNCH. I’ll arrange them on a tiered stand alongside some fresh fruit salad, perhaps a frittata, and some mimosas. They add a beautiful texture and flavor contrast to the spread. As a lighter DESSERT, they’re fantastic on their own, or maybe with a tiny dollop of Greek yogurt and a drizzle of honey if you want something extra special. They’re not overly sweet, so they make a perfect after-dinner treat without being too heavy. And for COZY SNACKS, they are an absolute lifesaver. On a chilly afternoon, they’re just the thing to pair with a steaming mug of herbal tea. My kids honestly love these with a glass of milk, and I feel good knowing they’re getting some veggies in there too! My family has this tradition where we have them after our Saturday morning bike rides – they’re the perfect reward. I’ve also found they are surprisingly good with a light side salad for a quick and healthy lunch.
Top Tips for Perfecting Your Zucchini Feta Bars
Over the years, I’ve learned a few little tricks that make these zucchini feta bars absolutely perfect every single time. Let’s start with the ZUCCHINI PREP. This is probably the most critical step. You absolutely MUST squeeze out as much moisture as possible. If you skip this, your bars will be dense and gummy. I usually grate the zucchini, put it in a fine-mesh sieve, and press down on it with a spoon for a few minutes. Then, I grab a clean kitchen towel, put the grated zucchini in the center, twist it up, and give it a really good squeeze over the sink. It’s amazing how much water comes out! For MIXING ADVICE, remember what I said about not overmixing. Once the wet and dry ingredients meet, stir just until combined. A few flour streaks are fine. Overmixing develops gluten, leading to tough bars, and we want tender, moist bars here. For SWIRL CUSTOMIZATION, while this recipe doesn’t strictly require swirling, you can gently fold in some sun-dried tomatoes or a tablespoon of pesto if you want to add more visual appeal and flavor complexity. Just don’t overwork the batter. For INGREDIENT SWAPS, if you can’t find feta, goat cheese works well, though it will be tangier. For herbs, parsley or even a tiny bit of mint can be interesting substitutes for dill or chives, but I always come back to dill for its classic pairing with zucchini and feta. For BAKING TIPS, always trust your oven, not just the clock. Ovens can vary wildly. Use the toothpick test as your guide. If the tops start to brown too quickly, you can loosely tent the pan with foil for the last 10 minutes of baking. For GLAZE VARIATIONS, if you’re not a fan of a sweet glaze, you can skip it entirely, or just dust the cooled bars with a little powdered sugar. A lemon zest added to the glaze also provides a wonderful brightness that cuts through the richness.
Storing and Reheating Tips
One of the best things about these zucchini feta bars is how well they store, making them perfect for meal prep or for those times when a craving strikes unexpectedly. For ROOM TEMPERATURE storage, if they’re completely cooled and glazed, they’ll keep well in an airtight container for up to 2 days. Just make sure they’re fully set from the glaze. If it’s very warm where you are, refrigeration might be safer. For REFRIGERATOR STORAGE, these bars are fantastic. Store them in an airtight container for up to 5 days. They’re actually really delicious served cold straight from the fridge, especially on a warm day. If you prefer them at room temperature, just let them sit out for about 20-30 minutes before serving. For FREEZER INSTRUCTIONS, these bars freeze surprisingly well! Let them cool completely and the glaze to set. You can freeze them whole or cut them into individual bars. Wrap them tightly in plastic wrap, then in a layer of aluminum foil or place them in a freezer-safe bag. They’ll keep for up to 2-3 months. To thaw, simply transfer them from the freezer to the refrigerator overnight. For the best quality, I recommend freezing them *without* the glaze and adding a fresh glaze or a dusting of powdered sugar after thawing. If you do freeze them with the glaze, it might be a little softer when thawed, but still delicious.
Frequently Asked Questions
Final Thoughts
So there you have it – my beloved zucchini feta bars! I really hope you give these a try. They’re more than just a recipe to me; they’re a taste of comfort, a solution for garden abundance, and a guaranteed crowd-pleaser, whether that crowd is just my family or a gathering of friends. The unique combination of zucchini and feta might sound a bit unexpected, but it truly works in the most delicious way. They’re moist, flavorful, and just perfectly balanced. If you’re looking for something that’s easy to make but feels a little bit special, these are it. I can’t wait to hear what you think! If you love these, you might also want to check out my savory zucchini muffins or my easy feta and spinach quiche for more ways to enjoy these wonderful flavors. Please, please leave a comment below and let me know how your zucchini feta bars turned out, or if you have any fun variations you tried! Happy baking!
zucchini feta bars
Ingredients
Main Ingredients
- 1 medium gold potato coarsely grated
- 5 cups zucchini coarsely grated
- 1 small onion grated
- 1 tbsp dill chopped
- 1 clove garlic minced
- 2 large eggs
- 0.33 cup olive oil
- 0.75 cup almond flour
- 0.75 cup breadcrumbs
- 1 tsp salt
- black pepper to taste
- 0.33 cup water
- 5 oz feta cheese crumbled
- everything bagel seasoning
Instructions
Preparation Steps
- Preheat oven to 400℉. Line a 7x11 inch pan with parchment paper.
- DO NOT squeeze out any liquids from the veggies.
- In a large bowl, combine the potato, zucchini, onion, dill, garlic, eggs, olive oil, almond flour, breadcrumbs, salt, pepper, and water. Mix until incorporated. Fold in the crumbled feta cheese. Transfer the mixture to the prepared pan and spread out evenly. Top with everything bagel seasoning.
- Bake for 45-50 minutes or until golden brown on top. Transfer to a wire rack and allow to cool before slicing.


