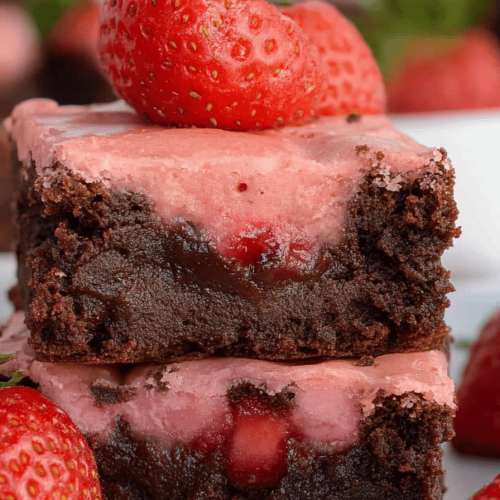
There are some recipes that just feel like a warm hug, and for me, these strawberry hand pies are absolutely one of them. I can still remember my grandmother making these on summer afternoons when the air was thick with the scent of blooming jasmine and ripe berries. She’d let me “help” by mashing the strawberries with a fork, my little hands getting sticky with juice, and the anticipation of that first bite was almost unbearable. They’re not as fussy as a full-blown pie, but they deliver all that cozy, fruity goodness in a perfect little portable package. Honestly, they’re my go-to when I’m craving something sweet and satisfying without wanting to commit to a whole dessert. They’re a little slice of sunshine, really, and way more special than a store-bought pastry, if you ask me.
What is strawberry hand pie?
So, what exactly are we talking about when I say strawberry hand pies? Think of them as individual, handheld pies, usually made with a flaky pastry dough encasing a sweet, slightly tart strawberry filling. They’re essentially mini pies that you can pick up and eat without needing a fork or plate. The name says it all, really – they’re pies that fit right in your hand! They’re brilliant because they combine that classic pie comfort with a delightful simplicity. My version usually involves a tender, buttery crust and a filling that’s bursting with fresh strawberry flavor, with just a hint of lemon to make it sing. They’re the perfect answer to a sweet craving, whether it’s for breakfast, a snack, or even a light dessert.
Why you’ll love this recipe?
I’m telling you, this recipe is a winner for so many reasons, and I’ve made it enough times to know! Firstly, the flavor. Oh, the flavor! When those strawberries are perfectly ripe, they’re like little jewels, and baking them with a touch of sugar and lemon just intensifies their natural sweetness. The crust? It’s flaky, buttery, and just melts in your mouth – it’s the kind of crust that makes people ask for the recipe itself. And speaking of ease, this is where hand pies truly shine. They’re so much less intimidating than a full-sized pie. No fancy lattice work or blind baking required, just simple folding and crimping. Plus, they’re incredibly budget-friendly, especially when strawberries are in season. You can whip up a batch of these for a fraction of the cost of even a mediocre store-bought pastry. I find myself making them year-round, but they’re especially magical during berry season. They’re a fantastic way to use up those abundant strawberries and share a little bit of joy. Honestly, what I love most about these strawberry hand pies is how they manage to be both a comforting treat and an elegant little indulgence, all at once. They’re perfect for picnics, lunchboxes, or just a quiet moment with a cup of tea.
How do I make strawberry hand pie?
Quick Overview
Making these delightful strawberry hand pies is really straightforward. We’ll start by preparing a simple, flaky pastry dough, then whip up a quick strawberry filling. Once those are ready, we’ll assemble our little pies, crimp them shut, and bake them until they’re golden brown and bubbling. The whole process is quite forgiving, and even if you’re new to baking, you’ll find yourself making perfect little hand pies in no time. It’s a relaxed way to enjoy that classic pie experience without all the fuss.
Ingredients
For the Pastry Dough: What is the
3 cups all-purpose flour, plus more for dusting
1 teaspoon salt
1 cup (2 sticks) unsalted butter, very cold and cut into ½-inch cubes
½ cup ice water, plus 1-2 tablespoons more if needed
For the Strawberry Filling:
4 cups fresh strawberries, hulled and quartered (or halved if small)
½ cup granulated sugar, or to taste
2 tablespoons cornstarch
1 tablespoon fresh lemon juice
½ teaspoon lemon zest (optional, but it adds a lovely brightness)
Pinch of salt
For the Egg Wash & Sugar Topping:
1 large egg, beaten with 1 tablespoon water
2 tablespoons granulated sugar (or coarse sugar for sparkle)
Step-by-Step Instructions
Step 1: Preheat & Prep Pan
First things first, let’s get our oven ready. Preheat it to 400°F (200°C). Then, line two baking sheets with parchment paper. This is a little step that makes cleanup a breeze and prevents any sticky messes from baking onto your pans. It’s one of those kitchen tricks that just makes life easier!
Step 2: Mix Dry Ingredients
In a large bowl, whisk together the 3 cups of flour and 1 teaspoon of salt. Make sure they’re well combined. This ensures the salt is evenly distributed, which is key for good flavor. Don’t skip this part; it sets the foundation for our dough.
Step 3: Mix Wet Ingredients
Now for the butter and water. Add the cold, cubed butter to the flour mixture. Using a pastry blender, your fingertips, or a food processor (pulsing just a few times), cut the butter into the flour until the mixture resembles coarse crumbs with some pea-sized pieces of butter still visible. This is what gives us that lovely flakiness! Then, gradually add the ice water, 1 tablespoon at a time, mixing gently with a fork until the dough just comes together. Be careful not to overmix – we’re not looking for a smooth ball just yet. If it seems a little dry, add another tablespoon of ice water. You want it to hold together when you squeeze a bit in your hand.
Step 4: Combine
Turn the dough out onto a lightly floured surface. Gently bring it together into a disc, then divide it in half. Wrap each half tightly in plastic wrap and flatten them into discs. Refrigerate for at least 30 minutes. This chill time is crucial; it lets the gluten relax and the butter firm up, which makes the dough easier to roll and ensures maximum flakiness. I often make the dough the day before and keep it in the fridge – it’s a real lifesaver!
Step 5: Prepare Filling
While the dough is chilling, let’s make our glorious strawberry filling. In a medium bowl, gently toss the quartered strawberries with ½ cup granulated sugar, 2 tablespoons cornstarch, 1 tablespoon lemon juice, lemon zest (if using), and a pinch of salt. The cornstarch is our thickening agent, so it’s important not to skip it. Let this mixture sit for about 10-15 minutes. This allows the strawberries to release some of their juices, which then helps the cornstarch dissolve and prevents lumps.
Step 6: Layer & Swirl
Now for the fun part: assembling! Take one disc of chilled dough out of the fridge. On a lightly floured surface, roll it out into a rough circle about 12-13 inches in diameter and about 1/8 inch thick. Use a round cutter or a plate to cut out circles, about 5-6 inches in diameter. You should get about 3-4 hand pie rounds from each disc. Repeat with the second disc of dough. So now you have about 6-8 circles. Spoon about 2-3 tablespoons of the strawberry filling onto one half of each circle, leaving a ½-inch border. Don’t overfill them, or you’ll have a mess! Brush the edges of the dough with the egg wash. Fold the other half of the dough over the filling to create a half-moon shape. Press the edges firmly together to seal, then crimp with a fork. Make sure they are well sealed to keep that delicious filling inside! Place the assembled hand pies onto your prepared baking sheets.
Step 7: Bake
Brush the tops of each hand pie with the remaining egg wash. This gives them that beautiful golden sheen. Sprinkle generously with sugar. Cut a small slit or two in the top of each pie with a sharp knife to allow steam to escape. This helps prevent them from puffing up too much or bursting. Bake for 25-30 minutes, or until the crust is golden brown and the filling is bubbly. If you notice any spots browning too quickly, you can loosely tent them with foil.
Step 8: Cool & Glaze
Once they’re out of the oven, let the strawberry hand pies cool on the baking sheets for about 10-15 minutes. This allows the filling to set up properly. Then, carefully transfer them to a wire rack to cool completely. If you want an extra touch, you can drizzle them with a simple glaze made from powdered sugar and a splash of milk or lemon juice once they’re completely cool. This is totally optional, but it adds a lovely sweetness and polish!
Step 9: Slice & Serve
These are best served slightly warm or at room temperature. The scent of warm strawberries and flaky pastry is just heavenly. They’re perfectly portioned for individual enjoyment, making them a breeze to serve. Just pick one up and enjoy! They look beautiful served simply on a platter, or you can add a dollop of whipped cream or a scoop of vanilla Ice Cream if you’re feeling decadent.
What to Serve It With
These strawberry hand pies are so wonderfully versatile! For breakfast, they’re an absolute treat. Imagine biting into one with a steaming mug of good coffee – pure bliss. They elevate a simple morning so much! For a lovely brunch spread, they’re perfect alongside some fresh fruit salad, yogurt parfaits, and maybe some crispy bacon. They add a beautiful sweet component that everyone will adore. As a dessert, they’re a fantastic alternative to a slice of cake. Serve them warm with a scoop of vanilla bean Ice Cream or a dollop of crème fraîche for a restaurant-worthy finish. And for those cozy afternoon snacks? They are just the ticket. They pair wonderfully with a glass of cold milk or a cup of herbal tea. My family loves them after school; they disappear in minutes! I also find they travel really well, making them ideal for picnics or potlucks.
Top Tips for Perfecting Your Strawberry Hand Pies
I’ve learned a few things over the years of making these, and I’m happy to share them so yours turn out just as amazing! For the strawberries, using fresh, ripe berries is key. If you’re using frozen, make sure to thaw them and drain off any excess liquid very well, and you might need a little more cornstarch. When preparing the filling, don’t be tempted to reduce the sugar too much if your berries are tart, as it needs to balance the cornstarch and create a lovely, jammy texture. It’s also important not to overwork the pastry dough. Overmixing develops the gluten too much, resulting in a tough crust. You want those little pockets of butter! Cold ingredients are your best friend for a flaky pastry. Keep your butter, water, and even your bowl and flour cold. If your kitchen is warm, don’t hesitate to pop your flour and butter in the freezer for a bit before starting. When it comes to rolling out the dough, don’t aim for perfectly round shapes; slightly rustic is part of their charm! Ensure you seal the edges really well; a good crimp with a fork is your best defense against filling leakage. If your dough starts to get too soft while you’re working with it, pop it back in the fridge for 10-15 minutes to firm up. For baking, if you notice the crust browning too quickly before the filling is bubbling, a loose tent of foil will protect it. And finally, resist the urge to eat them straight away if they’re piping hot! Letting them cool for a bit allows the filling to set, making them much easier to eat and enjoy.
Storing and Reheating Tips
These strawberry hand pies are surprisingly resilient! Once they’ve cooled completely, you can store them at room temperature in an airtight container for up to 2 days. They’re still delicious, though the crust might soften a little. If you plan to keep them longer, or if your kitchen is particularly warm, refrigerating them is a better option. Store them in an airtight container in the fridge for up to 4-5 days. They’ll maintain their quality nicely. For longer storage, these hand pies freeze beautifully! Once completely cooled, wrap each pie tightly in plastic wrap, then in aluminum foil, or place them in a freezer-safe bag. They’ll keep well in the freezer for up to 2-3 months. To reheat, if they’re from the fridge, you can warm them gently in a 300°F (150°C) oven for about 5-10 minutes until warmed through. If reheating from frozen, you might need a bit longer, about 15-20 minutes, or until heated through. This method really brings back that lovely crispness to the crust. I usually wait to add any glaze until just before serving, especially if I’m reheating, to keep it fresh and appealing.
Frequently Asked Questions
Final Thoughts
I truly hope you give these strawberry hand pies a try. They’re more than just a dessert; they’re a little piece of nostalgia and a whole lot of simple joy. That perfect balance of flaky pastry and sweet, bright strawberry filling is just irresistible, and the fact that they’re so easy to make makes them a real winner in my book. Whether you’re looking for a special breakfast treat, a delightful dessert, or just a comforting snack, these little golden treasures deliver every time. They’re a reminder that sometimes, the simplest recipes are the most rewarding. If you love these, you might also enjoy my [link to other berry recipe, e.g., Raspberry Crumble Bars] or my [link to other pie crust recipe, e.g., Perfect Pie Crust]. I can’t wait to hear how yours turn out! Please leave a comment below and share your experience, or tag me in your photos if you share them on social media. Happy baking!
Strawberry Hand Pies
Ingredients
Main Ingredients
- 2 cups Fresh strawberries, hulled and sliced
- 0.5 cup Granulated sugar
- 2 tablespoons Cornstarch
- 1 package Refrigerated pie crusts (2 crusts)
- 1 tablespoon Butter, melted
- tablespoon Egg wash (1 egg beaten with 1 tablespoon water) For brushing
Instructions
Preparation Steps
- Preheat oven to 375°F (190°C). In a bowl, combine sliced strawberries, sugar, and cornstarch. Let it sit for 10 minutes.
- On a lightly floured surface, unfold one pie crust. Use a cookie cutter or a knife to cut out desired shapes. Place half of the shapes on a baking sheet.
- Spoon the strawberry mixture onto the center of the shapes on the baking sheet. Brush the edges with melted butter.
- Top with the remaining pie crust shapes. Crimp the edges with a fork to seal. Brush with egg wash.
- Bake for 20-25 minutes, or until golden brown. Let cool before serving.