You know those days? The ones where you just *need* something sweet, something vibrant, something that feels like a mini-vacation in your own kitchen? That’s precisely when I reach for this strawberry margarita cheesecake. It’s not just a dessert; it’s a mood booster, a celebration waiting to happen, and honestly, it’s become my go-to when I want to impress without breaking a sweat. I remember the first time I tried to combine those bright, zesty margarita flavors with the creamy indulgence of cheesecake. I was a little nervous, I won’t lie! Would it be too tart? Too boozy? But oh my goodness, the moment I took that first bite, all my worries melted away. It’s got that perfect balance – the tang of lime, the sweet burst of strawberry, all wrapped up in a luxuriously smooth cheesecake filling. It’s a bit like a deconstructed cocktail, but in the best possible way, and it always disappears faster than you can say “¡Salud!”
What is strawberry margarita cheesecake?
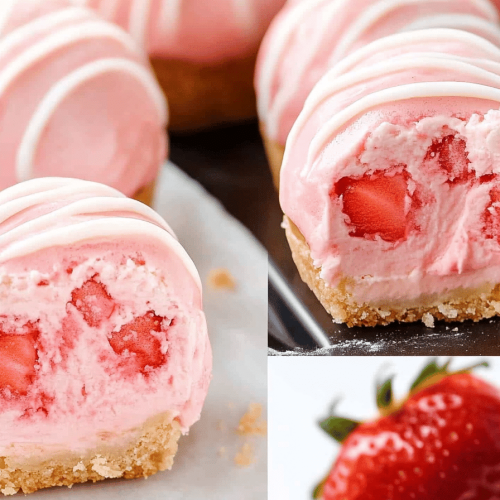
So, what exactly *is* this magical creation? Think of it as your favorite classic cheesecake, but with a seriously fun, tropical twist. We’re taking all those beloved elements – the rich, creamy filling, the buttery graham cracker crust – and infusing them with the irresistible flavors of a strawberry margarita. That means a bright, zesty kick from fresh lime juice and zest, a delightful sweetness and color from fresh strawberries, and just a hint of something special, like a whisper of tequila and triple sec, to really capture that cocktail vibe. It’s not overwhelmingly boozy, mind you! It’s just enough to give it that authentic margarita essence. We’re talking about a dessert that’s both sophisticated enough for a dinner party and utterly comforting for a quiet night in. It’s essentially a party in cake form, and who doesn’t love a party?
Why you’ll love this recipe?
What are some of the reasons why I love this strawberry margarita Cheesecake Recipe?flavor is just out of this world. You get that unmistakable tang from the lime that cuts through the richness of the cream cheese, a beautiful sweetness from the strawberries that bursts with every bite, and that subtle, sophisticated note from the tequila and triple sec. It’s like a vacation for your taste buds, a perfect balance of sweet, tart, and creamy. And the simplicity? Don’t let the fancy flavors fool you. I’ve streamlined this recipe so many times over the years, and I can honestly say it’s surprisingly straightforward. Even if you’re not a seasoned baker, you can absolutely nail this. The steps are logical, and I’ve added little tips throughout to make sure you get that perfect texture every time. What I love most is that it feels special without requiring hours in the kitchen. Plus, it’s pretty cost-effective! Most of the ingredients are pantry staples, and fresh strawberries are usually readily available, especially when they’re in season. The versatility is another huge win. While I adore this cheesecake as is, you can easily adapt it. Craving more strawberry flavor? Add a strawberry puree to the batter! Want a different citrusy punch? Swap some lime for lemon. It’s a fantastic base for so many delicious variations. Honestly, it just hits all the right notes for me: incredible taste, manageable effort, and delightful flexibility. It truly is my favorite way to capture that margarita spirit in a dessert form.
How do you make strawberry margarita cheesecake?
Quick Overview
Making this strawberry margarita cheesecake is a joyful process that starts with a simple graham cracker crust, followed by a luscious, lime-infused Cream Cheese Filling swirled with vibrant strawberry goodness. We’ll bake it until it’s just set, then let it chill to perfection. The final flourish is a light, zesty glaze that ties all the flavors together beautifully. It’s designed to be approachable, so don’t be intimidated – the results are so worth it!
Ingredients
For the Graham Cracker Crust:
2 cups graham cracker crumbs (about 14-16 full sheets)
1/4 cup granulated sugar
1/2 cup unsalted butter, melted
For the Cheesecake Filling:
3 (8-ounce) packages Cream Cheese, softened to room temperature
1 1/4 cups granulated sugar
1/4 cup fresh lime juice (from about 2-3 limes)
1 tablespoon lime zest (from about 2 limes)
2 large eggs, at room temperature
1 teaspoon vanilla extract
1 tablespoon triple sec or orange liqueur (optional, but recommended for authentic flavor)
1/2 cup fresh strawberries, hulled and pureed (about 1/4 cup puree)
For the Strawberry Swirl:
1/2 cup fresh strawberries, finely diced
1 tablespoon granulated sugar
1 teaspoon fresh lime juice
For the Lime Glaze:
1 cup powdered sugar
2-3 tablespoons fresh lime juice
1 teaspoon lime zest
Step-by-Step Instructions
Step 1: Preheat & Prep Pan
First things first, let’s get your oven ready. Preheat it to 325°F (160°C). Now, grab a 9-inch springform pan. This is super important because it makes releasing the cheesecake so much easier. Lightly grease the bottom and sides of the pan. Some people like to wrap the outside of the springform pan with a couple of layers of heavy-duty aluminum foil. This is crucial if you plan on using a water bath (which I highly recommend for the creamiest, most evenly baked cheesecake, preventing cracks!). The foil creates a barrier so no water seeps into the pan.
Step 2: Mix Dry Ingredients
In a medium bowl, combine your graham cracker crumbs and granulated sugar. Give it a good whisk to make sure there are no clumps and the sugar is evenly distributed. This ensures a consistent, delicious crust. I always like to do this step first to get it out of the way and ensure everything is ready to go.
Step 3: Mix Wet Ingredients
In a large bowl, beat the softened Cream Cheese with an electric mixer on medium speed until it’s completely smooth and creamy. Make sure there are absolutely no lumps! This is key for that velvety texture. Gradually add the granulated sugar and continue beating until well combined and fluffy. Then, add the fresh lime juice, lime zest, vanilla extract, and the triple sec (if using). Beat again until everything is smoothly incorporated. Scrape down the sides of the bowl a couple of times to make sure it’s all mixed in.
Step 4: Combine
Beat in the eggs, one at a time, mixing on low speed just until each egg is incorporated. It’s super important not to overmix here. Overmixing can incorporate too much air, which can lead to cracks in your cheesecake. Just mix until the yolk disappears. This is where you get that luxurious, dense, creamy texture we all crave.
Step 5: Prepare Filling
Now, take about two-thirds of your Cream Cheese mixture and pour it into the prepared springform pan. Gently smooth the top with a spatula. In a separate small bowl, whisk together the strawberry puree. This is where the magic happens! Gently dollop spoonfuls of the strawberry puree over the cream cheese filling in the pan. Don’t worry about being neat at this stage; it’s going to get swirled!
Step 6: Layer & Swirl
Pour the remaining two-thirds of the plain cream cheese mixture over the dollops of strawberry puree. Now for the fun part: swirling! Take a butter knife or a skewer and gently swirl the strawberry puree into the cream cheese batter. Make figure-eights and gentle curves. You want to create beautiful marbling, but don’t overdo it, or you’ll end up with just pink cheesecake. Aim for distinct swirls. Then, gently sprinkle the diced strawberries over the top for little pockets of intense strawberry flavor.
Step 7: Bake
If you’re using a water bath, carefully place your foil-wrapped springform pan into a larger roasting pan. Pour enough hot water into the roasting pan to come about halfway up the sides of the springform pan. Carefully transfer the entire setup to the preheated oven. Bake for 50-65 minutes. You’ll know it’s done when the edges are set but the center still has a slight jiggle when you gently shake the pan. It will continue to set as it cools. If you’re not using a water bath, just bake directly in the oven for the same amount of time. Keep an eye on it to prevent overbaking.
Step 8: Cool & Glaze
Once baked, turn off the oven, crack open the oven door about an inch, and let the cheesecake cool inside the oven for about an hour. This gradual cooling process helps prevent cracks. After an hour, remove the cheesecake from the oven and let it cool completely on a wire rack. Once it’s at room temperature, cover it loosely with plastic wrap and refrigerate for at least 4-6 hours, or preferably overnight. This is crucial for the cheesecake to fully set and develop its flavor. For the glaze, whisk together the powdered sugar, lime juice, and lime zest until smooth and pourable. Drizzle this over the chilled cheesecake right before serving.
Step 9: Slice & Serve
To get those clean slices everyone loves, run a thin, sharp knife under hot water, wipe it dry, and then slice. Repeat this with each cut. This prevents the knife from dragging and tearing the beautiful cheesecake. Serve chilled. The contrast of the cool, creamy cheesecake with the bright, zesty glaze is just divine. Garnish with a few fresh strawberries or a thin slice of lime for an extra pop of color and freshness.
What to Serve It With
This strawberry margarita cheesecake is a showstopper all on its own, but pairing it with the right accompaniments can elevate the entire experience. For breakfast, imagine a slice alongside a freshly brewed cup of coffee – the citrusy notes in the cheesecake actually cut through the richness of the coffee beautifully. A few fresh berries on the side add a lovely freshness. For a more elaborate brunch spread, this cheesecake feels incredibly elegant. Serve it with a dollop of whipped cream infused with a hint of lime or a sprinkle of toasted coconut flakes. A sparkling mimosa or a refreshing glass of iced tea would be perfect partners. As a decadent dessert, it’s pure bliss. I love serving it with a small scoop of vanilla bean ice cream, or even a raspberry sorbet for an extra fruity kick. A drizzle of strawberry coulis can add another layer of flavor and visual appeal. And for those spontaneous cozy snacks? A simple slice, enjoyed with a glass of cold milk or even a sweet white wine, is pure comfort. My family loves it when I just cut a small wedge and enjoy it while watching a movie. It’s that kind of versatile treat that fits every moment!
Top Tips for Perfecting Your Strawberry Margarita Cheesecake
I’ve baked this strawberry margarita cheesecake more times than I can count, and over the years, I’ve picked up a few tricks that really make a difference. For the cheesecake filling, the most crucial step is ensuring your cream cheese is truly at room temperature. I mean *really* soft. If it’s cold, you’ll end up with lumps, and no one wants a lumpy cheesecake! I often leave mine out for a good 2-3 hours. Also, resist the urge to overmix once you add the eggs. Just mix until they’re incorporated. That’s the secret to that silky-smooth texture and preventing cracks. When it comes to the strawberry swirl, I like to make sure my strawberry puree isn’t too watery. If it is, you can simmer it down a bit to thicken it before adding it to the batter. This prevents the cheesecake from becoming too moist. For the swirl customization, don’t be afraid to get creative! You can do more intricate patterns, or just gentle dollops and a few swipes with a knife. The key is to create visual appeal without overworking the batter. If you’re using fresh diced strawberries on top, make sure they’re not too large, otherwise, they can sink to the bottom during baking. For ingredient swaps, if you’re not a fan of triple sec or don’t have it, a splash of good quality orange juice works well as a substitute, though it won’t have quite the same depth. And for the crust, while graham crackers are classic, I’ve experimented with digestive biscuits or even vanilla wafers, and they’re both delicious! When it comes to baking, the water bath is my best friend. It creates a humid environment that bakes the cheesecake gently and evenly, drastically reducing the chances of cracks and ensuring that incredibly creamy, dense texture. If you skip the water bath, keep a close eye on it. And remember that jiggle in the center – it’s supposed to be there! It’s the sign of a perfectly baked cheesecake that will set up as it cools.
Storing and Reheating Tips
One of the best things about this strawberry margarita cheesecake is how well it keeps, making it perfect for making ahead of time. Once completely chilled, you can store it, covered loosely with plastic wrap or in an airtight container, at room temperature for up to 2 hours. After that, it’s best to move it to the refrigerator. In the refrigerator, it will stay wonderfully fresh for up to 4-5 days. I usually keep it in the springform pan with the sides removed and just covered with plastic wrap, or I transfer any leftovers to an airtight container. The flavor actually tends to deepen and mellow beautifully overnight, so it can be even better on the second day! If you need to store it for longer, freezing is an option. For freezer instructions, it’s best to freeze the cheesecake *before* adding the glaze. Wrap the completely cooled and chilled cheesecake tightly in a layer of plastic wrap, followed by a layer of aluminum foil. It can be frozen for up to 1-2 months. To thaw, remove the foil and plastic wrap and let it thaw overnight in the refrigerator. You can then add the glaze. For the glaze timing advice, I always recommend adding the glaze just before serving, especially if the cheesecake has been refrigerated or frozen. This ensures the glaze stays fresh and bright. If you’re serving it right away after chilling, apply the glaze then. If it’s been refrigerated overnight, give it a quick whisk before drizzling.
Frequently Asked Questions
Final Thoughts
There you have it – my beloved strawberry margarita cheesecake! It truly is a dessert that brings a smile to everyone’s face. The combination of bright, zesty lime, sweet strawberries, and that rich, creamy cheesecake base is just pure magic. I love how it feels so indulgent and celebratory, yet it’s perfectly approachable for any home baker. It’s a fantastic way to bring a little bit of that vacation feeling right into your kitchen, no matter the season. If you’re a fan of cheesecake, or if you just love a good citrusy, fruity dessert, you absolutely have to give this one a try. You might find yourself reaching for this recipe again and again, just like I do! It’s become a staple for birthdays, holidays, or just because. If you end up making this, I would absolutely adore hearing all about it in the comments below! Share your tips, your variations, or just tell me how much you enjoyed it. Happy baking, and I hope your strawberry margarita cheesecake turns out as wonderfully as mine always does!
Strawberry Margarita Cheesecake
Ingredients
Crust
- 1.5 cup Graham cracker crumbs
- 0.25 cup Granulated sugar
- 6 tablespoons Unsalted butter, melted
Filling
- 32 ounces Cream cheese, softened
- 1.25 cup Granulated sugar
- 0.5 cup Sour cream
- 0.25 cup Tequila
- 0.25 cup Lime juice
- 1 teaspoon Lime zest
- 1 cup Strawberry puree
Instructions
Make the Crust
- Preheat oven to 350°F (175°C).
- Combine graham cracker crumbs, sugar, and melted butter in a bowl. Press into the bottom of a 9-inch springform pan.
- Bake for 8-10 minutes.
Make the Filling
- In a large bowl, beat cream cheese and sugar until smooth.
- Beat in sour cream, tequila, lime juice, and lime zest.
- Gently fold in strawberry puree.
- Pour filling over the crust.
- Bake for 55-65 minutes, or until the edges are set and the center jiggles slightly.
- Let cool completely, then refrigerate for at least 4 hours.