You know, there are some recipes that just feel like coming home, right? For me, that’s always been strawberry shortcake. The smell of warm, crumbly cake, the burst of fresh, juicy strawberries, and that cloud of Whipped Cream… pure bliss! But lately, I’ve been playing around in the kitchen, trying to give some of our favorite treats a fun, new spin. And oh my goodness, have I landed on a winner! I’m so excited to share this Strawberry Shortcake Sushi with you. It’s got all the beloved flavors of classic strawberry shortcake, but presented in this super cute, bite-sized sushi roll form. It’s almost too pretty to eat, and trust me, it’s surprisingly simple to whip up, making it perfect for everything from a special occasion to just a fun weekend treat with the family. Think of it as your favorite dessert, all dressed up and ready for a party!
What is strawberry shortcake sushi?
So, what exactly is Strawberry Shortcake Sushi? It’s not *actual* sushi with raw fish, of course! Instead, we’re taking the essence of traditional strawberry shortcake and reimagining it as a delightful roll. Imagine a soft, slightly sweet cake “rice” that’s delicately flavored, then layered with a luscious strawberry filling and a creamy swirl. We then roll it all up, just like sushi, and slice it into adorable little rounds. The name just kind of clicked because of the rolling technique! It’s essentially deconstructed strawberry shortcake, but with a playful presentation that’s guaranteed to get smiles. It’s a conversation starter, for sure, and a fantastic way to enjoy all those classic shortcake flavors without needing to bake a whole cake from scratch.
Why you’ll love this recipe?
I love strawberry shortcake sushi, and I’m betting you’ll fall in love with it too!flavor is just out of this world. You get that lovely tender cake texture, the bright sweetness of the strawberries, and a hint of creamy richness that just sings. It’s familiar yet excitingly new. Then there’s the simplicityOnce you get the hang of rolling, it’s incredibly straightforward. I even find the rolling process kind of meditative!cost-effective. You’re using everyday ingredients you likely already have in your pantry, making it an affordable way to make a truly impressive dessert. What I love most about it is its versatility. You can customize the filling, play with the cake flavors, and serve it in so many ways – I’ll get into that more later! Compared to a traditional shortcake that can sometimes feel a bit rustic, this version feels a little more elegant, even though it’s so easy. It’s a fun alternative to cupcakes or a pie, and it’s perfect when you’re craving something sweet at 10 pm but don’t want to bake a whole cake. This one’s a lifesaver on busy nights when you want something special without all the fuss!
How to Make Strawberry Shortcake Sushi
Quick Overview
Making this Strawberry Shortcake Sushi is a delightful adventure! We’ll start by baking a light, tender cake that will form our “rice.” While that bakes and cools, we’ll whip up a quick and flavorful strawberry filling and a simple creamy element. Once everything is prepped, it’s all about layering, rolling, and slicing. It sounds fancy, but trust me, it’s a really fun process that results in a stunning dessert that’s surprisingly easy to achieve. The key is to have all your components ready before you start assembling. It’s a dessert that truly looks and tastes like you spent hours on it, but it’s actually quite manageable!
Ingredients
For the Main Batter (The “Cake Rice”):
2 cups all-purpose flour: Make sure it’s fresh! Sift it if you want an extra light texture, though I often skip this step when I’m in a hurry and it’s still fantastic.
1 cup granulated sugar: For that perfect sweetness.
2 teaspoons baking powder: This is what gives our cake its lift.
1/2 teaspoon salt: Balances out the sweetness beautifully.
1/2 cup unsalted butter, softened: Really important for texture. Make sure it’s truly soft, not melted!
2 large eggs: Room temperature is best for an even mix.
1 cup milk: Whole milk gives the richest flavor, but I’ve tested this with almond milk and it actually made it even creamier! So use what you have.
1 teaspoon vanilla extract: The classic flavor booster.
For the Filling:
2 cups fresh or frozen strawberries, chopped: If using frozen, no need to thaw completely; they’ll break down beautifully.
1/4 cup granulated sugar (or to taste): Adjust based on how sweet your strawberries are.
1 tablespoon lemon juice: Brightens up the strawberry flavor.
For the Creamy Swirl:
1 cup heavy whipping cream: Make sure it’s very cold!
2 tablespoons powdered sugar: For a delicate sweetness.
1/2 teaspoon vanilla extract: Enhances the creamy flavor.
Step-by-Step Instructions
Step 1: Preheat & Prep Pan
First things first, let’s get our oven preheated to 350°F (175°C). Then, grab a 9×13 inch baking pan. You’ll want to grease it really well with butter or cooking spray and then lightly flour it. This helps ensure our cake comes out cleanly, which is important for the next steps. I usually just tap out any excess flour. You want a nice, even surface for baking.
Step 2: Mix Dry Ingredients
In a large mixing bowl, whisk together the flour, 1 cup of granulated sugar, baking powder, and salt. Give it a good stir to make sure everything is well combined. This ensures that the leavening and salt are distributed evenly throughout the batter, which leads to a consistent texture in our final cake.
Step 3: Mix Wet Ingredients
In a separate medium bowl, cream together the softened butter until it’s light and fluffy. Then, beat in the eggs one at a time, making sure to scrape down the sides of the bowl as you go. Stir in the milk and vanilla extract. You want this mixture to be smooth and well-emulsified. Don’t worry if it looks a little separated; it will come together.
Step 4: Combine
Now, it’s time to bring the wet and dry ingredients together. Gradually add the wet ingredients to the dry ingredients, mixing on low speed (or by hand with a spatula) until just combined. Be careful not to overmix! Overmixing can develop the gluten too much, leading to a tougher cake. We’re aiming for a smooth, but not overly beaten, batter. A few small lumps are perfectly fine.
Step 5: Prepare Filling
While the cake batter is resting for a moment, let’s make our strawberry filling. In a saucepan, combine the chopped strawberries, 1/4 cup of sugar, and lemon juice. Cook over medium heat, stirring occasionally, until the strawberries have softened and released their juices, and the mixture has thickened slightly. This should take about 8-10 minutes. You want it jam-like but not too stiff. Let it cool completely.
Step 6: Layer & Swirl
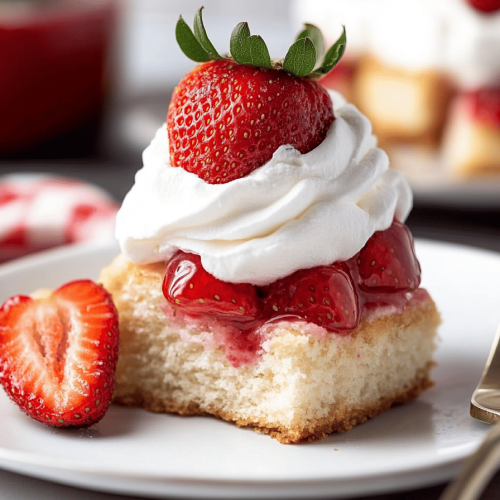
Once the cake is baked and still warm in the pan, spread the cooled strawberry filling evenly over the top. Then, in a separate bowl, whip the heavy cream with the powdered sugar and vanilla until stiff peaks form. Dollop spoonfuls of the Whipped Cream over the strawberry filling and use a knife or skewer to gently swirl it into the strawberries. Don’t over-swirl; we want distinct ribbons of cream and strawberry. This creates that beautiful marbled effect reminiscent of a lovely dessert.
Step 7: Bake
Bake the cake in your preheated oven for 25-30 minutes, or until a toothpick inserted into the center comes out clean. The top should be golden brown and spring back lightly when touched. Ovens can vary, so keep an eye on it during the last 10 minutes. If it’s browning too quickly, you can loosely tent it with foil.
Step 8: Cool & Glaze
Let the cake cool in the pan for about 10-15 minutes. This is crucial for the structure. Then, carefully invert the cake onto a wire rack to cool completely. Once fully cooled, you can add an optional simple glaze if you like – maybe a simple powdered sugar and milk drizzle. I sometimes skip this if I feel the whipped cream swirl is enough, but a light drizzle adds a lovely finished touch.
Step 9: Slice & Serve
Once the cake is completely cool and any glaze is set, it’s time to slice! Use a sharp knife to cut the cake into individual “sushi” rolls. I usually aim for rectangles about 1.5 inches wide and 2 inches long. The swirls should be visible on the cut edges. Arrange them on a platter and serve immediately. The texture is best when it’s fresh!
What to Serve It With
This Strawberry Shortcake Sushi is so versatile, it’s fantastic for almost any occasion! For Breakfast, I love serving a couple of these with a hot cup of coffee. It feels like such a special treat to start the day. The light cake and fresh fruit are perfect for a morning pick-me-up. For Brunch, these really shine! Arrange them on a tiered stand with some fresh fruit salad and mimosas. The elegant presentation makes it feel truly special. As Dessert, it’s a showstopper. Serve it after a nice dinner with a scoop of vanilla bean Ice Cream or a drizzle of extra whipped cream. The flavors are comforting and satisfying. And for those Cozy Snacks moments? This is perfect! If I’m craving something sweet in the afternoon or evening, these little bites are just the ticket. They’re satisfying without being too heavy. My kids also love them as a special after-school snack. We’ve even made them for birthday parties, and they always disappear in minutes!
Top Tips for Perfecting Your Strawberry Shortcake Sushi
I’ve made this Strawberry Shortcake Sushi more times than I can count, and along the way, I’ve picked up a few tricks that I think will really help you nail it. When it comes to the strawberries, make sure they are cooked down enough to be jammy. If they’re too liquidy, your rolls might get soggy. Cooking them until they’re thick and glossy is key. For the creamy swirl, it’s really important that your cream is ice cold and that you don’t over-whip it. Stop once you reach stiff peaks; if you go too far, it can start to turn buttery. I learned this lesson the hard way after a batch went a little too far! Don’t be afraid to get creative with the swirl. You can use a fork, a skewer, or even a toothpick to create different patterns. It’s all about the visual appeal! For ingredient swaps, if you don’t have milk, a non-dairy alternative like oat milk or soy milk works well, though it might slightly alter the richness. I haven’t personally tested it with gluten-free flour yet, but I imagine a good 1:1 blend would work, though you might need to adjust the liquid slightly. Baking is pretty straightforward, but remember that ovens vary. If you notice your cake is browning too quickly on top, tent it loosely with aluminum foil. And for slicing, a sharp, clean knife is your best friend. Wipe it clean between cuts if needed to keep those beautiful swirls looking crisp. This is a recipe where a little patience really pays off!
Storing and Reheating Tips
Proper storage is key to keeping your Strawberry Shortcake Sushi tasting its best. If you have any leftovers (which is rare in my house!), I usually store them at Room Temperature for up to 24 hours, loosely covered with plastic wrap or in an airtight container. The cake holds up well for a day. For longer storage, I recommend Refrigerator Storage. Keep them in an airtight container in the fridge for up to 3 days. They’ll still be delicious, though the cake might be a little denser. When it comes to Freezer Instructions, I’ve found they freeze reasonably well, though I prefer them fresh. If you do freeze them, wrap each individual roll tightly in plastic wrap, then place them in a freezer-safe bag or container for up to 2 weeks. Thaw them overnight in the refrigerator before serving. For the glaze, I always recommend adding it just before serving if you want it to stay fresh and slightly drippy. If you’re storing them, it’s best to add any glaze just before you plan to eat them. If they’re already glazed and stored, the glaze might become a bit sticky or soak into the cake.
Frequently Asked Questions
Final Thoughts
I really hope you give this Strawberry Shortcake Sushi a try! It’s such a fun and delightful way to enjoy the classic flavors we all love. It’s proof that you don’t need to be a master baker to create something impressive and delicious. The joy it brings, whether it’s the surprised look on someone’s face when they see it or the happy sighs as they take their first bite, is what cooking is all about for me. It’s a recipe that’s become a staple in my kitchen, especially when I want to add a little extra magic to our meals. If you’re a fan of strawberry shortcake, I have a feeling you’re going to adore this creative twist. And if you enjoyed this, you might also like my recipe for [Link to another relevant recipe, e.g., “No-Bake Berry Cheesecake Bars”] or my [Link to another relevant recipe, e.g., “Lemon Blueberry Scones“]. I can’t wait to hear what you think! Let me know in the comments below how yours turned out, or if you discovered any fun variations. Happy baking!
Strawberry Shortcake Sushi
Ingredients
Main Ingredients
- 1 cup Sushi Rice, cooked and cooled
- 0.5 cup Heavy Cream
- 2 tablespoons Powdered Sugar
- 1 teaspoon Vanilla Extract
- 1 pint Fresh Strawberries, sliced
- 2 tablespoons Strawberry Jam
Instructions
Preparation Steps
- In a bowl, combine heavy cream, powdered sugar, and vanilla extract. Beat until stiff peaks form.
- Lay a sheet of plastic wrap on a bamboo sushi mat. Spread a thin layer of cooked sushi rice over the plastic wrap.
- Spread a thin layer of strawberry jam over the rice.
- Arrange sliced strawberries along the center of the rice.
- Using the bamboo mat, roll the sushi tightly.
- Slice the roll into 6-8 pieces. Top with whipped cream and more sliced strawberries.