You know those nights? The ones where you stare into the fridge with absolutely zero inspiration, and the thought of a complicated meal feels like climbing Mount Everest in flip-flops? Yeah, me too. For a long time, those nights usually ended with me ordering takeout, feeling a mix of defeat and mild guilt. But then, I discovered the magic of stuffed chicken breasts. And not just any stuffed chicken breasts, but *these* stuffed chicken breasts. They’ve honestly become my culinary superpower. They look fancy, they taste incredible, and the best part? They’re shockingly easy. Seriously, if you can chop a few things and turn on your oven, you’re practically there. It’s like a secret weapon in my recipe arsenal, and I’m so excited to finally share it with you. Think of it as a hug on a plate, perfect for a busy Tuesday or even a relaxed Sunday dinner. This recipe is truly a game-changer, and I’ve been making it for years, tweaking it just so, until it was absolutely perfect. It’s honestly one of those dishes that I crave, and it never fails to impress, even my pickiest eaters!
What is stuffed chicken breast?
So, what exactly are stuffed chicken breasts? At its heart, it’s exactly what it sounds like: chicken breasts that have been lovingly filled with something delicious. We’re talking about taking a lean chicken breast, creating a little pocket (don’t worry, it’s easier than it sounds!), and then stuffing it with a flavorful mixture. This filling can be anything from creamy cheese and spinach to savory herbs and sun-dried tomatoes, or even a little bit of everything good! The beauty of this dish is its incredible versatility. It’s not just one thing; it’s a concept that can be adapted to whatever you have on hand or whatever flavors you’re craving. It’s essentially a way to elevate a simple piece of chicken into something truly special and a bit more exciting than just a plain ol’ grilled or baked breast. Think of it as a delicious little surprise waiting inside each bite. It’s a hug for your taste buds, really!
Why you’ll love this recipe?
Okay, let’s talk about why this particular stuffed chicken breast recipe is a keeper. First and foremost, the flavor. Oh. My. Goodness. We’re talking juicy, tender chicken that’s packed with a creamy, savory filling that just melts in your mouth. The combination of seasonings in the filling, plus the perfectly cooked chicken, creates a symphony of tastes that’s truly satisfying. It’s the kind of meal that makes you close your eyes and just savor every single bite. And then there’s the simplicity. I know, I know, “stuffed” sounds like it might be complicated, but trust me, this is surprisingly straightforward. The steps are logical, and you don’t need any fancy techniques. It’s the kind of recipe that I can whip up even after a long day, and it genuinely makes me feel like I’ve accomplished something amazing in the kitchen. Plus, it’s incredibly budget-friendly! Chicken breasts are usually a great staple, and the filling ingredients are typically things you might already have in your pantry or can grab without breaking the bank. What I really love most about this recipe is its versatility. You can swap out ingredients in the filling to suit your mood or what’s in season. It’s also a fantastic dish for entertaining because it looks so impressive, but you don’t have to spend hours slaving away. It’s a true crowd-pleaser, and my family devours it every single time. It’s a step up from a simple Baked Chicken, but without all the fuss. It’s just… perfect!
How do I make stuffed chicken breasts?
Quick Overview
The process for these incredible stuffed chicken breasts is really quite simple. You’ll butterfly and gently pound your chicken breasts to create a surface for the filling, mix up a wonderfully seasoned filling, carefully stuff and secure the chicken, and then bake it until it’s golden brown and cooked through. The beauty is in its straightforward nature – no complicated steps, just pure deliciousness waiting to happen. This method ensures a perfectly cooked, Juicy Chicken breast every single time, with a flavorful surprise tucked inside. It’s a lifesaver on those evenings when you need a satisfying meal without the stress.
Ingredients
For the main chicken breasts: For the main chicken breasts: For the main chicken breasts: For the main chicken
4 boneless, skinless chicken breasts (about 6-8 ounces each). I always look for ones that are relatively uniform in size so they cook evenly. If they’re super thick, you might need to gently pound them a bit thinner.
1 tablespoon olive oil. Just a good quality olive oil will do.
Salt and freshly ground Black Pepper. To taste, of course! Don’t be shy with the seasoning.
For the Flavorful Filling:
8 ounces cream cheese, softened. Make sure it’s nice and soft so it’s easy to mix.
1/2 cup grated Parmesan cheese. Use the real stuff, it makes a difference!
2 cloves garlic, minced. Fresh garlic is key for that punch of flavor.
1/4 cup finely chopped fresh spinach (or frozen, thawed and squeezed dry). I love using fresh spinach, but frozen works in a pinch! Just make sure you get all the excess water out if you use frozen.
2 tablespoons chopped sun-dried tomatoes (oil-packed, drained). These add a lovely tang and chew.
1/4 teaspoon red pepper flakes (optional). For a little kiss of heat!
Salt and freshly ground black pepper, to taste.
For the Simple Glaze:
2 tablespoons melted butter.
1 teaspoon dried Italian seasoning. Or whatever herbs you love!
Pinch of garlic powder.
Step-by-Step Instructions
Step 1: Preheat & Prep Pan
First things first, let’s get the oven ready. Preheat it to 375°F (190°C). While the oven heats up, grab a baking dish, something like a 9×13 inch casserole dish works perfectly. You don’t need to grease it or anything for this step, just have it ready.
Step 2: Prepare the Chicken Breasts
Now, for the star of the show: the chicken. Lay your chicken breasts flat on a cutting board. You’re going to carefully slice them horizontally, about halfway through, to create a pocket. Think of it like opening a book. Be gentle so you don’t cut all the way through! Once they’re butterflied, you can place a piece of plastic wrap over them and gently pound them with a meat mallet or even the bottom of a heavy pan until they’re about 1/2 inch thick. This helps them cook more evenly and makes them easier to stuff. Season both sides generously with salt and pepper. I always do this when prepping chicken; it makes a world of difference in the final flavor.
Step 3: Mix the Filling Ingredients
In a medium bowl, combine the softened cream cheese, grated Parmesan cheese, minced garlic, chopped spinach, and chopped sun-dried tomatoes. If you’re using red pepper flakes, toss them in now too. Season with a pinch of salt and pepper. Mix everything together until it’s well combined and creamy. Taste it! This is your chance to adjust the seasoning if needed. If it’s too thick, a tiny splash of milk or cream can loosen it up, but usually, the softened cream cheese does the trick.
Step 4: Stuff the Chicken Breasts
Lay your seasoned chicken breasts open on your cutting board. Spoon about 2 tablespoons (or a generous dollop) of the filling mixture onto one half of each butterflied chicken breast. You don’t want to overstuff them, or the filling will ooze out everywhere. Fold the other half of the chicken breast over the filling, enclosing it. To make sure everything stays put during baking, you can secure the edges with toothpicks. I usually just tuck the edges in as best as I can, and if a little filling peeks out, that’s okay – it often gets deliciously caramelized!
Step 5: Prepare for Baking
Arrange the stuffed chicken breasts in your prepared baking dish, seam-side up if you can manage, to help keep the filling contained. Drizzle the 1 tablespoon of olive oil over the chicken breasts. This will help them get a nice golden-brown color as they bake.
Step 6: Mix the Glaze
In a small bowl, whisk together the melted butter, Italian seasoning, and garlic powder. This is a super simple glaze that adds a lovely herby flavor and helps the chicken brown beautifully. It’s like a little flavor boost right before baking.
Step 7: Bake the Chicken
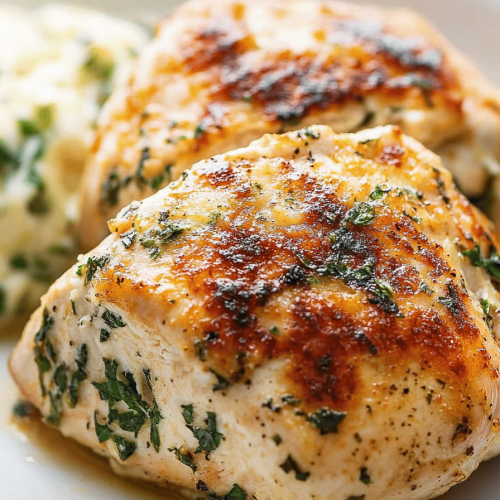
Brush the tops of the stuffed chicken breasts generously with the butter and herb glaze. Pop the baking dish into your preheated oven. Bake for 25-30 minutes, or until the chicken is cooked through and the internal temperature reaches 165°F (74°C) when checked with a meat thermometer. The exact time will depend on the thickness of your chicken breasts. You’ll know they’re done when they’re golden brown and the juices run clear when pierced.
Step 8: Rest and Serve
Once the chicken is cooked, carefully remove the baking dish from the oven. Let the stuffed chicken breasts rest in the dish for about 5-10 minutes before serving. This is a crucial step! It allows the juices to redistribute throughout the chicken, making it incredibly moist and tender. If you used toothpicks, now is the time to carefully remove them.
Step 9: Slice and Enjoy
You can serve the stuffed chicken breasts whole, or for a more elegant presentation, slice them in half horizontally to reveal the creamy, flavorful filling. Serve immediately and watch everyone’s faces light up!
What to Serve It With
These stuffed chicken breasts are so versatile, they can really go with almost anything! For a delicious breakfast or brunch, they’re fantastic served alongside some fluffy scrambled eggs and a side of crispy home fries. The savory filling complements the richness of the eggs beautifully. If you’re aiming for a more elegant brunch spread, consider serving them with a fresh fruit salad and some mini croissants. It feels decadent but is still surprisingly easy to manage. For a classic dinner, these are absolute perfection with a side of roasted asparagus or green beans, and a creamy mashed potato or a simple pilaf rice. The richness of the chicken and filling is balanced perfectly by the fresh vegetables and starch. I’ve also found they make a wonderful light lunch served over a bed of mixed greens with a light vinaigrette – the chicken is hearty enough to stand on its own. For a more comforting, cozy meal, a side of baked sweet potatoes or even some crusty bread to sop up any extra filling juices is always a winner. My kids always ask for this with a side of macaroni and cheese, so that’s a popular combo in my house too!
Top Tips for Perfecting Your Stuffed Chicken Breasts
I’ve made these stuffed chicken breasts more times than I can count, and over the years, I’ve picked up a few tricks that I think really make a difference. For the chicken itself, ensure it’s not too thick before stuffing. If you have very thick breasts, pounding them to about a half-inch thickness is key for even cooking. Nobody likes a dry outside with a raw center! When it comes to the filling, don’t be afraid to play around. I’ve experimented with adding finely diced mushrooms sautéed until all the moisture is gone, a sprinkle of smoked paprika for depth, or even a little bit of chopped artichoke hearts. The key is to make sure your filling isn’t too wet, or it’ll make the chicken soggy. If you’re using frozen spinach, squeezing out as much water as humanly possible is non-negotiable. I’ve learned that lesson the hard way! For securing the chicken, toothpicks are great, but if you don’t have them, you can often just tuck the edges tightly and rely on the chicken’s natural shape to hold things together. Just be mindful of it during baking. When it comes to the baking, a meat thermometer is your best friend. Aim for that 165°F (74°C) internal temperature. Overcooking is the enemy of tender chicken! And please, please, please let the chicken rest for at least 5 minutes after it comes out of the oven. I know it’s tempting to cut right into it, but that resting period is what ensures a juicy, flavorful bite. For variations on the glaze, you could try a drizzle of balsamic glaze instead of the butter mixture, or even a touch of honey for a sweeter profile. It really just depends on what you’re in the mood for. I once accidentally grabbed dried dill instead of Italian seasoning for the glaze, and it was surprisingly delicious with a lemon-butter sauce!
Storing and Reheating Tips
One of the things I love most about these stuffed chicken breasts is how well they store and reheat. If you have any leftovers (which, let’s be honest, is rare in my house!), you can keep them covered tightly in the refrigerator for up to 3 days. For optimal quality, I like to store them in an airtight container. When it comes to reheating, there are a few ways to go. The best method is to gently warm them in a covered oven-safe dish at around 325°F (160°C) for about 10-15 minutes, or until heated through. This helps to retain moisture. If you’re in a pinch, you can reheat them in the microwave, but be careful not to overheat them, as they can dry out quickly. Just heat in short bursts, checking for warmth. I find that if I reheat them whole, they stay juicier than if I slice them first. If the glaze has dried out a bit during storage, you can always add a tiny bit more melted butter or even a splash of broth to the reheating dish. I’ve never frozen these stuffed chicken breasts because they’re usually gone too fast, but if you wanted to freeze them, I’d recommend doing so *before* baking. Once cooled completely after baking, they can be stored in the freezer for up to 2-3 months. Thaw them in the refrigerator overnight and then reheat as directed above. The glaze is best applied just before baking, so if you’re freezing uncooked stuffed chicken breasts, you’ll want to apply the glaze right before you bake them after thawing.
Frequently Asked Questions
Final Thoughts
So there you have it! My absolute favorite stuffed chicken breasts recipe. I truly believe this dish is a keeper for so many reasons: it’s incredibly flavorful, surprisingly easy to put together, and always feels a little bit special. It’s the kind of meal that makes you feel accomplished and satisfied, without spending hours in the kitchen. Whether you’re looking for a weeknight dinner solution, a dish to impress guests, or just something comforting and delicious, this recipe delivers. I hope you give it a try and love it as much as my family and I do! If you’re looking for more simple yet impressive chicken dinners, you might also enjoy my Lemon Herb Roasted Chicken or my Sheet Pan Chicken Fajitas. They’re all about making delicious food accessible and enjoyable. I can’t wait to hear how your stuffed chicken breasts turn out! Feel free to leave a comment below with any variations you try or your favorite side dishes. Happy cooking!
Stuffed Chicken Breasts with Mozzarella and Ricotta
Ingredients
Main Ingredients
- 4 oz Chicken breasts
- 8 oz Ricotta cheese
- 4 oz Mozzarella cheese, shredded
- 0.25 cup Fresh basil, chopped
- 0.5 tsp Garlic powder
- 0.25 tsp Salt
- 0.25 tsp Black pepper
- 2 tbsp Olive oil
Instructions
Preparation Steps
- Preheat oven to 375°F (190°C).
- In a bowl, mix ricotta cheese, mozzarella cheese, basil, garlic powder, salt, and pepper.
- Make a pocket in each chicken breast by slicing horizontally through the thickest part.
- Stuff each chicken breast with the ricotta mixture.
- Heat olive oil in an oven-safe skillet over medium-high heat.
- Sear chicken breasts for 2-3 minutes per side, until lightly browned.
- Transfer skillet to the oven and bake for 20-25 minutes, or until chicken is cooked through.
- Let rest for a few minutes before serving.


