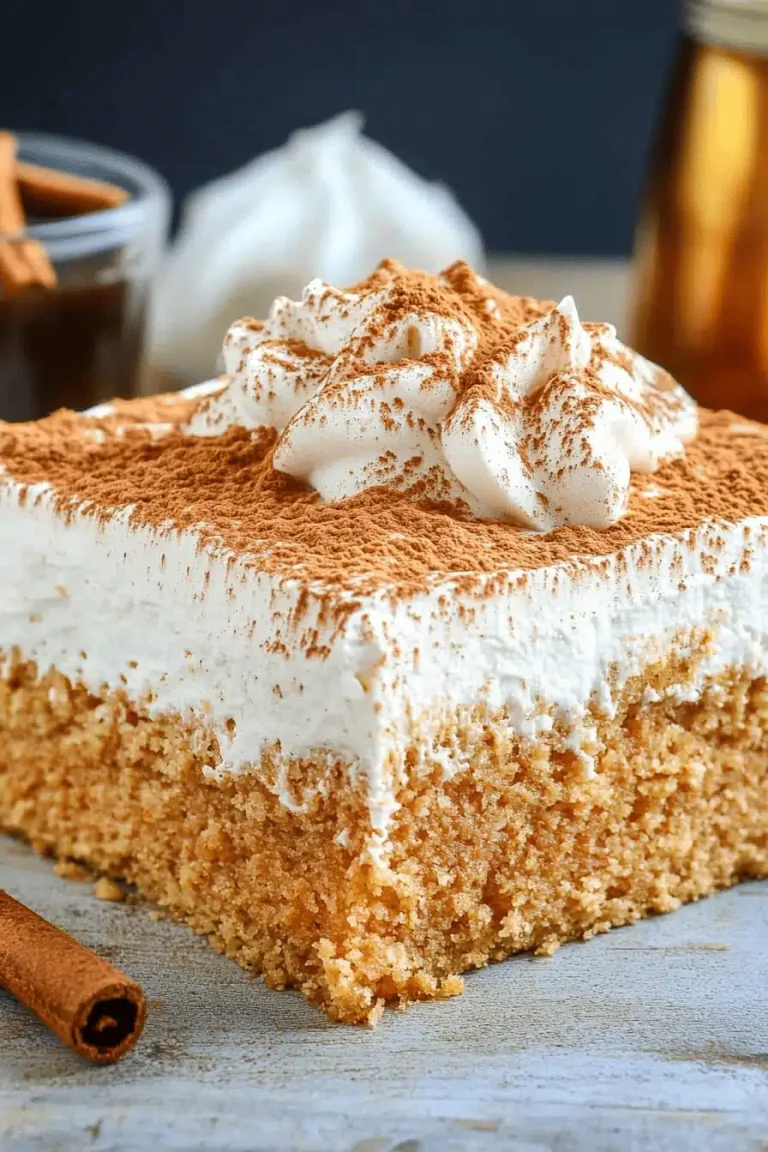
You know those recipes that just stick with you? The ones you make on repeat, the ones that get requested again and again, the ones that feel like a warm hug in edible form? Well, this one is all of that and more for my family. We affectionately call it “Stupid Pie” because it’s almost *stupidly* easy to make, and yet, it tastes like you spent hours in the kitchen. Honestly, it’s the kind of dessert that surprises everyone – including me, every single time. It’s not fussy, it doesn’t require a million obscure ingredients, and it always, always turns out perfectly. It’s that delightful sweet treat that’s somewhere between a cake and a custard, with a hint of something truly magical. Forget those elaborate layered cakes that take all day; this Stupid Pie is my go-to when I need something wonderful without the fuss. It’s the perfect answer when that 10 pm craving hits and I don’t want to turn on the oven for hours.
What is a stupid pie?
So, what exactly *is* this “Stupid Pie” that I rave about? Think of it as a gloriously moist, slightly dense cake that’s baked right in a pie dish. It’s got this incredible tender crumb, a rich, buttery flavor, and a subtle sweetness that makes it utterly addictive. The name, “Stupid Pie,” came about years ago when I was juggling a million things – kids home from school, a deadline looming, and a sudden need for something sweet. I looked around, saw what I had on hand, and threw this together in about 15 minutes. It was so simple, I remember thinking, “This is almost stupid how easy this is!” And the name just stuck. It’s essentially a one-bowl wonder (mostly!) that uses simple pantry staples to create something truly special. It’s not your traditional fruit pie or a heavy cheesecake; it’s its own delightful category, perfect for any time of day, really.
Why you’ll love this recipe?
There are so many reasons why this Stupid Pie has earned a permanent spot in my recipe collection and why I think you’ll fall in love with it too. First off, the flavor is just out of this world. It’s rich and buttery with a hint of vanilla, and the texture is unbelievably moist and tender. It’s not dry or crumbly, not even a little bit. Then there’s the simplicity – and I cannot stress this enough. You can literally have this mixed up and in the oven in under 20 minutes. That’s less time than it takes to preheat a fancy oven for some more complicated desserts! For busy weeknights or when unexpected guests pop over, this is an absolute lifesaver. It’s also incredibly cost-effective. The ingredients are all super common, budget-friendly items that you probably already have in your pantry. No fancy extracts or expensive nuts required here. And talk about versatile! I love serving this warm with a scoop of vanilla Ice Cream, but it’s equally delicious at room temperature with a simple dusting of powdered sugar, or even as a special breakfast treat. What I love most about this recipe is that it proves you don’t need to be a pastry chef to create something that tastes incredible. It’s proof that simple ingredients, put together with a little love, can yield spectacular results. It’s the kind of dessert that makes people ask for the recipe, and when you tell them how easy it was, they’re just as amazed as you were!
How do I make a Stupid Pie?
Quick Overview
The magic of this Stupid Pie lies in its straightforward assembly. We’ll mix up a quick, luscious batter in one bowl, pour it into a prepared pie dish, and bake until it’s golden and set. The result is a gorgeously moist, subtly sweet, and deeply satisfying dessert that feels way more complicated than it is. You’ll be amazed at how quickly it comes together, making it perfect for spontaneous baking sessions or when you just need a little sweetness without a big fuss. It’s truly a set-it-and-forget-it kind of bake, and the results are always worth it.
Ingredients
For the Main Batter:
2 cups all-purpose flour: I always use a good quality all-purpose flour. Make sure it’s spooned and leveled, not scooped directly from the bag, to avoid too much flour.
1 ½ cups granulated sugar: You can adjust this down by ¼ cup if you prefer a less sweet pie, but I find this amount perfect.
1 teaspoon baking soda: This is crucial for leavening and that lovely tender crumb.
½ teaspoon salt: Just to balance out the sweetness and bring out the flavors.
1 cup (2 sticks) unsalted butter, softened: Make sure it’s truly softened, not melted. This helps it cream beautifully with the sugar.
2 large eggs: At room temperature is best for emulsification.
1 teaspoon vanilla extract: Use the good stuff! It makes a real difference.
½ cup buttermilk: If you don’t have buttermilk, you can make a quick substitute by adding 1 tablespoon of white vinegar or lemon juice to ½ cup of milk and letting it sit for 5 minutes. This adds moisture and a tender texture.
For the Filling (Optional, but Highly Recommended!):
This is what elevates it from just a “good cake” to something truly special and gives it that “pie” feel.
½ cup packed light Brown Sugar: Adds a wonderful caramel note.
¼ cup all-purpose flour: Helps to thicken the filling.
1 teaspoon ground cinnamon: For that warm, comforting spice.
1 ½ cups chopped fresh or frozen berries (like blueberries, raspberries, or a mix): If using frozen, don’t thaw them first!
Zest of 1 lemon (optional): For a bright, fresh contrast to the sweetness.
For the Glaze:
1 cup powdered sugar: Sifted, if you want a super smooth glaze.
2-3 tablespoons milk or cream: You can use any milk, dairy or non-dairy. Adjust the amount for your desired consistency.
½ teaspoon vanilla extract (optional): For an extra flavor boost.
Step-by-Step Instructions
Step 1: Preheat & Prep Pan
First things first, get your oven preheated to 350°F (175°C). This ensures even baking from the moment it goes in. Now, grab a standard 9-inch pie plate. You’ll want to grease it really well. I like to use butter or non-stick cooking spray. For extra insurance against sticking, you can also lightly flour it after greasing, tapping out any excess. This prep work is super important; nobody wants a pie stuck in the pan!
Step 2: Mix Dry Ingredients
Grab a large mixing bowl – this is where most of the action happens! Add your all-purpose flour, granulated sugar, baking soda, and salt. Give them a good whisk together. You want to make sure the baking soda and salt are evenly distributed throughout the flour and sugar mixture. This ensures consistent leavening and flavor in every bite. Don’t skip this little whisking step; it really makes a difference.
Step 3: Mix Wet Ingredients
In a separate, smaller bowl, you’re going to combine your softened butter and the room-temperature eggs. Cream these together using an electric mixer (or a whisk and some elbow grease!) until they’re light and fluffy. It should look pale yellow and airy. Then, beat in the vanilla extract and the buttermilk. Make sure everything is well combined. This is your moistening base for the batter.
Step 4: Combine
Now, pour the wet ingredients into the bowl with your dry ingredients. This is the crucial part where you need to be gentle. Mix on low speed (or stir with a spatula) *just* until the ingredients are combined and you no longer see streaks of dry flour. Be careful not to overmix! Overmixing develops the gluten too much, which can lead to a tough cake. A few small lumps are perfectly fine; in fact, they’re a good sign you haven’t gone overboard. The batter should be thick but pourable.
Step 5: Prepare Filling
While your batter is resting for a minute, quickly whip up the filling ingredients. In a small bowl, whisk together the brown sugar, ¼ cup of flour, and cinnamon. If you’re using it, add the lemon zest. Toss in your berries. You want to coat the berries lightly with this mixture. This helps them not sink to the bottom of the pie and adds a wonderful spiced sweetness.
Step 6: Layer & Swirl
Pour about half of your cake batter into the prepared pie dish. Spread it out evenly. Now, gently scatter the berry filling mixture over the top of this batter layer. Dollop the remaining batter over the berries. Don’t worry about perfectly covering them; little gaps are fine. If you’re feeling fancy, you can run a knife or a skewer gently through the batter to create a bit of a swirl effect, but honestly, it’s delicious even without that step!
Step 7: Bake
Pop the pie into your preheated oven. Bake for about 40-50 minutes. The exact time will depend on your oven, of course. You’ll know it’s done when the edges are golden brown and a toothpick inserted into the center (avoiding any berries) comes out clean. The center should also spring back lightly when you gently press it. Resist the urge to open the oven door too early!
Step 8: Cool & Glaze
Once it’s baked to perfection, carefully remove the pie from the oven. Let it cool in the pie plate on a wire rack for at least 15-20 minutes before even thinking about the glaze. If you try to glaze it too hot, it’ll just melt off! While it’s cooling, whisk together your powdered sugar, milk or cream, and vanilla extract (if using) in a small bowl. Add the liquid a tablespoon at a time until you reach your desired drizzling consistency – thick enough to coat, but thin enough to pour. Once the pie has cooled slightly, drizzle the glaze all over the top. Let the glaze set for a few more minutes.
Step 9: Slice & Serve
This is the best part! You can serve the Stupid Pie warm or at room temperature. I find it’s absolutely divine served warm, perhaps with a scoop of vanilla ice cream melting into the moist crumb, or a dollop of fresh whipped cream. If serving at room temperature, a simple dusting of powdered sugar is lovely. Slice it up with a sharp knife and enjoy the incredible texture and flavor. It’s perfect for sharing, but I won’t judge if you want to keep it all to yourself!
What to Serve It With
This Stupid Pie is so versatile, it fits into any meal or occasion you can imagine! For breakfast, it’s a delightful change from the usual. Imagine slicing into a warm piece with your morning coffee – it’s like a sweet, comforting start to the day. I often serve it with a side of fresh berries to add a little brightness. For brunch, it feels a bit more elegant. I love to serve it on a pretty platter, maybe with a sprinkle of toasted slivered almonds on top of the glaze for a little crunch. A glass of sparkling cider or a mimosa pairs perfectly. As a dessert, it’s a crowd-pleaser that doesn’t require a lot of fanfare. A generous scoop of high-quality vanilla bean ice cream is my absolute go-to, or a swirl of freshly whipped cream is always a winner. A drizzle of raspberry coulis can also add a beautiful pop of color and tartness. And for those cozy snack times? This is the ultimate comfort food. I’ll often just cut a wedge and enjoy it with a hot cup of tea, especially on a chilly afternoon. My kids absolutely love it as an after-school treat, and it’s become a tradition to have a slice (or two!) during our family movie nights. It’s just one of those things that makes everyday moments feel a little bit special.
Top Tips for Perfecting Your “Stupid Pie”
Even though this recipe is designed to be ridiculously easy, like any good baker knows, a few little tricks can make all the difference between a good pie and an absolutely unforgettable one. When it comes to the berries, if you’re using frozen ones, my biggest piece of advice is *do not thaw them*. If you thaw them, they release too much liquid, which can make your pie soggy. Keep them frozen until you’re ready to toss them with the brown sugar mixture. For the batter, the key to that incredible moistness is really not to overmix. Seriously, once you add the wet to the dry, mix *just* until you don’t see any more dry flour. A few lumps are your friends here! If you see a lot of streaks of flour, keep mixing, but as soon as it looks mostly uniform, stop. I’ve definitely learned that the hard way by making mine tough in the past! For the swirl effect, if you want to attempt it, don’t go too deep or overdo it. Just a gentle swirl with a knife or skewer is enough to create a pretty pattern without messing up the layers too much. If you’re looking to swap out the berries, other fruits can work beautifully too. Chopped apples or pears, tossed with cinnamon and a little sugar, are fantastic. You can even add chocolate chips or chopped nuts to the batter if you’re feeling adventurous! For baking, always trust your toothpick test. Ovens can be finicky, so the visual cues and the toothpick are your best friends for telling if it’s perfectly done. If the top is browning too quickly, you can always loosely tent it with foil for the last 10-15 minutes. And for the glaze, the consistency is everything. If it’s too thick, add milk a teaspoon at a time. If it’s too thin, whisk in a little more powdered sugar. I’ve found that a slightly thicker glaze holds its shape better and looks really pretty drizzled on.
Storing and Reheating Tips
One of the best things about Stupid Pie is how well it keeps! If you happen to have any leftovers (which is rare in my house!), you can store it at room temperature for up to 2 days, as long as it’s covered loosely with plastic wrap or foil. This keeps it from drying out but still allows a little air circulation. If you know you won’t finish it within a couple of days, or if your kitchen is particularly warm, I’d recommend popping it into the refrigerator. Stored in an airtight container in the fridge, it will stay delicious for about 4-5 days. The texture might firm up slightly, but it’s still wonderful. Reheating is super simple: I usually pop a slice in the microwave for about 20-30 seconds, just until it’s warmed through. It brings back that lovely soft texture. You can also gently reheat it in a low oven (around 300°F or 150°C) for about 5-10 minutes. For freezing, this pie holds up surprisingly well! Let it cool completely, then wrap it tightly in plastic wrap, followed by a layer of aluminum foil, or place it in a freezer-safe container. It should stay good in the freezer for up to 2-3 months. To thaw, simply bring it out to room temperature or thaw it overnight in the refrigerator. If you’ve glazed your pie before storing, the glaze might become a little sticky after thawing, especially if it was frozen. My tip is, if you plan to freeze it, you can wait to add the glaze until after you’ve thawed and gently reheated it. That way, it looks just as pretty as when it was fresh!
Frequently Asked Questions
Final Thoughts
So there you have it – my beloved “Stupid Pie.” It’s a recipe that truly lives up to its name because it’s almost silly how easy it is to make, yet the results are consistently spectacular. It’s the kind of dessert that brings a smile to everyone’s face, from the pickiest eaters to the most discerning foodies. It’s a testament to the fact that deliciousness doesn’t have to be complicated. Whether you’re looking for a quick weeknight treat, a showstopper for a potluck, or just a comforting bite to enjoy with your favorite beverage, this Stupid Pie is sure to become a favorite in your home too. If you love this recipe, you might also enjoy my Easy Apple Crumble or my One-Bowl Chocolate Chip Cookies – they share that same spirit of simple, delightful baking. I can’t wait to hear what you think! Please share your thoughts, your own Stupid Pie variations, or any fun family stories in the comments below. Happy baking, and enjoy every single delicious bite!
Stupid Pie
Ingredients
Crust
- 1.5 cups All-purpose flour
- 0.75 teaspoon Salt
- 0.5 cup Cold unsalted butter cubed
- 0.25 cup Ice water
Filling
- 6 cups Sliced apples Granny Smith preferred
- 0.75 cup Granulated sugar
- 0.25 cup Brown sugar packed
- 2 tablespoons All-purpose flour
- 1 teaspoon Ground cinnamon
- 0.25 teaspoon Ground nutmeg
- 2 tablespoons Unsalted butter cut into small pieces
Instructions
Make the Crust
- In a large bowl, whisk together the flour and salt.
- Cut in the cold butter using a pastry blender or your fingers until the mixture resembles coarse crumbs.
- Gradually add the ice water, mixing until the dough just comes together. Do not overmix.
- Form the dough into a disc, wrap in plastic wrap, and refrigerate for at least 30 minutes.
Make the Filling
- In a large bowl, combine the sliced apples, granulated sugar, brown sugar, flour, cinnamon, and nutmeg.
Assemble and Bake
- Preheat oven to 375°F (190°C).
- On a lightly floured surface, roll out the pie crust to a 12-inch circle.
- Transfer the crust to a 9-inch pie plate.
- Pour the apple filling into the crust and dot with butter pieces.
- Bake for 45-50 minutes, or until the crust is golden brown and the filling is bubbly.
- Let cool completely before serving.