Oh my goodness, you guys! If there’s one treat that consistently disappears faster than I can make it in my house, it’s these Sugar Cookie truffles. Seriously, I’ve lost count of how many times I’ve whipped up a batch for birthdays, holidays, or just because the kids suddenly decided they *needed* something sweet. They’re like little bites of pure joy, and the best part? They’re ridiculously easy to make, even for a weeknight treat when you’re already exhausted. Forget complicated baking projects; these little gems are a lifesaver when you’re craving that sweet, festive sugar cookie flavor without all the fuss. Think of them as the best parts of a sugar cookie – that melt-in-your-mouth texture and that classic sweet flavor – all rolled into one perfect, bite-sized package. They remind me so much of the sugar cookies my grandma used to make, but these are, dare I say it, even easier to whip up. This recipe for sugar cookie truffles is my go-to, and I just know you’re going to love them as much as my family does.
What are sugar cookie truffles?
So, what exactly are sugar cookie truffles, you ask? Imagine all the deliciousness of a classic sugar cookie – that slightly chewy, slightly cakey texture, and that unmistakable sweet vanilla flavor – but without the rolling, the cutting, and the endless decorating. These aren’t your average cookies; they’re essentially a no-bake dessert that starts with crushed Sugar Cookies, bound together with a creamy frosting, and then coated in a sweet glaze or chocolate. Think of it as taking all the best elements of a sugar cookie and transforming them into a decadent, bite-sized treat. It’s essentially a shortcut to that beloved sugar cookie taste, perfect for when you’re short on time or just don’t feel like firing up the oven for a full batch of cookies. They’re versatile, fun, and seriously addictive – a sweet little package of happiness that’s so simple, it feels like magic!
Why you’
What are some of the reasons why I love this sugar cookie truffle recipe? flavor. These truffles taste *exactly* like a freshly baked sugar cookie, but with an added layer of creamy richness from the frosting and a satisfying snap from the glaze. It’s pure comfort food in a little ball. Then there’s the simplicity. Honestly, this is probably one of the easiest “desserts” I’ve ever made. There’s no baking involved, which means less mess and less time spent waiting. You just crush cookies, mix, roll, and dip! It’s the kind of recipe you can whip up with kids in tow, and they’ll have a blast helping out. I also love how cost-effective it is. You can often make these using store-bought cookies or even leftover cookies you might have lying around, and the other ingredients are pantry staples. It’s a budget-friendly way to create something that feels really special. And the versatility! Oh my goodness, the ways you can customize these are endless. You can use different colored glazes, add sprinkles, drizzle with chocolate, or even mix in other flavors. They’re perfect for any occasion, from a casual afternoon snack to a fancy dessert table. What I love most about these sugar cookie truffles, though, is that they deliver that “wow” factor without requiring you to be a professional baker. They look impressive, taste incredible, and are surprisingly easy to pull off. It’s a win-win-win!
How do I make sugar cookie truffles?
Quick Overview
Making these delightful sugar cookie truffles is a breeze! You’ll start by crushing up your favorite sugar cookies until they’re fine crumbs. Then, you’ll mix those crumbs with some creamy frosting to create a dough-like consistency. Roll this mixture into little balls, chill them briefly to firm up, and finally, dip them in a sweet, smooth glaze or melted chocolate. The whole process is incredibly straightforward and doesn’t require any baking, making it a perfect last-minute treat. This method ensures you get that intense sugar cookie flavor in every single bite, with a delightful texture that’s both tender and satisfying.
Ingredients
For the Main Batter:
– 1 package (about 14-16 oz) sugar cookies (store-bought or homemade work great! I usually go for the classic round ones, but any will do. If using homemade, make sure they’re cooled completely.)
– 1/2 cup (1 stick) unsalted butter, softened (I like to use good quality butter for the best flavor)
– 1/4 cup Cream Cheese, softened (this adds a lovely tang and helps with the texture)
– 1 teaspoon vanilla extract (use a good pure vanilla extract for that authentic sugar cookie taste)
For the Glaze:
– 1 1/2 cups powdered sugar (also called confectioners’ sugar)
– 2-3 tablespoons milk or heavy cream (milk makes it thinner, cream makes it richer. Start with 2 and add more if needed for desired consistency)
– 1/2 teaspoon vanilla extract (optional, but it really amps up the flavor)
– Food coloring (optional, for festive colors!)
Step-by-Step Instructions
Step 1: Preheat & Prep Pan
This step is super simple! You don’t need to preheat an oven for this recipe since it’s no-bake. What you *do* need is a baking sheet lined with parchment paper or wax paper. This is where you’ll place your rolled truffles to firm up. Make sure you have enough space in your fridge or freezer for this baking sheet.
Step 2: Mix Dry Ingredients
This is where the magic starts. Take your package of sugar cookies and crush them into fine crumbs. You can do this by pulsing them in a food processor until they’re fine and powdery, or if you don’t have one, you can place them in a sturdy zip-top bag and use a rolling pin to smash them. We’re aiming for something that resembles coarse sand. Set aside about 1/4 cup of these crumbs for later if you want to roll the finished truffles in them, or for decoration. This step is crucial for getting that true sugar cookie flavor base!
Step 3: Mix Wet Ingredients
In a medium bowl, cream together the softened butter and softened cream cheese until they are light and fluffy. It’s important that both are truly softened so they incorporate smoothly. Then, stir in the vanilla extract. You want a nice, smooth mixture here, like a creamy frosting base.
Step 4: Combine
Add the crushed sugar cookie crumbs to the creamed butter and cream cheese mixture. Stir everything together until it’s well combined and forms a thick dough. It should be moist enough to hold its shape when you squeeze it, but not sticky. If it seems too dry, you can add a tiny bit more softened butter (1 teaspoon at a time). If it seems too wet, you can add a few more cookie crumbs. This is the stage where you really want to test the consistency by hand; it should feel moldable.
Step 5: Prepare Filling
This is the “batter” for our truffles! Once combined, you’ll take about 1 to 1.5 tablespoons of the mixture at a time and roll it between your palms to form smooth balls, about 1-inch in diameter. This can get a little messy, but it’s part of the fun! Try to make them as uniform in size as possible for even chilling and dipping. Place the rolled balls onto your prepared baking sheet.
Step 6: Layer & Swirl
Once all your dough has been rolled into balls, place the entire baking sheet into the freezer for about 15-20 minutes, or into the refrigerator for at least 30 minutes. This chilling step is key to making them firm enough so they don’t fall apart when you dip them in the glaze. While they’re chilling, you can prepare your glaze.
Step 7: Bake
No baking required for this step! While the truffles are chilling, whisk together the powdered sugar, 2 tablespoons of milk (or cream), and 1/2 teaspoon of vanilla extract in a small bowl. Whisk until smooth. If the glaze is too thick, add more milk or cream, a teaspoon at a time, until it reaches a drizzly consistency – think pancake batter. If you want to color your glaze, divide it into smaller bowls and add a drop or two of food coloring to each, stirring until the color is uniform. Be careful not to add too much liquid or your glaze will be too thin to coat properly.
Step 8: Cool & Glaze
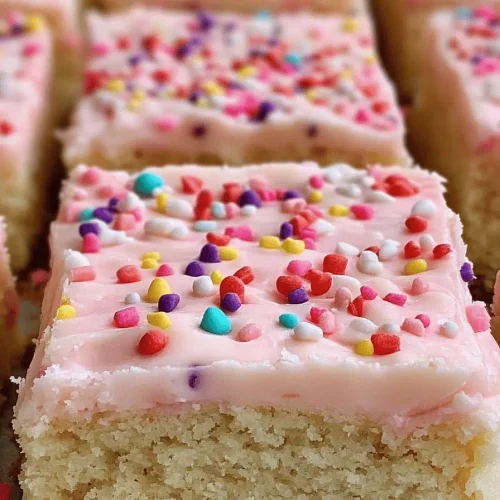
Once the truffles are firm from chilling, it’s time to dip! You can either drop each truffle directly into the glaze and use a fork to lift and let excess drip off, or you can use a toothpick to dip them. If using a toothpick, gently insert it into a truffle, dip it into the glaze, lift, let excess drip off, and then carefully place it back onto the parchment-lined baking sheet. You can then carefully remove the toothpick. If you reserved cookie crumbs, you can sprinkle them on top of the wet glaze before it sets. For those extra sprinkles on top, now’s the time!
Step 9: Slice & Serve
Let the glaze set completely at room temperature or pop them back into the fridge for about 10 minutes to speed things up. Once set, your sugar cookie truffles are ready to be enjoyed! They are delicious right away, but they’re even better when they’ve had a little time for the flavors to meld. Serve them on a pretty platter, and watch them disappear!
What to Serve It With
These sugar cookie truffles are so versatile, they fit in anywhere! For breakfast, they’re a sweet little surprise alongside a cup of hot coffee or tea. Imagine a weekend morning with a plate of these alongside some fresh fruit – it feels so decadent! For brunch, they’re absolutely perfect. You can arrange them on a tiered stand with other pastries, or even use them as a charming garnish on top of a cake or a fruit salad. Their small size makes them elegant and easy to manage. As dessert, they shine! Serve them in mini cupcake liners after dinner, perhaps with a scoop of vanilla ice cream or a dollop of whipped cream. They’re also fantastic alongside a dessert wine or a rich hot chocolate. And for those cozy snacks moments, when you just need a little pick-me-up, they’re ideal. I love having a few in an airtight container for when that 3 PM slump hits or for an after-dinner sweet treat without a whole cake. My family has a tradition of leaving a few out for Santa, but honestly, they don’t last long enough to make it to Christmas Eve! My kids also love them as a special treat after finishing their homework. They’re just universally loved.
Top Tips for Perfecting Your Sugar Cookie Truffles
After making these sugar cookie truffles more times than I can count, I’ve picked up a few tricks that I think will really help you nail them every time. For the cookie crumb base, I always recommend using cookies that are a bit on the softer side. If your cookies are super hard and crumbly to begin with, you might end up with a drier truffle mixture. If you only have harder cookies, you might need to add a tiny bit more butter or frosting. The key is that lovely dough-like consistency – not too dry, not too sticky. When it comes to mixing advice, don’t overmix the dough once the crumbs are added! You want to combine them just until everything is incorporated. Overmixing can make the truffles tough. I’ve learned this the hard way! For swirl customization, if you’re adding sprinkles or other decorations, do it while the glaze is still wet. That way, they’ll stick nicely. You can also get creative with drizzles of contrasting chocolate or colored glazes once the base glaze has set. For ingredient swaps, if you can’t find cream cheese, you can use an extra 2 tablespoons of softened butter, but the cream cheese adds a nice depth of flavor and a slight tang that I really enjoy. It balances the sweetness perfectly. If you want a richer flavor, try using a combination of butter and maybe a touch of shortening. For baking tips (even though there’s no baking!), the chilling step is your best friend. Don’t skip it! Cold truffles are much easier to dip and hold their shape better. Make sure your chilling environment is cold enough. If your kitchen is very warm, you might need to chill them longer. Lastly, for glaze variations, if you find your glaze is too thick, warm it up *very gently* in the microwave for just a few seconds, or whisk in another teaspoon of milk. If it’s too thin, add a bit more powdered sugar. A good consistency is crucial for that smooth, even coating. Sometimes, I like to add a tiny bit of lemon zest to the glaze for a bright citrus note, especially around the holidays!
Storing and Reheating Tips
Storing these sugar cookie truffles is pretty straightforward, and they usually stay fresh for a good while, which is fantastic. If you have any leftovers (which is rare in my house!), you can keep them at room temperature for up to 3 days. Just make sure they’re in an airtight container. The glaze needs to be fully set before you seal the container, otherwise, you might get condensation, which can make them a bit soggy. For refrigerator storage, they’ll last even longer, about 1-2 weeks. Again, an airtight container is best. Storing them in the fridge will keep the glaze nice and firm. When you want to enjoy one from the fridge, I find they’re best if you let them sit out for about 10-15 minutes to soften up just a touch – they taste more like they did when they were fresh. If you’re looking to freeze instructions, these truffles freeze surprisingly well! Wrap each truffle individually in plastic wrap, then place them all in a freezer-safe bag or airtight container. They can stay frozen for up to 2-3 months. To thaw, transfer them from the freezer to the refrigerator overnight, and then let them come to room temperature for about 30 minutes before serving. Don’t try to thaw them on the counter as this can cause condensation and affect the texture. For glaze timing advice, it’s always best to glaze your truffles *after* they have been chilled and are firm. If you glaze them before chilling, the glaze can crack as the truffle hardens. And if you plan to freeze them, make sure the glaze is completely set before wrapping and freezing.
Frequently Asked Questions
Final Thoughts
So there you have it, my friends – the recipe for my beloved sugar cookie truffles! I truly hope you give these a try because they’re just so incredibly fun and satisfying to make, and even more enjoyable to eat. They embody that perfect balance of nostalgic flavor and effortless preparation. Whether you need a quick dessert for a last-minute party, a sweet treat to brighten a gloomy day, or just want to experience a little bite of pure happiness, these truffles deliver every single time. They’re a testament to how simple ingredients and a little bit of love can create something truly magical. If you love these, you might also enjoy my recipe for [Link to another relevant recipe, e.g., Easy No-Bake Chocolate Peanut Butter Balls] for more no-bake delights, or my classic [Link to another relevant recipe, e.g., Perfect Cut-Out Sugar Cookies] for when you’re feeling a bit more ambitious with your baking! I can’t wait to hear how your sugar cookie truffles turn out! Don’t forget to leave a comment below with your thoughts or any fun variations you tried. Happy baking (or, in this case, happy no-baking)!
Sugar Cookie Truffles
Ingredients
Main Ingredients
- 2.5 cups Sugar Cookies crumbled
- 8 ounces Cream Cheese softened
- 12 ounces White Chocolate melted
- 0.25 cup Sprinkles
Instructions
Preparation Steps
- In a large bowl, crumble the sugar cookies until they are fine crumbs.
- Add the softened cream cheese to the cookie crumbs and mix until well combined.
- Roll the mixture into 1-inch balls and place them on a baking sheet lined with parchment paper.
- Freeze the cookie balls for 15 minutes to firm them up.
- Melt the white chocolate according to package directions.
- Dip each cookie ball into the melted chocolate, coating it completely.
- Place the dipped truffles back on the parchment paper and immediately sprinkle with sprinkles.
- Refrigerate the truffles for at least 30 minutes or until the chocolate is set.