You know those mornings when you wake up, and the thought of actually *making* breakfast feels like climbing Everest? Yeah, me too. Especially when that coffee craving hits hard and fast, and you just need something delicious, satisfying, and ready *now*. That’s precisely how I discovered my absolute obsession: Tiramisu Overnight Oats. Honestly, it’s less of a recipe and more of a magical morning miracle. Forget complicated baking or last-minute scrambling; this is your ticket to an indulgent breakfast that tastes like a decadent dessert but is secretly so good for you. It’s like having your cake (or in this case, your tiramisu) and eating it for breakfast too, without any of the guilt or the fuss. I’ve tried countless overnight oat concoctions, but this one? It’s a game-changer, a true week-saver, and honestly, it just tastes like pure bliss in a jar. If you’re a fan of that classic Italian dessert, you are going to lose your mind over this Tiramisu Overnight Oats version.
What is Tiramisu Overnight Oats?
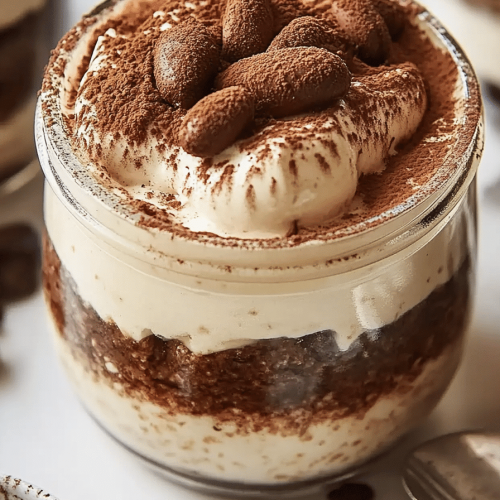
So, what exactly are we talking about here? Tiramisu Overnight Oats are exactly what they sound like – the creamy, dreamy flavors of a traditional tiramisu, but transformed into a no-cook, overnight oats breakfast. Think of it as a deconstructed, healthier, and way more convenient version of the beloved Italian dessert. Instead of ladyfingers soaked in coffee and layered with mascarpone, we’re using rolled oats as our base, soaking them overnight in a milky, coffee-kissed mixture. Then, we add in those classic tiramisu elements: a hint of cocoa, a touch of sweetness, and that creamy texture that makes you want to lick the spoon. It’s essentially a chilled, breakfast-friendly pudding that’s packed with fiber and protein, keeping you full and happy until lunchtime. It’s the perfect way to capture those sophisticated tiramisu vibes without ever turning on the oven.
Why you’ll love this recipe?
Honestly, there are so many reasons this recipe has earned a permanent spot in my breakfast rotation. First off, the flavor! It’s just out of this world. You get that subtle coffee kick, the rich depth of cocoa, and a lovely sweetness that isn’t cloying. It truly reminds me of my favorite tiramisu, but in a completely new and exciting way. And the texture? Oh my goodness. It’s wonderfully creamy, with the oats softening perfectly overnight. What I love most, though, is the sheer simplicity. It takes about five minutes to throw together the night before, and then *poof* – breakfast is ready when you wake up. No more rushing around! It’s also incredibly budget-friendly. Rolled oats, milk, a bit of coffee, cocoa powder – these are all pantry staples that won’t break the bank. Plus, it’s so versatile. I’ve experimented with different milks (almond milk makes it wonderfully creamy, by the way!) and sweeteners, and it always turns out delicious. If you’re anything like me, you probably have a million other Breakfast Recipes bookmarked, but this one just hits different. It’s the perfect balance of healthy and indulgent, and it’s ridiculously satisfying. It’s the kind of recipe that makes you feel like you’ve accomplished something amazing before you’ve even had your first sip of coffee.
How do I make Tiramisu Overnight Oats?
Quick Overview
Making these Tiramisu Overnight Oats is so straightforward, it feels almost silly to call it a recipe! The magic happens overnight in your fridge. You simply combine your oats, liquid, a touch of sweetener, and some key tiramisu flavors in a jar or container, give it a good stir, and let time do the work. By morning, you’ll have a thick, creamy, and incredibly flavorful breakfast that’s ready to eat straight from the jar. It’s the ultimate in grab-and-go deliciousness, perfect for those busy weekday mornings or even a lazy weekend brunch when you want something special without the effort.
Ingredients
For the Main Batter:
Here’s what you’ll need to build that creamy oat base. I always opt for old-fashioned rolled oats; they give the best texture. Instant oats can get a bit too mushy, and steel-cut oats just don’t soften enough without cooking. You’ll need about 1/2 cup of rolled oats per serving. For the liquid, I typically use 1/2 cup of your favorite milk – dairy, almond, soy, oat, whatever you prefer! The key here is the coffee element. You’ll want about 1/4 cup of cooled, strong brewed coffee. Make it the night before or use leftover coffee; just make sure it’s not hot! A tablespoon of unsweetened cocoa powder is essential for that deep, chocolatey tiramisu flavor. For sweetness, I usually go with about a teaspoon to a tablespoon of maple syrup or honey, but you can adjust this to your liking. A tiny pinch of salt enhances all the flavors, trust me!
For the Filling:
This is where we really amp up the tiramisu vibe. While traditional mascarpone is out, we can get that creamy richness in other ways. A tablespoon or two of Greek yogurt (plain, full-fat is best for creaminess!) or even a dollop of whipped Cream Cheese can add that luxurious mouthfeel. Sometimes, I’ll even stir in a bit of vanilla extract into the yogurt to give it an extra flavor boost. You can also add a touch more sweetener here if you like things extra sweet.
For the Glaze:
This is optional but highly recommended for that extra touch of decadence! A simple dusting of cocoa powder on top is classic. Or, for something a little richer, you can make a quick glaze by mixing a teaspoon of cocoa powder with just a tiny splash of milk or coffee and a little sweetener until it’s a drizzly consistency. Some people love to top theirs with a sprinkle of shaved Dark Chocolate – talk about fancy!
Step-by-Step Instructions
Step 1: Preheat & Prep Pan
This step is actually for a *baked* version, but since we’re making overnight oats, there’s no oven involved! Instead, your prep involves grabbing your favorite jar, bowl, or container. Make sure it has a lid, or you have some plastic wrap handy. Clean it well, and you’re good to go!
Step 2: Mix Dry Ingredients
In your jar or container, add the rolled oats, cocoa powder, and that tiny pinch of salt. Give them a quick stir with a fork or spoon to make sure the cocoa is evenly distributed. This ensures every bite gets that lovely chocolatey goodness.
Step 3: Mix Wet Ingredients
In a separate small bowl or directly into the jar with the dry ingredients (if you’re feeling bold and careful!), combine the milk, cooled strong coffee, and your chosen sweetener (maple syrup or honey). Stir well until the sweetener is mostly dissolved.
Step 4: Combine
Pour the wet ingredients into the jar with the dry ingredients. Stir everything together really well, making sure there are no dry clumps of oats or cocoa at the bottom. You want a nice, uniform mixture. It should look like a thick batter.
Step 5: Prepare Filling
If you’re using Greek yogurt or Cream Cheese, you can stir it in directly with the oats, or you can keep it separate to dollop on top in the morning. If you’re mixing it in, just make sure it’s well incorporated. If you’re keeping it separate, you might want to add a little vanilla extract to it now for extra flavor.
Step 6: Layer & Swirl
This is the fun part where we mimic that beautiful tiramisu swirl. If you’re keeping your yogurt filling separate, add a spoonful or two on top of the oat mixture. You can then gently swirl it in with a toothpick or the handle of a small spoon, creating lovely patterns. Alternatively, you can simply layer the oats and then dollop the yogurt on top just before serving.
Step 7: Bake
Again, no baking required for these overnight oats! The “cooking” happens in the refrigerator as the oats absorb the liquid and soften. Just pop the lid on tightly!
Step 8: Cool & Glaze
Pop your covered jar into the refrigerator. Let it chill for at least 4 hours, but ideally overnight. This is crucial for the oats to soften and the flavors to meld. In the morning, before you dig in, add your glaze. This could be a dusting of cocoa, a drizzle of chocolate syrup, or some shaved chocolate. The glaze is best added right before serving so it doesn’t get soggy.
Step 9: Slice & Serve
These are best served chilled, directly from the jar or bowl. If you’ve swirled in a filling, you’ll see those gorgeous layers. You can even add a little extra dusting of cocoa or a dollop of Whipped Cream on top if you’re feeling extra indulgent. Grab a spoon and enjoy!
What to Serve It With
These Tiramisu Overnight Oats are honestly a meal in themselves, but pairing them with the right things can elevate your breakfast, brunch, or even dessert experience. For a quick and classic breakfast, nothing beats a steaming hot mug of strong black coffee alongside. The coffee flavors in the oats really complement it perfectly. If you’re enjoying these for a more leisurely brunch, I love serving them with a side of fresh berries – raspberries or blackberries add a lovely tartness that cuts through the richness beautifully. A few slivers of dark chocolate on top also feel very brunch-appropriate. As a dessert, these are fantastic on their own, but if you want to go all out, a small scoop of vanilla bean ice cream on the side is pure indulgence, or a light dusting of powdered sugar can make them feel extra fancy. For those cozy snack moments when you just need a little treat, I sometimes whip up a batch of my simple sugar cookies to dip into the oats, or just enjoy them with a glass of cold milk. My kids, bless them, always want their own “fancy pudding,” so I’ll often top their jars with a sprinkle of rainbow sprinkles instead of cocoa – they love the fun!
Top Tips for Perfecting Your Tiramisu Overnight Oats
I’ve made these Tiramisu Overnight Oats more times than I can count, and over the years, I’ve picked up a few tricks that really make them shine. First off, for the oats themselves, stick to old-fashioned rolled oats. Seriously, it’s the secret to that perfect chewy-yet-creamy texture. If you use quick oats, they can turn to goo, and steel-cut just won’t soften enough without cooking. For the coffee element, using *cooled* strong coffee is key. Hot coffee will start to cook the oats, which isn’t what we want. I often brew a pot the night before or use leftover morning coffee. If you don’t drink coffee, a strong brewed decaf or even a splash of coffee extract mixed into the milk works too, though it’s not quite the same magic. When it comes to the sweetener, start with a small amount and taste. You can always add more in the morning, but you can’t take it away! I find that 1-2 teaspoons is usually enough for me, as the cocoa and coffee add their own depth. For that crucial creamy texture, don’t skimp on the fat if you can help it. Using full-fat Greek yogurt or even a splash of heavy cream in your milk mixture makes a world of difference. If you’re dairy-free, full-fat coconut milk or oat milk are excellent choices that still give you that lovely richness. Now, about the ‘swirl’ – don’t overthink it! A few gentle swirls with a spoon are all you need. You’re not aiming for perfection; you’re aiming for that marbled effect that just looks so appealing. Sometimes I’ll even stir in a bit of whipped cream cheese for extra tang and richness, and then just give it a quick swirl. Baking tips? Well, as you know, there are no baked oats here! But the chilling time is crucial. If you’re short on time, at least 4 hours in the fridge is the absolute minimum, but overnight is truly best for the flavors to meld and the oats to soften perfectly. My biggest mistake early on was not letting them chill long enough, and the oats were still a bit too firm for my liking. For ingredient swaps, if you’re out of cocoa, you can try carob powder, but the flavor is different. And if you’re not a fan of coffee, a vanilla-almond milk base with extra cocoa and a touch of espresso powder can still give you a delicious chocolatey breakfast, though it won’t be true tiramisu. Oh, and for the glaze, if it’s too thick, add a *tiny* bit more liquid. If it’s too thin, you can whisk in a little more cocoa powder. It’s all about that perfect drizzly consistency!
Storing and Reheating Tips
The beauty of overnight oats is their incredible make-ahead potential, and Tiramisu Overnight Oats are no exception! For refrigerator storage, you can keep them in an airtight container for up to 3-4 days. I find that they are actually best on the second or third day, as the flavors have really had time to meld beautifully. If you’re planning ahead for the week, I recommend prepping a few jars at the start of Sunday. Just make sure the lids are on tight to prevent any odors from the fridge from seeping in. I’ve noticed that after about 4 days, the texture can start to change slightly, becoming a little too soft for my personal preference, so aim to enjoy them within that window. Room temperature storage isn’t really recommended for overnight oats, especially with the dairy or coffee components, as they are best kept chilled for food safety and to maintain that lovely creamy texture. If you’re in a pinch and can’t refrigerate them immediately, eat them within an hour or two, but it’s not ideal. Freezer instructions are a bit tricky for overnight oats, as the texture can get a bit mushy upon thawing. However, if you *must*, you can freeze them in individual portions. Make sure they are in freezer-safe containers or bags, and they should last for about 1-2 months. Thaw them overnight in the refrigerator before eating. When it comes to the glaze, it’s always best to add it right before serving. If you’re storing them in the fridge for a few days, wait until you’re ready to eat to add any cocoa dusting or chocolate shavings so they stay crisp and appealing.
Frequently Asked Questions
Final Thoughts
Honestly, I could talk about these Tiramisu Overnight Oats all day long! They’re just such a fantastic way to start your day, feeling like you’re indulging in something special without all the effort. The way the oats soak up that coffee and cocoa flavor is just pure magic, and it’s so satisfying to have a healthy, filling breakfast ready to go the moment you wake up. They truly capture the spirit of tiramisu in a way that’s perfect for busy mornings, lazy weekends, or even a decadent-feeling dessert. If you’re a fan of that classic Italian dessert, or just love a good chocolatey, coffee-infused breakfast, you absolutely have to give these a try. They’ve become a staple in my kitchen, and I’m convinced they’ll become one in yours too! I’d love to hear what you think if you make them, or if you have any fun variations you discover. Let me know in the comments below how yours turn out! Happy making!
Tiramisu Overnight Oats
Ingredients
Main Ingredients
- 0.5 cup Rolled Oats
- 1 cup Milk (dairy or non-dairy)
- 0.25 cup Strong brewed coffee, cooled
- 1 tablespoon Chia seeds
- 1 tablespoon Mascarpone cheese
- 1 teaspoon Cocoa powder
- 1 tablespoon Maple syrup (or to taste)
- 0.5 teaspoon Vanilla extract
- 0.06 teaspoon Salt
Instructions
Preparation Steps
- In a jar or container, combine rolled oats, milk, coffee, chia seeds, mascarpone cheese, cocoa powder, maple syrup, vanilla extract, and salt.
- Stir well to combine all ingredients.
- Seal the jar and refrigerate overnight, or for at least 4 hours, to allow the oats to soften and the flavors to meld.
- Before serving, give the oats a good stir.
- If desired, top with a sprinkle of cocoa powder or a dollop of mascarpone cheese.


![Gingerbread Loaf [+Video]](https://tastyrecipesblog.com/wp-content/uploads/2025/03/classic-gingerbread-loaf-recipe-26-768x1152.jpg)