
Okay, confession time. I used to *dread* zucchini season. Not because I don’t like zucchini, but because, well, sometimes it can be a bit… bland? Then my Grandma pulled out her recipe box, and everything changed. She pulled out this recipe for zucchini fritters, and let me tell you, it was a revelation! These aren’t just any zucchini fritters; they’re these golden, crispy little clouds of deliciousness that vanish faster than you can say “pass the plate.” They’re surprisingly light, packed with incredible flavor, and just utterly comforting. If you’ve ever found yourself with a surplus of zucchini and thought, “What am I going to do with all this?”, this is your answer. Honestly, it’s my go-to when I want something that feels a little special but is ridiculously easy to whip up. Think of them as the savory cousin to a perfect pancake, but way more exciting!
What are Zucchini Fritters?
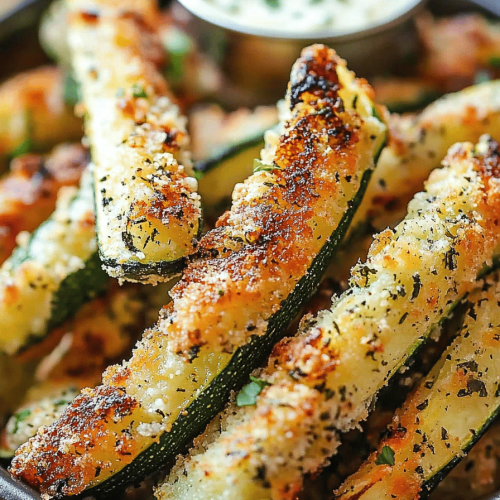
So, what exactly are these magical little things? At their heart, zucchini fritters are simply grated zucchini mixed with a light batter and then pan-fried until they’re perfectly golden and crisp. They’re like little savory pancakes or fritters, but the zucchini adds a wonderful moisture and subtle sweetness that makes them incredibly addictive. My Grandma always called them “Sunshine Bites” because of their golden hue and how they just brightened up any meal. The name “zucchini fritters” itself is pretty straightforward, but the magic is in the execution. It’s the kind of dish that proves simple ingredients can create something truly spectacular. It’s not heavy or greasy, which is often my fear with fried foods, but rather light and flavorful. It’s the perfect way to use up those garden-grown or farmer’s market zucchinis that seem to multiply overnight!
Why you’ll love this recipe?
There are so many reasons why I keep coming back to this zucchini fritter recipe, and I just know you’re going to fall in love with it too. First off, the flavor is just *chef’s kiss*. They have this incredible balance of savory and subtly sweet from the zucchini, with a hint of onion and herbs that just makes them sing. They get so wonderfully crispy on the outside, which is my favorite part. It’s that satisfying crunch followed by a tender, flavorful interior.
Then there’s the simplicity. Seriously, this is a lifesaver on busy weeknights or when unexpected guests pop over. You probably have most of the ingredients in your pantry already. The whole process is straightforward, and you don’t need any fancy equipment.
And let’s talk cost-efficiency! Zucchini is usually pretty affordable, and the other ingredients are pantry staples. This recipe gives you so much deliciousness for very little money, which is always a win in my book.
What I love most, though, is the versatility. You can serve these as a side dish, a light lunch, or even a fun appetizer. They’re fantastic with a dollop of sour cream or a squeeze of lemon. My kids, who can be a bit picky, absolutely devour these. They’re so much better than the store-bought frozen versions you might find. This recipe truly stands out because it feels homemade, made with love, and tastes infinitely better than anything mass-produced. It’s the kind of recipe that makes you feel like a kitchen rockstar without even breaking a sweat!
How do I make Zucchini Fritters?
Quick Overview
Making these zucchini fritters is a breeze! You’ll start by grating your zucchini and getting rid of excess moisture – this is key for crispiness! Then, you’ll whip up a simple batter, gently fold in the zucchini, and pan-fry them in a hot skillet until they’re golden brown and delicious. It’s a quick process from start to finish, and the result is always a crowd-pleaser. You’ll be amazed at how quickly you can go from raw ingredients to a plate full of these delightful fritters.
Ingredients
For the Main Batter:
2 cups grated zucchini (from about 2 medium zucchinis)
1 cup all-purpose flour (you can substitute with a good 1:1 gluten-free blend if needed)
2 large eggs, lightly beaten
1/2 cup milk (any kind works, I’ve even used almond milk for a creamier texture!)
2 tablespoons finely chopped fresh chives or green onions
1 teaspoon baking powder
1/2 teaspoon salt
1/4 teaspoon Black Pepper
For the Filling:
1/4 cup finely grated Parmesan cheese (optional, but highly recommended for extra flavor!)
1 clove garlic, minced (or 1/2 teaspoon garlic powder)
For Frying:
Vegetable oil, canola oil, or Olive oil for frying
Step-by-Step Instructions
Step 1: Preheat & Prep Pan
Before you even start mixing, get your frying pan ready. You want to preheat your skillet over medium-high heat. Add enough oil to generously coat the bottom, about 1/4 inch deep. You want the oil to be hot but not smoking. A good test is to drop a tiny bit of batter in; if it sizzles immediately, you’re good to go! This ensures your fritters get that lovely crisp exterior right away.
Step 2: Mix Dry Ingredients
In a large bowl, whisk together the flour, baking powder, salt, and pepper. Give it a good mix to ensure everything is evenly distributed. This helps make sure your fritters have a nice, even lift and seasoning.
Step 3: Mix Wet Ingredients
In a separate medium bowl, whisk together the lightly beaten eggs and milk until well combined. If you’re using it, stir in the minced garlic or garlic powder here too. This step ensures the wet ingredients are homogeneous before they meet the dry.
Step 4: Combine
Pour the wet ingredients into the dry ingredients. Stir *just* until combined. It’s really important not to overmix here! A few lumps are perfectly okay. Overmixing can develop the gluten too much, leading to tougher fritters. Then, gently fold in the grated zucchini and the optional Parmesan cheese and chives/green onions. Make sure everything is just incorporated. The batter will be thick.
Step 5: Prepare Filling
Actually, the “filling” is already incorporated into the batter in this recipe! The beauty of these zucchini fritters is that the zucchini is mixed right in, creating delicious pockets of flavor throughout. We’ve already added the optional Parmesan cheese and garlic to the batter in Step 4, which acts as our flavor boost!
Step 6: Layer & Swirl
This isn’t a layering recipe in the traditional sense, but we’ll get to the “swirl” of flavor. When you’re ready to cook, spoon about 2-3 tablespoons of batter per fritter into the hot oil. Don’t overcrowd the pan; cook in batches. You can gently flatten them a little with the back of your spoon to ensure they cook evenly. The “swirl” comes from the beautiful golden-brown texture and the bits of zucchini and cheese that peek through.
Step 7: Bake
Cook the fritters for about 3-4 minutes per side, until they are beautifully golden brown and cooked through. You’ll see the edges getting crispy and the center puffing up slightly. Use a spatula to carefully flip them over. Adjust the heat if they’re browning too quickly or too slowly. You’re looking for that perfect crispy, golden exterior.
Step 8: Cool & Glaze
Once cooked, transfer the fritters to a wire rack set over a baking sheet to drain any excess oil and stay crispy. This is super important; if you put them on paper towels, they can steam and lose their crispness! You can absolutely add a glaze, but honestly, these are so flavorful on their own that I usually skip it. If you do want a glaze, a simple lemon-yogurt sauce or a light honey drizzle would be lovely. For this recipe, however, I find they’re perfect served just as they are, hot off the pan.
Step 9: Slice & Serve
Serve these zucchini fritters immediately while they are warm and at their crispiest. They are truly best right out of the pan. You can serve them as is, or with a side of sour cream, Greek Yogurt, or a squeeze of fresh lemon juice. They’re wonderful as a side dish or a light snack.
What to Serve It With
These zucchini fritters are so versatile, they can truly fit into any meal! For breakfast, imagine these golden bites alongside a perfectly poached egg and a side of crispy bacon. The savory notes of the fritters are just divine with a cup of strong coffee. They’re also fantastic as part of a more elaborate brunch spread. Picture them nestled next to some smoked salmon, Cream Cheese, and capers, perhaps with a little fresh dill sprinkled over the top. For a lighter meal, I love serving them as a vegetarian main course with a big, vibrant salad on the side.
As an appetizer, they are a guaranteed hit. Serve them warm with a dollop of cooling sour cream or a zesty lime crema. They’re perfect for entertaining because they’re easy to make ahead (though best served fresh!) and always impress. My family also loves them as a cozy snack, especially on a chilly afternoon with a bowl of Tomato Soup. Honestly, the possibilities are endless, and that’s part of why I love them so much. They adapt beautifully to whatever you’re craving!
Top Tips for Perfecting Your Zucchini Fritters
Okay, so you want your zucchini fritters to be absolutely perfect, right? I’ve made these more times than I can count, and I’ve picked up a few tricks along the way that really make a difference.
Zucchini Prep: This is honestly the most crucial step. Zucchini has a LOT of water. If you don’t get it out, your fritters will be soggy and won’t crisp up properly. After grating, I like to place the zucchini in a fine-mesh sieve set over a bowl and sprinkle it with a little salt. Let it sit for about 10-15 minutes. The salt draws out the moisture. Then, with your hands or a clean kitchen towel, squeeze out as much liquid as possible. Really get in there and wring it out! This step is non-negotiable for crispiness.
Mixing Advice: Remember what I said about not overmixing? It’s super important. You want to mix just until the wet and dry ingredients are combined. A few streaks of flour are fine. Overmixing develops gluten, which can make your fritters tough instead of tender. When you add the zucchini, fold it in gently. You’re not trying to mash it; you’re just distributing it evenly throughout the batter. The batter should be thick enough that it holds its shape when spooned into the pan, not runny.
Swirl Customization: While this recipe doesn’t have a traditional swirl, you can customize the flavor profiles beautifully. I’ve added a pinch of cayenne pepper for a little heat, some chopped sun-dried tomatoes for a deeper, richer flavor, or even some crumbled feta cheese instead of Parmesan. Experiment with fresh herbs like parsley, dill, or even a little mint! Just remember to chop them finely so they distribute evenly.
Ingredient Swaps: If you don’t have chives, green onions are a fantastic substitute. For the milk, I’ve used buttermilk for extra tang and even coconut milk in a pinch – it just changes the flavor subtly. If you’re out of regular flour, a gluten-free all-purpose blend works well, though you might need to let the batter sit for a few extra minutes to thicken properly. The key is the zucchini and the binding agents (eggs and flour).
Baking Tips: The “baking” here is actually pan-frying. Make sure your oil is hot enough before adding the batter. If the oil isn’t hot, the fritters will absorb too much oil and become greasy. If it’s too hot, they’ll burn on the outside before cooking through. Medium-high heat is your sweet spot. Don’t overcrowd the pan! This lowers the oil temperature and makes it harder to flip the fritters. Cook in batches, giving them enough space. They usually take about 3-4 minutes per side to get that perfect golden crunch.
Glaze Variations: As I mentioned, I usually don’t glaze these, but if you’re feeling fancy, a simple lemon-yogurt sauce (Greek yogurt, lemon juice, salt, pepper) is divine. A drizzle of honey or maple syrup can also be lovely if you’re serving them as a slightly sweeter treat. For a savory kick, a spicy sriracha mayo would be amazing. The possibilities truly are endless!
Storing and Reheating Tips
These zucchini fritters are undeniably best enjoyed fresh, right out of the pan when they’re at their absolute crispiest. However, life happens, and sometimes you might have leftovers. Don’t despair! They can be stored and reheated successfully.
Room Temperature: If you have just a few that you plan to eat within a few hours, you can leave them on a wire rack at room temperature. Make sure they’re completely cooled before covering loosely with a tea towel or foil. They’ll start to lose some of their crispness after about an hour or two, but they’ll still be tasty.
Refrigerator Storage: For longer storage, let the fritters cool completely. Then, arrange them in a single layer on a plate or baking sheet lined with parchment paper and place them in the refrigerator. Once they’re chilled, you can transfer them to an airtight container, layering them with parchment paper to prevent sticking. They should stay good in the fridge for about 2-3 days. They’ll soften considerably in the fridge, so reheating is key!
Freezer Instructions: If you want to make a big batch to have on hand, freezing is a great option. Cool the fritters completely. Arrange them in a single layer on a baking sheet lined with parchment paper and freeze until solid, about 1-2 hours. This “flash freezing” prevents them from sticking together. Once frozen, transfer them to a freezer-safe bag or airtight container. They can be stored in the freezer for up to 2-3 months.
Glaze Timing Advice: If you plan to glaze your fritters, it’s always best to do it right before serving. Glaze applied to fritters that will be stored will likely make them soggy. If you must store them with glaze (which I don’t recommend for maximum crispiness), make sure they are thoroughly cooled and stored in an airtight container in the fridge. The glaze will likely soften and meld with the fritter over time.
Frequently Asked Questions
Final Thoughts
So there you have it – my cherished recipe for zucchini fritters. I truly hope you give these a try, especially if you’ve got a garden overflowing with zucchini or found yourself with a few extra at the market. They’re more than just a recipe; they’re a little bit of sunshine, a taste of comfort, and a testament to how simple ingredients can create something truly magical. They’re proof that zucchini doesn’t have to be boring!
What I love most about this recipe is how it’s brought smiles to my family’s faces time and time again. It’s easy enough for a weeknight but special enough to feel like a treat. If you enjoy these zucchini fritters, you might also love my recipe for Crispy Corn Fritters or my Savory Zucchini Bread – both great ways to use up seasonal produce!
I can’t wait to hear how yours turn out! Please leave a comment below and let me know your favorite way to serve them, or any fun variations you tried. Happy cooking, and enjoy every crispy, golden bite!
Zucchini Fritters
Ingredients
Main Ingredients
- 2 medium Zucchini
- 0.5 cup All-purpose flour
- 0.25 cup Grated Parmesan cheese
- 1 large Egg
- 0.25 cup Milk
- 0.5 teaspoon Salt
- 0.25 teaspoon Black pepper
- tablespoon Olive oil (for frying)
Instructions
Preparation Steps
- Grate the zucchini using a box grater. Place the grated zucchini in a colander and sprinkle with salt. Let it sit for 10 minutes to drain excess water.
- In a bowl, whisk together the egg, milk, salt, and pepper.
- Squeeze out as much water as possible from the zucchini. Add the zucchini, flour, and Parmesan cheese to the egg mixture. Mix until combined.
- Heat olive oil in a skillet over medium heat. Drop spoonfuls of the zucchini mixture into the hot oil.
- Cook for 2-3 minutes per side, or until golden brown and crispy.
- Remove the fritters from the skillet and place them on a plate lined with paper towels to drain excess oil.
- Serve warm with your favorite dipping sauce, such as sour cream or tzatziki.


